Shrine of Light: Difference between revisions
MIkeRotch1 (talk | contribs) mNo edit summary |
(Undid revision 1138872 by Link (cat) (Talk)) Tag: Undo |
||
| (15 intermediate revisions by 6 users not shown) | |||
| Line 1: | Line 1: | ||
{{Infobox Location | {{Infobox Location | ||
|image= File:TotK Shrine of Light.png | |image= | ||
{{Media | |||
|defaultTypeTab= Screenshot | |||
|Sprite TotK= File:TotK Shrine of Light Icon.png | |||
|Screenshot TotK= File:TotK Shrine of Light.png | |||
}} | |||
|caption= | |caption= | ||
|pronunciation= | |pronunciation= | ||
| Line 16: | Line 21: | ||
}} | }} | ||
{{Term/Store|Shrine of Light|Shrines of Light|Series, TotK|plural}} are locations in {{TotK}}.<ref>{{Cite|So you've made it here. This is a Shrine of Light. Long ago, I filled these places with light that purges evil. I believe this light will restore an ability your right arm has lost. Now then, extend your hand.|Rauru|TotK}}</ref> | {{Term/Store|Shrine of Light|Shrines of Light|Series, TotK|plural}} are locations in {{TotK}}.<ref>{{Cite|So you've made it here. This is a Shrine of Light. Long ago, I filled these places with light that purges evil. I believe this light will restore an ability your right arm has lost. Now then, extend your hand.|Rauru|TotK}}</ref> | ||
{{OTOC}} | |||
==Features and Overview== | ==Features and Overview== | ||
{{Plural|TotK|Shrine of Light}} are sacred places created to purge {{Term|TotK|Darkness|link}}. They often act as trials that offer {{Plural|TotK|Light of Blessing|link}} in return for reaching their ends. The {{Plural|TotK|Shrine of Light}} on the {{Term|TotK|Surface|link}} have corresponding {{Plural|TotK|Lightroot|link}} in the {{Term|TotK|Depths|link}}. These {{Plural|TotK|Lightroot}} appear in the same X and Y | {{Plural|TotK|Shrine of Light}} are sacred places created to purge {{Term|TotK|Darkness|link}}. They existed before the foundation of {{Term|TotK|Hyrule|link}} and were placed above where a demon was destroyed to prevent its reappearance.<ref>{{Cite Person|quote= The shrines themselves were built before Rauru founded Hyrule – before the Demon King Ganondorf appeared there were still a lot of evil beings, so Rauru and Sonia went around various places to calm things down. Shrines are placed above where a demon was destroyed so it will not reappear. This is why that spiral of light emerges from the shrine. Therefore, bathing in the remaining power of the shrines slightly cleanses Link of the demon magic.|name= Hidemaro Fujibayashi|title= Hyrule's Shrines Serve A Secret Peace-Keeping Purpose, Says TOTK Director|url= https://www.nintendolife.com/news/2023/12/random-hyrules-shrines-serve-a-secret-peace-keeping-purpose-says-totk-director|archive= |published= December 19, 2023|retrieved= December 19, 2023}}</ref> {{Plural|TotK|Shrine of Light}} often act as trials that offer {{Plural|TotK|Light of Blessing|link}} in return for reaching their ends. The {{Plural|TotK|Shrine of Light}} on the {{Term|TotK|Surface|link}} have corresponding {{Plural|TotK|Lightroot|link}} in the {{Term|TotK|Depths|link}}. These {{Plural|TotK|Lightroot}} appear in the same X and Y {{Term|TotK|Map Coordinates|link}} as their {{Term|TotK|Surface|link}} counterparts, and bear reversed names from their {{Term|TotK|Surface}} counterparts. {{Plural|TotK|Shrine of Light}} in the {{Term|TotK|Sky|link}} do not have matching {{Plural|TotK|Lightroot}}. | ||
In their default state, {{Plural|TotK|Shrine of Light}} have swirls of green energy that encircles a large stone at their centers. By touching a magical panel between the {{Term|TotK|Dragon|link}} | In their default state, {{Plural|TotK|Shrine of Light}} have swirls of green energy that encircles a large stone at their centers. By touching a magical panel between the {{Term|TotK|Dragon|link}} {{Plural|TotK|Statue|link}} on their fronts, {{Term|TotK|Link}} is able to activate the {{Plural|TotK|Shrine of Light}}. When activated, {{Plural|TotK|Shrine of Light}} summon {{Plural|TotK|Travel Point|link}} and a portal to their interiors appears on the front of the stones at their centers. {{Term|TotK|Link}} must enter these portals in order to claim the {{Plural|TotK|Light of Blessing}} inside. The {{Plural|TotK|Travel Point}} summoned by the {{Plural|TotK|Shrine of Light}} can be {{Term|TotK|Warping|link|display=Warped}} to with the {{Term|TotK|Purah Pad}}.<!-- | ||
Proving Grounds-style {{Plural|TotK|Shrine of Light}} will remove any equipment and {{Plural|TotK|Material|link}} obtainable within them once their trials have been completed. {{Plural|TotK|Object}} will remain in them, however. | |||
--> | |||
===List of {{Plural|TotK|Shrine of Light}}=== | ===List of {{Plural|TotK|Shrine of Light}}=== | ||
{{Stub|TotK}} | {{Stub|TotK}} | ||
===={{Term|TotK|Central Hyrule Sky}}==== | ===={{Term|TotK|Sky}}==== | ||
====={{Term|TotK|Akkala Sky}}===== | |||
======{{Term|TotK|Akkala Highlands Sky}}====== | |||
{{Data Table | |||
|game= TotK | |||
|columns= {{Term|TotK|Shrine of Light}}[Term], Trial Name, Location[Term], Treasure[List:plain] | |||
|- | |||
| Natak Shrine | |||
| Rauru's Blessing | |||
| Sokkala Sky Archipelago | |||
| Enduring Elixir | |||
}} | |||
======{{Term|TotK|Akkala Sea Sky}}====== | |||
{{Data Table | |||
|game= TotK | |||
|columns= {{Term|TotK|Shrine of Light}}[Term], Trial Name, Location[Term], Treasure[List:plain] | |||
|- | |||
| Gikaku Shrine | |||
| Rauru's Blessing | |||
| Sky Mine | |||
| Ruby | |||
|- | |||
| Mogisari Shrine | |||
| Courage to Jump | |||
| Lomei Sky Labyrinth | |||
| Mighty Zonaite Shield | |||
}} | |||
====={{Term|TotK|Central Hyrule Sky}}===== | |||
{{Data Table | {{Data Table | ||
|game= TotK | |game= TotK | ||
| Line 33: | Line 72: | ||
| Great Sky Island | | Great Sky Island | ||
| {{Term|TotK|Construct Bow|link}}, {{Term|TotK|Stone Axe|link}} | | {{Term|TotK|Construct Bow|link}}, {{Term|TotK|Stone Axe|link}} | ||
|- | |||
| Jinodok Shrine | |||
| Rauru's Blessing | |||
| South Hyrule Sky Archipelago | |||
| Diamond | |||
|- | |- | ||
| In-isa Shrine | | In-isa Shrine | ||
| The Ability to Combine | | The Ability to Combine | ||
| Great Sky Island | | Great Sky Island | ||
| {{Term|TotK|Arrow | | {{Term|TotK|Arrow x 5|link}} | ||
|- | |- | ||
| Nachoyah Shrine | | Nachoyah Shrine | ||
| The Ability to Rewind | | The Ability to Rewind | ||
| Great Sky Island | | Great Sky Island | ||
| {{Term|TotK|Arrow | | {{Term|TotK|Arrow x 10|link}} | ||
|- | |- | ||
| Ukouh Shrine | | Ukouh Shrine | ||
| Line 50: | Line 94: | ||
}} | }} | ||
======{{Term|TotK|Great Hyrule Forest Sky}}====== | |||
{{Data Table | |||
|game= TotK | |||
|columns= {{Term|TotK|Shrine of Light}}[Term], Trial Name, Location[Term], Treasure[List:plain] | |||
|- | |||
| Mayam Shrine | |||
| Rauru's Blessing | |||
| North Hyrule Sky Archipelago | |||
| Magic Rod | |||
|- | |||
| Simosiwak Shrine | |||
| Proving Grounds: Lights Out | |||
| Bravery Island | |||
| Bright Elixir | |||
}} | |||
======{{Term|TotK|Hyrule Ridge Sky}}====== | |||
{{Data Table | |||
|game= TotK | |||
|columns= {{Term|TotK|Shrine of Light}}[Term], Trial Name, Location[Term], Treasure[List:plain] | |||
|- | |||
| Taunhiy Shrine | |||
| Combat Training: Archery | |||
| Courage Island | |||
| Strong Construct Bow | |||
}} | |||
====={{Term|TotK|Eldin Sky}}===== | |||
======{{Term|TotK|Eldin Canyon Sky}}====== | |||
{{Data Table | |||
|game= TotK | |||
|columns= {{Term|TotK|Shrine of Light}}[Term], Trial Name, Location[Term], Treasure[List:plain] | |||
|- | |||
| Kadaunar Shrine | |||
| Water Makes a Way | |||
| South Eldin Sky Archipelago | |||
| Mighty Construct Bow | |||
}} | |||
====={{Term|TotK|Faron Sky}}===== | |||
======{{Term|TotK|Faron Grasslands Sky}}====== | |||
{{Data Table | |||
|game= TotK | |||
|columns= {{Term|TotK|Shrine of Light}}[Term], Trial Name, Location[Term], Treasure[List:plain] | |||
|- | |||
| Joku-u Shrine | |||
| Rauru's Blessing | |||
| Dragonhead Island | |||
| Diamond | |||
|- | |||
| Joku-usin Shrine | |||
| Proving Grounds: Short Circuit | |||
| Thunderhead Isles | |||
| Electro Elixir | |||
}} | |||
====={{Term|TotK|Gerudo Sky}}===== | |||
======{{Term|TotK|Gerudo Highlands Sky}}====== | |||
{{Data Table | |||
|game= TotK | |||
|columns= {{Term|TotK|Shrine of Light}}[Term], Trial Name, Location[Term], Treasure[List:plain] | |||
|- | |||
| Mayasiar Shrine | |||
| Rauru's Blessing | |||
| Starview Island | |||
| Star-Fragment Staff | |||
|- | |||
| Rakashog Shrine | |||
| A Reflective Device | |||
| North Gerudo Sky Archipelago | |||
| Large Zonai Charge | |||
|- | |||
| Siyamotsus Shrine | |||
| Rauru's Blessing | |||
| South Lomei Castle Top Floor | |||
| Strong Construct Bow | |||
}} | |||
====={{Term|TotK|Hebra Sky}}===== | |||
======{{Term|TotK|Hebra Mountains Sky}}====== | |||
{{Data Table | |||
|game= TotK | |||
|columns= {{Term|TotK|Shrine of Light}}[Term], Trial Name, Location[Term], Treasure[List:plain] | |||
|- | |||
| Ijo-o Shrine | |||
| More Than Defense | |||
|West Hebra Sky Archipelago | |||
| Arrow x 5 | |||
|- | |||
| Kahatanaum Shrine | |||
| Rauru's Blessing | |||
| Rising Island Chain | |||
| Large Zonai Charge | |||
|- | |||
| Mayaumekis Shrine | |||
| Downward Force | |||
| Rising Island Chain | |||
| Arrow x 10 | |||
|- | |||
| Taninoud Shrine | |||
| Rauru's Blessing | |||
| East Hebra Sky Archipelago | |||
| Topaz | |||
|- | |||
| Tenbez Shrine | |||
| Gravity and Velocity | |||
| North Lomei Castle Top Floor | |||
|Large Zonai Charge | |||
}} | |||
======{{Term|TotK|Tabantha Frontier Sky}}====== | |||
{{Data Table | |||
|game= TotK | |||
|columns= {{Term|TotK|Shrine of Light}}[Term], Trial Name, Location[Term], Treasure[List:plain] | |||
|- | |||
| Ga-ahisas Shrine | |||
| Rauru's Blessing | |||
| Lightcast Island | |||
| Star Fragment | |||
|- | |||
| Ganos Shrine | |||
| Rauru's Blessing | |||
| Tabantha Sky Archipelago | |||
| Diamond | |||
}} | |||
====={{Term|TotK|Lanayru Sky}}===== | |||
======{{Term|TotK|Lanayru Great Spring Sky}}====== | |||
{{Data Table | |||
|game= TotK | |||
|columns= {{Term|TotK|Shrine of Light}}[Term], Trial Name, Location[Term], Treasure[List:plain] | |||
|- | |||
| Igoshon Shrine | |||
| Orbs of Water | |||
| Wellspring Island | |||
| Lagre Zonai Charge | |||
|- | |||
| Jirutagumac Shrine | |||
| A Flying Device | |||
| Lanayru Sky Archipelago | |||
| Large Zonaite | |||
|- | |||
| Sihajog Shrine | |||
| Rauru's Blessing | |||
| Valor Island | |||
| Diamond | |||
}} | |||
======{{Term|TotK|Lanayru Sea Sky}}====== | |||
{{Data Table | |||
|game= TotK | |||
|columns= {{Term|TotK|Shrine of Light}}[Term], Trial Name, Location[Term], Treasure[List:plain] | |||
|- | |||
| Mayanas Shrine | |||
| The Ice Guides You | |||
| South Lanayru Sky Archipelago | |||
| Mighty Zonaite Shield | |||
}} | |||
====={{Term|TotK|Necluda Sky}}===== | |||
======{{Term|TotK|East Necluda Sky}}====== | |||
{{Data Table | |||
|game= TotK | |||
|columns= {{Term|TotK|Shrine of Light}}[Term], Trial Name, Location[Term], Treasure[List:plain] | |||
|- | |||
| Kumamayn Shrine | |||
| Rauru's Blessing | |||
| Necluda Sky Archipelago | |||
| Zonaite Bow | |||
|- | |||
| Yansamin Shrine | |||
| Proving Grounds: Low Gravity | |||
| Zonaite Forge Island | |||
| Large Zonaite | |||
}} | |||
======{{Term|TotK|West Necluda Sky}}====== | |||
{{Data Table | |||
|game= TotK | |||
|columns= {{Term|TotK|Shrine of Light}}[Term], Trial Name, Location[Term], Treasure[List:plain] | |||
|- | |||
| Josiu Shrine | |||
| Rauru's Blessing | |||
| North Necluda Sky Archipelago | |||
| Large Zonai Charge | |||
|- | |||
| Ukoojisi Shrine | |||
| Rauru's Blessing | |||
| West Necluda Sky Archipelago | |||
| Mighty Zonaite Shield | |||
}} | |||
===={{Term|TotK|Surface}}==== | |||
====={{Term|TotK|Akkala}}===== | |||
======{{Term|TotK|Akkala Highlands}}====== | |||
{{Data Table | |||
|game= TotK | |||
|columns= {{Term|TotK|Shrine of Light}}[Term], Trial Name, Location[Term], Treasure[List:plain] | |||
|- | |||
| Domizuin Shrine | |||
| A Prone Pathway | |||
| Akkala Citadel Ruins | |||
| Arrow x 10, Strong Zonaite Shield, Zonai Charge | |||
|- | |||
| Gatanisis Shrine | |||
| A Well-Timed Bounce | |||
| Akkala Highlands | |||
| Bomb Flower x 5 | |||
|- | |||
| Jochi-ihiga Shrine | |||
| Rauru's Blessing | |||
| Akkala Falls | |||
| Diamond | |||
|- | |||
| Rasitakiwak Shrine | |||
| Proving Grounds: Vehicles | |||
| Kaepora Pass | |||
| Magic Rod | |||
|- | |||
| Sinatanika Shrine | |||
| Combat Training: Sneakstrike | |||
| East Akkala Plains | |||
| Sneaky Elixir | |||
}} | |||
======{{Term|TotK|Akkala Sea}}====== | |||
{{Data Table | |||
|game= TotK | |||
|columns= {{Term|TotK|Shrine of Light}}[Term], Trial Name, Location[Term], Treasure[List:plain] | |||
|- | |||
| Gemimik Shrine | |||
| Turbine Power | |||
| Rist Peninsula | |||
| Mighty Zonai Shield | |||
|- | |||
| Igashuk Shrine | |||
| Rauru's Blessing | |||
| Lomei Labyrinth Island | |||
| Large Zonai Charge | |||
|- | |||
| Rasiwak Shrine | |||
| Flotational Brilliance | |||
| North Akkala Beach | |||
| Magic Scepter | |||
}} | |||
======{{Term|TotK|Deep Akkala}}====== | |||
{{Data Table | |||
|game= TotK | |||
|columns= {{Term|TotK|Shrine of Light}}[Term], Trial Name, Location[Term], Treasure[List:plain] | |||
|- | |||
| Jochi-iu Shrine | |||
| Courage to Pluck | |||
| North Akkala Foothill | |||
| Large Zonaite, Zonaite Bow | |||
|- | |||
| Kamatukis Shrine | |||
| A Precise Strike | |||
| Tempest Gulch | |||
| Mighty Zonaite Longsword | |||
}} | |||
====={{Term|TotK|Central Hyrule}}===== | |||
======{{Term|TotK|Great Hyrule Forest}}====== | |||
{{Data Table | |||
|game= TotK | |||
|columns= {{Term|TotK|Shrine of Light}}[Term], Trial Name, Location[Term], Treasure[List:plain] | |||
|- | |||
| Ekochiu Shrine | |||
| Rise and Fall | |||
| Minshi Woods | |||
| Zonaite Shield | |||
|- | |||
| Kikakin Shrine | |||
| Shining in Darkness | |||
| Mount Drena | |||
| Amber, Zonaite Bow | |||
|- | |||
| Kiuyoyou Shrine | |||
| Fire and Ice | |||
| Rowan Plain | |||
| Zonaite Spear | |||
|- | |||
| Musanokir Shrine | |||
| Swing to Hit | |||
| Korok Forest | |||
| Large Zonai Charge | |||
|- | |||
| Ninjis Shrine | |||
| Rauru's Blessing | |||
| Lost Woods | |||
| Construct Bow | |||
|- | |||
| Pupunke Shrine | |||
| Rauru's Blessing | |||
| Lost Woods | |||
| Mighty Zonaite Sword | |||
|- | |||
| Sakunbomar Shrine | |||
| Rauru's Blessing | |||
| Lost Woods | |||
| Diamond | |||
|- | |||
| Tenmaten Shrine | |||
| Rauru's Blessing | |||
| Elma Knolls Well | |||
| Large Zonai Charge | |||
}} | |||
======{{Term|TotK|Great Plateau}}====== | |||
{{Data Table | |||
|game= TotK | |||
|columns= {{Term|TotK|Shrine of Light}}[Term], Trial Name, Location[Term], Treasure[List:plain] | |||
|- | |||
| Kyokugon Shrine | |||
| Alignment of the Circles | |||
| Great Plateau Foothill Cave | |||
| Heart Elixir | |||
|- | |||
| Riogok Shrine | |||
| Force Transfer | |||
| Great Plateau | |||
| Mighty Construct Bow | |||
|- | |||
| Tadarok Shrine | |||
| Fire and Water | |||
| River of the Dead Waterfall Cave | |||
| Mighty Zonaite Shield | |||
}} | |||
======{{Term|TotK|Hyrule Field}}====== | |||
{{Data Table | |||
| | |game= TotK | ||
|columns= {{Term|TotK|Shrine of Light}}[Term], Trial Name, Location[Term], Treasure[List:plain] | |||
|- | |||
| Ishodag Shrine | |||
| A Windy Device | |||
| Quarry Ruins | |||
| Opal | |||
|- | |||
| Jiosin Shrine | |||
| Shape Rotation | |||
| Hyrule Field Chasm | |||
| Hasty Elixir | |||
|- | |||
| Jojon Shrine | |||
| Proving Grounds: Rotation | |||
| Crenel Peak Cave | |||
| Magic Rod | |||
|- | |||
| Kamizun Shrine | |||
| Proving Grounds: Beginner | |||
| Forest of Time | |||
| Spring Shield | |||
|- | |||
| Kyononis Shrine | |||
| Combat Training | |||
| Hyrule Castle Town Ruins | |||
| Zonaite Sword | |||
|- | |||
| Mayachin Shrine | |||
| A Fixed Device | |||
| Exchange Ruins | |||
| Energizing Elixir | |||
|- | |||
| Ren-iz Shrine | |||
| Jump the Gaps | |||
| Crenel Hills | |||
| Strong Zonaite Shield | |||
|- | |- | ||
| | | Sepapa Shrine | ||
| | | Backtrack | ||
| | | East Hyrule Castle | ||
| | | Strong Construct Bow | ||
|- | |- | ||
| | | Serutabomac Shrine | ||
| | | The Way Up | ||
| | | Hyrule Castle | ||
| | | Magic Rod | ||
|- | |- | ||
| | | Sinakawak Shrine | ||
| | | An Uplifting Device | ||
| | | New Serenne Stable | ||
| | | Opal | ||
|- | |- | ||
| | | Susuyai Shrine | ||
| | | A Spinning Device | ||
| | | Hyrule Garrison Ruins | ||
| | | Arrow x 5 | ||
|- | |- | ||
|[[ | | Tajikats Shrine | ||
| | | Building with Logs | ||
|North Lomei | | Riverside Stable | ||
|[[Large Zonai Charge]] | | Spiky Shield | ||
|} | |- | ||
| Teniten Shrine | |||
| Combat Training: Throwing | |||
| Whistling Hill | |||
| Zonaite Spear | |||
|- | |||
| Tsutsu-um Shrine | |||
| The Stakes Guide You | |||
| Outskirt Hill | |||
| Arrow x 5 | |||
|- | |||
| Yamiyo Shrine | |||
| Combat Training: Throwing | |||
| Romani Plains | |||
| Bomb Flower x 3 | |||
}} | |||
======{{Term|TotK|Hyrule Ridge}}====== | |||
{{Data Table | |||
|game= TotK | |||
|columns= {{Term|TotK|Shrine of Light}}[Term], Trial Name, Location[Term], Treasure[List:plain] | |||
|- | |||
| Makurukis Shrine | |||
| Combat Training: Archery | |||
| Mount Rhoam | |||
| Strong Construct Bow | |||
|- | |||
| Runakit Shrine | |||
| Built to Carry | |||
| Upland Lindor | |||
| Construct Bow | |||
|- | |||
| Sonapan Shrine | |||
| Missing Pathways | |||
| Satori Mountain | |||
| Arrow x 5 | |||
|- | |||
| Taki-ihaban Shrine | |||
| Rauru's Blessing | |||
| Lindor's Brow Cave | |||
| Large Zonai Charge | |||
|- | |||
| Turakawak Shrine | |||
| Stacking a Path | |||
| Lake Illumeni | |||
| Magic Rod | |||
|- | |||
| Usazum Shrine | |||
| Rauru's Blessing | |||
| Satori Mountain | |||
| Strong Zonaite Shield | |||
}} | |||
======{{Term|TotK|Lake Hylia}}====== | |||
{{Data Table | |||
|game= TotK | |||
|columns= {{Term|TotK|Shrine of Light}}[Term], Trial Name, Location[Term], Treasure[List:plain] | |||
|- | |||
| En-oma Shrine | |||
| Rauru's Blessing | |||
| Lake Hylia Whirlpool Cave | |||
| Mighty Zonaite Sword | |||
}} | |||
====={{Term|TotK|Eldin (Region)}}===== | |||
======{{Term|TotK|Death Mountain}}====== | |||
{{Data Table | |||
|game= TotK | |||
|columns= {{Term|TotK|Shrine of Light}}[Term], Trial Name, Location[Term], Treasure[List:plain] | |||
|- | |||
| Sitsum Shrine | |||
| A Controlling Device | |||
| Death Mountain | |||
| Mighty Construct Bow | |||
}} | |||
======{{Term|TotK|Eldin Canyon}}====== | |||
{{Data Table | |||
|game= TotK | |||
|columns= {{Term|TotK|Shrine of Light}}[Term], Trial Name, Location[Term], Treasure[List:plain] | |||
|- | |||
| Isisim Shrine | |||
| Proving Grounds: In Reverse | |||
| YunoboCo HQ East Cave | |||
| Magic Rod | |||
|- | |||
| Jiotak Shrine | |||
| Rauru's Blessing | |||
| Isle of Rabac Gallery | |||
| Magic Staff | |||
|- | |||
| Kimayat Shrine | |||
| Proving Grounds: Smash | |||
| Gut Check Rock | |||
| Captain III Reaper | |||
|- | |||
| Kisinona Shrine | |||
| Wind Power | |||
| Foothill Stable | |||
| Mighty Construct Bow | |||
|- | |||
| Marakuguc Shrine | |||
| Wheeled Wonders | |||
| Goron City | |||
| Strong Construct Bow | |||
|- | |||
| Mayachideg Shrine | |||
| Proving Grounds: The Hunt | |||
| Eldin Canyon | |||
| Captain III Spear | |||
|- | |||
| Momosik Shrine | |||
| Rauru's Blessing | |||
| Death Caldera | |||
| Big Battery | |||
|- | |||
| Moshapin Shrine | |||
| Rauru's Blessing | |||
| Lake Intenoch Cave | |||
| Mighty Zonaite Shield | |||
|- | |||
| Sibajitak Shrine | |||
| Alignment | |||
| Lake Darman | |||
| Strong Zonaite Longsword | |||
|- | |||
| Timawak Shrine | |||
| Against the Flow | |||
| Bedrock Bistro | |||
| Strong Zonaite Shield | |||
}} | |||
======{{Term|TotK|Eldin Mountains}}====== | |||
{{Data Table | |||
|game= TotK | |||
|columns= {{Term|TotK|Shrine of Light}}[Term], Trial Name, Location[Term], Treasure[List:plain] | |||
|- | |||
| Mayak Shrine | |||
| Timely Catches | |||
| East Deplian Badlands | |||
| Large Zonai Charge | |||
|- | |||
| Minetak Shrine | |||
| Rauru's Blessing | |||
| Deplian Badlands Cave | |||
| Big Battery | |||
|- | |||
| Sikukuu Shrine | |||
| Spinning Gears | |||
| Eldin Mountains | |||
| Zonaite Longsword | |||
}} | |||
====={{Term|TotK|Faron (Region)}}===== | |||
======{{Term|TotK|Faron Grasslands}}====== | |||
{{Data Table | |||
|game= TotK | |||
|columns= {{Term|TotK|Shrine of Light}}[Term], Trial Name, Location[Term], Treasure[List:plain] | |||
|- | |||
| Ishokin Shrine | |||
| Rauru's Blessing | |||
| Zokassa Ridge | |||
| Topaz | |||
|- | |||
| Jiukoum Shrine | |||
| Built for Rails | |||
| Popla Foothills | |||
| Sticky Elixir | |||
|- | |||
| Utsushok Shrine | |||
| Long or Wide | |||
| Highland Stable | |||
| Sneaky Elixir | |||
}} | |||
====={{Term|TotK|Gerudo (Region)}}===== | |||
======{{Term|TotK|Gerudo Desert}}====== | |||
{{Data Table | |||
|game= TotK | |||
|columns= {{Term|TotK|Shrine of Light}}[Term], Trial Name, Location[Term], Treasure[List:plain] | |||
|- | |||
| Chichim Shrine | |||
| Rauru's Blessing | |||
| Ancient Prison Ruins | |||
| Mighty Zonaite Spear | |||
|- | |||
| Irasak Shrine | |||
| Rauru's Blessing | |||
| Arbiter's Grounds | |||
| Large Zonai Charge | |||
|- | |||
| Karahatag Shrine | |||
| Drifting Flame | |||
| Southern Oasis | |||
| Construct Bow | |||
|- | |||
| Kudanisar Shrine | |||
| Bridging the Sands | |||
| West Barrens | |||
| Arrow x 10, Hasty Elixir | |||
|- | |||
| Mayatat Shrine | |||
| A Sliding Device | |||
| Kara Kara Bazaar | |||
| Arrow x 10 | |||
|- | |||
| Miryotanog Shrine | |||
| Proving Grounds: Lure | |||
| Toruma Dunes | |||
| Captain IV Blade | |||
|- | |||
| Siwakama Shrine | |||
| Moving the Spheres | |||
| East Barrens | |||
| Bomb Flower x 5 | |||
|- | |||
| Soryotanog Shrine | |||
| Buried Light | |||
| Gerudo Town | |||
| Arrow x 10 | |||
}} | |||
======{{Term|TotK|Gerudo Highlands}}====== | |||
{{Data Table | |||
|game= TotK | |||
|columns= {{Term|TotK|Shrine of Light}}[Term], Trial Name, Location[Term], Treasure[List:plain] | |||
|- | |||
| Kitawak Shrine | |||
| Upward and Forward | |||
| East Gerudo Mesa | |||
| Arrow x 10 | |||
|- | |||
| Mayamats Shrine | |||
| A Route for a Ball | |||
| Rutimala Hill | |||
| Large Zonai Charge | |||
|- | |||
| Motsusis Shrine | |||
| Rauru's Blessing | |||
| South Lomei Labyrinth | |||
| Large Zonai Charge | |||
|- | |||
| Otutsum Shrine | |||
| Rauru's Blessing | |||
| Risoka Snowfield | |||
| Topaz | |||
|- | |||
| Suariwak Shrine | |||
| Rauru's Blessing | |||
| Yiga Blademaster Station | |||
| Big Battery | |||
|- | |||
| Rakakudaj Shrine | |||
| Rauru's Blessing | |||
| Gerudo Canyon Pass | |||
| Mighty Zonaite Longsword | |||
|- | |||
| Rotsumamu Shrine | |||
| A Balanced Plan | |||
| Yiga Clan Hideout Chasm | |||
| Large Zonaite | |||
|- | |||
| Turakamik Shrine | |||
| Hidden Metal | |||
| Gerudo Canyon | |||
| Strong Zonaite Shield | |||
}} | |||
====={{Term|TotK|Hebra}}===== | |||
======{{Term|TotK|Hebra Mountains}}====== | |||
{{Data Table | |||
|game= TotK | |||
|columns= {{Term|TotK|Shrine of Light}}[Term], Trial Name, Location[Term], Treasure[List:plain] | |||
|- | |||
| Eutoum Shrine | |||
| Proving Grounds: Infiltration | |||
| Goflam's Secret Hot Spring | |||
| Sapphire | |||
|- | |||
| Mayaotaki Shrine | |||
| Rauru's Blessing | |||
| North Lomei Labyrinth | |||
| Diamond | |||
|- | |||
| Orochium Shrine | |||
| Courage to Fall | |||
| Snowfield Stable | |||
| Arrow x 5 | |||
|- | |||
| Oshozan-u Shrine | |||
| Mallet Smash | |||
| North Tabantha Snowfield | |||
| Zonaite Bow | |||
|- | |||
| Otak Shrine | |||
| Proving Grounds: Traps | |||
| Icefall Foothills Cave | |||
| Mighty Construct Bow | |||
|- | |||
| Rutafu-um Shrine | |||
| Rauru's Blessing | |||
| Hebra Mountains Northwest Cave | |||
| Topaz | |||
|- | |||
| Sahirow Shrine | |||
| Aid from Above | |||
| Corvash Peak | |||
| Spicy Elixir | |||
|- | |||
| Sisuran Shrine | |||
| Rauru's Blessing | |||
| Hebra East Summit North | |||
| Sapphire | |||
|- | |||
| Tauyosipun Shrine | |||
| Forward or Backward? | |||
| Hebra West Summit | |||
| Strong Construct Bow | |||
|- | |||
| Wao-os Shrine | |||
| Lever Power | |||
| West Lake Totori Cave | |||
| Spicy Elixir | |||
}} | |||
======{{Term|TotK|Tabantha Frontier}}====== | |||
{{Data Table | |||
|game= TotK | |||
|columns= {{Term|TotK|Shrine of Light}}[Term], Trial Name, Location[Term], Treasure[List:plain] | |||
|- | |||
| Gasas Shrine | |||
| Well-Timed Cuts | |||
| Tanagar Canyon | |||
| Large Zonai Charge | |||
|- | |||
| Gatakis Shrine | |||
| Ride the Winds | |||
| Rito Village | |||
| Strong Construct Bow | |||
|- | |||
| Ikatak Shrine | |||
| Rauru's Blessing | |||
| Gisa Crater | |||
| Big Battery | |||
|- | |||
| Iun-orok Shrine | |||
| The Right Roll | |||
| Tanagar Canyon West Cave | |||
| Arrow x 10 | |||
|- | |||
| Mayausiy Shrine | |||
| Building Blocks | |||
| Forgotten Temple | |||
| Large Zonai Charge | |||
|- | |||
| Nouda Shrine | |||
| Proving Grounds: Intermediate | |||
| Kopeeki Drifts Cave | |||
| Hearty Elixir | |||
|- | |||
| Oromuwak Shrine | |||
| A Launching Device | |||
| Tabantha Frontier | |||
| Ruby | |||
}} | |||
====={{Term|TotK|Lanayru (Region)}}===== | |||
======{{Term|TotK|Lanayru Great Spring}}====== | |||
{{Data Table | |||
|game= TotK | |||
|columns= {{Term|TotK|Shrine of Light}}[Term], Trial Name, Location[Term], Treasure[List:plain] | |||
|- | |||
| Apogek Shrine | |||
| Wings on the Wind | |||
| Ja'Abu Ridge | |||
| Strong Zonaite Spear | |||
|- | |||
| Ihen-a Shrine | |||
| Midair Perch | |||
| Mipha Court | |||
| Arrow x 5 | |||
|- | |||
| Joniu Shrine | |||
| Rauru's Blessing | |||
| Ralis Channel | |||
| Large Zonai Charge | |||
|- | |||
| Kurakat Shrine | |||
| Rauru's Blessing | |||
| Quatta's Shelf | |||
| Magic Scepter | |||
|- | |||
| Mogawak Shrine | |||
| The Power of Water | |||
| Zora's Domain | |||
| Magic Scepter, Opal | |||
|- | |||
| O-ogim Shrine | |||
| Rauru's Blessing | |||
| Lanayru Promenade | |||
| Big Battery | |||
|- | |||
| Yomizuk Shrine | |||
| Rauru's Blessing | |||
| Tarm Point Cave | |||
| Diamond | |||
}} | |||
======{{Term|TotK|Lanayru Wetlands}}====== | |||
{{Data Table | |||
|game= TotK | |||
|columns= {{Term|TotK|Shrine of Light}}[Term], Trial Name, Location[Term], Treasure[List:plain] | |||
|- | |||
| Jonsau Shrine | |||
| Deep Force | |||
| Mercay Island | |||
| Strong Construct Bow | |||
|- | |||
| Maoikes Shrine | |||
| Rauru's Blessing | |||
| Boné Pond East Cave | |||
| Diamond | |||
|- | |||
| Morok Shrine | |||
| A Bouncy Device | |||
| Sahasra Slope | |||
| Sneaky Elixir | |||
|- | |||
| Tukarok Shrine | |||
| Forward Force | |||
| Wetland Stable | |||
| Strong Zonaite Sword | |||
}} | |||
======{{Term|TotK|Mount Lanayru}}====== | |||
{{Data Table | |||
|game= TotK | |||
|columns= {{Term|TotK|Shrine of Light}}[Term], Trial Name, Location[Term], Treasure[List:plain] | |||
|- | |||
| Jikais Shrine | |||
| Jailbreak | |||
| Mount Lanayru | |||
| Magic Staff | |||
|- | |||
| Zakusu Shrine | |||
| Proving Grounds: Ascension | |||
| Naydra Snowfield | |||
| Soldier III Spear | |||
}} | |||
====={{Term|TotK|Necluda}}===== | |||
======{{Term|TotK|East Necluda}}====== | |||
{{Data Table | |||
|game= TotK | |||
|columns= {{Term|TotK|Shrine of Light}}[Term], Trial Name, Location[Term], Treasure[List:plain] | |||
|- | |||
| Anedamimik Shrine | |||
| Retraced Path | |||
| Deepback Bay Cave | |||
| Large Zonai Charge | |||
|- | |||
| Bamitok Shrine | |||
| Rauru's Blessing | |||
| Mount Dunsel Cave | |||
| Big Battery | |||
|- | |||
| Jogou Shrine | |||
| Rauru's Blessing | |||
| Lanayru Road East Cave | |||
| Hearty Elixir | |||
|- | |||
| Mayahisik Shrine | |||
| Rauru's Blessing | |||
| Retsam Forest Cave | |||
| Magic Scepter | |||
|- | |||
| Sifumim Shrine | |||
| Proving Grounds: Flow | |||
| Lurelin Village | |||
| Captain III Reaper | |||
|- | |||
| Utojis Shrine | |||
| Rauru's Blessing | |||
| Tobio's Hollow Cave | |||
| Large Zonai Charge | |||
|- | |||
| Zanmik Shrine | |||
| Scoop It Out | |||
| Hateno Village | |||
| Zonaite Longsword | |||
}} | |||
======{{Term|TotK|Necluda Sea}}====== | |||
{{Data Table | |||
|game= TotK | |||
|columns= {{Term|TotK|Shrine of Light}}[Term], Trial Name, Location[Term], Treasure[List:plain] | |||
|- | |||
| Marari-in Shrine | |||
| Rauru's Blessing | |||
| Eventide Island Cave | |||
| Ruby | |||
}} | |||
======{{Term|TotK|West Necluda}}====== | |||
{{Data Table | |||
|game= TotK | |||
|columns= {{Term|TotK|Shrine of Light}}[Term], Trial Name, Location[Term], Treasure[List:plain] | |||
|- | |||
| Eshos Shrine | |||
| Combat Training: Shields | |||
| Dueling Peaks | |||
| Mighty Zonaite Shield | |||
|- | |||
| Jochisiu Shrine | |||
| Rauru's Blessing | |||
| West Necluda | |||
| Big Battery | |||
|- | |||
| Joju-u-u Shrine | |||
| Building Bridges | |||
| Ubota Point | |||
| Large Zonaite | |||
|- | |||
| Makasura Shrine | |||
| An Upright Device | |||
| Kakariko Village | |||
| Fairy Tonic | |||
|- | |||
| Susub Shrine | |||
| Rauru's Blessing | |||
| Deya Village Ruins Well | |||
| Magic Staff | |||
}} | |||
==Nomenclature== | ==Nomenclature== | ||
| Line 89: | Line 1,026: | ||
The {{Plural|TotK|Shrine of Light}} are named for various real-world locations in {{Wp|Kyoto}}, Japan. For example, {{Term|TotK|In-isa Shrine|link}} is named for {{Wp|Saiin Station}} and {{Term|TotK|Gutanbac Shrine|link}} is named for {{Wp|Tambaguchi Station}}. | The {{Plural|TotK|Shrine of Light}} are named for various real-world locations in {{Wp|Kyoto}}, Japan. For example, {{Term|TotK|In-isa Shrine|link}} is named for {{Wp|Saiin Station}} and {{Term|TotK|Gutanbac Shrine|link}} is named for {{Wp|Tambaguchi Station}}. | ||
{{Nomenclature}} | {{Nomenclature}} | ||
==Gallery== | |||
<gallery> | |||
File:TotK Shrine of Light Promotional Screenshot.png|A promotional screenshot of a {{Term|TotK|Shrine of Light}} | |||
</gallery> | |||
==See Also== | ==See Also== | ||
Revision as of 19:37, 20 April 2024
Shrines of Light are locations in Tears of the Kingdom.[1]
Features and Overview
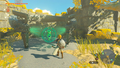
Shrines of Light are sacred places created to purge Darkness. They existed before the foundation of Hyrule and were placed above where a demon was destroyed to prevent its reappearance.[2] Shrines of Light often act as trials that offer Lights of Blessing in return for reaching their ends. The Shrines of Light on the Surface have corresponding Lightroots in the Depths. These Lightroots appear in the same X and Y Map Coordinates as their Surface counterparts, and bear reversed names from their Surface counterparts. Shrines of Light in the Sky do not have matching Lightroots.
In their default state, Shrines of Light have swirls of green energy that encircles a large stone at their centers. By touching a magical panel between the Dragon Statues on their fronts, Link is able to activate the Shrines of Light. When activated, Shrines of Light summon Travel Points and a portal to their interiors appears on the front of the stones at their centers. Link must enter these portals in order to claim the Lights of Blessing inside. The Travel Points summoned by the Shrines of Light can be Warped to with the Purah Pad.
List of Shrines of Light
Sky
Akkala Sky
Akkala Highlands Sky
| Shrine of Light | |
|---|---|
| Trial Name | Rauru's Blessing |
| Location | |
| Treasure |
|
| Shrine of Light | Trial Name | Location | Treasure |
|---|---|---|---|
Rauru's Blessing |
|
Akkala Sea Sky
| Shrine of Light | |
|---|---|
| Trial Name | Rauru's Blessing |
| Location | |
| Treasure |
|
| Shrine of Light | |
| Trial Name | Courage to Jump |
| Location | |
| Treasure |
|
| Shrine of Light | Trial Name | Location | Treasure |
|---|---|---|---|
Rauru's Blessing |
| ||
Courage to Jump |
|
Central Hyrule Sky
| Shrine of Light | |
|---|---|
| Trial Name | The Ability to Rise |
| Location | |
| Treasure | |
| Shrine of Light | |
| Trial Name | Rauru's Blessing |
| Location | |
| Treasure |
|
| Shrine of Light | |
| Trial Name | The Ability to Combine |
| Location | |
| Treasure | |
| Shrine of Light | |
| Trial Name | The Ability to Rewind |
| Location | |
| Treasure | |
| Shrine of Light | |
| Trial Name | The Ability to Create |
| Location | |
| Treasure |
| Shrine of Light | Trial Name | Location | Treasure |
|---|---|---|---|
The Ability to Rise | |||
Rauru's Blessing |
| ||
The Ability to Combine | |||
The Ability to Rewind | |||
The Ability to Create |
Great Hyrule Forest Sky
| Shrine of Light | |
|---|---|
| Trial Name | Rauru's Blessing |
| Location | |
| Treasure |
|
| Shrine of Light | |
| Trial Name | Proving Grounds: Lights Out |
| Location | |
| Treasure |
|
| Shrine of Light | Trial Name | Location | Treasure |
|---|---|---|---|
Rauru's Blessing |
| ||
Proving Grounds: Lights Out |
|
Hyrule Ridge Sky
| Shrine of Light | |
|---|---|
| Trial Name | Combat Training: Archery |
| Location | |
| Treasure |
|
| Shrine of Light | Trial Name | Location | Treasure |
|---|---|---|---|
Combat Training: Archery |
|
Eldin Sky
Eldin Canyon Sky
| Shrine of Light | |
|---|---|
| Trial Name | Water Makes a Way |
| Location | |
| Treasure |
|
| Shrine of Light | Trial Name | Location | Treasure |
|---|---|---|---|
Water Makes a Way |
|
Faron Sky
Faron Grasslands Sky
| Shrine of Light | |
|---|---|
| Trial Name | Rauru's Blessing |
| Location | |
| Treasure |
|
| Shrine of Light | |
| Trial Name | Proving Grounds: Short Circuit |
| Location | |
| Treasure |
|
| Shrine of Light | Trial Name | Location | Treasure |
|---|---|---|---|
Rauru's Blessing |
| ||
Proving Grounds: Short Circuit |
|
Gerudo Sky
Gerudo Highlands Sky
| Shrine of Light | |
|---|---|
| Trial Name | Rauru's Blessing |
| Location | |
| Treasure |
|
| Shrine of Light | |
| Trial Name | A Reflective Device |
| Location | |
| Treasure |
|
| Shrine of Light | |
| Trial Name | Rauru's Blessing |
| Location | |
| Treasure |
|
| Shrine of Light | Trial Name | Location | Treasure |
|---|---|---|---|
Rauru's Blessing |
| ||
A Reflective Device |
| ||
Rauru's Blessing |
|
Hebra Sky
Hebra Mountains Sky
| Shrine of Light | |
|---|---|
| Trial Name | More Than Defense |
| Location | |
| Treasure |
|
| Shrine of Light | |
| Trial Name | Rauru's Blessing |
| Location | |
| Treasure |
|
| Shrine of Light | |
| Trial Name | Downward Force |
| Location | |
| Treasure |
|
| Shrine of Light | |
| Trial Name | Rauru's Blessing |
| Location | |
| Treasure |
|
| Shrine of Light | |
| Trial Name | Gravity and Velocity |
| Location | |
| Treasure |
|
| Shrine of Light | Trial Name | Location | Treasure |
|---|---|---|---|
More Than Defense |
| ||
Rauru's Blessing |
| ||
Downward Force |
| ||
Rauru's Blessing |
| ||
Gravity and Velocity |
|
Tabantha Frontier Sky
| Shrine of Light | |
|---|---|
| Trial Name | Rauru's Blessing |
| Location | |
| Treasure |
|
| Shrine of Light | |
| Trial Name | Rauru's Blessing |
| Location | |
| Treasure |
|
| Shrine of Light | Trial Name | Location | Treasure |
|---|---|---|---|
Rauru's Blessing |
| ||
Rauru's Blessing |
|
Lanayru Sky
Lanayru Great Spring Sky
| Shrine of Light | |
|---|---|
| Trial Name | Orbs of Water |
| Location | |
| Treasure |
|
| Shrine of Light | |
| Trial Name | A Flying Device |
| Location | |
| Treasure |
|
| Shrine of Light | |
| Trial Name | Rauru's Blessing |
| Location | |
| Treasure |
|
| Shrine of Light | Trial Name | Location | Treasure |
|---|---|---|---|
Orbs of Water |
| ||
A Flying Device |
| ||
Rauru's Blessing |
|
Lanayru Sea Sky
| Shrine of Light | |
|---|---|
| Trial Name | The Ice Guides You |
| Location | |
| Treasure |
|
| Shrine of Light | Trial Name | Location | Treasure |
|---|---|---|---|
The Ice Guides You |
|
Necluda Sky
East Necluda Sky
| Shrine of Light | |
|---|---|
| Trial Name | Rauru's Blessing |
| Location | |
| Treasure |
|
| Shrine of Light | |
| Trial Name | Proving Grounds: Low Gravity |
| Location | |
| Treasure |
|
| Shrine of Light | Trial Name | Location | Treasure |
|---|---|---|---|
Rauru's Blessing |
| ||
Proving Grounds: Low Gravity |
|
West Necluda Sky
| Shrine of Light | |
|---|---|
| Trial Name | Rauru's Blessing |
| Location | |
| Treasure |
|
| Shrine of Light | |
| Trial Name | Rauru's Blessing |
| Location | |
| Treasure |
|
| Shrine of Light | Trial Name | Location | Treasure |
|---|---|---|---|
Rauru's Blessing |
| ||
Rauru's Blessing |
|
Surface
Akkala
Akkala Highlands
| Shrine of Light | |
|---|---|
| Trial Name | A Prone Pathway |
| Location | |
| Treasure |
|
| Shrine of Light | |
| Trial Name | A Well-Timed Bounce |
| Location | |
| Treasure |
|
| Shrine of Light | |
| Trial Name | Rauru's Blessing |
| Location | |
| Treasure |
|
| Shrine of Light | |
| Trial Name | Proving Grounds: Vehicles |
| Location | |
| Treasure |
|
| Shrine of Light | |
| Trial Name | Combat Training: Sneakstrike |
| Location | |
| Treasure |
|
| Shrine of Light | Trial Name | Location | Treasure |
|---|---|---|---|
A Prone Pathway |
| ||
A Well-Timed Bounce |
| ||
Rauru's Blessing |
| ||
Proving Grounds: Vehicles |
| ||
Combat Training: Sneakstrike |
|
Akkala Sea
| Shrine of Light | |
|---|---|
| Trial Name | Turbine Power |
| Location | |
| Treasure |
|
| Shrine of Light | |
| Trial Name | Rauru's Blessing |
| Location | |
| Treasure |
|
| Shrine of Light | |
| Trial Name | Flotational Brilliance |
| Location | |
| Treasure |
|
| Shrine of Light | Trial Name | Location | Treasure |
|---|---|---|---|
Turbine Power |
| ||
Rauru's Blessing |
| ||
Flotational Brilliance |
|
Deep Akkala
| Shrine of Light | |
|---|---|
| Trial Name | Courage to Pluck |
| Location | |
| Treasure |
|
| Shrine of Light | |
| Trial Name | A Precise Strike |
| Location | |
| Treasure |
|
| Shrine of Light | Trial Name | Location | Treasure |
|---|---|---|---|
Courage to Pluck |
| ||
A Precise Strike |
|
Central Hyrule
Great Hyrule Forest
| Shrine of Light | |
|---|---|
| Trial Name | Rise and Fall |
| Location | |
| Treasure |
|
| Shrine of Light | |
| Trial Name | Shining in Darkness |
| Location | |
| Treasure |
|
| Shrine of Light | |
| Trial Name | Fire and Ice |
| Location | |
| Treasure |
|
| Shrine of Light | |
| Trial Name | Swing to Hit |
| Location | |
| Treasure |
|
| Shrine of Light | |
| Trial Name | Rauru's Blessing |
| Location | |
| Treasure |
|
| Shrine of Light | |
| Trial Name | Rauru's Blessing |
| Location | |
| Treasure |
|
| Shrine of Light | |
| Trial Name | Rauru's Blessing |
| Location | |
| Treasure |
|
| Shrine of Light | |
| Trial Name | Rauru's Blessing |
| Location | |
| Treasure |
|
| Shrine of Light | Trial Name | Location | Treasure |
|---|---|---|---|
Rise and Fall |
| ||
Shining in Darkness |
| ||
Fire and Ice |
| ||
Swing to Hit |
| ||
Rauru's Blessing |
| ||
Rauru's Blessing |
| ||
Rauru's Blessing |
| ||
Rauru's Blessing |
|
Great Plateau
| Shrine of Light | |
|---|---|
| Trial Name | Alignment of the Circles |
| Location | |
| Treasure |
|
| Shrine of Light | |
| Trial Name | Force Transfer |
| Location | |
| Treasure |
|
| Shrine of Light | |
| Trial Name | Fire and Water |
| Location | |
| Treasure |
|
| Shrine of Light | Trial Name | Location | Treasure |
|---|---|---|---|
Alignment of the Circles |
| ||
Force Transfer |
| ||
Fire and Water |
|
Hyrule Field
| Shrine of Light | |
|---|---|
| Trial Name | A Windy Device |
| Location | |
| Treasure |
|
| Shrine of Light | |
| Trial Name | Shape Rotation |
| Location | |
| Treasure |
|
| Shrine of Light | |
| Trial Name | Proving Grounds: Rotation |
| Location | |
| Treasure |
|
| Shrine of Light | |
| Trial Name | Proving Grounds: Beginner |
| Location | |
| Treasure |
|
| Shrine of Light | |
| Trial Name | Combat Training |
| Location | |
| Treasure |
|
| Shrine of Light | |
| Trial Name | A Fixed Device |
| Location | |
| Treasure |
|
| Shrine of Light | |
| Trial Name | Jump the Gaps |
| Location | |
| Treasure |
|
| Shrine of Light | |
| Trial Name | Backtrack |
| Location | |
| Treasure |
|
| Shrine of Light | |
| Trial Name | The Way Up |
| Location | |
| Treasure |
|
| Shrine of Light | |
| Trial Name | An Uplifting Device |
| Location | |
| Treasure |
|
| Shrine of Light | |
| Trial Name | A Spinning Device |
| Location | |
| Treasure |
|
| Shrine of Light | |
| Trial Name | Building with Logs |
| Location | |
| Treasure |
|
| Shrine of Light | |
| Trial Name | Combat Training: Throwing |
| Location | |
| Treasure |
|
| Shrine of Light | |
| Trial Name | The Stakes Guide You |
| Location | |
| Treasure |
|
| Shrine of Light | |
| Trial Name | Combat Training: Throwing |
| Location | |
| Treasure |
|
| Shrine of Light | Trial Name | Location | Treasure |
|---|---|---|---|
A Windy Device |
| ||
Shape Rotation |
| ||
Proving Grounds: Rotation |
| ||
Proving Grounds: Beginner |
| ||
Combat Training |
| ||
A Fixed Device |
| ||
Jump the Gaps |
| ||
Backtrack |
| ||
The Way Up |
| ||
An Uplifting Device |
| ||
A Spinning Device |
| ||
Building with Logs |
| ||
Combat Training: Throwing |
| ||
The Stakes Guide You |
| ||
Combat Training: Throwing |
|
Hyrule Ridge
| Shrine of Light | |
|---|---|
| Trial Name | Combat Training: Archery |
| Location | |
| Treasure |
|
| Shrine of Light | |
| Trial Name | Built to Carry |
| Location | |
| Treasure |
|
| Shrine of Light | |
| Trial Name | Missing Pathways |
| Location | |
| Treasure |
|
| Shrine of Light | |
| Trial Name | Rauru's Blessing |
| Location | |
| Treasure |
|
| Shrine of Light | |
| Trial Name | Stacking a Path |
| Location | |
| Treasure |
|
| Shrine of Light | |
| Trial Name | Rauru's Blessing |
| Location | |
| Treasure |
|
| Shrine of Light | Trial Name | Location | Treasure |
|---|---|---|---|
Combat Training: Archery |
| ||
Built to Carry |
| ||
Missing Pathways |
| ||
Rauru's Blessing |
| ||
Stacking a Path |
| ||
Rauru's Blessing |
|
Lake Hylia
| Shrine of Light | |
|---|---|
| Trial Name | Rauru's Blessing |
| Location | |
| Treasure |
|
| Shrine of Light | Trial Name | Location | Treasure |
|---|---|---|---|
Rauru's Blessing |
|
Eldin
Death Mountain
| Shrine of Light | |
|---|---|
| Trial Name | A Controlling Device |
| Location | |
| Treasure |
|
| Shrine of Light | Trial Name | Location | Treasure |
|---|---|---|---|
A Controlling Device |
|
Eldin Canyon
| Shrine of Light | |
|---|---|
| Trial Name | Proving Grounds: In Reverse |
| Location | |
| Treasure |
|
| Shrine of Light | |
| Trial Name | Rauru's Blessing |
| Location | |
| Treasure |
|
| Shrine of Light | |
| Trial Name | Proving Grounds: Smash |
| Location | |
| Treasure |
|
| Shrine of Light | |
| Trial Name | Wind Power |
| Location | |
| Treasure |
|
| Shrine of Light | |
| Trial Name | Wheeled Wonders |
| Location | |
| Treasure |
|
| Shrine of Light | |
| Trial Name | Proving Grounds: The Hunt |
| Location | |
| Treasure |
|
| Shrine of Light | |
| Trial Name | Rauru's Blessing |
| Location | |
| Treasure |
|
| Shrine of Light | |
| Trial Name | Rauru's Blessing |
| Location | |
| Treasure |
|
| Shrine of Light | |
| Trial Name | Alignment |
| Location | |
| Treasure |
|
| Shrine of Light | |
| Trial Name | Against the Flow |
| Location | |
| Treasure |
|
| Shrine of Light | Trial Name | Location | Treasure |
|---|---|---|---|
Proving Grounds: In Reverse |
| ||
Rauru's Blessing |
| ||
Proving Grounds: Smash |
| ||
Wind Power |
| ||
Wheeled Wonders |
| ||
Proving Grounds: The Hunt |
| ||
Rauru's Blessing |
| ||
Rauru's Blessing |
| ||
Alignment |
| ||
Against the Flow |
|
Eldin Mountains
| Shrine of Light | |
|---|---|
| Trial Name | Timely Catches |
| Location | |
| Treasure |
|
| Shrine of Light | |
| Trial Name | Rauru's Blessing |
| Location | |
| Treasure |
|
| Shrine of Light | |
| Trial Name | Spinning Gears |
| Location | |
| Treasure |
|
| Shrine of Light | Trial Name | Location | Treasure |
|---|---|---|---|
Timely Catches |
| ||
Rauru's Blessing |
| ||
Spinning Gears |
|
Faron
Faron Grasslands
| Shrine of Light | |
|---|---|
| Trial Name | Rauru's Blessing |
| Location | |
| Treasure |
|
| Shrine of Light | |
| Trial Name | Built for Rails |
| Location | |
| Treasure |
|
| Shrine of Light | |
| Trial Name | Long or Wide |
| Location | |
| Treasure |
|
| Shrine of Light | Trial Name | Location | Treasure |
|---|---|---|---|
Rauru's Blessing |
| ||
Built for Rails |
| ||
Long or Wide |
|
Gerudo
Gerudo Desert
| Shrine of Light | |
|---|---|
| Trial Name | Rauru's Blessing |
| Location | |
| Treasure |
|
| Shrine of Light | |
| Trial Name | Rauru's Blessing |
| Location | |
| Treasure |
|
| Shrine of Light | |
| Trial Name | Drifting Flame |
| Location | |
| Treasure |
|
| Shrine of Light | |
| Trial Name | Bridging the Sands |
| Location | |
| Treasure |
|
| Shrine of Light | |
| Trial Name | A Sliding Device |
| Location | |
| Treasure |
|
| Shrine of Light | |
| Trial Name | Proving Grounds: Lure |
| Location | |
| Treasure |
|
| Shrine of Light | |
| Trial Name | Moving the Spheres |
| Location | |
| Treasure |
|
| Shrine of Light | |
| Trial Name | Buried Light |
| Location | |
| Treasure |
|
| Shrine of Light | Trial Name | Location | Treasure |
|---|---|---|---|
Rauru's Blessing |
| ||
Rauru's Blessing |
| ||
Drifting Flame |
| ||
Bridging the Sands |
| ||
A Sliding Device |
| ||
Proving Grounds: Lure |
| ||
Moving the Spheres |
| ||
Buried Light |
|
Gerudo Highlands
| Shrine of Light | |
|---|---|
| Trial Name | Upward and Forward |
| Location | |
| Treasure |
|
| Shrine of Light | |
| Trial Name | A Route for a Ball |
| Location | |
| Treasure |
|
| Shrine of Light | |
| Trial Name | Rauru's Blessing |
| Location | |
| Treasure |
|
| Shrine of Light | |
| Trial Name | Rauru's Blessing |
| Location | |
| Treasure |
|
| Shrine of Light | |
| Trial Name | Rauru's Blessing |
| Location | |
| Treasure |
|
| Shrine of Light | |
| Trial Name | Rauru's Blessing |
| Location | |
| Treasure |
|
| Shrine of Light | |
| Trial Name | A Balanced Plan |
| Location | |
| Treasure |
|
| Shrine of Light | |
| Trial Name | Hidden Metal |
| Location | |
| Treasure |
|
| Shrine of Light | Trial Name | Location | Treasure |
|---|---|---|---|
Upward and Forward |
| ||
A Route for a Ball |
| ||
Rauru's Blessing |
| ||
Rauru's Blessing |
| ||
Rauru's Blessing |
| ||
Rauru's Blessing |
| ||
A Balanced Plan |
| ||
Hidden Metal |
|
Hebra
Hebra Mountains
| Shrine of Light | |
|---|---|
| Trial Name | Proving Grounds: Infiltration |
| Location | |
| Treasure |
|
| Shrine of Light | |
| Trial Name | Rauru's Blessing |
| Location | |
| Treasure |
|
| Shrine of Light | |
| Trial Name | Courage to Fall |
| Location | |
| Treasure |
|
| Shrine of Light | |
| Trial Name | Mallet Smash |
| Location | |
| Treasure |
|
| Shrine of Light | |
| Trial Name | Proving Grounds: Traps |
| Location | |
| Treasure |
|
| Shrine of Light | |
| Trial Name | Rauru's Blessing |
| Location | |
| Treasure |
|
| Shrine of Light | |
| Trial Name | Aid from Above |
| Location | |
| Treasure |
|
| Shrine of Light | |
| Trial Name | Rauru's Blessing |
| Location | |
| Treasure |
|
| Shrine of Light | |
| Trial Name | Forward or Backward? |
| Location | |
| Treasure |
|
| Shrine of Light | |
| Trial Name | Lever Power |
| Location | |
| Treasure |
|
| Shrine of Light | Trial Name | Location | Treasure |
|---|---|---|---|
Proving Grounds: Infiltration |
| ||
Rauru's Blessing |
| ||
Courage to Fall |
| ||
Mallet Smash |
| ||
Proving Grounds: Traps |
| ||
Rauru's Blessing |
| ||
Aid from Above |
| ||
Rauru's Blessing |
| ||
Forward or Backward? |
| ||
Lever Power |
|
Tabantha Frontier
| Shrine of Light | |
|---|---|
| Trial Name | Well-Timed Cuts |
| Location | |
| Treasure |
|
| Shrine of Light | |
| Trial Name | Ride the Winds |
| Location | |
| Treasure |
|
| Shrine of Light | |
| Trial Name | Rauru's Blessing |
| Location | |
| Treasure |
|
| Shrine of Light | |
| Trial Name | The Right Roll |
| Location | |
| Treasure |
|
| Shrine of Light | |
| Trial Name | Building Blocks |
| Location | |
| Treasure |
|
| Shrine of Light | |
| Trial Name | Proving Grounds: Intermediate |
| Location | |
| Treasure |
|
| Shrine of Light | |
| Trial Name | A Launching Device |
| Location | |
| Treasure |
|
| Shrine of Light | Trial Name | Location | Treasure |
|---|---|---|---|
Well-Timed Cuts |
| ||
Ride the Winds |
| ||
Rauru's Blessing |
| ||
The Right Roll |
| ||
Building Blocks |
| ||
Proving Grounds: Intermediate |
| ||
A Launching Device |
|
Lanayru
Lanayru Great Spring
| Shrine of Light | |
|---|---|
| Trial Name | Wings on the Wind |
| Location | |
| Treasure |
|
| Shrine of Light | |
| Trial Name | Midair Perch |
| Location | |
| Treasure |
|
| Shrine of Light | |
| Trial Name | Rauru's Blessing |
| Location | |
| Treasure |
|
| Shrine of Light | |
| Trial Name | Rauru's Blessing |
| Location | |
| Treasure |
|
| Shrine of Light | |
| Trial Name | The Power of Water |
| Location | |
| Treasure |
|
| Shrine of Light | |
| Trial Name | Rauru's Blessing |
| Location | |
| Treasure |
|
| Shrine of Light | |
| Trial Name | Rauru's Blessing |
| Location | |
| Treasure |
|
| Shrine of Light | Trial Name | Location | Treasure |
|---|---|---|---|
Wings on the Wind |
| ||
Midair Perch |
| ||
Rauru's Blessing |
| ||
Rauru's Blessing |
| ||
The Power of Water |
| ||
Rauru's Blessing |
| ||
Rauru's Blessing |
|
Lanayru Wetlands
| Shrine of Light | |
|---|---|
| Trial Name | Deep Force |
| Location | |
| Treasure |
|
| Shrine of Light | |
| Trial Name | Rauru's Blessing |
| Location | |
| Treasure |
|
| Shrine of Light | |
| Trial Name | A Bouncy Device |
| Location | |
| Treasure |
|
| Shrine of Light | |
| Trial Name | Forward Force |
| Location | |
| Treasure |
|
| Shrine of Light | Trial Name | Location | Treasure |
|---|---|---|---|
Deep Force |
| ||
Rauru's Blessing |
| ||
A Bouncy Device |
| ||
Forward Force |
|
Mount Lanayru
| Shrine of Light | |
|---|---|
| Trial Name | Jailbreak |
| Location | |
| Treasure |
|
| Shrine of Light | |
| Trial Name | Proving Grounds: Ascension |
| Location | |
| Treasure |
|
| Shrine of Light | Trial Name | Location | Treasure |
|---|---|---|---|
Jailbreak |
| ||
Proving Grounds: Ascension |
|
Necluda
East Necluda
| Shrine of Light | |
|---|---|
| Trial Name | Retraced Path |
| Location | |
| Treasure |
|
| Shrine of Light | |
| Trial Name | Rauru's Blessing |
| Location | |
| Treasure |
|
| Shrine of Light | |
| Trial Name | Rauru's Blessing |
| Location | |
| Treasure |
|
| Shrine of Light | |
| Trial Name | Rauru's Blessing |
| Location | |
| Treasure |
|
| Shrine of Light | |
| Trial Name | Proving Grounds: Flow |
| Location | |
| Treasure |
|
| Shrine of Light | |
| Trial Name | Rauru's Blessing |
| Location | |
| Treasure |
|
| Shrine of Light | |
| Trial Name | Scoop It Out |
| Location | |
| Treasure |
|
| Shrine of Light | Trial Name | Location | Treasure |
|---|---|---|---|
Retraced Path |
| ||
Rauru's Blessing |
| ||
Rauru's Blessing |
| ||
Rauru's Blessing |
| ||
Proving Grounds: Flow |
| ||
Rauru's Blessing |
| ||
Scoop It Out |
|
Necluda Sea
| Shrine of Light | |
|---|---|
| Trial Name | Rauru's Blessing |
| Location | |
| Treasure |
|
| Shrine of Light | Trial Name | Location | Treasure |
|---|---|---|---|
Rauru's Blessing |
|
West Necluda
| Shrine of Light | |
|---|---|
| Trial Name | Combat Training: Shields |
| Location | |
| Treasure |
|
| Shrine of Light | |
| Trial Name | Rauru's Blessing |
| Location | |
| Treasure |
|
| Shrine of Light | |
| Trial Name | Building Bridges |
| Location | |
| Treasure |
|
| Shrine of Light | |
| Trial Name | An Upright Device |
| Location | |
| Treasure |
|
| Shrine of Light | |
| Trial Name | Rauru's Blessing |
| Location | |
| Treasure |
|
| Shrine of Light | Trial Name | Location | Treasure |
|---|---|---|---|
Combat Training: Shields |
| ||
Rauru's Blessing |
| ||
Building Bridges |
| ||
An Upright Device |
| ||
Rauru's Blessing |
|
Nomenclature
The Shrines of Light are named for various real-world locations in Kyoto, Japan. For example, In-isa Shrine is named for Saiin Station and Gutanbac Shrine is named for Tambaguchi Station.
| Language | Names | |
|---|---|---|
| This table was generated using translation pages. To request an addition, please contact a staff member with a reference. | ||
Gallery
-
A promotional screenshot of a Shrine of Light

See Also
References
- ↑ "So you've made it here. This is a Shrine of Light. Long ago, I filled these places with light that purges evil. I believe this light will restore an ability your right arm has lost. Now then, extend your hand." — Rauru (Tears of the Kingdom)
- ↑ "The shrines themselves were built before Rauru founded Hyrule – before the Demon King Ganondorf appeared there were still a lot of evil beings, so Rauru and Sonia went around various places to calm things down. Shrines are placed above where a demon was destroyed so it will not reappear. This is why that spiral of light emerges from the shrine. Therefore, bathing in the remaining power of the shrines slightly cleanses Link of the demon magic." —Hidemaro Fujibayashi (Hyrule's Shrines Serve A Secret Peace-Keeping Purpose, Says TOTK Director, published December 19, 2023, retrieved December 19, 2023.)