Ancient Shrine: Difference between revisions
MannedTooth (talk | contribs) (might need that) |
m (→Eldin Canyon: corrected location for a shrine) |
||
| (48 intermediate revisions by 11 users not shown) | |||
| Line 1: | Line 1: | ||
{{Hatnote|Shrine redirects here. For other uses, see [[Shrine (Disambiguation)]].}} | |||
{{Infobox | {{Infobox Location | ||
|image= File:BotW Oman Au Shrine | |image= File:BotW Oman Au Shrine.png | ||
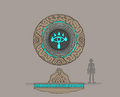
|caption= The {{Term|BotW|Oman Au Shrine}}, one of the many {{Plural|BotW|Ancient Shrine}} | |caption= The {{Term|BotW|Oman Au Shrine}}, one of the many {{Plural|BotW|Ancient Shrine}} | ||
|game= | |game= BotW | ||
|other= | |other= HWAoC | ||
|inhab= | |inhab= {{Plural|BotW|Monk|link}} | ||
|items= | |items= {{List|{{Plural|BotW|Rune|link}}, {{Plural|BotW|Spirit Orb|link}}}} | ||
|related= | |related= {{List|{{Plural|Series|Dungeon|link}}, {{Plural|Series|Sheikah Tower|link}}, {{Plural|Series|Shrine of Light|link}}}} | ||
|theme= | |theme= | ||
}} | }} | ||
{{Term/Store|Ancient Shrine|Ancient Shrines|Series, BotW|plural}} are dungeon-like puzzles in {{BotW}}.<ref>{{Cite| | {{Term/Store|Ancient Shrine|Ancient Shrines|Series, BotW|plural}} are dungeon-like puzzles in {{BotW}}.<ref>{{Cite|{{Color|BotW Side Quest|Ancient Shrine}}|A Gift from the Monks|BotW}}</ref> | ||
{{OTOC}} | {{OTOC}} | ||
==Overview== | ==Overview== | ||
After the Sheikah helped to seal away Calamity Ganon, they built the Ancient | After the {{Term|BotW|Sheikah|link}} helped to seal away {{Term|BotW|Calamity Ganon|link}}, they built the {{Plural|BotW|Ancient Shrine|link}} to serve as training grounds for the hero as he prepared for the revival of {{Term|BotW|Calamity Ganon}}.<ref>{{Cite Book|quote= |book=CaC |publisher= |page=370}}</ref> There are initially 120 {{Plural|BotW|Ancient Shrine}} scattered throughout {{Term|BotW|Hyrule Kingdom|link}}. Many of the {{Plural|BotW|Ancient Shrine}} where uncovered during {{Term|BotW|King Rhoam|link}}'s excavations for {{Term|BotW|Ancient Technology|link}}, but they only began to glow after {{Term|BotW|Link|link}} activated the {{Term|BotW|Great Plateau Tower|link}} following his {{Term|BotW|Slumber of Restoration|link}}.<ref>{{Cite|Countless ancient structures are being discovered across Hyrule...but all attempts to enter them have failed. Records indicate that these are facilities designed to train the hero who is fated to combat the Calamity. But the crucial activation mechanism remains a mystery. Is the Sheikah Slate the key to activating them? That is Purah's theory, and I concur. And yet, my experiments so far have been fruitless. Still, we must exhaustively investigate all means of opposing the Calamity. We must not give up, no matter what!|Zelda's Research Notes|BotW}}</ref><ref>{{Cite|See that glowing structure there? That light appeared at the exact moment those towers rose from the ground.|Old Man|BotW}}</ref> In order to enter an {{Term|BotW|Ancient Shrine}}, {{Term|BotW|Link}} must unlock the entrance by pressing his {{Term|BotW|Sheikah Slate|link}} to the {{Term|BotW|Sheikah Slate Terminal|link}} at a {{Term|BotW|Ancient Shrine|display=Shrine}}'s entrance. {{Plural|BotW|Ancient Shrine|display=Shrines}} that have not yet been unlocked glow an orange light, and glow orange and blue once their entrance has been opened, but not yet completed. Upon completion, {{Plural|BotW|Ancient Shrine}} only glow blue. | ||
During the beginning of the fifth Recovered Memory, [[Zelda's Resentment]], Princess Zelda attempts to use the Sheikah Slate to try to access the one of the shrines, but to no avail and seeks to find a loophole before Link arrives, much to her displeasure. | |||
Once an {{Term|BotW|Ancient Shrine}} has been opened with a {{Term|BotW|Sheikah Slate Terminal}}, its {{Term|BotW|Travel Gate|link}} will activate.<ref>{{Cite|{{Color|BotW Monk Blue|Travel Gate registered to map.}}|N/A|BotW}}</ref> This will allow {{Term|BotW|Link}} to {{Term|BotW|Warping|link|display=Warp}} to the {{Term|BotW|Ancient Shrine}} from his {{Term|BotW|Map|link}}. | |||
After completing all four {{Plural|BotW|Divine Beast|link}} and beginning [[ | {{Term|BotW|Link}} is lowered into each {{Term|BotW|Ancient Shrine}} by an {{Term|BotW|Elevator Platform|link}}, and each {{Term|BotW|Ancient Shrine|display=Shrine}} contains a series of traps and obstacles to be overcome as part of a trial. At the end of every {{Term|BotW|Ancient Shrine|display=Shrine}} is a {{Term|BotW|Monk|link}}, who are the creators of the trials inside.<ref>{{Cite|{{Color|BotW Monk Blue|I am Keh Namut, the creator of this trial.}}|Keh Namut|BotW}}</ref> They rest upon {{Plural|BotW|Monk's Pedestal|link}}. The {{Plural|BotW|Monk}} will present {{Term|BotW|Link}} a {{Term|BotW|Spirit Orb|link}} for successfully reaching them.<ref>{{Cite|{{Color|BotW Monk Blue|In the name of Goddess Hylia, allow me to bestow this gift upon you... Please accept this Spirit Orb.}}|Monk|BotW}}</ref><ref>{{Cite|{{Color|BotW Monk Blue|In the name of Goddess Hylia, I bestow upon you this Spirit Orb.}}|Monk|BotW}}</ref> The first four {{Plural|BotW|Ancient Shrine}} also contain {{Plural|BotW|Guidance Stone|link}} that will distill {{Plural|BotW|Rune|link}}, which add functionalities to the {{Term|BotW|Sheikah Slate}} and bestow {{Term|BotW|Link}} with new abilities. Each {{Term|BotW|Ancient Shrine|display=Shrine}} contains various amounts of {{Plural|BotW|Treasure Chest|link}} alongside the {{Plural|BotW|Spirit Orb}} bestowed by the {{Plural|BotW|Monk}}. A {{Term|BotW|Treasure Chest}} icon will appear next to the {{Term|BotW|Ancient Shrine|display=Shrine}}'s name on the {{Term|BotW|Map}} once all {{Plural|BotW|Treasure Chest|display=Chests}} have been collected. | ||
After completing all 120 {{Plural|BotW|Ancient Shrine}}, {{Term|BotW|Link}} is instructed to head to the {{Term|BotW|Goddess Statue|link}} in the {{Term|BotW|Forgotten Temple|link}}, where he will find {{Plural|BotW|Treasure Chest}} containing the {{Term|BotW|Wild Set|link}}.<ref>{{Cite|You've conquered all of the shrine trials. The monks have prepared a gift for just such an occasion. Head to the Forgotten Temple where the oldest statue of the Goddess stands to see what they have left for you there.|Adventure Log|BotW}}</ref><ref>{{Cite|Inside, you found a special green outfit made especially for the hero who braved the wilderness alone.|Adventure Log|BotW}}</ref> | |||
After completing all four {{Plural|BotW|Divine Beast|link}} and beginning {{TCB}} [[DLC]] Pack, {{Term|BotW|Link}} can access 16 new {{Plural|BotW|Ancient Shrine}} across {{Term|BotW|Hyrule Kingdom}}. This expansion raises the total number of {{Plural|BotW|Ancient Shrine|display=Shrines}} to 136. These {{Plural|BotW|Ancient Shrine|display=Shrines}} have a tall pillar on their top to differentiate them from regular {{Plural|BotW|Ancient Shrine|display=Shrines}} and their {{Term|BotW|Map}} icon is likewise slightly edited to match. Four of them are found on the {{Term|BotW|Great Plateau|link}}, while the four {{Plural|BotW|Region|link}} coinciding with the {{Plural|BotW|Champions|link}} contain three {{Plural|BotW|Ancient Shrine|display=Shrines}} each. {{Term|BotW|Link}} must complete a Trial to access each of these {{Plural|BotW|Ancient Shrine|display=Shrines}}. {{Term|BotW|Link}} is rewarded with {{Plural|BotW|Spirit Orb}} as usual at the end of the four {{Term|BotW|Great Plateau}} {{Plural|BotW|Ancient Shrine|display=Shrines}}, but is instead given emblems related to the {{Term|BotW|Region}}'s respective {{Term|BotW|Divine Beast}} for the rest of the {{Plural|BotW|Ancient Shrine|display=Shrines}}.<ref>{{Cite|{{Color|BotW Monk Blue|In the name of the Goddess Hylia, I bestow upon you this gift... Naboris's Emblem.}}|Monk|BotW}}</ref><ref>{{Cite|{{Color|BotW Monk Blue|In the name of the Goddess Hylia, I bestow upon you this gift... Rudania's Emblem.}}|Monk|BotW}}</ref><ref>{{Cite|{{Color|BotW Monk Blue|In the name of the Goddess Hylia, I bestow upon you this gift... Ruta's Emblem.}}|Monk|BotW}}</ref><ref>{{Cite|{{Color|BotW Monk Blue|In the name of the Goddess Hylia, I bestow upon you this gift... Medoh's Emblem.}}|Monk|BotW}}</ref> | |||
==List of Shrines== | ==List of Shrines== | ||
| Line 31: | Line 35: | ||
!style="width:20%"| Treasure | !style="width:20%"| Treasure | ||
|- | |- | ||
| '''[[Dah Hesho Shrine]]''' | |||
| '''A Minor Test of Strength''' | | '''A Minor Test of Strength''' | ||
| '''[[Akkala Highlands]]''' | | '''[[Akkala Highlands]]''' | ||
| '''[[Giant Ancient Core]]''' | | '''[[Giant Ancient Core]]''' | ||
|- | |- | ||
| '''[[Kah Mael Shrine]]''' | |||
| '''Drop and Rise''' | | '''Drop and Rise''' | ||
| '''[[Tingel Island]]''' | | '''[[Tingel Island]]''' | ||
| '''[[Diamond]]''' | | '''[[Diamond]]''' | ||
|- | |- | ||
| '''[[Ke'nai Shakah Shrine]]''' | |||
| '''A Modest Test of Strength''' | | '''A Modest Test of Strength''' | ||
| '''[[ | | '''[[Ulria Grotto]]''' | ||
| '''[[Sapphire]]''' | | '''[[Sapphire]]''' | ||
|- | |- | ||
| '''[[Ritaag Zumo Shrine]]''' | |||
| '''Ritaag Zumo's Blessing''' | | '''Ritaag Zumo's Blessing''' | ||
| '''[[Rist Peninsula]]''' | | '''[[Rist Peninsula]]''' | ||
| '''[[Giant Ancient Core]]''' | | '''[[Giant Ancient Core]]''' | ||
|- | |- | ||
| '''[[Tutsuwa Nima Shrine]]''' | |||
| '''A Major Test of Strength''' | | '''A Major Test of Strength''' | ||
| '''[[Spring of Power]]''' | | '''[[Spring of Power]]''' | ||
| '''[[Flamespear]]''' | | '''[[Flamespear]]''' | ||
|- | |- | ||
| '''[[Ze Kasho Shrine]]''' | |||
| '''Ze Kasho Apparatus''' | | '''Ze Kasho Apparatus''' | ||
| '''[[South Akkala Stable]]''' | | '''[[South Akkala Stable]]''' | ||
| '''[[Silverscale Spear]]''' | | '''[[Silverscale Spear]]''' | ||
|} | |||
====Akkala Sea==== | |||
{| class="wikitable" style="width: 100%; text-align:center" | |||
!style="width:25%"| Shrine | |||
!style="width:25%"| Trial Name | |||
!style="width:15%"| Location | |||
!style="width:20%"| Treasure | |||
|- | |||
| '''[[Tu Ka'loh Shrine]]''' | |||
| '''Tu Ka'loh's Blessing''' | |||
| '''[[Lomei Labyrinth Island]]''' | |||
| '''[[Barbarian Helm]]''' | |||
|} | |} | ||
====Deep Akkala==== | ====Deep Akkala==== | ||
| Line 68: | Line 85: | ||
!style="width:20%"| Treasure | !style="width:20%"| Treasure | ||
|- | |- | ||
| '''[[Katosa Aug Shrine]]''' | |||
| '''Katosa Aug Apparatus''' | | '''Katosa Aug Apparatus''' | ||
| '''[[East Akkala Stable]]''' | | '''[[East Akkala Stable]]''' | ||
| '''[[Great Frostblade]]''' | | '''[[Great Frostblade]]''' | ||
|- | |- | ||
| '''[[Zuna Kai Shrine]]''' | |||
| '''Zuna Kai's Blessing''' | | '''Zuna Kai's Blessing''' | ||
| '''[[Skull Lake]]''' | | '''[[Left Eye of Skull Lake]]''' | ||
| '''[[Flameblade]]''' | | '''[[Flameblade]]''' | ||
|} | |} | ||
| Line 92: | Line 104: | ||
!style="width:20%"| Treasure | !style="width:20%"| Treasure | ||
|- | |- | ||
| '''[[Etsu Korima Shrine]]'''{{DLC|TCB}} | |||
| '''Path of Light''' | | '''Path of Light''' | ||
| '''[[Mount Hylia]]''' | | '''[[Mount Hylia]]''' | ||
| '''[[Gold Rupee]]''' | | '''[[Gold Rupee]]''' | ||
|- | |- | ||
| '''[[Ja Baij Shrine]]''' | |||
| '''Bomb Trial''' | | '''Bomb Trial''' | ||
| '''[[Eastern Abbey]]''' | | '''[[Eastern Abbey]]''' | ||
| '''[[Traveler's Claymore]]'''<br>'''[[Amber]]''' | | '''[[Traveler's Claymore]]'''<br/>'''[[Amber]]''' | ||
|- | |- | ||
| '''[[Keh Namut Shrine]]''' | |||
| '''Cryonis Trial''' | | '''Cryonis Trial''' | ||
| '''[[Mount Hylia]]''' | | '''[[Mount Hylia]]''' | ||
| '''[[Traveler's Spear]]''' | | '''[[Traveler's Spear]]''' | ||
|- | |- | ||
| '''[[Oman Au Shrine]]''' | |||
| '''Magnesis Trial''' | | '''Magnesis Trial''' | ||
| '''[[Great Plateau]]''' | | '''[[Great Plateau]]''' | ||
| '''[[Traveler's Bow]]''' | | '''[[Traveler's Bow]]''' | ||
|- | |- | ||
| '''[[Owa Daim Shrine]]''' | |||
| '''Stasis Trial''' | | '''Stasis Trial''' | ||
| '''[[Great Plateau]]''' | | '''[[Great Plateau]]''' | ||
| '''[[Traveler's Shield]]''' | | '''[[Traveler's Shield]]''' | ||
|- | |- | ||
| '''[[Rohta Chigah Shrine]]'''{{DLC|TCB}} | |||
| '''Stop to Start''' | | '''Stop to Start''' | ||
| '''[[Great Plateau]]''' | | '''[[Great Plateau]]''' | ||
| '''[[Forest Dweller's Shield]]''' | | '''[[Forest Dweller's Shield]]''' | ||
|- | |- | ||
| '''[[Ruvo Korbah Shrine]]'''{{DLC|TCB}} | |||
| '''A Major Test of Strength+''' | | '''A Major Test of Strength+''' | ||
| '''[[Great Plateau]]''' | | '''[[Great Plateau]]''' | ||
| '''[[Bomb Arrow]] | | '''[[Bomb Arrow]] ×10'''<br/>'''[[Giant Ancient Core]]''' | ||
|- | |- | ||
| '''[[Yowaka Ita Shrine]]'''{{DLC|TCB}} | |||
| '''Collected Soul''' | | '''Collected Soul''' | ||
| '''[[Forest of Spirits]]''' | | '''[[Forest of Spirits]]''' | ||
| '''[[Bomb Arrow]] | | '''[[Bomb Arrow]] ×5'''<br/>'''[[Phrenic Bow]]''' | ||
|} | |} | ||
| Line 140: | Line 152: | ||
!style="width:20%"| Treasure | !style="width:20%"| Treasure | ||
|- | |- | ||
| '''[[Bosh Kala Shrine]]''' | |||
| '''The Wind Guides You''' | | '''The Wind Guides You''' | ||
| '''[[Hyrule Field]]''' | | '''[[Hyrule Field]]''' | ||
| '''[[Amber]]'''<br>'''[[Soldier's Claymore]]''' | | '''[[Amber]]'''<br/>'''[[Soldier's Claymore]]''' | ||
|- | |- | ||
| '''[[Dah Kaso Shrine]]''' | |||
| '''A Minor Test of Strength''' | | '''A Minor Test of Strength''' | ||
| '''[[ | | '''[[Digdogg Suspension Bridge]]''' | ||
| '''[[Ancient Core]]''' | | '''[[Ancient Core]]''' | ||
|- | |- | ||
| '''[[Kaam Ya'tak Shrine]]''' | |||
| '''Trial of Power''' | | '''Trial of Power''' | ||
| '''[[Hyrule Field]]''' | | '''[[Hyrule Field]]''' | ||
| '''[[Edge of Duality]]'''<br>'''[[Knight's Broadsword]]'''<br>'''[[Ancient Core]]'''<br>'''[[Silver Rupee]]'''<br>'''[[Diamond]]''' | | '''[[Edge of Duality]]'''<br/>'''[[Knight's Broadsword]]'''<br/>'''[[Ancient Core]]'''<br/>'''[[Silver Rupee]]'''<br/>'''[[Diamond]]''' | ||
|- | |- | ||
| '''[[Katah Chuki Shrine]]''' | |||
| '''A Minor Test of Strength''' | | '''A Minor Test of Strength''' | ||
| '''[[ | | '''[[Quarry Ruins]]''' | ||
| '''[[Royal Halberd]]''' | | '''[[Royal Halberd]]''' | ||
|- | |- | ||
| '''[[Monya Toma Shrine]]''' | |||
| '''Drawing Parabolas''' | | '''Drawing Parabolas''' | ||
| '''[[ | | '''[[Salari Hill]]''' | ||
| '''[[Thunderblade]]''' | | '''[[Thunderblade]]''' | ||
|- | |- | ||
| '''[[Namika Ozz Shrine]]''' | |||
| '''A Modest Test of Strength''' | | '''A Modest Test of Strength''' | ||
| '''[[Crenel Hills]]''' | | '''[[Crenel Hills]]''' | ||
| '''[[Frostspear]]''' | | '''[[Frostspear]]''' | ||
|- | |- | ||
| '''[[Noya Neha Shrine]]''' | |||
| '''A Minor Test of Strength''' | | '''A Minor Test of Strength''' | ||
| '''[[Hyrule | | '''[[Hyrule Castle West]]''' | ||
| '''[[Knight's Shield]]''' | | '''[[Knight's Shield]]''' | ||
|- | |- | ||
| '''[[Rota Ooh Shrine]]''' | |||
| '''Passing of the Gates''' | | '''Passing of the Gates''' | ||
| '''[[Outskirt Stable]]''' | | '''[[Outskirt Stable]]''' | ||
| '''[[Feathered Edge]]''' | | '''[[Feathered Edge]]''' | ||
|- | |- | ||
| '''[[Saas Ko'sah Shrine]]''' | |||
| '''A Major Test of Strength''' | | '''A Major Test of Strength''' | ||
| '''[[ | | '''[[Docks]]''' | ||
| '''[[Flameblade]]''' | | '''[[Flameblade]]''' | ||
|- | |- | ||
| '''[[Wahgo Katta Shrine]]''' | |||
| '''Metal Connections''' | | '''Metal Connections''' | ||
| '''[[Riverside Stable]]''' | | '''[[Riverside Stable]]''' | ||
| '''[[Amber]]''' | | '''[[Amber]]''' | ||
|- | |- | ||
| '''[[Zalta Wa Shrine]]''' | |||
| '''Two Orbs to Guide You''' | | '''Two Orbs to Guide You''' | ||
| '''[[Breach of Demise]]''' | | '''[[Breach of Demise]]''' | ||
| Line 203: | Line 215: | ||
!style="width:20%"| Treasure | !style="width:20%"| Treasure | ||
|- | |- | ||
| '''[[Mijah Rokee Shrine]]''' | |||
| '''A Modest Test of Strength''' | | '''A Modest Test of Strength''' | ||
| '''[[Washa's Bluff]]''' | | '''[[Washa's Bluff]]''' | ||
| '''[[Frostblade]]''' | | '''[[Frostblade]]''' | ||
|- | |- | ||
| '''[[Maag No'rah Shrine]]''' | |||
| '''Maag No'rah's Blessing''' | | '''Maag No'rah's Blessing''' | ||
| '''[[ | | '''[[Upland Lindor]]''' | ||
| '''[[Silver Rupee]]''' | | '''[[Silver Rupee]]''' | ||
|- | |- | ||
| '''[[Mogg Latan Shrine]]''' | |||
| '''Synced Swing''' | | '''Synced Swing''' | ||
| '''[[Satori Mountain]]''' | | '''[[Satori Mountain]]''' | ||
| '''[[Forest Dweller's Spear]]'''<br>'''[[Forest Dweller's Bow]]'''<br>'''[[Gold Rupee]]''' | | '''[[Forest Dweller's Spear]]'''<br/>'''[[Forest Dweller's Bow]]'''<br/>'''[[Gold Rupee]]''' | ||
|- | |||
| '''[[Shae Loya Shrine]]''' | |||
| '''Aim for the Moment''' | |||
| '''[[Tabantha Bridge Stable]]''' | |||
| '''[[Falcon Bow]]'''<br/>'''[[Topaz]]''' | |||
|- | |- | ||
| '''[[Shira Gomar Shrine]]'''{{DLC|TCB}} | |||
| '''Aim for Stillness''' | | '''Aim for Stillness''' | ||
| '''[[ | | '''[[Upland Lindor]]''' | ||
| '''[[Bomb Arrow]] | | '''[[Bomb Arrow]] ×10''' | ||
|- | |- | ||
| '''[[Toh Yahsa Shrine]]''' | |||
| '''Buried Secrets''' | | '''Buried Secrets''' | ||
| '''[[Thundra Plateau]]''' | | '''[[Thundra Plateau]]''' | ||
| '''[[Rubber Armor]]'''<br>'''[[Opal]]''' | | '''[[Rubber Armor]]'''<br/>'''[[Opal]]''' | ||
|} | |} | ||
| Line 237: | Line 254: | ||
!style="width:20%"| Treasure | !style="width:20%"| Treasure | ||
|- | |- | ||
| '''[[Daqa Koh Shrine]]''' | |||
| '''Stalled Flight''' | | '''Stalled Flight''' | ||
| '''[[Eldin Canyon]]''' | | '''[[Eldin Canyon]]''' | ||
| '''[[Silver Rupee]]''' | | '''[[Silver Rupee]]''' | ||
|- | |- | ||
| '''[[Gorae Torr Shrine]]''' | |||
| '''Gorae Torr's Blessing''' | | '''Gorae Torr's Blessing''' | ||
| '''[[Gut Check Rock]]''' | | '''[[Gut Check Rock]]''' | ||
| '''[[Great Frostblade]]''' | | '''[[Great Frostblade]]''' | ||
|- | |- | ||
| '''[[Kamia Omuna Shrine]]'''{{DLC|TCB}} | |||
| '''Moving Targets''' | | '''Moving Targets''' | ||
| '''[[Lake Darman]]''' | | '''[[Lake Darman]]''' | ||
| '''[[Diamond]]''' | | '''[[Diamond]]''' | ||
|- | |- | ||
| '''[[Kayra Mah Shrine]]''' | |||
| '''Greedy Hill''' | | '''Greedy Hill''' | ||
| '''[[ | | '''[[Gorko Tunnel]]''' | ||
| '''[[Ruby]]'''<br>'''[[Bomb Arrow]] | | '''[[Ruby]]'''<br/>'''[[Bomb Arrow]] ×5''' | ||
|- | |- | ||
| '''[[Mirro Shaz Shrine]]''' | |||
| '''Tempered Power''' | | '''Tempered Power''' | ||
| '''[[Pico Pond]]''' | | '''[[Pico Pond]]''' | ||
| '''[[Giant Ancient Core]]'''<br>'''[[Iron Sledgehammer]] | | '''[[Giant Ancient Core]]'''<br/>'''[[Iron Sledgehammer]] ×2''' | ||
|- | |- | ||
| '''[[Mo'a Keet Shrine]]''' | |||
| '''Metal Makes a Path''' | | '''Metal Makes a Path''' | ||
| '''[[ | | '''[[Foothill Stable]]''' | ||
| '''[[Knight's Broadsword]]'''<br>'''[[Ruby]]''' | | '''[[Knight's Broadsword]]'''<br/>'''[[Ruby]]''' | ||
|- | |- | ||
| '''[[Qua Raym Shrine]]''' | |||
| '''A Balanced Approach''' | | '''A Balanced Approach''' | ||
| '''[[Goronbi Lake]]''' | | '''[[Goronbi Lake]]''' | ||
| '''[[Knight's Claymore]]''' | | '''[[Knight's Claymore]]''' | ||
|- | |- | ||
| '''[[Rinu Honika Shrine]]'''{{DLC|TCB}} | |||
| '''Block the Blaze''' | | '''Block the Blaze''' | ||
| '''[[Eldin Canyon]]''' | | '''[[Eldin Canyon]]''' | ||
| '''[[Stone Smasher]]''' | | '''[[Stone Smasher]]''' | ||
|- | |- | ||
| '''[[Sah Dahaj Shrine]]''' | |||
| '''Power of Fire''' | | '''Power of Fire''' | ||
| '''[[Eldin Canyon]]''' | | '''[[Eldin Canyon]]''' | ||
| '''[[Knight's Bow]]''' | | '''[[Knight's Bow]]''' | ||
|- | |- | ||
| '''[[Shae Mo'sah Shrine]]''' | |||
| '''Swinging Flames''' | | '''Swinging Flames''' | ||
| '''[[Goron City]]''' | | '''[[Goron City]]''' | ||
| '''[[Ruby]]'''<br>'''[[Stone Smasher]]'''<br>'''[[Ice Arrow]] | | '''[[Ruby]]'''<br/>'''[[Stone Smasher]]'''<br/>'''[[Ice Arrow]] ×10''' | ||
|- | |- | ||
| '''[[Sharo Lun Shrine]]'''{{DLC|TCB}} | |||
| '''Blind Spots''' | | '''Blind Spots''' | ||
| '''[[Eldin Canyon]]''' | | '''[[Eldin Canyon]]''' | ||
| '''[[Great Flameblade]]''' | | '''[[Great Flameblade]]''' | ||
|- | |- | ||
| '''[[Shora Hah Shrine]]''' | |||
| '''Blue Flame''' | | '''Blue Flame''' | ||
| '''[[Isle of Rabac]]''' | | '''[[Isle of Rabac]]''' | ||
| '''[[Silver Rupee]]'''<br>'''[[Great Flameblade]]'''<br>'''[[Giant Ancient Core]]'''<br>'''[[Forest Dweller's Sword]]'''<br>'''[[Royal Bow]]'''<br>'''[[Ice Arrow]] | | '''[[Silver Rupee]]'''<br/>'''[[Great Flameblade]]'''<br/>'''[[Giant Ancient Core]]'''<br/>'''[[Forest Dweller's Sword]]'''<br/>'''[[Royal Bow]]'''<br/>'''[[Ice Arrow]] ×10''' | ||
|- | |- | ||
| '''[[Tah Muhl Shrine]]''' | |||
| '''Passing the Flame''' | | '''Passing the Flame''' | ||
| '''[[ | | '''[[Trilby Valley]]''' | ||
| '''[[Ruby]]'''<br>'''[[Opal]]''' | | '''[[Cobble Crusher]]'''<br/>'''[[Ruby]]'''<br/>'''[[Opal]]''' | ||
|} | |} | ||
| Line 310: | Line 327: | ||
!style="width:20%"| Treasure | !style="width:20%"| Treasure | ||
|- | |- | ||
| '''[[Daag Chokah Shrine]]''' | |||
| '''Daag Chokah's Blessing''' | | '''Daag Chokah's Blessing''' | ||
| '''[[Great Hyrule Forest]]''' | | '''[[Great Hyrule Forest]]''' | ||
| '''[[Ancient Core]]''' | | '''[[Ancient Core]]''' | ||
|- | |- | ||
| '''[[Keo Ruug Shrine]]''' | |||
| '''Fateful Stars''' | | '''Fateful Stars''' | ||
| '''[[Korok Forest]]''' | | '''[[Korok Forest]]''' | ||
| '''[[Knight's Claymore]]''' | | '''[[Knight's Claymore]]''' | ||
|- | |- | ||
| '''[[Ketoh Wawai Shrine]]''' | |||
| '''Ketoh Wawai's Blessing''' | | '''Ketoh Wawai's Blessing''' | ||
| '''[[Thyphlo Ruins]]''' | | '''[[Thyphlo Ruins]]''' | ||
| '''[[Ancient Core]]''' | | '''[[Ancient Core]]''' | ||
|- | |- | ||
| '''[[Kuhn Sidajj Shrine]]''' | |||
| '''Kuhn Sidajj's Blessing''' | | '''Kuhn Sidajj's Blessing''' | ||
| '''[[Lake Saria]]''' | | '''[[Lake Saria]]''' | ||
| '''[[Giant Ancient Core]]''' | | '''[[Giant Ancient Core]]''' | ||
|- | |- | ||
| '''[[Maag Halan Shrine]]''' | |||
| '''Maag Halan's Blessing''' | | '''Maag Halan's Blessing''' | ||
| '''[[Mido Swamp]]''' | | '''[[Mido Swamp]]''' | ||
| '''[[Giant Ancient Core]]''' | | '''[[Giant Ancient Core]]''' | ||
|- | |- | ||
| '''[[Sword Monk's Shrine]]'''{{DLC|TMT}} | |||
| '''Trial of The Sword''' | | '''Trial of The Sword''' | ||
| '''[[Korok Forest]]''' | | '''[[Korok Forest]]''' | ||
| Line 348: | Line 365: | ||
!style="width:20%"| Treasure | !style="width:20%"| Treasure | ||
|- | |- | ||
| '''[[Ka'o Makagh Shrine]]''' | |||
| '''Metal Doors Open the Way''' | | '''Metal Doors Open the Way''' | ||
| '''[[Highland Stable]]''' | | '''[[Highland Stable]]''' | ||
| '''[[Opal]]'''<br>'''[[Traveler's Bow]]'''<br>'''[[Gold Rupee]]''' | | '''[[Opal]]'''<br/>'''[[Traveler's Bow]]'''<br/>'''[[Gold Rupee]]''' | ||
|- | |- | ||
| '''[[Pumaag Nitae Shrine]]''' | |||
| '''A Minor Test of Strength''' | | '''A Minor Test of Strength''' | ||
| '''[[Faron Grasslands]]''' | | '''[[Faron Grasslands]]''' | ||
| '''[[Boomerang]]''' | | '''[[Boomerang]]''' | ||
|- | |- | ||
| '''[[Shae Katha Shrine]]''' | |||
| '''Shae Katha's Blessing''' | | '''Shae Katha's Blessing''' | ||
| '''[[Spring of Courage]]''' | | '''[[Spring of Courage]]''' | ||
| '''[[Thunderspear]]''' | | '''[[Thunderspear]]''' | ||
|- | |- | ||
| '''[[Shoqa Tatone Shrine]]''' | |||
| '''A Modest Test of Strength''' | | '''A Modest Test of Strength''' | ||
| '''[[ | | '''[[Puffer Beach]]''' | ||
| '''[[Royal Broadsword]]''' | | '''[[Royal Broadsword]]''' | ||
|} | |} | ||
| Line 375: | Line 392: | ||
!style="width:20%"| Treasure | !style="width:20%"| Treasure | ||
|- | |- | ||
| '''[[Ya Naga Shrine]]''' | |||
| '''Shatter the Heavens''' | | '''Shatter the Heavens''' | ||
| '''[[Hylia Island]]''' | | '''[[Hylia Island]]''' | ||
| Line 389: | Line 406: | ||
!style="width:20%"| Treasure | !style="width:20%"| Treasure | ||
|- | |- | ||
| '''[[Dako Tah Shrine]]''' | |||
| '''Electric Path''' | | '''Electric Path''' | ||
| '''[[Great Cliffs]]''' | | '''[[Great Cliffs]]''' | ||
| '''[[Moonlight Scimitar]]'''<br>'''[[Ancient Core]]'''<br>'''[[Silver Rupee]]'''<br>'''[[Radiant Shield]]''' | | '''[[Moonlight Scimitar]]'''<br/>'''[[Ancient Core]]'''<br/>'''[[Silver Rupee]]'''<br/>'''[[Radiant Shield]]''' | ||
|- | |- | ||
| '''[[Daqo Chisay Shrine]]''' | |||
| '''The Whole Picture''' | | '''The Whole Picture''' | ||
| '''[[Gerudo Town]]''' | | '''[[Gerudo Town]]''' | ||
| '''[[Thunderblade]]''' | | '''[[Thunderblade]]''' | ||
|- | |- | ||
| '''[[Hawa Koth Shrine]]''' | |||
| '''The Current Solution''' | | '''The Current Solution''' | ||
| '''[[Gerudo Great Skeleton]]''' | | '''[[Gerudo Great Skeleton]]''' | ||
| '''[[Ancient Core]]'''<br>'''[[Gold Rupee]]'''<br>'''[[Sapphire]]''' | | '''[[Ancient Core]]'''<br/>'''[[Gold Rupee]]'''<br/>'''[[Sapphire]]''' | ||
|- | |- | ||
| '''[[Keive Tala Shrine]]'''{{DLC|TCB}} | |||
| '''Big or Small''' | | '''Big or Small''' | ||
| '''[[East Barrens]]''' | | '''[[East Barrens]]''' | ||
| '''[[Radiant Shield]]''' | | '''[[Radiant Shield]]''' | ||
|- | |- | ||
| '''[[Kema Zoos Shrine]]''' | |||
| '''A Delayed Puzzle''' | | '''A Delayed Puzzle''' | ||
| '''[[West Barrens]]''' | | '''[[West Barrens]]''' | ||
| '''[[Moonlight Scimitar]]''' | | '''[[Moonlight Scimitar]]''' | ||
|- | |- | ||
| '''[[Korsh O'hu Shrine]]''' | |||
| '''Korsh O'hu's Blessing''' | | '''Korsh O'hu's Blessing''' | ||
| '''[[East Gerudo Ruins]]''' | | '''[[East Gerudo Ruins]]''' | ||
| '''[[Flamespear]]''' | | '''[[Flamespear]]''' | ||
|- | |- | ||
| '''[[Misae Suma Shrine]]''' | |||
| '''Misae Suma's Blessing''' | | '''Misae Suma's Blessing''' | ||
| '''[[East Barrens]]''' | | '''[[East Barrens]]''' | ||
| '''[[Diamond]]''' | | '''[[Diamond]]''' | ||
|- | |- | ||
| '''[[Raqa Zunzo Shrine]]''' | |||
| '''Raqa Zunzo's Blessing''' | | '''Raqa Zunzo's Blessing''' | ||
| '''[[Sand-Seal Rally]]''' | | '''[[Sand-Seal Rally]]''' | ||
| '''[[Radiant Shield]]''' | | '''[[Radiant Shield]]''' | ||
|- | |- | ||
| '''[[Takama Shiri Shrine]]'''{{DLC|TCB}} | |||
| '''Dual Purpose''' | | '''Dual Purpose''' | ||
| '''[[West Barrens]]''' | | '''[[West Barrens]]''' | ||
| '''[[Royal Bow]]'''<br>{{Verify}}<!--Check whether it does or does not scale--> | | '''[[Royal Bow]]'''<br/>{{Verify}}<!--Check whether it does or does not scale--> | ||
|- | |- | ||
| '''[[Tho Kayu Shrine]]''' | |||
| '''Tho Kayu's Blessing''' | | '''Tho Kayu's Blessing''' | ||
| '''[[Toruma Dunes]]''' | | '''[[Toruma Dunes]]''' | ||
| Line 447: | Line 464: | ||
!style="width:20%"| Treasure | !style="width:20%"| Treasure | ||
|- | |- | ||
| '''[[Dila Maag Shrine]]''' | |||
| '''Dila Maag's Blessing''' | | '''Dila Maag's Blessing''' | ||
| '''[[South Lomei Labyrinth]]''' | | '''[[South Lomei Labyrinth]]''' | ||
| '''[[Barbarian Armor]]''' | | '''[[Barbarian Armor]]''' | ||
|- | |- | ||
| '''[[Ishto Soh Shrine]]''' | |||
| '''Bravery's Grasp''' | | '''Bravery's Grasp''' | ||
| '''[[Gerudo Highlands]]''' | | '''[[Gerudo Highlands]]''' | ||
| '''[[Topaz]]'''<br>'''[[Ancient Core]]''' | | '''[[Topaz]]'''<br/>'''[[Ancient Core]]''' | ||
|- | |- | ||
| '''[[Jee Noh Shrine]]''' | |||
| '''On the Move''' | | '''On the Move''' | ||
| '''[[Gerudo Canyon Pass]] | | '''[[Gerudo Canyon Pass]] | ||
| '''[[Opal]]''' | | '''[[Opal]]''' | ||
|- | |- | ||
| '''[[Joloo Nah Shrine]]''' | |||
| '''Joloo Nah Apparatus''' | | '''Joloo Nah Apparatus''' | ||
| '''[[Mount Nabooru]]''' | | '''[[Mount Nabooru]]''' | ||
| '''[[Golden Claymore]]'''<br>'''[[Gerudo Spear]]''' | | '''[[Golden Claymore]]'''<br/>'''[[Gerudo Spear]]''' | ||
|- | |- | ||
| '''[[Kay Noh Shrine]]''' | |||
| '''Power of Electricity''' | | '''Power of Electricity''' | ||
| '''[[Gerudo Canyon Stable]]''' | | '''[[Gerudo Canyon Stable]]''' | ||
| '''[[Gerudo Scimitar]]''' | | '''[[Gerudo Scimitar]]''' | ||
|- | |- | ||
| '''[[Keeha Yoog Shrine]]''' | |||
| '''Keeha Yoog's Blessing''' | | '''Keeha Yoog's Blessing''' | ||
| '''[[Gerudo Highlands]]''' | | '''[[Gerudo Highlands]]''' | ||
| '''[[Diamond]]''' | | '''[[Diamond]]''' | ||
|- | |- | ||
| '''[[Kema Kosassa Shrine]]''' | |||
| '''A Major Test of Strength''' | | '''A Major Test of Strength''' | ||
| '''[[Risoka Snowfield]]''' | | '''[[Risoka Snowfield]]''' | ||
| '''[[Silver Rupee]]''' | | '''[[Silver Rupee]]''' | ||
|- | |- | ||
| '''[[Kihiro Moh Shrine]]'''{{DLC|TCB}} | |||
| '''Inside the Box''' | | '''Inside the Box''' | ||
| '''[[Gerudo Highlands]]''' | | '''[[Gerudo Highlands]]''' | ||
| '''[[Thunderspear]]''' | | '''[[Thunderspear]]''' | ||
|- | |- | ||
| '''[[Kuh Takkar Shrine]]''' | |||
| '''Melting Ice Hazard''' | | '''Melting Ice Hazard''' | ||
| '''[[ | | '''[[Vatorsa Snowfield]]''' | ||
| '''[[Frostblade]]''' | | '''[[Frostblade]]''' | ||
|- | |- | ||
| '''[[Sasa Kai Shrine]]''' | |||
| '''A Modest Test of Strength''' | | '''A Modest Test of Strength''' | ||
| '''[[Gerudo Highlands]]''' | | '''[[Gerudo Highlands]]''' | ||
| '''[[Frostblade]]''' | | '''[[Frostblade]]''' | ||
|- | |- | ||
| '''[[Sho Dantu Shrine]]''' | |||
| '''Two Bombs''' | | '''Two Bombs''' | ||
| '''[[ | | '''[[Karusa Valley]]''' | ||
| '''[[Silver Rupee]]''' | | '''[[Silver Rupee]]''' | ||
|- | |- | ||
| '''[[Suma Sahma Shrine]]''' | |||
| '''Suma Sahma's Blessing''' | | '''Suma Sahma's Blessing''' | ||
| '''[[Mount Granajh]]''' | | '''[[Mount Granajh]]''' | ||
| Line 516: | Line 533: | ||
!style="width:20%"| Treasure | !style="width:20%"| Treasure | ||
|- | |- | ||
| '''[[Goma Asaagh Shrine]]''' | |||
| '''A Major Test of Strength''' | | '''A Major Test of Strength''' | ||
| '''[[Hebra Peak]]''' | | '''[[Hebra Peak]]''' | ||
| '''[[Royal Claymore]]''' | | '''[[Royal Claymore]]''' | ||
|- | |- | ||
| '''[[Hia Miu Shrine]]''' | |||
| '''A Major Test of Strength''' | | '''A Major Test of Strength''' | ||
| '''[[Icefall Foothills]]''' | | '''[[Icefall Foothills]]''' | ||
| '''[[Sapphire]]''' | | '''[[Sapphire]]''' | ||
|- | |- | ||
| '''[[Kiah Toza Shrine]]'''{{DLC|TCB}} | |||
| '''Master the Orb''' | | '''Master the Orb''' | ||
| '''[[Pikida Stonegrove]]''' | | '''[[Pikida Stonegrove]]''' | ||
| '''[[Falcon Bow]]''' | | '''[[Falcon Bow]]''' | ||
|- | |- | ||
| '''[[Maka Rah Shrine]]''' | |||
| '''Steady Thy Heart''' | | '''Steady Thy Heart''' | ||
| '''[[Lake Kilsie]]''' | | '''[[Lake Kilsie]]''' | ||
| '''[[Ancient Core]]'''<br>'''[[Bomb Arrow]] | | '''[[Ancient Core]]'''<br/>'''[[Bomb Arrow]] ×10'''<br/>'''[[Diamond]]''' | ||
|- | |- | ||
| '''[[Mozo Shenno Shrine]]''' | |||
| '''A Major Test of Strength''' | | '''A Major Test of Strength''' | ||
| '''[[Biron Snowshelf]]''' | | '''[[Biron Snowshelf]]''' | ||
| '''[[Diamond]]''' | | '''[[Diamond]]''' | ||
|- | |- | ||
| '''[[Noe Rajee Shrine]]'''{{DLC|TCB}} | |||
| '''The Four Winds''' | | '''The Four Winds''' | ||
| '''[[Flight Range]]''' | | '''[[Flight Range]]''' | ||
| '''[[Shield of the Mind's Eye]]''' | | '''[[Shield of the Mind's Eye]]''' | ||
|- | |- | ||
| '''[[Qaza Tokki Shrine]]''' | |||
| '''Qaza Tokki's Blessing''' | | '''Qaza Tokki's Blessing''' | ||
| '''[[North Lomei Labyrinth]]''' | | '''[[North Lomei Labyrinth]]''' | ||
| '''[[Barbarian Leg Wraps]]''' | | '''[[Barbarian Leg Wraps]]''' | ||
|- | |- | ||
| '''[[Rok Uwog Shrine]]''' | |||
| '''Power of Reach''' | | '''Power of Reach''' | ||
| '''[[Pikida Stonegrove]]''' | | '''[[Pikida Stonegrove]]''' | ||
| '''[[Drillshaft]]''' | | '''[[Drillshaft]]''' | ||
|- | |- | ||
| '''[[Sha Warvo Shrine]]''' | |||
| '''Path of Hidden Winds''' | | '''Path of Hidden Winds''' | ||
| '''[[Dronoc's Pass]]''' | | '''[[Dronoc's Pass]]''' | ||
| '''[[Knight's Bow]]'''<br>'''[[Purple Rupee]]''' | | '''[[Knight's Bow]]'''<br/>'''[[Purple Rupee]]''' | ||
|- | |- | ||
| '''[[Shada Naw Shrine]]''' | |||
| '''Red Giveaway''' | | '''Red Giveaway''' | ||
| '''[[Selmie's Spot]]''' | | '''[[Selmie's Spot]]''' | ||
| '''[[Great Frostblade]]''' | | '''[[Great Frostblade]]''' | ||
|- | |- | ||
| '''[[To Quomo Shrine]]''' | |||
| '''To Quomo's Blessing''' | | '''To Quomo's Blessing''' | ||
| '''[[Hebra Great Skeleton]]''' | | '''[[Hebra Great Skeleton]]''' | ||
| Line 579: | Line 596: | ||
!style="width:20%"| Treasure | !style="width:20%"| Treasure | ||
|- | |- | ||
| '''[[Rin Oyaa Shrine]]''' | |||
| '''Directing the Wind''' | | '''Directing the Wind''' | ||
| '''[[Snowfield Stable]]''' | | '''[[Snowfield Stable]]''' | ||
| '''[[Ancient Core]]''' | | '''[[Ancient Core]]''' | ||
|- | |- | ||
| '''[[Sha Gehma Shrine]]''' | |||
| '''Shift and Lock''' | | '''Shift and Lock''' | ||
| '''[[North Tabantha Snowfield]]''' | | '''[[North Tabantha Snowfield]]''' | ||
| Line 597: | Line 614: | ||
!style="width:20%"| Treasure | !style="width:20%"| Treasure | ||
|- | |- | ||
| '''[[Akh Va'quot Shrine]]''' | |||
| '''Windmills''' | | '''Windmills''' | ||
| '''[[Rito Village]]''' | | '''[[Rito Village]]''' | ||
| '''[[Ancient Core]]'''<br>'''[[Feathered Spear]]'''<br>'''[[Sapphire]]''' | | '''[[Ancient Core]]'''<br/>'''[[Feathered Spear]]'''<br/>'''[[Sapphire]]''' | ||
|- | |- | ||
| '''[[Bareeda Naag Shrine]]''' | |||
| '''Cannon''' | | '''Cannon''' | ||
| '''[[ | | '''[[Lake Totori South]]''' | ||
| '''[[Swallow Bow]]'''<br>'''[[Diamond]]''' | | '''[[Swallow Bow]]'''<br/>'''[[Diamond]]''' | ||
|- | |- | ||
| '''[[Dunba Taag Shrine]]''' | |||
| '''Build and Release''' | | '''Build and Release''' | ||
| '''[[Tanagar Canyon]]''' | | '''[[Tanagar Canyon]]''' | ||
| '''[[Falcon Bow]]'''<br>'''[[Great Thunderblade]]''' | | '''[[Falcon Bow]]'''<br/>'''[[Great Thunderblade]]''' | ||
|- | |- | ||
| '''[[Gee Ha'rah Shrine]]''' | |||
| '''Tandem''' | | '''Tandem''' | ||
| '''[[Kopeeki Drifts]]''' | | '''[[Kopeeki Drifts]]''' | ||
| '''[[Diamond]]''' | | '''[[Diamond]]''' | ||
|- | |- | ||
| '''[[Kah Okeo Shrine]]''' | |||
| '''Wind Guide''' | | '''Wind Guide''' | ||
| '''[[Tabantha Frontier]]''' | | '''[[Tabantha Frontier]]''' | ||
| '''[[Korok Leaf]]'''<br>'''[[Gold Rupee]]'''<br>'''[[Forest Dweller's Sword]]'''<br>'''[[Giant Ancient Core]]'''<br>'''[[Thunderspear]]''' | | '''[[Korok Leaf]]'''<br/>'''[[Gold Rupee]]'''<br/>'''[[Forest Dweller's Sword]]'''<br/>'''[[Giant Ancient Core]]'''<br/>'''[[Thunderspear]]''' | ||
|- | |- | ||
| '''[[Lanno Kooh Shrine]]''' | |||
| '''Lanno Kooh's Blessing''' | | '''Lanno Kooh's Blessing''' | ||
| '''[[ | | '''[[Hebra Falls]]''' | ||
| '''[[Gold Rupee]]''' | | '''[[Gold Rupee]]''' | ||
|- | |- | ||
| '''[[Rona Kachta Shrine]]''' | |||
| '''Rona Kachta's Blessing''' | | '''Rona Kachta's Blessing''' | ||
| '''[[Forgotten Temple]]''' | | '''[[Forgotten Temple]]''' | ||
| '''[[Great Flameblade]]''' | | '''[[Great Flameblade]]''' | ||
|- | |- | ||
| '''[[Sheem Dagoze Shrine]]''' | |||
| '''Moving in Parallel''' | | '''Moving in Parallel''' | ||
| '''[[ | | '''[[West Hyrule Plains]]''' | ||
| '''[[Great Thunderblade]]''' | | '''[[Great Thunderblade]]''' | ||
|- | |- | ||
| '''[[Tena Ko'sah Shrine]]''' | |||
| '''A Major Test of Strength''' | | '''A Major Test of Strength''' | ||
| '''[[Ancient Columns]]''' | | '''[[Ancient Columns]]''' | ||
| '''[[Knight's Halberd]]''' | | '''[[Knight's Halberd]]''' | ||
|- | |- | ||
| '''[[Voo Lota Shrine]]''' | |||
| '''The Winding Route''' | | '''The Winding Route''' | ||
| '''[[Warbler's Nest]]''' | | '''[[Warbler's Nest]]''' | ||
| Line 661: | Line 673: | ||
!style="width:20%"| Treasure | !style="width:20%"| Treasure | ||
|- | |- | ||
| '''[[Dagah Keek Shrine]]''' | |||
| '''Dagah Keek's Blessing''' | | '''Dagah Keek's Blessing''' | ||
| '''[[ | | '''[[Veiled Falls]]''' | ||
| '''[[Silver Rupee]]''' | | '''[[Silver Rupee]]''' | ||
|- | |- | ||
| '''[[Mah Eliya Shrine]]'''{{DLC|TCB}} | |||
| '''Secret Stairway''' | | '''Secret Stairway''' | ||
| '''[[Ploymus Mountain]]''' | | '''[[Ploymus Mountain]]''' | ||
| '''[[Royal Shield]]'''<br>{{Verify}}<!--Check whether it does or does not scale--> | | '''[[Royal Shield]]'''<br/>{{Verify}}<!--Check whether it does or does not scale--> | ||
|- | |- | ||
| '''[[Mezza Lo Shrine]]''' | |||
| '''Ancient Trifecta''' | | '''Ancient Trifecta''' | ||
| '''[[ | | '''[[Rabia Plain]]''' | ||
| '''[[Thunderblade]]''' | | '''[[Thunderblade]]''' | ||
|- | |- | ||
| '''[[Ne'ez Yohma Shrine]]''' | |||
| '''Pushing Power''' | | '''Pushing Power''' | ||
| '''[[Zora's Domain]]''' | | '''[[Zora's Domain]]''' | ||
| '''[[Zora Spear]]''' | | '''[[Zora Spear]]''' | ||
|- | |- | ||
| '''[[Rucco Maag Shrine]]''' | |||
| '''Five Flames''' | | '''Five Flames''' | ||
| '''[[ | | '''[[Samasa Plain]]''' | ||
| '''[[Opal]]'''<br>'''[[Silver Bow]]''' | | '''[[Opal]]'''<br/>'''[[Silver Bow]]''' | ||
|- | |- | ||
| '''[[Sato Koda Shrine]]'''{{DLC|TCB}} | |||
| '''Support and Guidance''' | | '''Support and Guidance''' | ||
| '''[[Upland Zorana]]''' | | '''[[Upland Zorana]]''' | ||
| '''[[Giant Ancient Core]]''' | | '''[[Giant Ancient Core]]''' | ||
|- | |- | ||
| '''[[Soh Kofi Shrine]]''' | |||
| '''A Minor Test of Strength''' | | '''A Minor Test of Strength''' | ||
| '''[[Lanayru Great Spring]]''' | | '''[[Lanayru Great Spring]]''' | ||
| Line 705: | Line 717: | ||
!style="width:20%"| Treasure | !style="width:20%"| Treasure | ||
|- | |- | ||
| '''[[Kee Dafunia Shrine]]'''{{DLC|TCB}} | |||
| '''The Melting Point''' | | '''The Melting Point''' | ||
| '''[[Lanayru Sea]]''' | | '''[[Lanayru Sea]]''' | ||
| '''[[Frostblade]]''' | | '''[[Frostblade]]''' | ||
|- | |- | ||
| '''[[Shai Yota Shrine]]''' | |||
| '''Shai Yota's Blessing''' | | '''Shai Yota's Blessing''' | ||
| '''[[Horon Lagoon]]''' | | '''[[Horon Lagoon]]''' | ||
| Line 723: | Line 735: | ||
!style="width:20%"| Treasure | !style="width:20%"| Treasure | ||
|- | |- | ||
| '''[[Daka Tuss Shrine]]''' | |||
| '''Sunken Scoop''' | | '''Sunken Scoop''' | ||
| '''[[Shrine Island]]''' | | '''[[Shrine Island]]''' | ||
| '''[[Silver Longsword]]''' | | '''[[Silver Longsword]]''' | ||
|- | |- | ||
| '''[[Kaya Wan Shrine]]''' | |||
| '''Shields from Water''' | | '''Shields from Water''' | ||
| '''[[Wetland Stable]]''' | | '''[[Wetland Stable]]''' | ||
| '''[[Ancient Core]]'''<br>'''[[Knight's Broadsword]]''' | | '''[[Ancient Core]]'''<br/>'''[[Knight's Broadsword]]''' | ||
|- | |- | ||
| '''[[Sheh Rata Shrine]]''' | |||
| '''Speed of Light''' | | '''Speed of Light''' | ||
| '''[[Lanayru Wetlands]]''' | | '''[[Lanayru Wetlands]]''' | ||
| '''[[Giant Boomerang]]'''<br>'''[[Opal]]''' | | '''[[Giant Boomerang]]'''<br/>'''[[Opal]]''' | ||
|} | |} | ||
| Line 746: | Line 758: | ||
!style="width:20%"| Treasure | !style="width:20%"| Treasure | ||
|- | |- | ||
| '''[[Jitan Sa'mi Shrine]]''' | |||
| '''Jitan Sa'mi's Blessing''' | | '''Jitan Sa'mi's Blessing''' | ||
| '''[[Spring of Wisdom]]''' | | '''[[Spring of Wisdom]]''' | ||
| '''[[Frostspear]]''' | | '''[[Frostspear]]''' | ||
|- | |- | ||
| '''[[Tahno O'ah Shrine]]''' | |||
| '''Tahno O'ah's Blessing''' | | '''Tahno O'ah's Blessing''' | ||
| '''[[ | | '''[[Madorna Mountain]]''' | ||
| '''[[Climbing Boots]]''' | | '''[[Climbing Boots]]''' | ||
|} | |} | ||
| Line 765: | Line 777: | ||
!style="width:20%"| Treasure | !style="width:20%"| Treasure | ||
|- | |- | ||
| '''[[Dow Na'eh Shrine]]''' | |||
| '''Three Boxes''' | | '''Three Boxes''' | ||
| '''[[Lanayru | | '''[[Lanayru Road South Cave]]''' | ||
| '''[[Amber]]'''<br>'''[[Opal]]'''<br>'''[[Zora Sword]]''' | | '''[[Amber]]'''<br/>'''[[Opal]]'''<br/>'''[[Zora Sword]]''' | ||
|- | |- | ||
| '''[[Kah Yah Shrine]]''' | |||
| '''Quick Thinking''' | | '''Quick Thinking''' | ||
| '''[[Palmorae Ruins]]''' | | '''[[Palmorae Ruins]]''' | ||
| '''[[Knight's Claymore]]''' | | '''[[Knight's Claymore]]''' | ||
|- | |- | ||
| '''[[Kam Urog Shrine]]''' | |||
| '''Trial of Passage''' | | '''Trial of Passage''' | ||
| '''[[East Necluda]]''' | | '''[[East Necluda]]''' | ||
| '''[[Opal]]'''<br>'''[[Soldier's Spear]]''' | | '''[[Opal]]'''<br/>'''[[Soldier's Spear]]''' | ||
|- | |- | ||
| '''[[Muwo Jeem Shrine]]''' | |||
| '''A Modest Test of Strength''' | | '''A Modest Test of Strength''' | ||
| '''[[Cape Cales]]''' | | '''[[Cape Cales]]''' | ||
| '''[[Knight's Bow]]''' | | '''[[Knight's Bow]]''' | ||
|- | |- | ||
| '''[[Myahm Agana Shrine]]''' | |||
| '''Myahm Agana Apparatus''' | | '''Myahm Agana Apparatus''' | ||
| '''[[Hateno Village]]''' | | '''[[Hateno Village]]''' | ||
| '''[[Phrenic Bow]]''' | | '''[[Phrenic Bow]]''' | ||
|- | |- | ||
| '''[[Tawa Jinn Shrine]]''' | |||
| '''Tawa Jinn's Blessing''' | | '''Tawa Jinn's Blessing''' | ||
| '''[[ | | '''[[Mount Taran]]''' | ||
| '''[[Great Thunderblade]]''' | | '''[[Great Thunderblade]]''' | ||
|- | |- | ||
| '''[[Yah Rin Shrine]]''' | |||
| '''A Weighty Decision''' | | '''A Weighty Decision''' | ||
| '''[[Lurelin Village]]''' | | '''[[Lurelin Village]]''' | ||
| '''[[Knight's Broadsword]]'''<br>'''[[Opal]]''' | | '''[[Knight's Broadsword]]'''<br/>'''[[Opal]]''' | ||
|} | |} | ||
| Line 808: | Line 820: | ||
!style="width:20%"| Treasure | !style="width:20%"| Treasure | ||
|- | |- | ||
| '''[[Chaas Qeta Shrine]]''' | |||
| '''A Major Test of Strength''' | | '''A Major Test of Strength''' | ||
| '''[[Tenoko Island]]''' | | '''[[Tenoko Island]]''' | ||
| '''[[Climbing Gear]]''' | | '''[[Climbing Gear]]''' | ||
|- | |- | ||
| '''[[Korgu Chideh Shrine]]''' | |||
| '''Korgu Chideh's Blessing''' | | '''Korgu Chideh's Blessing''' | ||
| '''[[Eventide Island]]''' | | '''[[Eventide Island]]''' | ||
| Line 826: | Line 838: | ||
!style="width:20%"| Treasure | !style="width:20%"| Treasure | ||
|- | |- | ||
| '''[[Ha Dahamar Shrine]]''' | |||
| '''The Water Guides''' | | '''The Water Guides''' | ||
| '''[[Dueling Peaks Stable]]''' | | '''[[Dueling Peaks Stable]]''' | ||
| '''[[Purple Rupee]]''' | | '''[[Purple Rupee]]''' | ||
|- | |- | ||
| '''[[Hila Rao Shrine]]''' | |||
| '''Drifting''' | | '''Drifting''' | ||
| '''[[Floret Sandbar]]''' | | '''[[Floret Sandbar]]''' | ||
| '''[[Ice Arrow]] | | '''[[Ice Arrow]] ×5'''<br/>'''[[Opal]]''' | ||
|- | |- | ||
| '''[[Lakna Rokee Shrine]]''' | |||
| '''Lakna Rokee's Blessing''' | | '''Lakna Rokee's Blessing''' | ||
| '''[[ | | '''[[Kakariko Village]]''' | ||
| '''[[Edge of Duality]]''' | | '''[[Edge of Duality]]''' | ||
|- | |- | ||
| '''[[Qukah Nata Shrine]]''' | |||
| '''Qukah Nata's Blessing''' | | '''Qukah Nata's Blessing''' | ||
| '''[[ | | '''[[Calora Lake]]''' | ||
| '''[[Rubber Tights]]''' | | '''[[Rubber Tights]]''' | ||
|- | |- | ||
| '''[[Ree Dahee Shrine]]''' | |||
| '''Timing is Critical''' | | '''Timing is Critical''' | ||
| '''[[Dueling Peaks]]''' | | '''[[Dueling Peaks]]''' | ||
| '''[[Climber's Bandanna]]''' | | '''[[Climber's Bandanna]]''' | ||
|- | |- | ||
| '''[[Shai Utoh Shrine]]''' | |||
| '''Halt the Tilt''' | | '''Halt the Tilt''' | ||
| '''[[Lakeside Stable]]''' | | '''[[Lakeside Stable]]''' | ||
| '''[[Ancient Core]]'''<br>'''[[Traveler's Sword]]''' | | '''[[Ancient Core]]'''<br/>'''[[Traveler's Sword]]''' | ||
|- | |- | ||
| '''[[Shee Venath Shrine]]''' | |||
| '''Twin Memories''' | | '''Twin Memories''' | ||
| '''[[Dueling Peaks]]''' | | '''[[Dueling Peaks]]''' | ||
| '''[[Serpentine Spear]]''' | | '''[[Serpentine Spear]]''' | ||
|- | |- | ||
| '''[[Shee Vaneer Shrine]]''' | |||
| '''Twin Memories''' | | '''Twin Memories''' | ||
| '''[[Dueling Peaks]]''' | | '''[[Dueling Peaks]]''' | ||
| '''[[Eightfold Longblade]]''' | | '''[[Eightfold Longblade]]''' | ||
|- | |- | ||
| '''[[Shoda Sah Shrine]]''' | |||
| '''Impeccable Timing''' | | '''Impeccable Timing''' | ||
| '''[[ | | '''[[Floria Falls]]''' | ||
| '''[[Ice Arrow]] | | '''[[Ice Arrow]] ×5''' | ||
|- | |- | ||
| '''[[Ta'loh Naeg Shrine]]''' | |||
| '''Ta'loh Naeg's Teaching''' | | '''Ta'loh Naeg's Teaching''' | ||
| '''[[Kakariko Village]]''' | | '''[[Kakariko Village]]''' | ||
| '''[[Eightfold Blade]]'''<br>'''[[Shield of the Mind's Eye]]'''<br>'''[[Opal]]''' | | '''[[Eightfold Blade]]'''<br/>'''[[Shield of the Mind's Eye]]'''<br/>'''[[Opal]]''' | ||
|- | |- | ||
| '''[[Toto Sah Shrine]]''' | |||
| '''Toto Sah Apparatus''' | | '''Toto Sah Apparatus''' | ||
| '''[[West Necluda]]''' | | '''[[West Necluda]]''' | ||
| Line 883: | Line 895: | ||
==Trivia== | ==Trivia== | ||
*The design of the {{Plural|BotW|Ancient Shrine}} was inspired by art from the Japanese {{Wp|Jōmon period}}.<ref>{{Cite | *The design of the {{Plural|BotW|Ancient Shrine}} was inspired by art from the Japanese {{Wp|Jōmon period}}.<ref>{{Cite Person|quote= Indeed, I briefly mentioned in an interview that I drew inspiration from the art of the Japanese Jōmon prehistoric era to create the appearance of the ancient ruins in Breath of the Wild.|name= Satoru Takizawa|url= https://www.youtube.com/watch?v=mMP-e-c1NZE|title= The Art of Legend of Zelda Series Masterclass}}</ref> | ||
==Nomenclature== | ==Nomenclature== | ||
''See [[Breath of the Wild Translations/Locations#Ancient Shrines|here]] for the names of each particular {{Term|BotW|Ancient Shrine}} in {{BotW}}.'' | ''See [[Breath of the Wild Translations/Locations#Ancient Shrines|here]] for the names of each particular {{Term|BotW|Ancient Shrine}} in {{BotW}}.'' | ||
{{Nomenclature}} | {{Nomenclature}} | ||
===Other Names=== | |||
{{Other Names | |||
|- | |||
| Shrine of Trials<ref>{{Cite Web|quote= |author= |title= The Legend of Zelda™: Breath of the Wild for the Nintendo Switch™ home gaming system and Wii U™ console - Features |url= https://zelda.nintendo.com/breath-of-the-wild/features/ |archive= https://web.archive.org/web/20230810151508/https://zelda.nintendo.com/breath-of-the-wild/features/ |published= |retrieved= August 10, 2023|site= Zelda.com |type= archive}}</ref> | |||
| {{BotW}} | |||
| [[Zelda.com]] | |||
| {{BotW}} | |||
}} | |||
==Gallery== | ==Gallery== | ||
<gallery> | <gallery> | ||
File:BotW Ancient Shrine | File:BotW Ancient Shrine Promotional Screenshot.png|{{Term|BotW|Link}} entering an {{Term|BotW|Ancient Shrine}} | ||
File:BotW | File:BotW Ta'loh Naeg Shrine Promotional Screenshot.png|{{Term|BotW|Link}} in combat with a Guardian Scout II inside the [[Ta'loh Naeg Shrine]] | ||
File:BotW Ancient Shrine Rising.png|An {{Term|BotW|Ancient Shrine}} rising from the ground | File:BotW Ancient Shrine Rising.png|An {{Term|BotW|Ancient Shrine}} rising from the ground | ||
File:BotW Etsu Korima Shrine | File:BotW Etsu Korima Shrine.png|The exterior of an {{Term|BotW|Ancient Shrine}} as seen in ''The Champion's Ballad'' DLC Pack | ||
File:BotW Lift Concept Artwork.png|Concept art of the lift entrance of {{Plural|BotW|Ancient Shrine|display=Shrines}} | File:BotW Lift Concept Artwork.png|Concept art of the lift entrance of {{Plural|BotW|Ancient Shrine|display=Shrines}} | ||
</gallery> | </gallery> | ||
{{ | ==See Also== | ||
* {{Term|Series|Shrine of Light|link}} | |||
* {{Term|Series|Spirit Orb|link}} | |||
{{Ref}} | {{Ref}} | ||
{{Categories | {{Categories | ||
|Ancient Shrines, Ancient Technology, Shrines | |Ancient Shrines, Ancient Technology, Mini-Dungeons, Shrines | ||
| | |locations= BotW | ||
}} | }} | ||
Latest revision as of 20:02, 20 February 2024
Ancient Shrines are dungeon-like puzzles in Breath of the Wild.[1]
Overview
After the Sheikah helped to seal away Calamity Ganon, they built the Ancient Shrines to serve as training grounds for the hero as he prepared for the revival of Calamity Ganon.[2] There are initially 120 Ancient Shrines scattered throughout Hyrule Kingdom. Many of the Ancient Shrines where uncovered during King Rhoam's excavations for Ancient Technology, but they only began to glow after Link activated the Great Plateau Tower following his Slumber of Restoration.[3][4] In order to enter an Ancient Shrine, Link must unlock the entrance by pressing his Sheikah Slate to the Sheikah Slate Terminal at a Shrine's entrance. Shrines that have not yet been unlocked glow an orange light, and glow orange and blue once their entrance has been opened, but not yet completed. Upon completion, Ancient Shrines only glow blue.
During the beginning of the fifth Recovered Memory, Zelda's Resentment, Princess Zelda attempts to use the Sheikah Slate to try to access the one of the shrines, but to no avail and seeks to find a loophole before Link arrives, much to her displeasure.
Once an Ancient Shrine has been opened with a Sheikah Slate Terminal, its Travel Gate will activate.[5] This will allow Link to Warp to the Ancient Shrine from his Map.
Link is lowered into each Ancient Shrine by an Elevator Platform, and each Shrine contains a series of traps and obstacles to be overcome as part of a trial. At the end of every Shrine is a Monk, who are the creators of the trials inside.[6] They rest upon Monk's Pedestals. The Monks will present Link a Spirit Orb for successfully reaching them.[7][8] The first four Ancient Shrines also contain Guidance Stones that will distill Runes, which add functionalities to the Sheikah Slate and bestow Link with new abilities. Each Shrine contains various amounts of Treasure Chests alongside the Spirit Orbs bestowed by the Monks. A Treasure Chest icon will appear next to the Shrine's name on the Map once all Chests have been collected.
After completing all 120 Ancient Shrines, Link is instructed to head to the Goddess Statue in the Forgotten Temple, where he will find Treasure Chests containing the Wild Set.[9][10]
After completing all four Divine Beasts and beginning The Champions' Ballad DLC Pack, Link can access 16 new Ancient Shrines across Hyrule Kingdom. This expansion raises the total number of Shrines to 136. These Shrines have a tall pillar on their top to differentiate them from regular Shrines and their Map icon is likewise slightly edited to match. Four of them are found on the Great Plateau, while the four Regions coinciding with the Champions contain three Shrines each. Link must complete a Trial to access each of these Shrines. Link is rewarded with Spirit Orbs as usual at the end of the four Great Plateau Shrines, but is instead given emblems related to the Region's respective Divine Beast for the rest of the Shrines.[11][12][13][14]
List of Shrines
Akkala
Akkala Highlands
| Shrine | Trial Name | Location | Treasure |
|---|---|---|---|
| Dah Hesho Shrine | A Minor Test of Strength | Akkala Highlands | Giant Ancient Core |
| Kah Mael Shrine | Drop and Rise | Tingel Island | Diamond |
| Ke'nai Shakah Shrine | A Modest Test of Strength | Ulria Grotto | Sapphire |
| Ritaag Zumo Shrine | Ritaag Zumo's Blessing | Rist Peninsula | Giant Ancient Core |
| Tutsuwa Nima Shrine | A Major Test of Strength | Spring of Power | Flamespear |
| Ze Kasho Shrine | Ze Kasho Apparatus | South Akkala Stable | Silverscale Spear |
Akkala Sea
| Shrine | Trial Name | Location | Treasure |
|---|---|---|---|
| Tu Ka'loh Shrine | Tu Ka'loh's Blessing | Lomei Labyrinth Island | Barbarian Helm |
Deep Akkala
| Shrine | Trial Name | Location | Treasure |
|---|---|---|---|
| Katosa Aug Shrine | Katosa Aug Apparatus | East Akkala Stable | Great Frostblade |
| Zuna Kai Shrine | Zuna Kai's Blessing | Left Eye of Skull Lake | Flameblade |
Central Hyrule
Great Plateau
| Shrine | Trial Name | Location | Treasure |
|---|---|---|---|
| Etsu Korima Shrine(TCB) | Path of Light | Mount Hylia | Gold Rupee |
| Ja Baij Shrine | Bomb Trial | Eastern Abbey | Traveler's Claymore Amber |
| Keh Namut Shrine | Cryonis Trial | Mount Hylia | Traveler's Spear |
| Oman Au Shrine | Magnesis Trial | Great Plateau | Traveler's Bow |
| Owa Daim Shrine | Stasis Trial | Great Plateau | Traveler's Shield |
| Rohta Chigah Shrine(TCB) | Stop to Start | Great Plateau | Forest Dweller's Shield |
| Ruvo Korbah Shrine(TCB) | A Major Test of Strength+ | Great Plateau | Bomb Arrow ×10 Giant Ancient Core |
| Yowaka Ita Shrine(TCB) | Collected Soul | Forest of Spirits | Bomb Arrow ×5 Phrenic Bow |
Hyrule Field
| Shrine | Trial Name | Location | Treasure |
|---|---|---|---|
| Bosh Kala Shrine | The Wind Guides You | Hyrule Field | Amber Soldier's Claymore |
| Dah Kaso Shrine | A Minor Test of Strength | Digdogg Suspension Bridge | Ancient Core |
| Kaam Ya'tak Shrine | Trial of Power | Hyrule Field | Edge of Duality Knight's Broadsword Ancient Core Silver Rupee Diamond |
| Katah Chuki Shrine | A Minor Test of Strength | Quarry Ruins | Royal Halberd |
| Monya Toma Shrine | Drawing Parabolas | Salari Hill | Thunderblade |
| Namika Ozz Shrine | A Modest Test of Strength | Crenel Hills | Frostspear |
| Noya Neha Shrine | A Minor Test of Strength | Hyrule Castle West | Knight's Shield |
| Rota Ooh Shrine | Passing of the Gates | Outskirt Stable | Feathered Edge |
| Saas Ko'sah Shrine | A Major Test of Strength | Docks | Flameblade |
| Wahgo Katta Shrine | Metal Connections | Riverside Stable | Amber |
| Zalta Wa Shrine | Two Orbs to Guide You | Breach of Demise | Knight's Bow |
Hyrule Ridge
| Shrine | Trial Name | Location | Treasure |
|---|---|---|---|
| Mijah Rokee Shrine | A Modest Test of Strength | Washa's Bluff | Frostblade |
| Maag No'rah Shrine | Maag No'rah's Blessing | Upland Lindor | Silver Rupee |
| Mogg Latan Shrine | Synced Swing | Satori Mountain | Forest Dweller's Spear Forest Dweller's Bow Gold Rupee |
| Shae Loya Shrine | Aim for the Moment | Tabantha Bridge Stable | Falcon Bow Topaz |
| Shira Gomar Shrine(TCB) | Aim for Stillness | Upland Lindor | Bomb Arrow ×10 |
| Toh Yahsa Shrine | Buried Secrets | Thundra Plateau | Rubber Armor Opal |
Eldin
Eldin Canyon
| Shrine | Trial Name | Location | Treasure |
|---|---|---|---|
| Daqa Koh Shrine | Stalled Flight | Eldin Canyon | Silver Rupee |
| Gorae Torr Shrine | Gorae Torr's Blessing | Gut Check Rock | Great Frostblade |
| Kamia Omuna Shrine(TCB) | Moving Targets | Lake Darman | Diamond |
| Kayra Mah Shrine | Greedy Hill | Gorko Tunnel | Ruby Bomb Arrow ×5 |
| Mirro Shaz Shrine | Tempered Power | Pico Pond | Giant Ancient Core Iron Sledgehammer ×2 |
| Mo'a Keet Shrine | Metal Makes a Path | Foothill Stable | Knight's Broadsword Ruby |
| Qua Raym Shrine | A Balanced Approach | Goronbi Lake | Knight's Claymore |
| Rinu Honika Shrine(TCB) | Block the Blaze | Eldin Canyon | Stone Smasher |
| Sah Dahaj Shrine | Power of Fire | Eldin Canyon | Knight's Bow |
| Shae Mo'sah Shrine | Swinging Flames | Goron City | Ruby Stone Smasher Ice Arrow ×10 |
| Sharo Lun Shrine(TCB) | Blind Spots | Eldin Canyon | Great Flameblade |
| Shora Hah Shrine | Blue Flame | Isle of Rabac | Silver Rupee Great Flameblade Giant Ancient Core Forest Dweller's Sword Royal Bow Ice Arrow ×10 |
| Tah Muhl Shrine | Passing the Flame | Trilby Valley | Cobble Crusher Ruby Opal |
Great Hyrule Forest
| Shrine | Trial Name | Location | Treasure |
|---|---|---|---|
| Daag Chokah Shrine | Daag Chokah's Blessing | Great Hyrule Forest | Ancient Core |
| Keo Ruug Shrine | Fateful Stars | Korok Forest | Knight's Claymore |
| Ketoh Wawai Shrine | Ketoh Wawai's Blessing | Thyphlo Ruins | Ancient Core |
| Kuhn Sidajj Shrine | Kuhn Sidajj's Blessing | Lake Saria | Giant Ancient Core |
| Maag Halan Shrine | Maag Halan's Blessing | Mido Swamp | Giant Ancient Core |
| Sword Monk's Shrine(TMT) | Trial of The Sword | Korok Forest |
Faron
Faron Grasslands
| Shrine | Trial Name | Location | Treasure |
|---|---|---|---|
| Ka'o Makagh Shrine | Metal Doors Open the Way | Highland Stable | Opal Traveler's Bow Gold Rupee |
| Pumaag Nitae Shrine | A Minor Test of Strength | Faron Grasslands | Boomerang |
| Shae Katha Shrine | Shae Katha's Blessing | Spring of Courage | Thunderspear |
| Shoqa Tatone Shrine | A Modest Test of Strength | Puffer Beach | Royal Broadsword |
Lake Hylia
| Shrine | Trial Name | Location | Treasure |
|---|---|---|---|
| Ya Naga Shrine | Shatter the Heavens | Hylia Island | Eightfold Blade |
Gerudo
Gerudo Desert
| Shrine | Trial Name | Location | Treasure |
|---|---|---|---|
| Dako Tah Shrine | Electric Path | Great Cliffs | Moonlight Scimitar Ancient Core Silver Rupee Radiant Shield |
| Daqo Chisay Shrine | The Whole Picture | Gerudo Town | Thunderblade |
| Hawa Koth Shrine | The Current Solution | Gerudo Great Skeleton | Ancient Core Gold Rupee Sapphire |
| Keive Tala Shrine(TCB) | Big or Small | East Barrens | Radiant Shield |
| Kema Zoos Shrine | A Delayed Puzzle | West Barrens | Moonlight Scimitar |
| Korsh O'hu Shrine | Korsh O'hu's Blessing | East Gerudo Ruins | Flamespear |
| Misae Suma Shrine | Misae Suma's Blessing | East Barrens | Diamond |
| Raqa Zunzo Shrine | Raqa Zunzo's Blessing | Sand-Seal Rally | Radiant Shield |
| Takama Shiri Shrine(TCB) | Dual Purpose | West Barrens | Royal Bow [verification needed] |
| Tho Kayu Shrine | Tho Kayu's Blessing | Toruma Dunes | Golden Bow |
Gerudo Highlands
| Shrine | Trial Name | Location | Treasure |
|---|---|---|---|
| Dila Maag Shrine | Dila Maag's Blessing | South Lomei Labyrinth | Barbarian Armor |
| Ishto Soh Shrine | Bravery's Grasp | Gerudo Highlands | Topaz Ancient Core |
| Jee Noh Shrine | On the Move | Gerudo Canyon Pass | Opal |
| Joloo Nah Shrine | Joloo Nah Apparatus | Mount Nabooru | Golden Claymore Gerudo Spear |
| Kay Noh Shrine | Power of Electricity | Gerudo Canyon Stable | Gerudo Scimitar |
| Keeha Yoog Shrine | Keeha Yoog's Blessing | Gerudo Highlands | Diamond |
| Kema Kosassa Shrine | A Major Test of Strength | Risoka Snowfield | Silver Rupee |
| Kihiro Moh Shrine(TCB) | Inside the Box | Gerudo Highlands | Thunderspear |
| Kuh Takkar Shrine | Melting Ice Hazard | Vatorsa Snowfield | Frostblade |
| Sasa Kai Shrine | A Modest Test of Strength | Gerudo Highlands | Frostblade |
| Sho Dantu Shrine | Two Bombs | Karusa Valley | Silver Rupee |
| Suma Sahma Shrine | Suma Sahma's Blessing | Mount Granajh | Moonlight Scimitar |
Hebra
Hebra Mountains
| Shrine | Trial Name | Location | Treasure |
|---|---|---|---|
| Goma Asaagh Shrine | A Major Test of Strength | Hebra Peak | Royal Claymore |
| Hia Miu Shrine | A Major Test of Strength | Icefall Foothills | Sapphire |
| Kiah Toza Shrine(TCB) | Master the Orb | Pikida Stonegrove | Falcon Bow |
| Maka Rah Shrine | Steady Thy Heart | Lake Kilsie | Ancient Core Bomb Arrow ×10 Diamond |
| Mozo Shenno Shrine | A Major Test of Strength | Biron Snowshelf | Diamond |
| Noe Rajee Shrine(TCB) | The Four Winds | Flight Range | Shield of the Mind's Eye |
| Qaza Tokki Shrine | Qaza Tokki's Blessing | North Lomei Labyrinth | Barbarian Leg Wraps |
| Rok Uwog Shrine | Power of Reach | Pikida Stonegrove | Drillshaft |
| Sha Warvo Shrine | Path of Hidden Winds | Dronoc's Pass | Knight's Bow Purple Rupee |
| Shada Naw Shrine | Red Giveaway | Selmie's Spot | Great Frostblade |
| To Quomo Shrine | To Quomo's Blessing | Hebra Great Skeleton | Royal Claymore |
Tabantha Tundra
| Shrine | Trial Name | Location | Treasure |
|---|---|---|---|
| Rin Oyaa Shrine | Directing the Wind | Snowfield Stable | Ancient Core |
| Sha Gehma Shrine | Shift and Lock | North Tabantha Snowfield | Royal Broadsword |
Tabantha Frontier
| Shrine | Trial Name | Location | Treasure |
|---|---|---|---|
| Akh Va'quot Shrine | Windmills | Rito Village | Ancient Core Feathered Spear Sapphire |
| Bareeda Naag Shrine | Cannon | Lake Totori South | Swallow Bow Diamond |
| Dunba Taag Shrine | Build and Release | Tanagar Canyon | Falcon Bow Great Thunderblade |
| Gee Ha'rah Shrine | Tandem | Kopeeki Drifts | Diamond |
| Kah Okeo Shrine | Wind Guide | Tabantha Frontier | Korok Leaf Gold Rupee Forest Dweller's Sword Giant Ancient Core Thunderspear |
| Lanno Kooh Shrine | Lanno Kooh's Blessing | Hebra Falls | Gold Rupee |
| Rona Kachta Shrine | Rona Kachta's Blessing | Forgotten Temple | Great Flameblade |
| Sheem Dagoze Shrine | Moving in Parallel | West Hyrule Plains | Great Thunderblade |
| Tena Ko'sah Shrine | A Major Test of Strength | Ancient Columns | Knight's Halberd |
| Voo Lota Shrine | The Winding Route | Warbler's Nest | Flameblade |
Lanayru
Lanayru Great Spring
| Shrine | Trial Name | Location | Treasure |
|---|---|---|---|
| Dagah Keek Shrine | Dagah Keek's Blessing | Veiled Falls | Silver Rupee |
| Mah Eliya Shrine(TCB) | Secret Stairway | Ploymus Mountain | Royal Shield [verification needed] |
| Mezza Lo Shrine | Ancient Trifecta | Rabia Plain | Thunderblade |
| Ne'ez Yohma Shrine | Pushing Power | Zora's Domain | Zora Spear |
| Rucco Maag Shrine | Five Flames | Samasa Plain | Opal Silver Bow |
| Sato Koda Shrine(TCB) | Support and Guidance | Upland Zorana | Giant Ancient Core |
| Soh Kofi Shrine | A Minor Test of Strength | Lanayru Great Spring | Knight's Bow |
Lanayru Sea
| Shrine | Trial Name | Location | Treasure |
|---|---|---|---|
| Kee Dafunia Shrine(TCB) | The Melting Point | Lanayru Sea | Frostblade |
| Shai Yota Shrine | Shai Yota's Blessing | Horon Lagoon | Great Flameblade |
Lanayru Wetlands
| Shrine | Trial Name | Location | Treasure |
|---|---|---|---|
| Daka Tuss Shrine | Sunken Scoop | Shrine Island | Silver Longsword |
| Kaya Wan Shrine | Shields from Water | Wetland Stable | Ancient Core Knight's Broadsword |
| Sheh Rata Shrine | Speed of Light | Lanayru Wetlands | Giant Boomerang Opal |
Mount Lanayru
| Shrine | Trial Name | Location | Treasure |
|---|---|---|---|
| Jitan Sa'mi Shrine | Jitan Sa'mi's Blessing | Spring of Wisdom | Frostspear |
| Tahno O'ah Shrine | Tahno O'ah's Blessing | Madorna Mountain | Climbing Boots |
Necluda
East Necluda
| Shrine | Trial Name | Location | Treasure |
|---|---|---|---|
| Dow Na'eh Shrine | Three Boxes | Lanayru Road South Cave | Amber Opal Zora Sword |
| Kah Yah Shrine | Quick Thinking | Palmorae Ruins | Knight's Claymore |
| Kam Urog Shrine | Trial of Passage | East Necluda | Opal Soldier's Spear |
| Muwo Jeem Shrine | A Modest Test of Strength | Cape Cales | Knight's Bow |
| Myahm Agana Shrine | Myahm Agana Apparatus | Hateno Village | Phrenic Bow |
| Tawa Jinn Shrine | Tawa Jinn's Blessing | Mount Taran | Great Thunderblade |
| Yah Rin Shrine | A Weighty Decision | Lurelin Village | Knight's Broadsword Opal |
Necluda Sea
| Shrine | Trial Name | Location | Treasure |
|---|---|---|---|
| Chaas Qeta Shrine | A Major Test of Strength | Tenoko Island | Climbing Gear |
| Korgu Chideh Shrine | Korgu Chideh's Blessing | Eventide Island | Gold Rupee |
West Necluda
| Shrine | Trial Name | Location | Treasure |
|---|---|---|---|
| Ha Dahamar Shrine | The Water Guides | Dueling Peaks Stable | Purple Rupee |
| Hila Rao Shrine | Drifting | Floret Sandbar | Ice Arrow ×5 Opal |
| Lakna Rokee Shrine | Lakna Rokee's Blessing | Kakariko Village | Edge of Duality |
| Qukah Nata Shrine | Qukah Nata's Blessing | Calora Lake | Rubber Tights |
| Ree Dahee Shrine | Timing is Critical | Dueling Peaks | Climber's Bandanna |
| Shai Utoh Shrine | Halt the Tilt | Lakeside Stable | Ancient Core Traveler's Sword |
| Shee Venath Shrine | Twin Memories | Dueling Peaks | Serpentine Spear |
| Shee Vaneer Shrine | Twin Memories | Dueling Peaks | Eightfold Longblade |
| Shoda Sah Shrine | Impeccable Timing | Floria Falls | Ice Arrow ×5 |
| Ta'loh Naeg Shrine | Ta'loh Naeg's Teaching | Kakariko Village | Eightfold Blade Shield of the Mind's Eye Opal |
| Toto Sah Shrine | Toto Sah Apparatus | West Necluda | Shield of the Mind's Eye |
Trivia
- The design of the Ancient Shrines was inspired by art from the Japanese Jōmon period.[15]
Nomenclature
See here for the names of each particular Ancient Shrine in Breath of the Wild.
| Language | Names | |
|---|---|---|
| This table was generated using translation pages. To request an addition, please contact a staff member with a reference. | ||
Other Names
| Name | Shrine of Trials[16] |
|---|---|
| Applies to | |
| Source | |
| Superseded by |
| Name | Applies to | Source | Superseded by |
|---|---|---|---|
Shrine of Trials[16] |
Gallery
-
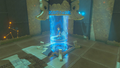
Link entering an Ancient Shrine
-
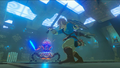
Link in combat with a Guardian Scout II inside the Ta'loh Naeg Shrine
-
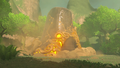
An Ancient Shrine rising from the ground
-
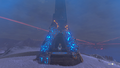
The exterior of an Ancient Shrine as seen in The Champion's Ballad DLC Pack
-
Concept art of the lift entrance of Shrines


See Also
References
- ↑ "Ancient Shrine" — A Gift from the Monks (Breath of the Wild)
- ↑ Creating a Champion, Dark Horse Books, pg. 370
- ↑ "Countless ancient structures are being discovered across Hyrule...but all attempts to enter them have failed. Records indicate that these are facilities designed to train the hero who is fated to combat the Calamity. But the crucial activation mechanism remains a mystery. Is the Sheikah Slate the key to activating them? That is Purah's theory, and I concur. And yet, my experiments so far have been fruitless. Still, we must exhaustively investigate all means of opposing the Calamity. We must not give up, no matter what!" — Zelda's Research Notes (Breath of the Wild)
- ↑ "See that glowing structure there? That light appeared at the exact moment those towers rose from the ground." — Old Man (Breath of the Wild)
- ↑ "Travel Gate registered to map." — N/A (Breath of the Wild)
- ↑ "I am Keh Namut, the creator of this trial." — Keh Namut (Breath of the Wild)
- ↑ "In the name of Goddess Hylia, allow me to bestow this gift upon you... Please accept this Spirit Orb." — Monk (Breath of the Wild)
- ↑ "In the name of Goddess Hylia, I bestow upon you this Spirit Orb." — Monk (Breath of the Wild)
- ↑ "You've conquered all of the shrine trials. The monks have prepared a gift for just such an occasion. Head to the Forgotten Temple where the oldest statue of the Goddess stands to see what they have left for you there." — Adventure Log (Breath of the Wild)
- ↑ "Inside, you found a special green outfit made especially for the hero who braved the wilderness alone." — Adventure Log (Breath of the Wild)
- ↑ "In the name of the Goddess Hylia, I bestow upon you this gift... Naboris's Emblem." — Monk (Breath of the Wild)
- ↑ "In the name of the Goddess Hylia, I bestow upon you this gift... Rudania's Emblem." — Monk (Breath of the Wild)
- ↑ "In the name of the Goddess Hylia, I bestow upon you this gift... Ruta's Emblem." — Monk (Breath of the Wild)
- ↑ "In the name of the Goddess Hylia, I bestow upon you this gift... Medoh's Emblem." — Monk (Breath of the Wild)
- ↑ "Indeed, I briefly mentioned in an interview that I drew inspiration from the art of the Japanese Jōmon prehistoric era to create the appearance of the ancient ruins in Breath of the Wild." —Satoru Takizawa (The Art of Legend of Zelda Series Masterclass.)
- ↑ The Legend of Zelda™: Breath of the Wild for the Nintendo Switch™ home gaming system and Wii U™ console - Features (web archive), Zelda.com (archive), retrieved August 10, 2023.