Dragon Citadel
Dragon Citadel is the penultimate Level in Tri Force Heroes.[1] It is the third Level of the Sky Realm Area, preceded by Deception Castle and followed by Sky Temple.
Dragon Citadel takes place inside of a giant castle high in the sky. Many of its floors are missing, and strong currents of wind blow through its corridors, creating dangerous gaps that the Links will need to cross. Several types of platforms originally encountered in previous Levels make a reappearance, including glass tiles similar to the ice platforms from the Ice Cavern, the vanishing and reappearing platforms from The Ruins, and the colored tiles which only the Link with the matching color can stand on.

In Stage 1, the Links appear on a floor in the southwest corner with little room to move. Straight ahead is a floating platform and a Shock Switch, which when struck, lifts the platform up to the next small floor. The Links should make sure they are all standing on the platform before setting it in motion, or risk falling down through the clouds. On the next floor, they find a Boomerang, Magic Hammer, and a Water Rod for the taking. An extra-tall Mole, requiring a full Totem to hammer down, springs them up to the next floor. Here the Links encounter their first major gap, where strong winds blow in through the north windows, and a floating platform hovers to the north and south. The gap can be crossed in two steps using the Water Rod and/or Boomerang, and the Links can make use of a Shock Switch on each side which controls a set of Elevator Blocks by the windows, changing which sections are affected by the wind. Once all three heroes make it safely across, they climb a set of tall steps using the Water Rod, then make their way to the east, pounding down a set of Stakes and crossing a narrow, angled bridge while fighting the currents. They finally arrive at a platform with a Big Switch; when all three Links stand on it, they are elevated high up to the Triforce Gateway.

In Stage 2, the Links immediately come to a large, windy divide to the east, that can only be crossed on square platforms that appear then quickly vanish a moment later. The path of these platforms changes directions several times, forcing the Links to run against the wind in some places. Once on the other side, they head north toward a Sky Spear Soldier, then west in order to cross the same divide once again, this time on a curving path made of glass tiles that break away if stood on for too long. Halfway across the gap is a Shock Switch that changes which half of the gap is affected by the wind, though it can be safer to simply ignore it. Back on the west side, the Links find a Squiddy, then head north again, where a pair of Sky Bomb Soldiers await. This time, a strip of solid ground leads them into the divide, where they come to a narrow walkway heading far to the north, all the way to a ledge against the north wall. Several glass tiles on each side of the ledge expand the standing area slightly; a Shock Switch in the center controls a set of Elevator Blocks against the windows, while below it, three Floor Switches await the trio. When all three are pressed, the walkway leading to the ledge is retracted, and four Ice Wizzrobes suddenly appear. Two of the Wizzrobes hover around ground level while the other two can be reached with a Totem. Getting hit by their projectiles is especially dangerous, as a frozen Link is susceptible to being blown off the ledge by the wind. When all four Enemies are defeated, the Triforce Gateway appears.

Stage 3 continues the Links' ascent, starting them next to a red platform that hovers left and right, meeting a green platform that rises and lowers. The red Link will need to carry the others onto the first platform, with the green Link in the middle of the Totem. Then, he must throw the green Link onto the green platform, who can then throw the blue Link onto the ledge above, then pick up the red Link once his platform lowers again. The Links climb some stairs to where a Cucco frolics, and soon reach a gap, as well as a Floor Switch that makes a blue platform appear at the other end of the gap. The blue Link can carry the Cucco and glide across onto the blue platform, but finds that a row of Stakes block him from reaching the other side. Using the Magic Hammer or Water Rod, or gliding across the gap while carrying the Link(s) who have them, allows him to pass the obstacle. On the other side, two Sky Shield Soldiers roam nearby, and a Floor Switch creates a bridge across the previous gap. From here, heading south takes the Links to a ledge with several Cuccos, leading into a massive pit filled with inactive Fans and colored platforms. However, even with the Cuccos' help, the pit is too large to cross.
Heading north instead, the Link with the Boomerang can hit a Shock Switch that opens a door to hidden room, where a Big Switch can be pressed by all three Links to turn on the Fans, creating Updrafts throughout the massive pit. The Links can then use the Cuccos to glide carefully from the southwest ledge, across to either the northeast or northwest corner of the pit, using the Updrafts and platforms to keep them afloat. Several tiny ledges in the pit carry Red Rupees, should the Links attempt to land on them. The platform at the northeast corner also features two Treasure Chests, containing three Hearts and another Red Rupee. From either corner, the Links can climb the final sets of stairs and reach the Triforce Gateway.

In Stage 4, the Links reach the top of the castle's tower; a round, stone platform with several holes broken in the surrounding barrier. Three dragon-like Aeralfos suddenly appear and simultaneously attack the Links. The heroes will have to avoid the Aeralfos' breaths of wind and diving attacks, striking them from behind once an opening appears. Around the edge of the tower, several Jars can be broken to receive Hearts. When all of the Enemies are defeated, the Triforce Gateway appears.
Drablands Challenges
Once the Boss of the Sky Realm has been defeated, Dragon Citadel can be replayed with the following Drablands Challenges: "Halved attack and defense!", "Avoid the volcanic rocks!", and "Don't fall at all!".
In "Don't fall at all!", the Red Rupees on low platforms in Stage 3's Updraft-filled chasm are replaced by Purple Rupees.
Materials
At the end of the Level, three Treasure Chests can be opened. Two contain the same Material, and one contains another, more valuable Material.
| Drablands Challenge | — |
|---|---|
| Magical Materials | |
| Drablands Challenge | Avoid the volcanic rocks! |
| Magical Materials | |
| Drablands Challenge | Halved attack and defense! |
| Magical Materials | |
| Drablands Challenge | Don't fall at all! |
| Magical Materials |
| Drablands Challenge | Magical Materials |
|---|---|
— | |
Avoid the volcanic rocks! | |
Halved attack and defense! | |
Don't fall at all! |
Enemies and Traps
![Ice Wizzrobe ×4[a]](/wiki/File:TFH_Ice_Wizzrobe_Model.png)


Treasure Chests
| Treasure Chest | |
|---|---|
| Contents | |
| Notes | At the end of south walkway after crossing the moving platforms in Stage 1 |
| Treasure Chest | |
| Contents | |
| Notes | Beside the east stairs after crossing the Updraft-filled chasm in Stage 3 |
| Treasure Chest | |
| Contents |
|
| Notes | Beside the east stairs after crossing the Updraft-filled chasm in Stage 3 |

| Treasure Chest | Contents | Notes |
|---|---|---|
At the end of south walkway after crossing the moving platforms in Stage 1 | ||
Beside the east stairs after crossing the Updraft-filled chasm in Stage 3 | ||
| Beside the east stairs after crossing the Updraft-filled chasm in Stage 3 |
Trivia
- Though it is not mentioned in the Drablands Diary like each of the prior Areas, a bird's nest is hidden in each Level of the Sky Realm. One can be found in Stage 3 of Dragon Citadel, on top of the east wall of the Updraft-filled chasm, near the green platform.
Nomenclature
| Language | Names | Meanings |
|---|---|---|
Japanese | 飛竜の砦 (Hiryō no Toride)[3] | Flying Dragon's Fort |
FrenchCA | Bastion Dragon[7] | |
FrenchEU | Fort du dragon[5] | |
German | Drachenzitadelle[4] | |
Italian | Forte del drago[2] | |
SpanishLA | Fortaleza del dragón[6] | |
SpanishEU | Fortaleza del Dragón[8] | |
| This table was generated using translation pages. To request an addition, please contact a staff member with a reference. | ||
Gallery
-
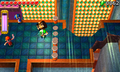
Hammering Stakes before the final windy crossing, Stage 1
-
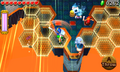
Battling Ice Wizzrobes in Stage 2
-
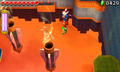
Gliding through a massive pit with Cuccos and Updrafts, Stage 3
-
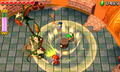
Battling Aeralfos in Stage 4


References
- ↑ Encyclopedia, Dark Horse Books, pg. 161
- ↑ "Forte del drago" — Level Selection (Tri Force Heroes)
- ↑ "飛竜の砦" — Level Selection (Tri Force Heroes)
- ↑ "Drachenzitadelle" — Level Selection (Tri Force Heroes)
- ↑ "Fort du dragon" — Level Selection (Tri Force Heroes)
- ↑ "Fortaleza del dragón" — Level Selection (Tri Force Heroes)
- ↑ "Bastion Dragon" — Level Selection (Tri Force Heroes)
- ↑ "Fortaleza del Dragón" — Level Selection (Tri Force Heroes)