Wind and Earth Temples: Difference between revisions
mNo edit summary |
m (→Nomenclature) |
||
| (30 intermediate revisions by 8 users not shown) | |||
| Line 1: | Line 1: | ||
{{Noncanon}} | {{Noncanon}} | ||
{{HW Stage | {{Infobox HW Stage | ||
| | |image= | ||
| | {{Media | ||
|Screenshot HWL= File:HWL Wind and Earth Temples.png | |||
|Screenshot HWDE= File:HWDE Wind and Earth Temples Center.png | |||
}} | |||
|caption= | |caption= | ||
|era= [[Era of the Great Sea]] | |era= [[Era of the Great Sea]] | ||
|theme | |theme= | ||
|scenario 1= Watchers of the Triforce | |scenario 1= Watchers of the Triforce | ||
|characters 1= [[Link]]<br>[[Lana]]<br>[[Tetra]]<br>[[King Daphnes]] | |characters 1= [[Link]]<br/>[[Lana]]<br/>[[Tetra]]<br/>[[King Daphnes]] | ||
|mini-boss 1= [[Gohma]]<br>[[Manhandla]] | |mini-boss 1= [[Gohma]]<br/>[[Manhandla]] | ||
|boss 1= [[Phantom Ganon]] | |boss 1= [[Phantom Ganon]] | ||
|item 1= | |item 1= | ||
|unlock 1= [[Hero Mode]] difficulty<br>Hard difficulty | |unlock 1= [[Hero Mode]] difficulty<br/>Hard difficulty {{Plural|HWDE|Gold Skulltula|link}} | ||
|strategy 1= | |strategy 1= | ||
|map= | |map= | ||
}} | }} | ||
The | The {{Term/Store|Wind and Earth Temples||Series, HWL, HWDE}} are a {{Term|HWDE|Stage|link}} in {{HW|L}}. They contain the {{Term|HWDE|Scenario|link}} "{{Term|HWDE|Watchers of the Triforce|link}}" in {{Term|HWDE|Legend Mode|link}}. | ||
==Features and Overview== | |||
The {{Term|HWDE|Wind and Earth Temples}} are a fusion of the {{Term|TWWHD|Wind Temple|link}} and the {{Term|TWWHD|Earth Temple|link}} from {{TWW}}. | |||
===Areas=== | |||
{{Gallery List|Locations | |||
|HWL= Faces Keep, NE Sage Keep, NW Sage Keep, Rock Keep, Sage's Keep, Sage's Keep Gate, SE Sage Keep, South Mine Keep, SW Sage Keep | |||
}} | |||
==Watchers of the Triforce== | ==Watchers of the Triforce== | ||
The heroes have now learnt that [[Phantom Ganon]] was the great evil one who has stolen the [[Triforce of Power]] and was robbing away [[Cia]] of her power which helped him learn about [[Lana]]. With the balance of the Triforce's power shifted so greatly, time was of the essence as well as Cia disappearing forever without her magic. With little power left, Cia told Link and his allies where to find Phantom Ganon and rushed off as quickly as they can. <ref>{{Cite|The heroes now knew the evil one had taken the Triforce of Power. He had robbed Cia of her magic and learned of her other half, Lana. With the balance of the Triforce so shifted, there was little hope the world would return to normal. And with her magic gone, in time Cia would completely disappear. Cia used what little power she had left to seek out the one who had taken from her so much. She told Link and the others of her findings. If they could defeat the shadowy presence, they could save not only the world from danger, but Cia as well. Link and his allies held the promise of future peace in their hearts as they readied for this final, decisive battle.| | The heroes have now learnt that [[Phantom Ganon]] was the great evil one who has stolen the [[Triforce of Power]] and was robbing away [[Cia]] of her power which helped him learn about [[Lana]]. With the balance of the Triforce's power shifted so greatly, time was of the essence as well as Cia disappearing forever without her magic. With little power left, Cia told Link and his allies where to find Phantom Ganon and rushed off as quickly as they can. <ref>{{Cite|The heroes now knew the evil one had taken the Triforce of Power. He had robbed Cia of her magic and learned of her other half, Lana. With the balance of the Triforce so shifted, there was little hope the world would return to normal. And with her magic gone, in time Cia would completely disappear. Cia used what little power she had left to seek out the one who had taken from her so much. She told Link and the others of her findings. If they could defeat the shadowy presence, they could save not only the world from danger, but Cia as well. Link and his allies held the promise of future peace in their hearts as they readied for this final, decisive battle.|N/A|HWL}}</ref> | ||
Phantom Ganon's power was extremely and was causing lightning to strike endlessly all over the temples and causing [[Hyrulean Forces]] to lose health. [[King Daphnes]], however, proposed another option to cease the lightning strikes by using the power of the Temples' sages. Claiming the sage keeps from each corner of the map will weaken their foe. Once a sage keep is claimed, the large pattern on the floor will change from evil to a Triforce emblem, however, the doors remain sealed due to Phantom Ganon's doing. Two out four Sage keeps are merely impossible for Hyrulean Forces to advance to. A Hero can find a switch to pound with the [[Hammer]] to open a pathway to the Sage Keeps, one will grow out planted [[Korok]] trees to raise a Hookshot platform while another will open a light source to evaporate stone statues that was blocking a Hootshot spot. However, clearing a path will cause the Monster forces to summon Messengers to run at the sage keeps to summon reinforcements. During the confusion, Phantom Ganon continues to grow stronger within the Enemy base and overtime, Cia will be losing health from the Lightning as well if capturing the Sage keeps isn't dealt with quickly. | Phantom Ganon's power was extremely high and was causing lightning to strike endlessly all over the temples and causing [[Hyrulean Forces]] to lose health. [[King Daphnes]], however, proposed another option to cease the lightning strikes by using the power of the Temples' sages. Claiming the sage keeps from each corner of the map will weaken their foe. Once a sage keep is claimed, the large pattern on the floor will change from evil to a Triforce emblem, however, the doors remain sealed due to Phantom Ganon's doing. Two out four Sage keeps are merely impossible for Hyrulean Forces to advance to. A Hero can find a switch to pound with the [[Hammer]] to open a pathway to the Sage Keeps, one will grow out planted [[Korok]] trees to raise a Hookshot platform while another will open a light source to evaporate stone statues that was blocking a Hootshot spot. However, clearing a path will cause the Monster forces to summon Messengers to run at the sage keeps to summon reinforcements. During the confusion, Phantom Ganon continues to grow stronger within the Enemy base and overtime, Cia will be losing health from the Lightning as well if capturing the Sage keeps isn't dealt with quickly. | ||
Once all four Sage Keeps are captured, the lightning strikes will have stopped and the doors will have finally been opened. The Heroes must protect the keeps in order to keep the lightning from resuming. Lana now wishes to rendezvous to Cia in the Allied Base. Retaliating, Phantom Ganon increases the Power within monsters that were in the central area of the map. The Heroes must clear the paths to reach and defeat the central area monsters to make Phantom Ganon leave his base. In time, the monsters will have summoned [[Gohma]] and [[Manhandla]] to advance and attack the Sage keeps. Defeating both bosses becomes the priority before regrouping with Cia. | Once all four Sage Keeps are captured, the lightning strikes will have stopped and the doors will have finally been opened. The Heroes must protect the keeps in order to keep the lightning from resuming. Lana now wishes to rendezvous to Cia in the Allied Base. Retaliating, Phantom Ganon increases the Power within monsters that were in the central area of the map. The Heroes must clear the paths to reach and defeat the central area monsters to make Phantom Ganon leave his base. In time, the monsters will have summoned [[Gohma]] and [[Manhandla]] to advance and attack the Sage keeps. Defeating both bosses becomes the priority before regrouping with Cia. | ||
When defeating the powered up monsters as well as the two bosses, Phantom Ganon will open the doors of his base and come out to advance on Cia at the central area as she advances towards him as well. Cia reveals that Phantom Ganon was the cause of the new rift when he was stealing her magic. In her weakened state, Cia will be unable to defeat Phantom Ganon on her own and will lose health quickly. Engaging Phantom Ganon will be proven pointless as his health will recover overtime. Once all the heroes have gathered around Phantom Ganon with Cia, using their combined strength, they will cause Phantom Ganon to lose his power to regenerate. Cia will reveal that she has used the last bit of her power and will now sit back on the sidelines, allowing the four reminding Heroes to deal with Phantom Ganon. He will strike furiously with his blades, crating clones of himself to attack and unleashing energy balls at his enemies which can be deflected back. | When defeating the powered up monsters as well as the two bosses, Phantom Ganon will open the doors of his base and come out to advance on Cia at the central area as she advances towards him as well. Cia reveals that Phantom Ganon was the cause of the new rift when he was stealing her magic. In her weakened state, Cia will be unable to defeat Phantom Ganon on her own and will lose health quickly. Engaging Phantom Ganon will be proven pointless as his health will recover overtime. Once all the heroes have gathered around Phantom Ganon with Cia, using their combined strength, they will cause Phantom Ganon to lose his power to regenerate. Cia will reveal that she has used the last bit of her power and will now sit back on the sidelines, allowing the four reminding Heroes to deal with Phantom Ganon. He will strike furiously with his blades, crating clones of himself to attack and unleashing energy balls at his enemies which can be deflected back. | ||
Once defeated, Phantom Ganon will vanish and would have released the Triforce of Power which Lana will have used to restore Cia's power back to her. With the battle won, Tetra and King Daphnes will have vanished and return to their proper homes saying good-bye. Link, Lana and Cia then return to Hyrule Castle where they will meet up with [[Zelda]] to reunite the Triforce to close the rifts once again. Restoring the lands, Lana and Cia say their good-bye to Link and Zelda as they return to the [[Valley of Seers]] to resume their roles as Guardians and keepers of the Triforce of Power.<ref>{{Cite|In this way, peace returned to Hyrule. Lana and Cia bid Link and the others farewell and resumed their roles as guardians in the Valley of Seers. Power... Wisdom... Courage. Together, Lana and Cia would protect the balance of the Triforce--in peace and harmony.| | Once defeated, Phantom Ganon will vanish and would have released the Triforce of Power which Lana will have used to restore Cia's power back to her. With the battle won, Tetra and King Daphnes will have vanished and return to their proper homes saying good-bye. Link, Lana and Cia then return to Hyrule Castle where they will meet up with [[Zelda]] to reunite the Triforce to close the rifts once again. Restoring the lands, Lana and Cia say their good-bye to Link and Zelda as they return to the [[Valley of Seers]] to resume their roles as Guardians and keepers of the Triforce of Power.<ref>{{Cite|In this way, peace returned to Hyrule. Lana and Cia bid Link and the others farewell and resumed their roles as guardians in the Valley of Seers. Power... Wisdom... Courage. Together, Lana and Cia would protect the balance of the Triforce--in peace and harmony.|N/A|HWL}}</ref> | ||
===Combatants=== | ===Combatants=== | ||
{| class= | {| class=wikitable style="text-align:center; width:100%; max-width:40em;" | ||
!style="width:50%"| Hyrulean Forces | !style="width:50%"| Hyrulean Forces | ||
!style="width:50%"| Phantom Ganon's Forces | !style="width:50%"| Phantom Ganon's Forces | ||
|- | |- | ||
| [[File: | | [[File:HWDE Hylian Captain Mini Map Icon.png]]<br/>'''[[Hylian Captain]]s''' | ||
| [[File: | | [[File:HWDE Big Poe Mini Map Icon.png]]<br/>'''[[Big Poe]]s''' | ||
|- | |- | ||
| [[File: | | [[File:HWDE Hylian Soldier Mini Map Icon.png]]<br/>'''[[Hylian Soldier]]s''' | ||
| [[File:HWDE Stone Blin Mini Map Icon.png]]<br>'''[[ | | [[File:HWDE Stone Blin Mini Map Icon.png]]<br/>'''[[Stone Blin]]s''' | ||
|- | |- | ||
|style="background-color: | |style="background-color:#0c2236" rowspan="6"| | ||
| [[File:HWDE Stone Blin Mini Map Icon.png]]<br>'''Messengers''' | | [[File:HWDE Stone Blin Mini Map Icon.png]]<br/>'''Messengers''' | ||
|- | |- | ||
| '''[[Miniblin]]s''' | | '''[[Miniblin]]s''' | ||
|- | |- | ||
| [[File:HWDE Minblin Captain Mini Map Icon.png]]<br>'''[[Captain (Hyrule Warriors)|Miniblin | | [[File:HWDE Minblin Captain Mini Map Icon.png]]<br/>'''[[Captain (Hyrule Warriors)|Miniblin Captain]]s''' | ||
|- | |- | ||
| '''[[Green Chuchu]]s''' | | [[File:HWDE Green Chuchu Mini Map Icon.png]]<br/>'''[[Green Chuchu]]s''' | ||
|- | |- | ||
| '''[[Red Chuchu]]s''' | | [[File:HWDE Red Chuchu Mini Map Icon.png]]<br/>'''[[Red Chuchu]]s''' | ||
|- | |- | ||
| '''[[Yellow Chuchu]]s''' | | [[File:HWDE Yellow Chuchu Mini Map Icon.png]]<br/>'''[[Yellow Chuchu]]s''' | ||
|- | |- | ||
!colspan="3"| Commanders | !colspan="3"| Commanders | ||
|- | |- | ||
| [[File: | | [[File:HWDE Link Mini Map Icon.png]]<br/>'''[[Link]]''' | ||
| [[File:HWDE Phantom Ganon Mini Map Icon.png]]<br>'''[[Phantom Ganon]]''' | | [[File:HWDE Phantom Ganon Mini Map Icon.png]]<br/>'''[[Phantom Ganon]]''' | ||
|- | |- | ||
| [[File: | | [[File:HWDE Lana Mini Map Icon.png]]<br/>'''[[Lana]]''' | ||
| [[File: | | [[File:HWDE Gohma Mini Map Icon.png]]<br/>'''[[Gohma]]''' | ||
|- | |- | ||
| [[File: | | [[File:HWDE Tetra Mini Map Icon.png]]<br/>'''[[Tetra]]''' | ||
| [[File: | | [[File:HWDE Manhandla Mini Map Icon.png]]<br/>'''[[Manhandla]]''' | ||
|- | |- | ||
| [[File: | | [[File:HWDE King Daphnes Mini Map Icon.png]]<br/>'''[[King Daphnes]]''' | ||
|style="background-color: | |style="background-color:#0c2236" rowspan="2"| | ||
|- | |- | ||
| [[File:HWDE Cia Hatless Mini Map Icon.png]]<br>'''[[Cia]]''' | | [[File:HWDE Cia Hatless Mini Map Icon.png]]<br/>'''[[Cia]]''' | ||
|} | |} | ||
| Line 73: | Line 83: | ||
<div style="display:none"> | <div style="display:none"> | ||
{{#vardefine:Center|{{!}}style="text-align:center;"}} | {{#vardefine:Center|{{!}}style="text-align:center;"}} | ||
{{#vardefine:GS|{{!}} [[File:HW Gold Skulltula Icon.png|60px]]<br>'''[[Gold Skulltula]]'''}} | {{#vardefine:GS|{{!}} [[File:HW Gold Skulltula Icon.png|60px]]<br/>'''[[Gold Skulltula]]'''}} | ||
{{#vardefine:PoH|{{!}} [[File:HW Piece of Heart Icon.png|60px]]<br>'''[[Piece of Heart]]'''}} | {{#vardefine:PoH|{{!}} [[File:HW Piece of Heart Icon.png|60px]]<br/>'''[[Piece of Heart]]'''}} | ||
{{#vardefine:HC|{{!}} [[File:HW Heart Container Icon.png|60px]]<br>'''[[Heart Container]]'''}} | {{#vardefine:HC|{{!}} [[File:HW Heart Container Icon.png|60px]]<br/>'''[[Heart Container]]'''}} | ||
{{#vardefine:SW|{{!}} [[File:HW Sealed Weapon Icon.png|x50px]]<br>'''[[Sealed Weapon]]'''<br>}} | {{#vardefine:SW|{{!}} [[File:HW Sealed Weapon Icon.png|x50px]]<br/>'''[[Sealed Weapon]]'''<br/>}} | ||
</div> | </div> | ||
{| class= | {| class=wikitable style="width:100%" | ||
!style="width:20%"| Item | !style="width:20%"| Item | ||
!style="width:40%"| Location | !style="width:40%"| Location | ||
| Line 87: | Line 97: | ||
|Defeat 1000 enemies | |Defeat 1000 enemies | ||
|- | |- | ||
{{#var:Center}}{{#var:GS}}<br>(Hard Mode) | {{#var:Center}}{{#var:GS}}<br/>(Hard Mode) | ||
| Behind a wall of vines in the tunnel west of Rock Keep. | | Behind a wall of vines in the tunnel west of Rock Keep. | ||
| As Tetra, reduce Phantom Ganon to 50% health or less in 15 minutes or less. | | As Tetra, reduce Phantom Ganon to 50% health or less in 15 minutes or less. | ||
| Line 93: | Line 103: | ||
{{#var:Center}}{{#var:PoH}} | {{#var:Center}}{{#var:PoH}} | ||
| Faces Keep. | | Faces Keep. | ||
| Play as Link | | Play as Link | ||
|- | |- | ||
{{#var:Center}}{{#var:HC}} | {{#var:Center}}{{#var:HC}} | ||
| Line 99: | Line 109: | ||
| Play as King Daphnes. | | Play as King Daphnes. | ||
|- | |- | ||
{{#var:Center}}{{#var:SW}}(''[[Sail#Hyrule Warriors | {{#var:Center}}{{#var:SW}}(''[[Sail#Hyrule Warriors|Swift Sail]]'') | ||
| Rock Keep. | | Rock Keep. | ||
| Capture the Rock Keep. | | Capture the Rock Keep. | ||
| Line 105: | Line 115: | ||
==Nomenclature== | ==Nomenclature== | ||
{{ | {{Nomenclature}} | ||
==Gallery== | ==Gallery== | ||
<gallery> | <gallery> | ||
File:HWL Wind Temple 1.jpg|The exterior of the Rock Keep in the Wind Temple | File:HWL Wind Temple 1.jpg|The exterior of the Rock Keep in the Wind Temple from {{HWL|-}} | ||
File:HWL Wind Temple 2.jpg|The Korok Trees in the Wind Temple | File:HWL Wind Temple 2.jpg|The Korok Trees in the Wind Temple from {{HWL|-}} | ||
File:HWL Earth Temple 1.jpg|The Statues in the Earth Temple | File:HWL Earth Temple 1.jpg|The Statues in the Earth Temple from {{HWL|-}} | ||
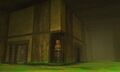
File:HWL Earth Temple 2.jpg|The exterior of the Faces Keep in the Earth Temple | File:HWL Earth Temple 2.jpg|The exterior of the Faces Keep in the Earth Temple from {{HWL|-}} | ||
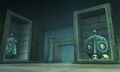
File:HWL Earth Temple 3.jpg|The NW Sage Keep in the Earth Temple | File:HWL Earth Temple 3.jpg|The NW Sage Keep in the Earth Temple from {{HWL|-}} | ||
File:HWDE | File:HWDE NW Sage Keep Promotional Screenshot.png|A promotional screenshot of the {{Term|HWDE|NW Sage Keep}} in the Earth Temple from {{HWDE|-}} | ||
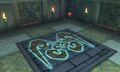
File: | File:HWDE Wind and Earth Temples Map.png|Wind and Earth Temples Map from {{HWDE|-}} | ||
</gallery> | </gallery> | ||
{{Ref}} | {{Ref}} | ||
{{ | {{HW Stages}} | ||
{{Categories | |||
|Temples | |||
|stages= HWL, HWDE | |||
}} | |||
Latest revision as of 22:37, 15 April 2024
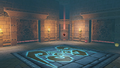
Wind and Earth Temples | |
|---|---|
Screenshot   HWLHWDE | |
| Era | Era of the Great Sea |
| Main Theme Music | |
| | |
| Playable Character(s) | Link Lana Tetra King Daphnes |
| Mini-boss(es) | Gohma Manhandla |
| Boss | Phantom Ganon |
| Completion Reward(s) | Hero Mode difficulty Hard difficulty Gold Skulltulas |
The Wind and Earth Temples are a Stage in Hyrule Warriors Legends. They contain the Scenario "Watchers of the Triforce" in Legend Mode.
Features and Overview
The Wind and Earth Temples are a fusion of the Wind Temple and the Earth Temple from The Wind Waker.
Areas
Watchers of the Triforce
The heroes have now learnt that Phantom Ganon was the great evil one who has stolen the Triforce of Power and was robbing away Cia of her power which helped him learn about Lana. With the balance of the Triforce's power shifted so greatly, time was of the essence as well as Cia disappearing forever without her magic. With little power left, Cia told Link and his allies where to find Phantom Ganon and rushed off as quickly as they can. [1]
Phantom Ganon's power was extremely high and was causing lightning to strike endlessly all over the temples and causing Hyrulean Forces to lose health. King Daphnes, however, proposed another option to cease the lightning strikes by using the power of the Temples' sages. Claiming the sage keeps from each corner of the map will weaken their foe. Once a sage keep is claimed, the large pattern on the floor will change from evil to a Triforce emblem, however, the doors remain sealed due to Phantom Ganon's doing. Two out four Sage keeps are merely impossible for Hyrulean Forces to advance to. A Hero can find a switch to pound with the Hammer to open a pathway to the Sage Keeps, one will grow out planted Korok trees to raise a Hookshot platform while another will open a light source to evaporate stone statues that was blocking a Hootshot spot. However, clearing a path will cause the Monster forces to summon Messengers to run at the sage keeps to summon reinforcements. During the confusion, Phantom Ganon continues to grow stronger within the Enemy base and overtime, Cia will be losing health from the Lightning as well if capturing the Sage keeps isn't dealt with quickly.
Once all four Sage Keeps are captured, the lightning strikes will have stopped and the doors will have finally been opened. The Heroes must protect the keeps in order to keep the lightning from resuming. Lana now wishes to rendezvous to Cia in the Allied Base. Retaliating, Phantom Ganon increases the Power within monsters that were in the central area of the map. The Heroes must clear the paths to reach and defeat the central area monsters to make Phantom Ganon leave his base. In time, the monsters will have summoned Gohma and Manhandla to advance and attack the Sage keeps. Defeating both bosses becomes the priority before regrouping with Cia.
When defeating the powered up monsters as well as the two bosses, Phantom Ganon will open the doors of his base and come out to advance on Cia at the central area as she advances towards him as well. Cia reveals that Phantom Ganon was the cause of the new rift when he was stealing her magic. In her weakened state, Cia will be unable to defeat Phantom Ganon on her own and will lose health quickly. Engaging Phantom Ganon will be proven pointless as his health will recover overtime. Once all the heroes have gathered around Phantom Ganon with Cia, using their combined strength, they will cause Phantom Ganon to lose his power to regenerate. Cia will reveal that she has used the last bit of her power and will now sit back on the sidelines, allowing the four reminding Heroes to deal with Phantom Ganon. He will strike furiously with his blades, crating clones of himself to attack and unleashing energy balls at his enemies which can be deflected back.
Once defeated, Phantom Ganon will vanish and would have released the Triforce of Power which Lana will have used to restore Cia's power back to her. With the battle won, Tetra and King Daphnes will have vanished and return to their proper homes saying good-bye. Link, Lana and Cia then return to Hyrule Castle where they will meet up with Zelda to reunite the Triforce to close the rifts once again. Restoring the lands, Lana and Cia say their good-bye to Link and Zelda as they return to the Valley of Seers to resume their roles as Guardians and keepers of the Triforce of Power.[2]
Combatants
| Hyrulean Forces | Phantom Ganon's Forces | |
|---|---|---|
Hylian Captains |
Big Poes | |
Hylian Soldiers |
Stone Blins | |
Messengers | ||
| Miniblins | ||
Miniblin Captains | ||
Green Chuchus | ||
Red Chuchus | ||
Yellow Chuchus | ||
| Commanders | ||
Link |
Phantom Ganon | |
Lana |
Gohma | |
Tetra |
Manhandla | |
King Daphnes |
||
Cia | ||
Collectibles
| Item | Location | Condition |
|---|---|---|
Gold Skulltula |
On a ledge south of South Mine Keep. | Defeat 1000 enemies |
Gold Skulltula (Hard Mode) |
Behind a wall of vines in the tunnel west of Rock Keep. | As Tetra, reduce Phantom Ganon to 50% health or less in 15 minutes or less. |
Piece of Heart |
Faces Keep. | Play as Link |
Heart Container |
Beneath a boulder southwest of the Allied Base. | Play as King Daphnes. |
Sealed Weapon (Swift Sail) |
Rock Keep. | Capture the Rock Keep. |
Nomenclature
| Language | Names | Meanings |
|---|---|---|
FrenchCA | Temples du vent et de la terre (HWDE) | |
FrenchEU | Temples du vent et de la terre (HWDE)[5] | |
German | Zephir- und Terratempel (HWDE)[4] | |
Italian | Santuari del mare (HWDE)[3] | Sanctuaries of the sea |
SpanishLA | Templos de los mares (HWDE)[6] | Temples of the seas |
SpanishEU | Templos de los mares (HWDE) | Temples of the seas |
| This table was generated using translation pages. To request an addition, please contact a staff member with a reference. | ||
Gallery
-
The exterior of the Rock Keep in the Wind Temple from Hyrule Warriors Legends
-

The Korok Trees in the Wind Temple from Hyrule Warriors Legends
-
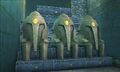
The Statues in the Earth Temple from Hyrule Warriors Legends
-
The exterior of the Faces Keep in the Earth Temple from Hyrule Warriors Legends
-
The NW Sage Keep in the Earth Temple from Hyrule Warriors Legends
-
A promotional screenshot of the NW Sage Keep in the Earth Temple from Hyrule Warriors: Definitive Edition
-
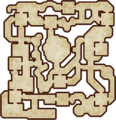
Wind and Earth Temples Map from Hyrule Warriors: Definitive Edition


References
- ↑ "The heroes now knew the evil one had taken the Triforce of Power. He had robbed Cia of her magic and learned of her other half, Lana. With the balance of the Triforce so shifted, there was little hope the world would return to normal. And with her magic gone, in time Cia would completely disappear. Cia used what little power she had left to seek out the one who had taken from her so much. She told Link and the others of her findings. If they could defeat the shadowy presence, they could save not only the world from danger, but Cia as well. Link and his allies held the promise of future peace in their hearts as they readied for this final, decisive battle." — N/A (Hyrule Warriors Legends)
- ↑ "In this way, peace returned to Hyrule. Lana and Cia bid Link and the others farewell and resumed their roles as guardians in the Valley of Seers. Power... Wisdom... Courage. Together, Lana and Cia would protect the balance of the Triforce--in peace and harmony." — N/A (Hyrule Warriors Legends)
- ↑ "Santuari del mare" — Select Scenario (Hyrule Warriors: Definitive Edition)
- ↑ "Zephir- und Terratempel" — Select Scenario (Hyrule Warriors: Definitive Edition)
- ↑ "Temples du vent et de la terre" — Select Scenario (Hyrule Warriors: Definitive Edition)
- ↑ "Templos de los mares" — Select Scenario (Hyrule Warriors: Definitive Edition)