Den of Flames: Difference between revisions
MannedTooth (talk | contribs) No edit summary |
Htwretched (talk | contribs) mNo edit summary |
||
| (23 intermediate revisions by 9 users not shown) | |||
| Line 1: | Line 1: | ||
{{Dungeon | {{Infobox Dungeon | ||
|type= level | |||
|type = level | |image= File:TFH Den of Flames Stage 1.png | ||
|image = | |caption= Stage 1 of Den of Flames | ||
|caption = | |location= {{Term|TFH|Volcano|link}} | ||
|location = | |game= TFH | ||
|game = {{TFH}} | |item= {{List|{{Term|TFH|Boomerang|link}}, {{Term|TFH|Gust Jar|link}} ×2}} | ||
| | |quest= | ||
|quest = | |mini-boss= | ||
|mini-boss = | |boss= | ||
|boss = | |theme= | ||
|theme | |strategy= | ||
|strategy = | |||
}} | }} | ||
{{Term/Store|Den of Flames||Series, TFH}} is a {{Term|TFH|Level|link}} in {{TFH}}.<ref>{{Cite Book|quote= |book= E |publisher= |page= 160}}</ref> It is the third {{Term|TFH|Level}} in the {{Term|TFH|Volcano|link}} {{Term|TFH|Area}}, preceded by {{Term|TFH|Hinox Mine|link}} and followed by {{Term|TFH|Fire Temple|link}}. | |||
==Themes and Navigation== | ==Themes and Navigation== | ||
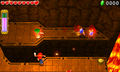
In '''Stage 1''', the | [[File:TFH Den of Flames Stage 1 2.png|250px|right|thumb|The Treasure Chest with three Hearts in Stage 1]] | ||
In '''Stage 1''', the {{Plural|TFH|Links|link}} begin inside a chasm with pools of molten {{Term|TFH|Lava|link}}. Two {{Plural|TFH|Gust Jar|link}} and a {{Term|TFH|Boomerang|link}} are immediately available for use. To cross a gap to the next ledge, the {{Term|TFH|Links}} with the {{Term|TFH|Boomerang}} is propelled over with the other {{Plural|TFH|Links}}' {{Plural|TFH|Gust Jar}}, then carries them over using the {{Term|TFH|Boomerang}}. A {{Term|TFH|Treasure Chest|link}} containing a {{Term|TFH|Red Rupee|link}} is sitting on a ledge, surrounded by a {{Term|TFH|Flame Wall|link}}, which can be extinguished by forming a {{Term|TFH|Totem|link}} firing the {{Term|TFH|Gust Jar}} at it. The {{Plural|TFH|Links}} then move to a {{Term|TFH|Swinging Platform|link}}, which will swing them over to the next ledge where the {{Term|TFH|Triforce Gateway|link}} awaits. This {{Term|TFH|Swinging Platform}} can be made to swing further by using the {{Term|TFH|Gust Jar}} to propel it. The {{Plural|TFH|Links}} can ride it over to another {{Term|TFH|Swinging Platform}} that leads to a {{Term|TFH|Treasure Chest}} containing three {{Plural|TFH|Heart|link}}. Alternately, the {{Plural|TFH|Links}} can simply form a {{Term|TFH|Totem}} near the {{Term|TFH|Triforce Gateway}} and throw one {{Term|TFH|Links}} onto a nearby ledge leading to it. | |||
{{Clear}} | |||
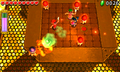
In '''Stage 2''', the Links drop down to a grated platform with three | [[File:TFH Den of Flames Stage 2.png|250px|right|thumb|The battle area in Stage 2]] | ||
In '''Stage 2''', the {{Plural|TFH|Links}} drop down to a large grated platform with three {{Plural|TFH|Floor Switch|link}}. Pressing the {{Plural|TFH|Switch}} summons a horde of {{Plural|TFH|Red Hardhat Beetle|link}}. As these {{Plural|TFH|Enemy}} are covered in flames, they must first be either stunned using the {{Term|TFH|Boomerang}}, or extinguished with the {{Plural|TFH|Gust Jar}}, else the {{Plural|TFH|Links}} will get burned when attacking them. However, if any {{Term|TFH|Links}} is wearing the {{Term|TFH|Goron Garb|link}}, these flaming {{Plural|TFH|Enemy}} can be dispatched with only the {{Term|TFH|Sword}}. As the {{Plural|TFH|Red Hardhat Beetle}} are defeated, several more will appear. After they are all defeated, a bridge leading to the {{Term|TFH|Triforce Gateway}} will appear. {{Plural|TFH|Heart}} and {{Plural|TFH|Rupee}} sitting on ledges along the way can be grabbed with the {{Term|TFH|Boomerang}}. | |||
{{Clear}} | |||
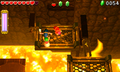
In '''Stage 3''', the Links appear on another platform. A pair of | [[File:TFH Den of Flames Promotional Screenshot 2.png|250px|right|thumb|Crossing the first gap in Stage 3]] | ||
In '''Stage 3''', the {{Plural|TFH|Links}} appear on another platform. A pair of {{Plural|TFH|Guruguru Bar|link}} can be seen spinning around on the next platform across a gap, the upper bar spinning faster than the lower one. The {{Plural|TFH|Links}} must carefully cross the gap while avoiding the flames by using the {{Plural|TFH|Gust Jar}} and {{Term|TFH|Boomerang}}. The {{Plural|TFH|Links}} then cross a bridge north to a set of {{Plural|TFH|Swinging Platform}}. As the first {{Term|TFH|Swinging Platform}} does not swing far enough to reach the second, and must be propelled using the {{Term|TFH|Gust Jar}}. The {{Plural|TFH|Links}} reach a ledge, then ride a stone platform raised into the air by a {{Term|TFH|Lava Geyser|link}} and transfer to a final {{Term|TFH|Swinging Platform}}, which also needs to be propelled using the {{Term|TFH|Gust Jar}} to reach a passageway to the north. After dispatching a pair of {{Plural|TFH|Red Hardhat Beetle}}, the {{Plural|TFH|Links}} then cross a narrow, winding path over a lake of {{Term|TFH|Lava}} with several spinning {{Plural|TFH|Guruguru Bar}} along the way. At the end of this path, they reach the {{Term|TFH|Triforce Gateway}} and a {{Term|TFH|Squiddy|link}}. | |||
{{Clear}} | |||
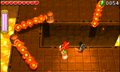
In '''Stage 4''', the Links drop to an island inhabited by Fire | [[File:TFH Den of Flames Stage 4.png|250px|right|thumb|Stage 4]] | ||
In '''Stage 4''', the {{Plural|TFH|Links}} drop to an island inhabited by {{Plural|TFH|Fire Keeleon|link}}. As they are on fire, the {{Plural|TFH|Keeleon}} must also be stunned with the {{Term|TFH|Boomerang}} or have their flames extinguished with the {{Term|TFH|Gust Jar}} before they can be attacked, and a {{Term|TFH|Totem}} is required in order to reach them. After they are defeated, more {{Plural|TFH|Fire Keeleon}} and some {{Plural|TFH|Red Hardhat Beetle}} appear. After they are all defeated, a stairway to the {{Term|TFH|Triforce Gateway}} appears. | |||
{{Clear}} | |||
===Drablands | ==={{Plural|TFH|Drablands Challenge}}=== | ||
Den of Flames | Once the {{Term|TFH|Boss|link}} of the {{Term|TFH|Volcano|link}} has been defeated, {{Term|TFH|Den of Flames}} can be replayed with the following {{Plural|TFH|Drablands Challenge|link}}: "[[Drablands Challenge#Fewer Heart Containers!|Fewer Heart Containers!]]", "[[Drablands Challenge#Avoid the volcanic rocks!|Avoid the volcanic rocks!]]", and "[[Drablands Challenge#Clear within the time limit!|Clear within the time limit!]]". | ||
In "Clear within the time limit!", the {{Plural|TFH|Links|link}} are given a timer of one minute in both single-player and [[Multiplayer]]. This timer can be increased by collecting {{Plural|TFH|Hourglass|link}} or wearing {{Term|TFH|Linebeck's Uniform|link}}. | |||
==== | ==={{Plural|TFH|Material}}=== | ||
At the end of the {{Term|TFH|Level}}, three {{Plural|TFH|Treasure Chest|link}} can be opened. Two contain the same {{Term|TFH|Material|link}}, and one contains another, more valuable {{Term|TFH|Material}}. | |||
== | {{Data Table | ||
|game= TFH | |||
|columns= {{Term|TFH|Drablands Challenge}}, {{Plural|TFH|Magical Material}} [Amounts] | |||
|- | |||
| N/A | |||
| 2 Monster Guts, 1 Rugged Horn | |||
|- | |||
| [[File:TFH Fewer Heart Containers Icon.png]]<br/>'''Fewer Heart Containers!''' | |||
| 2 Demon Fossil, 1 Kodongo Tail | |||
|- | |||
| [[File:TFH Volcanic Rocks Icon.png]]<br/>'''Avoid the volcanic rocks!''' | |||
| 2 Rugged Horn, 1 Keese Wing | |||
|- | |||
| [[File:TFH Hourglass Icon.png]]<br/>'''Clear within the time limit!''' | |||
| 2 Kodongo Tail, 1 Star Fragment | |||
}} | |||
==={{Plural|TFH|Enemy}} and Traps=== | |||
{{Tabs | |||
|tab1= No Challenge | |||
|content1= | |||
;{{Term|TFH|Stage}} 1 | |||
{{Gallery List|Enemies | |||
|TFH= Flame Wall [2] | |||
}} | |||
;{{Term|TFH|Stage}} 2 | |||
{{Gallery List|Enemies | |||
|TFH= Red Hardhat Beetle [Qty:11]{{List Note|Five appear when the {{Plural|TFH|Links|link}} stand on three {{Plural|TFH|Floor Switch|link}}. The rest appear as they are defeated.}} | |||
}} | |||
{{List Notes}} | |||
;{{Term|TFH|Stage}} 3 | |||
{{Gallery List|Enemies | |||
|TFH= Guruguru Bar [Qty:5], Red Hardhat Beetle [Qty:2], Squiddy | |||
}} | |||
;{{Term|TFH|Stage}} 4 | |||
{{Gallery List|Enemies | |||
|TFH= Fire Keeleon [Qty:6], Red Hardhat Beetle [Qty:4] | |||
}} | |||
|tab2= "Fewer Heart Containers!" | |||
|content2= | |||
;{{Term|TFH|Stage}} 1 | |||
{{Gallery List|Enemies | |||
|TFH= Fire Keese [Qty:3], Flame Wall [2] | |||
}} | |||
;{{Term|TFH|Stage}} 2 | |||
{{Gallery List|Enemies | |||
|TFH= Red Hardhat Beetle [Qty:11]{{List Note|Five appear when the {{Plural|TFH|Links|link}} stand on three {{Plural|TFH|Floor Switch|link}}. The rest appear as they are defeated.}} | |||
}} | |||
{{List Notes}} | |||
;{{Term|TFH|Stage}} 3 | |||
{{Gallery List|Enemies | |||
|TFH= Guruguru Bar [Qty:5], Red Hardhat Beetle [Qty:2], Squiddy | |||
}} | |||
= | ;{{Term|TFH|Stage}} 4 | ||
{{Gallery List|Enemies | |||
|TFH= Fire Keeleon [Qty:6], Red Hardhat Beetle [Qty:4] | |||
}} | |||
|tab3= "Avoid the volcanic rocks!" | |||
|content3= | |||
;{{Term|TFH|Stage}} 1 | |||
{{Gallery List|Enemies | |||
|TFH= Flame Wall [2], Volcanic Rock | |||
}} | |||
===Enemies=== | ;{{Term|TFH|Stage}} 2 | ||
{{Gallery List|Enemies | |||
|TFH= Red Hardhat Beetle [Qty:11]{{List Note|Five appear when the {{Plural|TFH|Links|link}} stand on three {{Plural|TFH|Floor Switch|link}}. The rest appear as they are defeated.}}, Volcanic Rock | |||
}} | |||
{{List Notes}} | |||
;{{Term|TFH|Stage}} 3 | |||
{{Gallery List|Enemies | |||
|TFH= Guruguru Bar [Qty:5], Red Hardhat Beetle [Qty:2], Squiddy, Volcanic Rock | |||
}} | |||
;{{Term|TFH|Stage}} 4 | |||
{{Gallery List|Enemies | |||
|TFH= Fire Keeleon [Qty:6], Red Hardhat Beetle [Qty:4], Volcanic Rock | |||
}} | |||
|tab4= "Clear within the time limit!" | |||
|content4= | |||
;{{Term|TFH|Stage}} 1 | |||
{{Gallery List|Enemies | |||
|TFH= Flame Wall [2] | |||
}} | |||
;{{Term|TFH|Stage}} 2 | |||
{{Gallery List|Enemies | |||
|TFH= Red Hardhat Beetle [Qty:11]{{List Note|Five appear when the {{Plural|TFH|Links|link}} stand on three {{Plural|TFH|Floor Switch|link}}. The rest appear as they are defeated.}} | |||
}} | |||
{{List Notes}} | |||
;{{Term|TFH|Stage}} 3 | |||
{{Gallery List|Enemies | |||
|TFH= Guruguru Bar [Qty:5], Keese [Qty:3], Red Hardhat Beetle [Qty:2], Squiddy | |||
}} | |||
;{{Term|TFH|Stage}} 4 | |||
{{Gallery List|Enemies | |||
|TFH= Fire Keeleon [Qty:6], Red Hardhat Beetle [Qty:4] | |||
}} | |||
}} | |||
==={{Plural|TFH|Treasure Chest}}=== | |||
{{Treasure Chests|game= TFH | |||
|- | |||
| Treasure Chest | |||
| Red Rupee | |||
| Within a {{Term|TFH|Flame Wall}} on a ledge in {{Term|TFH|Stage}} 1 | |||
|- | |||
| Treasure Chest | |||
| Heart [File:TFH Three Hearts Sprite.png] {{Qty|3}} | |||
| On a high ledge east of both {{Plural|TFH|Swinging Platform}} in {{Term|TFH|Stage}} 1 | |||
}} | |||
==Trivia== | |||
*In {{Term|TFH|Stage}} 1, three {{Plural|TFH|Blue Rupee|link}} can be found on fire atop a ledge. They will turn into {{Plural|TFH|Green Rupee|link}} if not collected within 15 seconds, making them the only known degradable {{Plural|TFH|Rupee}} in {{TLoZ|series}}. | |||
*As described in Vol. 3 of the {{Term|TFH|Drablands Diary|link}}, some fossilized bones are hidden in each {{Term|TFH|Level|link}} of the {{Term|TFH|Volcano|link}}. They can be found in {{Term|TFH|Stage}} 3 of {{Term|TFH|Den of Flames}} throwing one of more of the {{Plural|TFH|Links|link}} onto the ledge to the west of the first {{Term|TFH|Swinging Platform|link}}, then shifting the camera to the upper-left. | |||
==Nomenclature== | |||
{{Nomenclature}} | |||
==Gallery== | |||
<gallery> | <gallery> | ||
File:TFH | File:TFH Den of Flames Stage 1 3.png|The unique degradable {{Plural|TFH|Rupee}} on a ledge in {{Term|TFH|Stage}} 1 | ||
File:TFH Red Hardhat Beetle.png| | File:TFH Den of Flames Stage 2 2.png|Battling {{Plural|TFH|Red Hardhat Beetle}} in {{Term|TFH|Stage}} 2 | ||
File:TFH | File:TFH Den of Flames Stage 3.png|A series of {{Plural|TFH|Swinging Platform}}, {{Term|TFH|Stage}} 3 | ||
File:TFH Den of Flames Stage 3 2.png|{{Plural|TFH|Guruguru Bar}} on a narrow pathway, {{Term|TFH|Stage}} 3 | |||
</gallery> | </gallery> | ||
{{Ref}} | |||
{{ | |||
{{Categories | |||
|Dens | |||
|levels= TFH | |||
}} | |||
Latest revision as of 21:39, 4 December 2023
Den of Flames is a Level in Tri Force Heroes.[1] It is the third Level in the Volcano Area, preceded by Hinox Mine and followed by Fire Temple.

In Stage 1, the Links begin inside a chasm with pools of molten Lava. Two Gust Jars and a Boomerang are immediately available for use. To cross a gap to the next ledge, the Link with the Boomerang is propelled over with the other Links' Gust Jars, then carries them over using the Boomerang. A Treasure Chest containing a Red Rupee is sitting on a ledge, surrounded by a Flame Wall, which can be extinguished by forming a Totem firing the Gust Jar at it. The Links then move to a Swinging Platform, which will swing them over to the next ledge where the Triforce Gateway awaits. This Swinging Platform can be made to swing further by using the Gust Jar to propel it. The Links can ride it over to another Swinging Platform that leads to a Treasure Chest containing three Hearts. Alternately, the Links can simply form a Totem near the Triforce Gateway and throw one Link onto a nearby ledge leading to it.

In Stage 2, the Links drop down to a large grated platform with three Floor Switches. Pressing the Switches summons a horde of Red Hardhat Beetles. As these Enemies are covered in flames, they must first be either stunned using the Boomerang, or extinguished with the Gust Jars, else the Links will get burned when attacking them. However, if any Link is wearing the Goron Garb, these flaming Enemies can be dispatched with only the Sword. As the Red Hardhat Beetles are defeated, several more will appear. After they are all defeated, a bridge leading to the Triforce Gateway will appear. Hearts and Rupees sitting on ledges along the way can be grabbed with the Boomerang.

In Stage 3, the Links appear on another platform. A pair of Guruguru Bars can be seen spinning around on the next platform across a gap, the upper bar spinning faster than the lower one. The Links must carefully cross the gap while avoiding the flames by using the Gust Jars and Boomerang. The Links then cross a bridge north to a set of Swinging Platforms. As the first Swinging Platform does not swing far enough to reach the second, and must be propelled using the Gust Jar. The Links reach a ledge, then ride a stone platform raised into the air by a Lava Geyser and transfer to a final Swinging Platform, which also needs to be propelled using the Gust Jar to reach a passageway to the north. After dispatching a pair of Red Hardhat Beetles, the Links then cross a narrow, winding path over a lake of Lava with several spinning Guruguru Bars along the way. At the end of this path, they reach the Triforce Gateway and a Squiddy.

In Stage 4, the Links drop to an island inhabited by Fire Keeleons. As they are on fire, the Keeleons must also be stunned with the Boomerang or have their flames extinguished with the Gust Jar before they can be attacked, and a Totem is required in order to reach them. After they are defeated, more Fire Keeleons and some Red Hardhat Beetles appear. After they are all defeated, a stairway to the Triforce Gateway appears.
Drablands Challenges
Once the Boss of the Volcano has been defeated, Den of Flames can be replayed with the following Drablands Challenges: "Fewer Heart Containers!", "Avoid the volcanic rocks!", and "Clear within the time limit!".
In "Clear within the time limit!", the Links are given a timer of one minute in both single-player and Multiplayer. This timer can be increased by collecting Hourglasses or wearing Linebeck's Uniform.
Materials
At the end of the Level, three Treasure Chests can be opened. Two contain the same Material, and one contains another, more valuable Material.
| Drablands Challenge | — |
|---|---|
| Magical Materials | |
| Drablands Challenge | Fewer Heart Containers! |
| Magical Materials | |
| Drablands Challenge | Avoid the volcanic rocks! |
| Magical Materials | |
| Drablands Challenge | Clear within the time limit! |
| Magical Materials |
| Drablands Challenge | Magical Materials |
|---|---|
— | |
Fewer Heart Containers! | |
Avoid the volcanic rocks! | |
Clear within the time limit! |
Enemies and Traps
- Stage 1

- Stage 2
![Red Hardhat Beetle ×11[a]](/wiki/File:TFH_Red_Hardhat_Beetle_Model.png)
- ↑ Five appear when the Links stand on three Floor Switches. The rest appear as they are defeated.
- Stage 3


- Stage 4

- Stage 1

- Stage 2
- ↑ Five appear when the Links stand on three Floor Switches. The rest appear as they are defeated.
- Stage 3
- Stage 4
- Stage 1

- Stage 2
- ↑ Five appear when the Links stand on three Floor Switches. The rest appear as they are defeated.
- Stage 3
- Stage 4
- Stage 1
- Stage 2
- ↑ Five appear when the Links stand on three Floor Switches. The rest appear as they are defeated.
- Stage 3
-

Guruguru Bar ×5
-

Keese ×3
-

-


- Stage 4
Treasure Chests
| Treasure Chest | |
|---|---|
| Contents | |
| Notes | Within a Flame Wall on a ledge in Stage 1 |
| Treasure Chest | |
| Contents |
|
| Notes | On a high ledge east of both Swinging Platforms in Stage 1 |

| Treasure Chest | Contents | Notes |
|---|---|---|
Within a Flame Wall on a ledge in Stage 1 | ||
| On a high ledge east of both Swinging Platforms in Stage 1 |
Trivia
- In Stage 1, three Blue Rupees can be found on fire atop a ledge. They will turn into Green Rupees if not collected within 15 seconds, making them the only known degradable Rupees in The Legend of Zelda series.
- As described in Vol. 3 of the Drablands Diary, some fossilized bones are hidden in each Level of the Volcano. They can be found in Stage 3 of Den of Flames throwing one of more of the Links onto the ledge to the west of the first Swinging Platform, then shifting the camera to the upper-left.
Nomenclature
| Language | Names | Meanings |
|---|---|---|
Japanese | ファイアーフロント (Faiāfuronto)[3] | Fire Front |
FrenchCA | Rive de feu | |
FrenchEU | Rive de feu[5] | |
German | Feuerfront[4] | |
Italian | Covo del fuoco[2] | |
SpanishLA | Morada de las llamas[6] | |
SpanishEU | Morada de las Llamas[7] | |
| This table was generated using translation pages. To request an addition, please contact a staff member with a reference. | ||
Gallery
-
The unique degradable Rupees on a ledge in Stage 1
-
Battling Red Hardhat Beetles in Stage 2
-
A series of Swinging Platforms, Stage 3
-
Guruguru Bars on a narrow pathway, Stage 3


References
- ↑ Encyclopedia, Dark Horse Books, pg. 160
- ↑ "Covo del fuoco" — Level Selection (Tri Force Heroes)
- ↑ "ファイアーフロント" — Level Selection (Tri Force Heroes)
- ↑ "Feuerfront" — Level Selection (Tri Force Heroes)
- ↑ "Rive de feu" — Level Selection (Tri Force Heroes)
- ↑ "Morada de las llamas" — Level Selection (Tri Force Heroes)
- ↑ "Morada de las Llamas" — Level Selection (Tri Force Heroes)