Lake Hylia (Stage)
Lake Hylia is a stage in Hyrule Warriors. It contains the Scenario "The Water Temple" in Legend Mode.
Part of Sheik and Impa's quest, it is separated into two halves: the northern half is Lake Hylia itself, and the southern half is the Water Temple. Pieces of Zora's Domain in its frozen state appear in the Lake Hylia portion of the stage.
The Water Temple
- The Water Temple redirects here. For the location in Ocarina of Time, see Water Temple.
After rescuing Princess Ruto atop the Death Mountain summit from a brainwashed Darunia, Impa and Sheik learn that the Gate of Souls located inside the Water Temple is teeming with monsters apparently being led by Princess Zelda. The Hyrulean Forces, now joined by the Princess of Zoras and the Goron chieftain, venture to Lake Hylia to investigate Zelda's apparent change of heart.[1]
As the Hyrulean Forces arrive at Zora's Domain, Princess Zelda orders her minions to attack them.[2] The allies, however, use the domain's frozen waterfall to attack from the rear and surprise the Dark Forces, lowering their morale.[3] They soon discover that Ruto is being attacked by a group of monsters, and they quickly rush to help her since she is the only one who knows how to gain entrance to the Water Temple, where Zelda and the Gate of Souls are.[4][5] After rescuing the Zora Princess from a group of Lizalfos, she heads to the Lakeside Keep to open the floodgates and thus reveal the entrance to the Water Temple.[6]
Using her position as the Princess of Hyrule, Zelda harshly and continually urges the Hyrulean soldiers to cease their attack and instead follow her "royal command". This causes conflicting thoughts within the army and lowers their morale; Impa realizes that this Zelda is an impostor and repeatedly urges the Hyrulean Forces not to listen.[7][8][9] In light of this, Ruto suggests that they use the Mirror of Truth, found within the Water Temple, to reveal the identity of the fake Zelda.[10] While the Hyrulean Forces advance to the inside of the temple, the Zora Princess goes underwater to search for the relic.[11] Ruto easily infiltrates the temple from underneath and finds the Mirror of Truth, but Zelda closes the hall and imprisons her before she can rejoin her allies.[12][13] Ruto, seeking help from the Hyrulean Forces, instructs them to open the floodgates inside the temple in order to free her.[14] Pulling the two floodgate switches found in the Southeast and Southwest Room of the temple recedes the water from the Central Hall, allowing the allies to rescue the Zora Princess from within. She hands over the Mirror of Truth to Sheik before she retreats from the battlefield.
The newly-acquired relic reveals the room where the impostor and the Gate of Souls are located, and the Hyrulean Forces quickly engage in combat with the false Zelda.[15] Angered, the fake Princess of Hyrule summons King Dodongo to the battlefield to use as a distraction,[16] but Sheik and Impa manage to defeat the impostor before any grave damage is done. Sheik then holds the Mirror of Truth toward Zelda, revealing Wizzro as the impostor. As Wizzro expresses his surprise at how they managed to see through his disguise, Sheik states that the wizard could not have been Zelda before twirling around in a flash of light and revealing her own true identity: Princess Zelda.[17][18] Impa is overjoyed at the sight of the princess alive,[19] with Zelda apologizing for not having told her before.[20] After Wizzro escapes, the real Princess of Hyrule and her top general combine their powers to close the Gate of Souls, stemming the flow of monsters from the era of the Hero of Time.[21]
After the Scenario finishes, Zelda becomes a playable character and her weapon, the Polished Rapier, becomes available for use.
Enemies and Bosses


-
King Dodongo (Optional)
Keeps
- Central Hall
- Cliffside Keep
- Hall of Mirrors
- King's Hall
- Lakeside Keep
- East Room
- SE Room
- SW Room
- West Room
- Temple Face Keep
Collectibles
| Item | Location | Condition | |
|---|---|---|---|
| Gold Skulltula | North of the Temple Face Keep behind a set of vines | Defeat 1000 enemies | |
| Gold Skulltula (Hard Mode) |
Atop the waterfall cliff in the Zora's Domain portion of the stage | As Impa equipped with the Giant Blade, defeat King Dodongo within three minutes of him appearing while keeping Sheik safe. | |
| File:Heart Piece Icon TP.png | Piece of Heart | Capture the East Room | Play as Sheik |
| File:Heart Container Icon TP.png | Heart Container | Bomb the boulder in the eastern portion of Central Hall | Play as Darunia |
Gallery
-
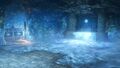
Frozen Zora's Domain
-
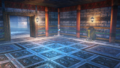
The Water Temple


References
- ↑ "At the fairy's request, Impa had fought her way to the summit of Death Mountain to rescue Princess Ruto. There, she subdued the Goron chieftain, Darunia, who had temporarily lost his senses. Upon freeing Princess Ruto, however, Impa was shocked to learn the reason for the conflict between the Zora and Goron people. The ancient Water Temple was teeming with monsters that poured from the Gate of Souls. What's more, the monsters were apparently led by Princess Zelda herself! Hoping to make sense of this disturbing revelation, Impa and her newfound allies journeyed to Lake Hylia. When they arrived, they were greeted by a Zelda seemingly consumed by evil..." — Narrator (Hyrule Warriors)
- ↑ "Hm. Invaders. Someone destroy them for me." — Zelda (Hyrule Warriors)
- ↑ "Jump from the frozen waterfall cliff, and attack from the rear!" — N/A (Hyrule Warriors)
- ↑ "He-ey there! Help me!" — Ruto (Hyrule Warriors)
- ↑ "Princess Ruto is the only one who knows how to get into the temple! Keep her safe!" — Impa (Hyrule Warriors)
- ↑ "The only way into the Water Temple requires we open the floodgates. Let's hurry!" — Ruto (Hyrule Warriors)
- ↑ "Hyrulean soldiers! Cease fighting for the unworthy, and follow my royal command!" — Zelda (Hyrule Warriors)
- ↑ "Zelda's harsh rhetoric has cost Hyrulean Forces some morale!" — N/A (Hyrule Warriors)
- ↑ "Don't be deceived! This is not our Zelda! Anything she says will be a lie!" — Impa (Hyrule Warriors)
- ↑ "We could always use the Mirror of Truth... A hero left it in the temple some time ago!" — Ruto (Hyrule Warriors)
- ↑ "I'll go underwater and find the Mirror of Truth. We can meet back up later." — Ruto (Hyrule Warriors)
- ↑ "Getting in was easy. Now I just need to find the Mirror of Truth itself... Here it is! The Mirror of Truth! This is exactly what we need... [...] Oh, of course. I feared they were planning to trap me in here, and they have." — Ruto (Hyrule Warriors)
- ↑ "Zelda's strategy has closed the Central Hall!" — N/A (Hyrule Warriors)
- ↑ "Go and open the floodgates inside the temple! Doing that should free me! You have to seek out all the keeps with floodgate switches. Understand?" — Ruto (Hyrule Warriors)
- ↑ "The Mirror of Truth has revealed a hidden passageway!" — N/A (Hyrule Warriors)
- ↑ "I have no diea how you broke my spell... But no matter. You leave me no recourse... My loyal servant, King Dodongo! Come forth! Burn these fools to the bone!" — Zelda (Hyrule Warriors)
- ↑ "How did you see through my disguise?" — Wizzro (Hyrule Warriors)
- ↑ "You can't be Zelda. Because... I am Zelda!" — Zelda (Hyrule Warriors)
- ↑ "Princess! You're alive!" — Impa (Hyrule Warriors)
- ↑ "Impa, forgive me for not telling you." — Zelda (Hyrule Warriors)
- ↑ "Let us close this gate together." — Zelda (Hyrule Warriors)