Force Gem: Difference between revisions

From Zelda Wiki, the Zelda encyclopedia
Jump to navigation Jump to search
m (Renaming Image)
(→‎{{ST|-}}: Added sortable Prerequisites column to table)
Line 73: Line 73:
! Realm Affected
! Realm Affected
! class="unsortable" | New Access
! Prerequisites
|-
|-
| data-sort-value="1"| {{Term|ST|Force Gem 1|link}}
| data-sort-value="1"| {{Term|ST|Force Gem 1|link}}
Line 81: Line 82:
| {{Key|1}}{{Term|ST|Forest Realm|link}}
| {{Key|1}}{{Term|ST|Forest Realm|link}}
| {{Term|ST|Warp Gate B|link}}<br/>[[Grass Rabbit|Grass Rabbit 4]]
| {{Term|ST|Warp Gate B|link}}<br/>[[Grass Rabbit|Grass Rabbit 4]]
| data-sort-value="0"| —
|-
|-
| data-sort-value="2"| {{Term|ST|Force Gem 2|link}}
| data-sort-value="2"| {{Term|ST|Force Gem 2|link}}
Line 89: Line 91:
| {{Key|1}}{{Term|ST|Forest Realm|link}}
| {{Key|1}}{{Term|ST|Forest Realm|link}}
| {{Plural|ST|Grass Rabbit|link}} 5 and 6
| {{Plural|ST|Grass Rabbit|link}} 5 and 6
| data-sort-value="2"| Complete the {{Term|ST|Ocean Temple|link}}
|-
|-
| data-sort-value="3"| {{Term|ST|Force Gem 3|link}}
| data-sort-value="3"| {{Term|ST|Force Gem 3|link}}
Line 97: Line 100:
| {{Key|1}}{{Term|ST|Forest Realm|link}}
| {{Key|1}}{{Term|ST|Forest Realm|link}}
| {{Plural|ST|Grass Rabbit|link}} 8 and 9
| {{Plural|ST|Grass Rabbit|link}} 8 and 9
| data-sort-value="2"| Complete the {{Term|ST|Ocean Temple|link}}
|-
|-
| data-sort-value="4"| {{Term|ST|Force Gem 4|link}}
| data-sort-value="4"| {{Term|ST|Force Gem 4|link}}
Line 105: Line 109:
| {{Key|1}}{{Term|ST|Forest Realm|link}}
| {{Key|1}}{{Term|ST|Forest Realm|link}}
| Shortcut between {{Term|ST|Castle Town|link}} and {{Term|ST|Forest Temple|link}}
| Shortcut between {{Term|ST|Castle Town|link}} and {{Term|ST|Forest Temple|link}}
| data-sort-value="2"| Complete the {{Term|ST|Ocean Temple|link}}
|-
|-
| data-sort-value="5"| {{Term|ST|Force Gem 5|link}}
| data-sort-value="5"| {{Term|ST|Force Gem 5|link}}
Line 113: Line 118:
| {{Key|2}}{{Term|ST|Snow Realm|link}}
| {{Key|2}}{{Term|ST|Snow Realm|link}}
| {{Term|ST|Warp Gate C|link}}<br/>Eastern link to {{Term|ST|Forest Realm|link}}
| {{Term|ST|Warp Gate C|link}}<br/>Eastern link to {{Term|ST|Forest Realm|link}}
| data-sort-value="1"| Perform {{Term|ST|Lokomo Song|link}} with {{Term|ST|Carben|link}}
|-
|-
| data-sort-value="6"| {{Term|ST|Force Gem 6|link}}
| data-sort-value="6"| {{Term|ST|Force Gem 6|link}}
Line 121: Line 127:
| {{Key|2}}{{Term|ST|Snow Realm|link}}
| {{Key|2}}{{Term|ST|Snow Realm|link}}
| {{Term|ST|Warp Gate D|link}}<br/>{{Plural|ST|Snow Rabbit|link}} 8 and 9
| {{Term|ST|Warp Gate D|link}}<br/>{{Plural|ST|Snow Rabbit|link}} 8 and 9
| data-sort-value="5"| Complete the {{Term|ST|Fire Temple|link}}
|-
|-
| data-sort-value="7"| {{Term|ST|Force Gem 7|link}}
| data-sort-value="7"| {{Term|ST|Force Gem 7|link}}
Line 129: Line 136:
| {{Key|2}}{{Term|ST|Snow Realm|link}}
| {{Key|2}}{{Term|ST|Snow Realm|link}}
| Northern link to {{Term|ST|Fire Realm|link}}
| Northern link to {{Term|ST|Fire Realm|link}}
| data-sort-value="6"| Obtain {{Term|ST|Force Gem 6|link}}
|-
|-
| data-sort-value="8"| {{Term|ST|Force Gem 8|link}}
| data-sort-value="8"| {{Term|ST|Force Gem 8|link}}
Line 137: Line 145:
| {{Key|4}}{{Term|ST|Fire Realm|link}}
| {{Key|4}}{{Term|ST|Fire Realm|link}}
| {{Term|ST|Warp Gate F|link}}<br/>[[Desert Rabbit|Desert Rabbit 1]]<br/>Western link to {{Term|ST|Ocean Realm|link}} through {{Term|ST|Sand Realm|link}}
| {{Term|ST|Warp Gate F|link}}<br/>[[Desert Rabbit|Desert Rabbit 1]]<br/>Western link to {{Term|ST|Ocean Realm|link}} through {{Term|ST|Sand Realm|link}}
| data-sort-value="4"| Clear the {{Term|ST|Geyser|link}} in {{Term|ST|Goron Village|link}}
|-
|-
| data-sort-value="9"| {{Term|ST|Force Gem 9|link}}
| data-sort-value="9"| {{Term|ST|Force Gem 9|link}}
Line 145: Line 154:
| {{Key|1}}{{Term|ST|Forest Realm|link}}
| {{Key|1}}{{Term|ST|Forest Realm|link}}
| Shortcut from {{Term|ST|Forest Temple|link}} to {{Term|ST|Warp Gate A}} in {{Term|ST|Snow Realm|link}}
| Shortcut from {{Term|ST|Forest Temple|link}} to {{Term|ST|Warp Gate A}} in {{Term|ST|Snow Realm|link}}
| data-sort-value="4"| Clear the {{Term|ST|Geyser|link}} in {{Term|ST|Goron Village|link}}
|-
|-
| data-sort-value="10"| {{Term|ST|Force Gem 10|link}}
| data-sort-value="10"| {{Term|ST|Force Gem 10|link}}
Line 153: Line 163:
| {{Key|2}}{{Term|ST|Snow Realm|link}}
| {{Key|2}}{{Term|ST|Snow Realm|link}}
| {{Term|ST|Snowdrift Station|link}}<br/>[[Snow Rabbit|Snow Rabbit 10]]
| {{Term|ST|Snowdrift Station|link}}<br/>[[Snow Rabbit|Snow Rabbit 10]]
| data-sort-value="3"| Obtain a {{Term|ST|Freight Car|link}} {{Note|{{Term|ST|Kenzo}} can be transported after performing the {{Term|ST|Lokomo Song}} with {{Term|ST|Carben}}.}}
|-
|-
| data-sort-value="11"| {{Term|ST|Force Gem 11|link}}
| data-sort-value="11"| {{Term|ST|Force Gem 11|link}}
Line 161: Line 172:
| {{Key|1}}{{Term|ST|Forest Realm|link}}
| {{Key|1}}{{Term|ST|Forest Realm|link}}
| Shortcut from {{Term|ST|Hyrule Castle Town|link}} to [[Bridge Worker's Home]] in {{Term|ST|Snow Realm}}
| Shortcut from {{Term|ST|Hyrule Castle Town|link}} to [[Bridge Worker's Home]] in {{Term|ST|Snow Realm}}
| data-sort-value="4"| Clear the {{Term|ST|Geyser|link}} in {{Term|ST|Goron Village|link}}
|-
|-
| data-sort-value="12"| {{Term|ST|Force Gem 12|link}}
| data-sort-value="12"| {{Term|ST|Force Gem 12|link}}
Line 169: Line 181:
| {{Key|1}}{{Term|ST|Forest Realm|link}}
| {{Key|1}}{{Term|ST|Forest Realm|link}}
| [[Grass Rabbit|Grass Rabbit 10]]<br/>[[Ocean Rabbit|Ocean Rabbit 8]]<br/>Link to {{Term|ST|Ocean Realm|link}}{{Note|The tracks added by {{Term|ST|Force Gem 12}} lead to a dead-end in the {{Term|ST|Ocean Realm}} that links up to the tracks from {{Term|ST|Force Gem 16}}.}}
| [[Grass Rabbit|Grass Rabbit 10]]<br/>[[Ocean Rabbit|Ocean Rabbit 8]]<br/>Link to {{Term|ST|Ocean Realm|link}}{{Note|The tracks added by {{Term|ST|Force Gem 12}} lead to a dead-end in the {{Term|ST|Ocean Realm}} that links up to the tracks from {{Term|ST|Force Gem 16}}.}}
| data-sort-value="3"| Obtain a {{Term|ST|Freight Car|link}} {{Note|If this {{Term|ST|Force Gem}} is not obtained by the time {{Term|ST|Link}} completes the {{Term|ST|Fire Temple}}, he will need to obtain {{Term|ST|Force Gem 16}} first.}}
|-
|-
| data-sort-value="13"| {{Term|ST|Force Gem 13|link}}
| data-sort-value="13"| {{Term|ST|Force Gem 13|link}}
Line 177: Line 190:
| {{Key|1}}{{Term|ST|Forest Realm|link}}
| {{Key|1}}{{Term|ST|Forest Realm|link}}
| {{Term|ST|Warp Gate E|link}}
| {{Term|ST|Warp Gate E|link}}
| data-sort-value="3"| Obtain a {{Term|ST|Freight Car|link}}
|-
|-
| data-sort-value="14"| {{Term|ST|Force Gem 14|link}}
| data-sort-value="14"| {{Term|ST|Force Gem 14|link}}
| {{Term|ST|Steem|link}}
| {{Term|ST|Steem|link}}
| {{Term|ST|Cargo|link}}
| {{Term|ST|Cargo|link}}: [[File:ST Vessel Icon.png|16px|link=Vessel]]
| {{Term|ST|Papuchia Village|link}}
| {{Term|ST|Papuchia Village|link}}
| [[Snow Sanctuary]]
| [[Snow Sanctuary]]
| {{Key|2}}{{Term|ST|Snow Realm|link}}
| {{Key|2}}{{Term|ST|Snow Realm|link}}
| [[Slippery Station]]
| [[Slippery Station]]
| data-sort-value="3"| Obtain a {{Term|ST|Freight Car|link}}
|-
|-
| data-sort-value="15"| {{Term|ST|Force Gem 15|link}}
| data-sort-value="15"| {{Term|ST|Force Gem 15|link}}
Line 193: Line 208:
| {{Key|4}}{{Term|ST|Fire Realm|link}}
| {{Key|4}}{{Term|ST|Fire Realm|link}}
| [[Disorientation Station]]<br/>[[Mountain Rabbit|Mountain Rabbit 9]]
| [[Disorientation Station]]<br/>[[Mountain Rabbit|Mountain Rabbit 9]]
| data-sort-value="5"| Complete the {{Term|ST|Fire Temple|link}}
|-
|-
| data-sort-value="16"| {{Term|ST|Force Gem 16|link}}
| data-sort-value="16"| {{Term|ST|Force Gem 16|link}}
Line 201: Line 217:
| {{Key|3}}{{Term|ST|Ocean Realm|link}}
| {{Key|3}}{{Term|ST|Ocean Realm|link}}
| [[Pirate Hideout]]<br/>Shortcut from [[Pirate Hideout]] to {{Term|ST|Forest Realm|link}} via tracks from {{Term|ST|Force Gem 12}}
| [[Pirate Hideout]]<br/>Shortcut from [[Pirate Hideout]] to {{Term|ST|Forest Realm|link}} via tracks from {{Term|ST|Force Gem 12}}
| data-sort-value="5"| Complete the {{Term|ST|Fire Temple|link}}
|-
|-
| data-sort-value="17"| {{Term|ST|Force Gem 17|link}}
| data-sort-value="17"| {{Term|ST|Force Gem 17|link}}
Line 209: Line 226:
| {{Key|3}}{{Term|ST|Ocean Realm|link}}
| {{Key|3}}{{Term|ST|Ocean Realm|link}}
| {{Term|ST|Warp Gate G|link}}<br/>[[Ocean Rabbit|Ocean Rabbit 9]]<br/>Shortcut between {{Term|ST|Ocean Sanctuary|link}} and {{Term|ST|Ocean Floor|link}}, {{Term|ST|Sand Realm|link}}
| {{Term|ST|Warp Gate G|link}}<br/>[[Ocean Rabbit|Ocean Rabbit 9]]<br/>Shortcut between {{Term|ST|Ocean Sanctuary|link}} and {{Term|ST|Ocean Floor|link}}, {{Term|ST|Sand Realm|link}}
| data-sort-value="5"| Complete the {{Term|ST|Fire Temple|link}}
|-
|-
| data-sort-value="18"| {{Term|ST|Force Gem 18|link}}
| data-sort-value="18"| {{Term|ST|Force Gem 18|link}}
Line 216: Line 234:
| [[Ocean Temple]]
| [[Ocean Temple]]
| {{Key|4}}{{Term|ST|Fire Realm|link}}
| {{Key|4}}{{Term|ST|Fire Realm|link}}
| [[Dark Ore Mine]]<br/>Eastern link to {{Term|ST|Sand Realm|link}}  
| [[Dark Ore Mine]]<br/>Eastern link to {{Term|ST|Sand Realm|link}}
| data-sort-value="8"| Complete the {{Term|ST|Sand Temple|link}}, then enter the {{Term|ST|Tower of Spirits|link}}
|-
|-
| data-sort-value="19"| {{Term|ST|Force Gem 19|link}}
| data-sort-value="19"| {{Term|ST|Force Gem 19|link}}
Line 225: Line 244:
| {{Key|3}}{{Term|ST|Ocean Realm|link}}
| {{Key|3}}{{Term|ST|Ocean Realm|link}}
| [[Lost at Sea Station]]<br/>[[Ocean Rabbit|Ocean Rabbit 10]]
| [[Lost at Sea Station]]<br/>[[Ocean Rabbit|Ocean Rabbit 10]]
| data-sort-value="9"| Obtain {{Term|ST|Force Gem 18|link}}
|-
|-
| data-sort-value="20"| {{Term|ST|Force Gem 20|link}}
| data-sort-value="20"| {{Term|ST|Force Gem 20|link}}
Line 233: Line 253:
| {{Key|5}}{{Term|ST|Sand Realm|link}}
| {{Key|5}}{{Term|ST|Sand Realm|link}}
| [[Ends of the Earth Station]]<br/>[[Mountain Rabbit|Mountain Rabbit 10]]
| [[Ends of the Earth Station]]<br/>[[Mountain Rabbit|Mountain Rabbit 10]]
| data-sort-value="7"| Obtain the {{Term|ST|Sand Wand|link}}
|}
|}


Revision as of 02:50, 18 June 2023

ZW Reorg Asset.png
This article is a viable candidate for reorganization.
Please see the related discussion on this article's talk page for more information concerning its future layout.

Force Gems are recurring triangular-pyramid-shaped jewels in The Legend of Zelda series.[1] Their roles vary from restoring power to the Four Sword in Four Swords Adventures,[2][3] to restoring Spirit Tracks and portions of the Tower of Spirits in Spirit Tracks. They are physical manifestations of the Force, the sacred power that dwells in every living being.[4][5]

Location and Uses

Four Swords Adventures

FSA Force Gems.png

Force Gems first appeared in Four Swords Adventures. The Links need to collect 2000 of them to empower the Four Sword, which has lost its power because of Vaati's magic.[6] Once empowered, it can break Vaati's Dark Barrier at the end of each level.[7][8] Like Rupees in most games in the series, their size and color determine their value. Often, levels will have an area that gives an opportunity to get many Force Gems at once; usually, this involves defeating many enemies without being hit. Doing this awards combo points, which will give more Force Gems from defeating the enemies.[9] In some cases, the Force Gems are used as currency.[10] Sometimes, if big Force Gems are lying around, Tingle will appear and attempt to take them before Link can reach them; Link can throw things at him to deter him.

Force Gems appear throughout each level, found on enemies, under rocks, frozen in ice, and more.[11] Below is a list of the values for each variety of Force Gem:

Force Gem Values

  • FSA Force Gem Green Sprite.png
    Small Green Force Gem worth 1
  • FSA Force Gem Blue Sprite.png
    Small Blue Force Gem worth 5
  • FSA Force Gem Red Sprite.png
    Small Red Force Gem worth 20
  • FSA Force Gem Purple Sprite.png
    Small Purple Force Gem worth 50
  • FSA Big Force Gem Green Sprite.png
    Big Green Force Gem worth 100
  • FSA Big Force Gem Blue Sprite.png
    Big Blue Force Gem worth 150
  • FSA Big Force Gem Red Sprite.png
    Big Red Force Gem worth 200
  • FSA Big Force Gem Purple Sprite.png
    Big Purple Force Gem worth 300
  • Large Green Force Gem worth 1,000
  • Large Blue Force Gem worth 1,500
  • Large Red Force Gem worth 2,000
  • Large Purple Force Gem worth 3,000

Rare Force Gems

A Force Soldier
A Force Soldier
  • Color alternating Force Gem: Its value depends on which color it is when obtained.
  • Force Soldier: A large green Force Gem with a sword and legs. If Link destroys it, it will become a big green Force Gem. However, if Link does not defeat it in time and it self destructs, its value will be reduced to one Force Gem.

Force Gem Thieves

  • Hinoxes will shake great amounts of Force Gems from Link while he is in their grasp.
  • Wizzrobes can continuously suck Force Gems from Link while dodging him at great ease and speed.
  • Force Likes will suck Force Gems from Link.
  • When Link takes significant damage, Force Gems will fall from him.

Phantom Hourglass

Force Gems in Phantom Hourglass are gold-colored. They are used in Temple of the Ocean King. In the temple, they are used to complete a Triforce symbol in the ground that will open a door. Just like a Boss Key, they slow down Link while he is carrying one and prevent him from attacking or defending himself.[12] At one point in the game, Oshus explains that the Sand of Hours are made of Force Gems from the Ocean King.[13]

In Battle Mode, Force Gems vary in size. The colors are changed during gameplay but the value of points remains the same. The larger it is, the more it is worth and heavier to carry. The Gold-colored Force Gems signify an unclaimed Force Gem. The Links' colors for the Battle Mode are red and blue. Each will have Safe Zones in their respective colors. The safe zones serve to hide Link from the Phantoms and the colored Safe Zones will change a Force Gem to its color, which adds its value to that Link's score. The neutral Safe Zones will turn red or blue gems back to gold and subtract the values from the scores.

Force Gems are found on floors three and twelve, both having three each. They're usually found on chests which can only be found and opened after solving puzzles, and it's not uncommon that other Gems are held by Phantoms as well, requiring Link to stun them first. On floor nine, the role of the Force Gems is taken by the geometrically-shaped crystals found on floors seven and eight.

Spirit Tracks

The Force Gem of the Forest Temple

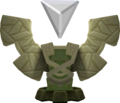
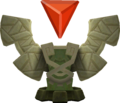
In Spirit Tracks, Force Gems are integral to the plot. The Force Gems in the Forest, Snow, Ocean, Fire Temples emit energy that is carried by Spirit Tracks to the Tower of Spirits, which the Spirits of Good built to imprison Malladus.[14][15] When Cole and Byrne plot to resurrect Malladus, Link and Princess Zelda go to the four temples to restore the energy between them and the broken Tower of Spirits.[16] These Force Gems are colored according to the Realm in which they are in. They each emerge from the remains of defeated bosses and rest on a winged pedestal that appears out of the floor. This restores the Spirit Tracks from the temple to the Spirit Tower, at the same time sending a burst of energy that restores another section of the tower.

The pedestal-mounted Force Gem is the symbol of the Spirits of Good which appears on the Rail Map and the Lokomo's vehicles. For the same reason, the Shield is studded with an ornamental Force Gem—the Lokomo Sword has one in its pommel. One of each pair of Spacetime Gates is adorned with a Force Gem whose color indicates whether or not the gate is active. The gate is activated by striking the Force Gem using the Cannon.

When Link helps certain characters, their happiness or gratitude causes them to emit Energy in the form of a small yellow Force Gem that restores yet more of the Spirit Tracks.[17] Anjean gives Link one that opens the Spirit Tracks in the Sand Realm.[5][18] The other 20 of these Force Gems restore tracks that are optional. These grant access to new shortcuts, Stations, Spacetime Gates and Rabbits (generally in the Realm the person is in). Link obtains the 20 Force Gems by transporting Passengers and Cargo from one location to another.

Number[note 1] Giver Event Origin Destination Realm Affected New Access Prerequisites
Force Gem 1 Carben Passenger Papuchia Village Ocean Sanctuary 1Forest Realm Warp Gate B
Grass Rabbit 4
Force Gem 2 Dovok Passenger Whittleton Papuchia Village 1Forest Realm Grass Rabbits 5 and 6 Complete the Ocean Temple
Force Gem 3 Mona Passenger Castle Town Rabbitland Rescue 1Forest Realm Grass Rabbits 8 and 9 Complete the Ocean Temple
Force Gem 4 Joe Passenger Aboda Village Beedle's Airshop 1Forest Realm Shortcut between Castle Town and Forest Temple Complete the Ocean Temple
Force Gem 5 Noko Passenger Anouki Village Wellspring Station 2Snow Realm Warp Gate C
Eastern link to Forest Realm
Perform Song of Restoration with Carben
Force Gem 6 Goron[which?] Passenger Goron Village Anouki Village 2Snow Realm Warp Gate D
Snow Rabbits 8 and 9
Complete the Fire Temple
Force Gem 7 Kofu Passenger Anouki Village Goron Village 2Snow Realm Northern link to Fire Realm Obtain Force Gem 6
Force Gem 8 Goron[which?] Cargo: ST Mega Ice Icon.png (10) Wellspring Station Goron Village 4Fire Realm Warp Gate F
Desert Rabbit 1
Western link to Ocean Realm through Sand Realm
Clear the Geyser in Goron Village
Force Gem 9 Mash Cargo: ST Goron Iron Icon.png (5) Goron Village Whittleton 1Forest Realm Shortcut from Forest Temple to Warp Gate A in Snow Realm Clear the Geyser in Goron Village
Force Gem 10 Yeko Cargo: ST Lumber Icon.png (10)
Passenger: Kenzo
Whittleton (for Lumber)
Trading Post (for Kenzo)
Anouki Village 2Snow Realm Snowdrift Station
Snow Rabbit 10
Obtain a Freight Car [note 2]
Force Gem 11 Ferrus Passenger Snow Realm tracks near Snow Temple Aboda Village 1Forest Realm Shortcut from Castle Town to Bridge Worker's Home in Snow Realm Clear the Geyser in Goron Village
Force Gem 12 Lucia Cargo: ST Fish Icon.png (10) Papuchia Village Hyrule Castle Town 1Forest Realm Grass Rabbit 10
Ocean Rabbit 8
Link to Ocean Realm[note 3]
Obtain a Freight Car [note 4]
Force Gem 13 Harry Cargo: ST Cucco Icon.png (10) Castle Town Aboda Village 1Forest Realm Warp Gate E Obtain a Freight Car
Force Gem 14 Steem Cargo: ST Vessel Icon.png Papuchia Village Snow Sanctuary 2Snow Realm Slippery Station Obtain a Freight Car
Force Gem 15 Goron Child Passenger Goron Village Hyrule Castle Town 4Fire Realm Disorientation Station
Mountain Rabbit 9
Complete the Fire Temple
Force Gem 16 Niboshi Cargo: ST Mega Ice Icon.png (10) Wellspring Station Papuchia Village 3Ocean Realm Pirate Hideout
Shortcut from Pirate Hideout to Forest Realm via tracks from Force Gem 12
Complete the Fire Temple
Force Gem 17 Wadatsumi Passenger Pirate Hideout Papuchia Village 3Ocean Realm Warp Gate G
Ocean Rabbit 9
Shortcut between Ocean Sanctuary and Ocean Floor, Sand Realm
Complete the Fire Temple
Force Gem 18 Ferrus Passenger Fire Realm tracks next to Fire Temple Ocean Temple 4Fire Realm Dark Ore Mine
Eastern link to Sand Realm
Complete the Sand Temple, then enter the Tower of Spirits
Force Gem 19 Linebeck III Cargo: ST Dark Ore Icon.png (5) Dark Ore Mine Trading Post 3Ocean Realm Lost at Sea Station
Ocean Rabbit 10
Obtain Force Gem 18
Force Gem 20 Rael Cargo: ST Cucco Icon.png (5) Castle Town Sand Sanctuary 5Sand Realm Ends of the Earth Station
Mountain Rabbit 10
Obtain the Sand Wand

Battle Mode has players collecting as many Force Gems as they can within a time limit.

Trivia

Nomenclature

ZW Nomenclature Asset.png Names in Other Regions ZW Nomenclature Asset 2.png
LanguageNamesMeanings
Japan
Japanese
フォース (Fōsu) (PH)[23]Force
Canada
FrenchCA
Joyau de force (ST)[27] 
The French Republic
FrenchEU
Gemme de force (ST)[25] 
The Federal Republic of Germany
German
Force-Kristall (ST)[24] 
The Italian Republic
Italian
  • Gemma Forza (FSA)[21]
  • Gemma della Forza (ST)[22]
  • Same as English.
  •  
Latin America
SpanishLA
Gema de la fuerza (ST)[26] 
The Kingdom of Spain
SpanishEU
Fortianita (ST)[28] 
This table was generated using translation pages.
To request an addition, please contact a staff member with a reference.

Gallery

Notes

  1. According to The Legend of Zelda: Spirit Tracks—PRIMA Official Game Guide by Prima Games.[19] They are not numbered in-game, nor are they even stored on the Collection Screen screen.
  2. Kenzo can be transported after performing the Song of Restoration with Carben.
  3. The tracks added by Force Gem 12 lead to a dead-end in the Ocean Realm that links up to the tracks from Force Gem 16.
  4. If this Force Gem is not obtained by the time Link completes the Fire Temple, he will need to obtain Force Gem 16 first.

References

  1. Encyclopedia, Dark Horse Books, pg. 124 (FSA | PH | ST)
  2. "Your sword is weak, but you can restore its power by infusing it with Force Gems." — Kaepora Gaebora (Four Swords Adventures)
  3. "You found a Force Gem, the Four Sword's power source!" — N/A (Four Swords Adventures)
  4. Hyrule Historia, Dark Horse Books, pg. 75
  5. 5.0 5.1 "As I am sure you know, happiness and gratitude create energy. Well, I am deeply grateful to both of you for all of your help. I cannot help you directly, but I can at least give you this Force Gem." — Anjean (Spirit Tracks)
  6. "However, Vaati's magic has robbed the Four Sword of its power to vanquish darkness. To return the sword to its full strength, find the source of that power: Force Gems." — Kaepora Gaebora (Four Swords Adventures)
  7. "Your goal is to destroy the dark magic barrier at the end of each stage. The only way to destroy the barrier is with the magic Force Gem power of the legendary Four Sword." (Four Swords Adventures manual, pg. 18)
  8. "If the Four Sword doesn't have enough power, it cant destroy the barrier. Refer to the Status screen to see how many Force Gems you need before the Four Sword reclaims its power to repel evil." (Four Swords Adventures manual, pg. 19)
  9. "Defeat multiple enemies with a single blow to get more Force Gems." — N/A (Four Swords Adventures)
  10. "Today, my aid can be yours for a paltry sum! How about a mere... ??? Force Gems!" — Man (Four Swords Adventures)
  11. "Force Gems can be found all over Hyrule. These gems are the source of the Four Sword's power. They appear after you defeat enemies or cut down grass and bushes." (Four Swords Adventures manual, pg. 18)
  12. The Legend of Zelda: Phantom Hourglass—Prima Official Game Guide, Prima Games, pg. 15
  13. "It is said to be made of Force Gems of the great spirit, the Ocean King." — Oshus (Phantom Hourglass)
  14. "Long ago, the spirits of good and the Demon King were embroiled in a never-ending war. In the end, the spirits could not defeat him. But they did manage to imprison him in this tower." — Anjean (Spirit Tracks)
  15. "It's not chains or bars that keep him imprisoned, but an energy that flows between the tower and the four temples that surround it." — Anjean (Spirit Tracks)
  16. "At the top of this tower is your body. The Demon King's spirit is also there. To prevent him from possessing your body, you must fortify his prison. To do this, restore the energy between the temples and this tower. In other words... Restore the tracks between here and the temples." — Anjean (Spirit Tracks)
  17. "You plan to continue your journey by train, do you not? Then you must always go forth with people's hearts in your mind. When you make people happy, their spirits emit energy. When this energy builds, new tracks appear.
    This should be very useful for your journey.
    " — Carben (Spirit Tracks)
  18. "This Force Gem will serve that very purpose. It will open tracks into the desert." — Anjean (Spirit Tracks)
  19. The Legend of Zelda: Spirit Tracks—PRIMA Official Game Guide, Prima Games, pg. 311
  20. Encyclopedia, Dark Horse Books, pg. 267
  21. "Per far sì che torni com'era, devi cercare la fonte del suo potere: le Gemme Forza." — Kaepora Gaebora (Four Swords Adventures, Italian localization)
  22. "Hai ricevuto una Gemma della Forza! La Stele sprigiona forte luce!" — N/A (Spirit Tracks)
  23. フォースを見つけた!
    こっそり持ち運ぼう! (N/A)
  24. "Du hast einen Force-Kristall erhalten! Die Waldtafel leuchtet auf!" — N/A (Spirit Tracks)
  25. "Vous obtenez une gemme de force, signe de gratitude! La stèle sylvestre se met à briller!" — N/A (Spirit Tracks)
  26. "¡Has encontrado una gema de la fuerza! ¡La Litografía de los Bosques está brillando!" — N/A (Spirit Tracks)
  27. "Vous avez obtenez un joyau de force, signe de gratitude! Le glyphe de la forêt s'est mis à briller!" — N/A (Spirit Tracks)
  28. "¡Has recibido una fortianita! ¡La Litografía de los Bosques está brillando!" — N/A (Spirit Tracks)