Figurine Gallery: Difference between revisions
MannedTooth (talk | contribs) |
|||
| (30 intermediate revisions by 6 users not shown) | |||
| Line 1: | Line 1: | ||
{{ | {{Infobox Location | ||
| | |image= | ||
| | {{Media | ||
| | |Sprite TMC= File:TMC Figurine Gallery Sprite.png | ||
|Screenshot TMC= File:TMC Figurine Gallery Interior.png | |||
}} | }} | ||
The | |caption= | ||
|pronunciation= | |||
|game= {{TMC}} | |||
|other= | |||
|inhab= {{Term|TMC|Carlov|link}} | |||
|items= | |||
|season= | |||
|temperature= | |||
|theme= | |||
|related= | |||
}} | |||
The {{Term/Store|Figurine Gallery||Series, TMC}} is a location in {{TMC}}.<ref>{{Cite Guide|quote= |game= TMC |publisher= Nintendo |page= 39}}</ref> | |||
==Features and Overview== | |||
The {{Term|TMC|Figurine Gallery}} is run by {{Term|TMC|Carlov|link}} the sculptor. Its entrance is a clump of bushes found in the southwest corner of {{Term|TMC|Hyrule Town|link}}. | |||
The Figurine | The {{Term|TMC|Figurine Gallery}} functions as a drawing where {{Term|TMC|Link|link}} trades {{Plural|TMC|Mysterious Shell|link}} for a chance to win a {{Term|TMC|Figurine|link}} from the {{Term|TMC|Figure-Dispensing Machine|link}}. {{Plural|TMC|Figurine}} are of the various people, creatures, and enemies {{Term|TMC|Link}} meets throughout the game. The starting price for a drawing is one {{Term|TMC|Mysterious Shell}}. As more {{Plural|TMC|Figurine}} are won, the chance of winning a new {{Term|TMC|Figurine}} for his collection decreases. The probability can be raised by betting additional {{Plural|TMC|Mysterious Shell}} and by exploring new areas. {{Term|TMC|Carlov}} will make newer {{Plural|TMC|Figurine}} as {{Term|TMC|Link}} meets newer allies and enemies. | ||
The | The {{Plural|TMC|Figurine}} won are kept by {{Term|TMC|Carlov}} in a display case in the {{Term|TMC|Figurine Gallery}} for {{Term|TMC|Link}} to view. {{Term|TMC|Carlov}} will buy back {{Plural|TMC|Figurine}} drawn that are already in {{Term|TMC|Link}}'s collection for five {{Plural|TMC|Rupee|link}}. | ||
There are a total of 130 | There are a total of 130 {{Plural|TMC|Figurine}} to be won, with six more added to collect upon completing the game, making the total 136. | ||
The reward for collecting all of the | The reward for collecting all of the {{Plural|TMC|Figurine}} is given by {{Term|TMC|Herb|link}}, the man sitting outside {{Term|TMC|Mama's Cafe|link}}. He will let {{Term|TMC|Link}} inside his house, which contains a {{Term|TMC|Piece of Heart|link}}, three {{Plural|TMC|Treasure Chest}} with 200 {{Plural|TMC|Rupee}} each, and a {{Term|TMC|Phonograph|link}}. | ||
After collecting all 136 | After collecting all 136 {{Plural|TMC|Figurine}}, the spot on the pause menu where the {{Plural|TMC|Mysterious Shell}} used to go is replaced with the {{Term|TMC|Carlov Medal}}. | ||
{{Plural|TMC|Figurine}} come out of colored eggs. Each color corresponds to a different type of {{Term|TMC|Figurine}}. They are as follows: | |||
*<font color=#000080>'''Blue'''</font> - Characters | *<font color=#000080>'''Blue'''</font> - Characters | ||
*<font color=#800000>'''Red'''</font> - Sets of characters or scenes | *<font color=#800000>'''Red'''</font> - Sets of characters or scenes | ||
*<font color=#008000>'''Green'''</font> - Common enemies | *<font color=#008000>'''Green'''</font> - Common enemies | ||
*<font color=#808000>'''Golden'''</font> - Bosses and | *<font color=#808000>'''Golden'''</font> - Bosses and {{Plural|TMC|Sub-Boss}} | ||
==Figurine Probability== | ==Figurine Probability== | ||
The probability of getting a new {{Term|TMC|Figurine}} follows a specific formula. It is as follows: | |||
[[File:TMC Figurine Probability.png]] | |||
[[File: | |||
Where: | Where: | ||
*'''P''' = the probability that Link will obtain a new | *'''P''' = the probability that Link will obtain a new {{Term|TMC|Figurine}}. | ||
*'''S''' = the number of | *'''S''' = the number of {{Plural|TMC|Mysterious Shell}} that {{Term|TMC|Link}} bets. | ||
*'''C''' = the current number of | *'''C''' = the current number of {{Plural|TMC|Figurine}} that {{Term|TMC|Link}} has collected. | ||
*'''U''' = the current number of unlocked | *'''U''' = the current number of unlocked {{Plural|TMC|Figurine}} available for collecting. | ||
Note: the resulting value is '''always rounded down''' to the nearest whole percent. | Note: the resulting value is '''always rounded down''' to the nearest whole percent. | ||
For every extra | For every extra {{Term|TMC|Mysterious Shell}} that {{Term|TMC|Link}} bets, the probability of getting goes up. It can be seen from the formula that the probability of getting a new {{Term|TMC|Figurine}} increases when there are more {{Plural|TMC|Figurine}} to collect. It also shows that it is much cheaper to collect all the {{Plural|TMC|Figurine}} at the end when they are all available, than to try to obtain a group as soon as it is available. | ||
The table below shows the values of '''U''' as well as the | The table below shows the values of '''U''' as well as the {{Plural|TMC|Figurine}} that can be collected after specific events. | ||
{| class=" | {| class="wikitable mw-collapsible mw-collapsed" | ||
! colspan=6 width=200|Main Quest | ! colspan=6 width=200|Main Quest | ||
|- | |- | ||
! rowspan=2|Event | ! rowspan=2|Event | ||
! rowspan=2 width=50|U | ! rowspan=2 width=50|U | ||
! colspan=4|Unlocked | ! colspan=4|Unlocked {{Plural|TMC|Figurine}} | ||
|- | |- | ||
! Blue | ! Blue | ||
| Line 56: | Line 65: | ||
! Gold | ! Gold | ||
|- valign="top" | |- valign="top" | ||
| Obtain the Earth Element<br>(Complete the | | Obtain the {{Term|TMC|Earth Element|link}}<br/>(Complete the {{Term|TMC|Deepwood Shrine|link}}) | ||
| 48 | | 48 | ||
| | | | ||
Capless Link<br> | Capless {{Term|TMC|Link|link}}<br/> | ||
Ezlo and Link<br> | {{Term|TMC|Ezlo|link}} and {{Term|TMC|Link}}<br/> | ||
Ezlo (Cap)<br> | {{Term|TMC|Ezlo}} (Cap)<br/> | ||
Princess Zelda<br> | {{Term|TMC|Princess Zelda|link}}<br/> | ||
King Daltus<br> | {{Term|TMC|King Daltus|link}}<br/> | ||
Minister Potho<br> | {{Term|TMC|Minister Potho|link}}<br/> | ||
Anju<br> | {{Term|TMC|Anju|link}}<br/> | ||
Brocco<br> | {{Term|TMC|Brocco|link}}<br/> | ||
Festari<br> | {{Term|TMC|Festari|link}}<br/> | ||
Forest Picori<br> | {{Term|TMC|Forest Picori|link}}<br/> | ||
Gentari<br> | {{Term|TMC|Gentari|link}}<br/> | ||
Mayor Hagen<br> | {{Term|TMC|Mayor Hagen|link}}<br/> | ||
Pina<br> | {{Term|TMC|Pina|link}}<br/> | ||
Postman<br> | {{Term|TMC|Postman|link}}<br/> | ||
Rem<br> | {{Term|TMC|Rem|link}}<br/> | ||
Smith<br> | {{Term|TMC|Smith|link}}<br/> | ||
Stamp<br> | {{Term|TMC|Stamp|link}}<br/> | ||
Stockwell | {{Term|TMC|Stockwell|link}} | ||
| | | | ||
Funday School<br> | {{Term|TMC|Funday School|link}}<br/> | ||
Gregal & the Ghost<br> | {{Term|TMC|Gregal|link}} & the Ghost<br/> | ||
Mama's Cafe<br> | {{Term|TMC|Mama's Cafe|link}}<br/> | ||
Peaceful Hyrule 1<br> | Peaceful {{Term|TMC|Hyrule|link}} 1<br/> | ||
Peaceful Hyrule 2<br> | Peaceful {{Term|TMC|Hyrule}} 2<br/> | ||
The Carpenters<br> | The Carpenters<br/> | ||
Wheaton & Pita<br> | {{Term|TMC|Wheaton|link}} & {{Term|TMC|Pita|link}}<br/> | ||
Zill and Friends<br> | {{Term|TMC|Zill|link}} and Friends<br/> | ||
| | | | ||
Acro- | {{Plural|TMC|Acro-Bandit|link}}<br/> | ||
{{Term|TMC|Beetle (Enemy)|link}}<br/> | |||
Bob-omb<br> | {{Term|TMC|Bob-omb|link}}<br/> | ||
Boulder<br> | {{Term|TMC|Boulder|link}}<br/> | ||
Business Scrub<br> | {{Term|TMC|Business Scrub|link}}<br/> | ||
Chaser<br> | {{Term|TMC|Chaser|link}}<br/> | ||
{{Term|TMC|Chuchu|link}}<br/> | |||
Helmasaur<br> | {{Term|TMC|Helmasaur|link}}<br/> | ||
Keaton<br> | {{Term|TMC|Yellow Keaton|link|display= Keaton}}<br/> | ||
Keese<br> | {{Term|TMC|Keese|link}}<br/> | ||
Octorok<br> | {{Term|TMC|Octorok|link}}<br/> | ||
Peahat<br> | {{Term|TMC|Peahat|link}}<br/> | ||
Pesto<br> | {{Term|TMC|Pesto|link}}<br/> | ||
Puffstool<br> | {{Term|TMC|Puffstool|link}}<br/> | ||
Rollobite<br> | {{Term|TMC|Rollobite|link}}<br/> | ||
Sluggula<br> | {{Term|TMC|Sluggula|link}}<br/> | ||
Spiked Beetle<br> | {{Term|TMC|Spiked Beetle|link}}<br/> | ||
Spiny Beetle<br> | {{Term|TMC|Spiny Beetle|link}}<br/> | ||
Tektite<br> | {{Term|TMC|Tektite|link}}<br/> | ||
Trap | {{Term|TMC|Trap|link}} | ||
| | | | ||
Big Green Chuchu<br> | {{Term|TMC|Big Green Chuchu|link}}<br/> | ||
Madderpillar | {{Term|TMC|Madderpillar|link}} | ||
|- valign="top" | |- valign="top" | ||
| Obtain the Fire Element<br>(Complete the | | Obtain the {{Term|TMC|Fire Element|link}}<br/>(Complete the {{Term|TMC|Cave of Flames|link}}) | ||
| +3 | | +3 | ||
| Great Butterfly Fairy | | {{Term|TMC|Great Butterfly Fairy|link}} | ||
| | | | ||
| Spiny Chuchu | | {{Term|TMC|Spiny Chuchu|link}} | ||
| Gleerok | | {{Term|TMC|Gleerok|link}} | ||
|- valign="top" | |- valign="top" | ||
| | | {{Term|TMC|Vaati|link}} takes control of {{Term|TMC|King Daltus|link}}<br/>(Enter the {{Term|TMC|Western Wood|link}} for the first time) | ||
| +9 | | +9 | ||
| | | | ||
Din<br> | {{Term|TMC|Din (Oracle)|link}}<br/> | ||
Farore<br> | {{Term|TMC|Farore (Oracle)|link}}<br/> | ||
Nayru<br> | {{Term|TMC|Nayru (Oracle)|link}}<br/> | ||
Sorcerer Vaati | Sorcerer {{Term|TMC|Vaati}} | ||
| | | | ||
{{Term|TMC|Eenie|link}} & {{Term|TMC|Meenie|link}}<br/> | |||
Happy Hearth Inn<br> | {{Term|TMC|Happy Hearth Inn|link}}<br/> | ||
| | | | ||
Bow Moblin<br> | {{Term|TMC|Bow Moblin|link}}<br/> | ||
Crow & Takkuri<br> | {{Term|TMC|Crow|link}} & {{Term|TMC|Takkuri|link}}<br/> | ||
Spear Moblin | {{Term|TMC|Spear Moblin|link}} | ||
| | | | ||
|- valign="top" | |- valign="top" | ||
| Obtain the | | Obtain the {{Term|TMC|Ocarina of Wind|link}}<br/>(Complete the {{Term|TMC|Fortress of Winds|link}}) | ||
| +25 | | +25 | ||
| | | | ||
Borlov<br> | {{Term|TMC|Borlov|link}}<br/> | ||
Gorman<br> | {{Term|TMC|Gorman|link}}<br/> | ||
Great Mayfly Fairy<br> | {{Term|TMC|Great Mayfly Fairy|link}}<br/> | ||
Melari<br> | {{Term|TMC|Melari|link}}<br/> | ||
Minish Vaati<br> | {{Term|TMC|Minish|link}} {{Term|TMC|Vaati}}<br/> | ||
Monster Lady<br> | {{Term|TMC|Monster Lady|link}}<br/> | ||
Mountain Picori<br> | {{Term|TMC|Mountain Picori|link}}<br/> | ||
Percy<br> | {{Term|TMC|Percy|link}}<br/> | ||
Syrup | {{Term|TMC|Syrup|link}} | ||
| | | | ||
At Lon Lon Ranch<br> | At {{Term|TMC|Lon Lon Ranch|link}}<br/> | ||
Cucco!<br> | {{Term|TMC|Cucco|link}}!<br/> | ||
{{Term|TMC|Vassal|link}} | |||
| | | | ||
Armos<br> | {{Term|TMC|Armos|link}}<br/> | ||
Eyegore Statue<br> | {{Term|TMC|Eyegore Statue|link}}<br/> | ||
Floor Master<br> | {{Term|TMC|Floor Master|link}}<br/> | ||
Leever<br> | {{Term|TMC|Leever|link}}<br/> | ||
Like Like<br> | {{Term|TMC|Like Like|link}}<br/> | ||
Moldorm<br> | {{Term|TMC|Moldorm|link}}<br/> | ||
Rope<br> | {{Term|TMC|Rope|link}}<br/> | ||
Rupee Like<br> | {{Term|TMC|Rupee Like|link}}<br/> | ||
Spark<br> | {{Term|TMC|Spark|link}}<br/> | ||
Stalfos<br> | {{Term|TMC|Stalfos|link}}<br/> | ||
Wizzrobe | {{Term|TMC|Wizzrobe|link}} | ||
| | | | ||
Dark Nut<br> | {{Term|TMC|Dark Nut|link}}<br/> | ||
Mazaal | {{Term|TMC|Mazaal|link}} | ||
|- valign="top" | |- valign="top" | ||
| Obtain the | | Obtain the {{Term|TMC|Flame Lantern|link}}<br/>(Defeat the {{Term|TMC|Sub-Boss|link}} of the {{Term|TMC|Temple of Droplets|link}}) | ||
| +1 | | +1 | ||
| | | | ||
| | | | ||
| | | | ||
| | | {{Term|TMC|Big Blue Chuchu|link}} | ||
|- valign="top" | |- valign="top" | ||
| Obtain the Water Element<br>(Complete the | | Obtain the {{Term|TMC|Water Element|link}}<br/>(Complete the {{Term|TMC|Temple of Droplets}}) | ||
| +12 | | +12 | ||
| | | | ||
{{Term|TMC|Dr. Left|link}}<br/> | |||
{{Term|TMC|Librari|link}}<br/> | |||
{{Term|TMC|Simon|link}}<br/> | |||
{{Term|TMC|Town Minish|link}} | |||
| | | | ||
{{Term|TMC|Library|link}}<br/> | |||
Peaceful {{Term|TMC|Hyrule}} 3<br/> | |||
Young Couple | |||
| | | | ||
{{Term|TMC|Moldworm|link}}<br/> | |||
{{Term|TMC|Mulldozer|link}}<br/> | |||
{{Term|TMC|Scissors Beetle|link}}<br/> | |||
{{Term|TMC|Wallmaster|link}} | |||
| | | {{Term|TMC|Big Octorok|link}} | ||
|- | |- | ||
| Complete the | | Complete the {{Term|TMC|Royal Crypt|link}} | ||
| +5 | | +5 | ||
| | | | ||
{{Term|TMC|Dampé|link}}<br/> | |||
{{Term|TMC|Great Dragonfly Fairy|link}}<br/> | |||
{{Term|TMC|Gustaf|link|display=Gustaf, Royal Spirit}} | |||
| | |||
| | | | ||
{{Term|TMC|Door Mimic|link}}<br/> | |||
{{Term|TMC|Ghini|link}} | |||
| | | | ||
|- | |- | ||
| Defeat the | | Defeat the {{Term|TMC|Sub-Boss}} of the {{Term|TMC|Palace of Winds|link}} | ||
| +6 | | +6 | ||
| | | | ||
{{Term|TMC|Biggoron|link}} | |||
| | | | ||
The {{Term|TMC|Wind Tribe|link}} | |||
| | | | ||
{{Term|TMC|Cloud Piranha|link}}<br/> | |||
{{Term|TMC|Lakitu|link}}<br/> | |||
{{Term|TMC|Rock Chuchu|link}}<br/> | |||
{{Term|TMC|Whisp}} | |||
| | | | ||
|- | |- | ||
| Complete the | | Complete the {{Term|TMC|Palace of Winds}} | ||
| +10 | | +10 | ||
| | | | ||
{{Term|TMC|Carlov|link}} | |||
| | | | ||
{{Term|TMC|Blade Brothers|link}}<br/> | |||
{{Term|TMC|Tingle Siblings?|link}} | |||
| | | | ||
{{Term|TMC|Bombarossa|link}}<br/> | |||
{{Term|TMC|Fire Wizzrobe|link}}<br/> | |||
{{Term|TMC|Gibdo|link}}<br/> | |||
Ice Wizzrobe | {{Term|TMC|Ice Wizzrobe|link}} | ||
| | | | ||
{{Term|TMC|Ball and Chain Soldier|link}}<br/> | |||
{{Term|TMC|Gyorg Pair|link}}<br/> | |||
{{Term|TMC|Red Dark Nut|link}} | |||
|- | |- | ||
| Defeat | | Defeat {{Term|TMC|Vaati}} | ||
| +6 | | +6 | ||
| | | | ||
{{Term|TMC|Minish}} {{Term|TMC|Ezlo}} | |||
| | | | ||
{{Term|TMC|Princess Zelda|display=Zelda}} & {{Term|TMC|Link}} | |||
| | | | ||
| | | | ||
{{Term|TMC|Black Knight|link}}<br/> | |||
Vaati Reborn<br> | {{Term|TMC|Vaati|display=Vaati Reborn}}<br/> | ||
Vaati Transfigured<br> | {{Term|TMC|Vaati|display=Vaati Transfigured}}<br/> | ||
Vaati's Wrath | {{Term|TMC|Vaati|display=Vaati's Wrath}} | ||
|} | |} | ||
{| class=" | {| class="wikitable mw-collapsible mw-collapsed" | ||
! colspan=6 width=200|Optional | ! colspan=6 width=200|Optional | ||
|- | |- | ||
! rowspan=2|Event | ! rowspan=2|Event | ||
! rowspan=2 width=50|U | ! rowspan=2 width=50|U | ||
! colspan=4|Unlocked | ! colspan=4|Unlocked {{Plural|TMC|Figurine}} | ||
|- | |- | ||
! Blue | ! Blue | ||
| Line 258: | Line 268: | ||
! Gold | ! Gold | ||
|- valign="top" | |- valign="top" | ||
| Clear the dust covering the empty stall in Hyrule Town with the | | Clear the dust covering the empty stall in {{Term|TMC|Hyrule Town|link}} with the {{Term|TMC|Gust Jar|link}} | ||
| +1 | | +1 | ||
| | | {{Term|TMC|Beedle|link}} | ||
| | | | ||
| | | | ||
| | | | ||
|- valign="top" | |- valign="top" | ||
| Fuse | | Fuse {{Plural|TMC|Kinstone Piece|link}} with the {{Term|TMC|Postman|link}} | ||
| +1 | | +1 | ||
| | | {{Term|TMC|Marcy|link}} | ||
| | | | ||
| | | | ||
| | | | ||
|- valign="top" | |- valign="top" | ||
| Meet the | | Meet the {{Term|TMC|Crenel Hermit|link}} | ||
| +1 | | +1 | ||
| Crenel Hermit | | {{Term|TMC|Crenel Hermit}} | ||
| | | | ||
| | | | ||
| | | | ||
|- | |- | ||
| Fuse | | Fuse {{Plural|TMC|Kinstone}} with {{Term|TMC|Din (Oracle)}}, {{Term|TMC|Nayru (Oracle)}} or {{Term|TMC|Farore (Oracle)}} until a {{Term|TMC|Joy Butterfly|link}} appears | ||
| +1 | | +1 | ||
| | | {{Term|TMC|Joy Butterfly|link}} | ||
| | | | ||
| | | | ||
| | | | ||
|- | |- | ||
| Fuse | | Fuse {{Plural|TMC|Kinstone}} with {{Term|TMC|Dampé}} | ||
| +1 | | +1 | ||
| | | {{Term|TMC|Gina|link}} | ||
| | | | ||
| | | | ||
| | | | ||
|- | |- | ||
| | | Completely excavate the {{Term|TMC|Goron Cave|link}} | ||
| +1 | | +1 | ||
| | | {{Term|TMC|Goron|link}} | ||
| | | | ||
| | | | ||
| | | | ||
|- | |- | ||
| Fuse | | Fuse {{Plural|TMC|Kinstone}} with the {{Term|TMC|Goron}} punching the wall | ||
| +1 | | +1 | ||
| | | {{Term|TMC|Goron Merchant|link}} | ||
| | | | ||
| | | | ||
| | | | ||
|- | |- | ||
| Fuse | | Fuse {{Plural|TMC|Kinstone}} with {{Term|TMC|Spookter|link}} until {{Term|TMC|Spekter|link}} leaves {{Term|TMC|Hyrule Town}} | ||
| +1 | | +1 | ||
| | | | ||
| | | {{Term|TMC|Spookter|link}} & {{Term|TMC|Spekter|link}} | ||
| | | | ||
| | | | ||
|- | |- | ||
| Fuse with | | Fuse {{Plural|TMC|Kinstone}} with the {{Term|TMC|Business Scrub|link}} in {{Term|TMC|Castor Wilds|link}}, then with the {{Term|TMC|Business Scrub|link}} in the newly opened tree in the {{Term|TMC|Minish Woods|link}} | ||
| +1 | | +1 | ||
| | | | ||
| | | | ||
| | | | ||
| | | {{Term|TMC|Golden Octorok|link}} | ||
|- | |- | ||
| Fuse with Minish in | | Fuse {{Plural|TMC|Kinstone}} with the {{Term|TMC|Minish}} in the southeastern room of {{Term|TMC|Melari's Mine|link}} | ||
| +1 | | +1 | ||
| | | | ||
| | | | ||
| | | | ||
| | | {{Term|TMC|Golden Tektite|link}} | ||
|- | |- | ||
| Fuse with | | Fuse {{Plural|TMC|Kinstone}} with {{Term|TMC|Flurris|link}}, near the stairs on the third floor of the {{Term|TMC|Wind Tribe|link}}'s tower | ||
| +1 | | +1 | ||
| | | | ||
| | | | ||
| | | | ||
| | | {{Term|TMC|Golden Rope|link}} | ||
|} | |} | ||
==Strategy== | ==Strategy== | ||
Statistically speaking, the best strategy for gaining all | Statistically speaking, the best strategy for gaining all {{Plural|TMC|Figurine}} is to spend a single {{Term|TMC|Mysterious Shell|link}} per drawing. For example, if there is a 25% chance of gaining a new {{Term|TMC|Figurine}} with one {{Term|TMC|Mysterious Shell}}, spending ten {{Plural|TMC|Mysterious Shell}} all at once will raise the probability to 34%, while spending one {{Term|TMC|Mysterious Shell}} each in ten separate drawings will give, on average, a 95.78% chance of getting a new {{Term|TMC|Figurine}}. | ||
The following chart shows the number of | The following chart shows the number of {{Term|TMC|Mysterious Shell}} that need to be spent for three different strategies: All-for-one, where enough {{Plural|TMC|Mysterious Shell}} are spent to give a 100% chance of a new {{Term|TMC|Figurine}}; the 80%-rule, where enough {{Plural|TMC|Mysterious Shell}} are spent to give an 80% chance; and One-for-all, where only one {{Term|TMC|Mysterious Shell}} is spent per drawing. The final row shows the average total cost if the strategy is carried out for all 136 {{Plural|TMC|Figurine}}. | ||
{| class="wikitable" | {| class="wikitable" | ||
| Line 372: | Line 382: | ||
|} | |} | ||
Note: Because it will cost 100 | Note: Because it will cost 100 {{Plural|TMC|Mysterious Shell}} regardless of strategy for the final {{Term|TMC|Figurine}}, {{Term|TMC|Link}} may either use "One-for-all" to gain approximately 500 {{Plural|TMC|Rupee}} in consolation prizes, or {{Term|TMC|Link}} can use "All-for-one" to immediately gain the final {{Term|TMC|Figurine}}. Both have the same cost and probability. | ||
==Nomenclature== | ==Nomenclature== | ||
{{ | {{Nomenclature}} | ||
==Gallery== | ==Gallery== | ||
<gallery> | <gallery> | ||
File:TMC | File:TMC Figurine Gallery Exterior.png|The exterior of the {{Term|TMC|Figurine Gallery}} | ||
</gallery> | </gallery> | ||
==See Also== | |||
* {{Term|Series|Nintendo Gallery|link}} | |||
{{Ref}} | |||
{{Categories | |||
|Shops | |||
|locations= TMC | |||
}} | |||
Latest revision as of 22:50, 28 April 2024
The Figurine Gallery is a location in The Minish Cap.[1]
Features and Overview
The Figurine Gallery is run by Carlov the sculptor. Its entrance is a clump of bushes found in the southwest corner of Hyrule Town.
The Figurine Gallery functions as a drawing where Link trades Mysterious Shells for a chance to win a Figurine from the Figure-Dispensing Machine. Figurines are of the various people, creatures, and enemies Link meets throughout the game. The starting price for a drawing is one Mysterious Shell. As more Figurines are won, the chance of winning a new Figurine for his collection decreases. The probability can be raised by betting additional Mysterious Shells and by exploring new areas. Carlov will make newer Figurines as Link meets newer allies and enemies.
The Figurines won are kept by Carlov in a display case in the Figurine Gallery for Link to view. Carlov will buy back Figurines drawn that are already in Link's collection for five Rupees.
There are a total of 130 Figurines to be won, with six more added to collect upon completing the game, making the total 136.
The reward for collecting all of the Figurines is given by Herb, the man sitting outside Mama's Cafe. He will let Link inside his house, which contains a Piece of Heart, three Chests with 200 Rupees each, and a Phonograph.
After collecting all 136 Figurines, the spot on the pause menu where the Mysterious Shells used to go is replaced with the Carlov Medal.
Figurines come out of colored eggs. Each color corresponds to a different type of Figurine. They are as follows:
- Blue - Characters
- Red - Sets of characters or scenes
- Green - Common enemies
- Golden - Bosses and Sub-Bosses
Figurine Probability
The probability of getting a new Figurine follows a specific formula. It is as follows:
![]()
Where:
- P = the probability that Link will obtain a new Figurine.
- S = the number of Mysterious Shells that Link bets.
- C = the current number of Figurines that Link has collected.
- U = the current number of unlocked Figurines available for collecting.
Note: the resulting value is always rounded down to the nearest whole percent.
For every extra Mysterious Shell that Link bets, the probability of getting goes up. It can be seen from the formula that the probability of getting a new Figurine increases when there are more Figurines to collect. It also shows that it is much cheaper to collect all the Figurines at the end when they are all available, than to try to obtain a group as soon as it is available.
The table below shows the values of U as well as the Figurines that can be collected after specific events.
| Optional | |||||
|---|---|---|---|---|---|
| Event | U | Unlocked Figurines | |||
| Blue | Red | Green | Gold | ||
| Clear the dust covering the empty stall in Hyrule Town with the Gust Jar | +1 | Beedle | |||
| Fuse Kinstone Pieces with the Postman | +1 | Marcy | |||
| Meet the Crenel Hermit | +1 | Crenel Hermit | |||
| Fuse Kinstones with Din, Nayru or Farore until a Joy Butterfly appears | +1 | Joy Butterfly | |||
| Fuse Kinstones with Dampé | +1 | Gina | |||
| Completely excavate the Goron Cave | +1 | Goron | |||
| Fuse Kinstones with the Goron punching the wall | +1 | Goron Merchant | |||
| Fuse Kinstones with Spookter until Spekter leaves Hyrule Town | +1 | Spookter & Spekter | |||
| Fuse Kinstones with the Business Scrub in Castor Wilds, then with the Business Scrub in the newly opened tree in the Minish Woods | +1 | Golden Octorok | |||
| Fuse Kinstones with the Minish in the southeastern room of Melari's Mine | +1 | Golden Tektite | |||
| Fuse Kinstones with Flurris, near the stairs on the third floor of the Wind Tribe's tower | +1 | Golden Rope | |||
Strategy
Statistically speaking, the best strategy for gaining all Figurines is to spend a single Mysterious Shell per drawing. For example, if there is a 25% chance of gaining a new Figurine with one Mysterious Shell, spending ten Mysterious Shells all at once will raise the probability to 34%, while spending one Mysterious Shell each in ten separate drawings will give, on average, a 95.78% chance of getting a new Figurine.
The following chart shows the number of Mysterious Shell that need to be spent for three different strategies: All-for-one, where enough Mysterious Shells are spent to give a 100% chance of a new Figurine; the 80%-rule, where enough Mysterious Shells are spent to give an 80% chance; and One-for-all, where only one Mysterious Shell is spent per drawing. The final row shows the average total cost if the strategy is carried out for all 136 Figurines.
| Percentage | All-for-One | 80% Rule | One-for-All |
|---|---|---|---|
| 100% | 1.0 | 1.0 | 1.0 |
| 75% | 26.0 | 7.5 | 1.33 |
| 50% | 51.0 | 38.75 | 2.0 |
| 40% | 61.0 | 51.25 | 2.5 |
| 30% | 71.0 | 63.75 | 3.33 |
| 20% | 81.0 | 76.25 | 5.0 |
| 10% | 91.0 | 88.75 | 10.0 |
| 5% | 96.0 | 95.0 | 20.0 |
| 4% | 97.0 | 96.25 | 25.0 |
| 3% | 98.0 | 97.5 | 33.33 |
| 2% | 99.0 | 98.75 | 50.0 |
| 1% | 100.0 | 100.0 | 100.0 |
| Total | 6851.0 | 5521.39 | 686.02 |
Note: Because it will cost 100 Mysterious Shells regardless of strategy for the final Figurine, Link may either use "One-for-all" to gain approximately 500 Rupees in consolation prizes, or Link can use "All-for-one" to immediately gain the final Figurine. Both have the same cost and probability.
Nomenclature
| Language | Names | |
|---|---|---|
| This table was generated using translation pages. To request an addition, please contact a staff member with a reference. | ||
Gallery
-
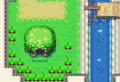
The exterior of the Figurine Gallery

See Also
References
- ↑ The Legend of Zelda: The Minish Cap—The Official Nintendo Player's Guide, Nintendo of America, pg. 39