The Travels of Link: Difference between revisions
Cremia2000 (talk | contribs) (→Photographs: replaced a gif) |
Cremia2000 (talk | contribs) (→Photographs: replaced gifs) |
||
| Line 24: | Line 24: | ||
|- | |- | ||
| rowspan="2" align="center"|1 | | rowspan="2" align="center"|1 | ||
| [[File: | | [[File:LADX The Travels of Link Photo 1.png|Here Stands A Brave Man]] | ||
| Talking to the [[Photographer]] at the [[Camera Shop]] for the first time. He asks him to stand in front of a curtain so he can take his picture.<ref>{{Cite Text Dump|LADX|352}}</ref> If Link agrees, he gets a picture of himself giving the peace sign in front of the curtain.<ref>{{Cite Text Dump|LADX|353}}</ref> The photo is available after acquiring the [[Roc's Feather]] in [[Tail Cave]], which is needed to access [[Tal Tal Heights]] where the Camera Shop is located. | | Talking to the [[Photographer]] at the [[Camera Shop]] for the first time. He asks him to stand in front of a curtain so he can take his picture.<ref>{{Cite Text Dump|LADX|352}}</ref> If Link agrees, he gets a picture of himself giving the peace sign in front of the curtain.<ref>{{Cite Text Dump|LADX|353}}</ref> The photo is available after acquiring the [[Roc's Feather]] in [[Tail Cave]], which is needed to access [[Tal Tal Heights]] where the Camera Shop is located. | ||
| rowspan="2" align="center"|'''Always available'''{{Exp|When one is obtained, the other is lost}} | | rowspan="2" align="center"|'''Always available'''{{Exp|When one is obtained, the other is lost}} | ||
|- | |- | ||
| [[File: | | [[File:LADX The Travels of Link Photo 2.png|Game Over]] | ||
| If Link refuses and keeps telling the Photographer "No" he will instead get a picture of himself beaten up in front of the curtain.<ref>{{Cite Text Dump|LADX|73}}</ref><ref>{{Cite Text Dump|LADX|74}}</ref><ref>{{Cite Text Dump|LADX|75}}</ref> | | If Link refuses and keeps telling the Photographer "No" he will instead get a picture of himself beaten up in front of the curtain.<ref>{{Cite Text Dump|LADX|73}}</ref><ref>{{Cite Text Dump|LADX|74}}</ref><ref>{{Cite Text Dump|LADX|75}}</ref> | ||
|- | |- | ||
| 2 | | 2 | ||
| [[File: | | [[File:LADX The Travels of Link Photo 3.png|...]] | ||
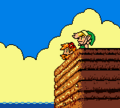
| Walking up to the edge of the beach-side cliff in the southwestern corner of [[Toronbo Shores]] while accompanied by [[Marin]]. The Photographer takes a picture of Link and Marin looking at the ocean.<ref>{{Cite Text Dump|LADX|12}}</ref> The photo is available after [[Key Cavern]], when Marin follows Link to wake the [[Walrus]] blocking the way to [[Yarna Desert]]. | | Walking up to the edge of the beach-side cliff in the southwestern corner of [[Toronbo Shores]] while accompanied by [[Marin]]. The Photographer takes a picture of Link and Marin looking at the ocean.<ref>{{Cite Text Dump|LADX|12}}</ref> The photo is available after [[Key Cavern]], when Marin follows Link to wake the [[Walrus]] blocking the way to [[Yarna Desert]]. | ||
| rowspan="3" align="center"|'''Unavailable''' after waking [[Walrus]] | | rowspan="3" align="center"|'''Unavailable''' after waking [[Walrus]] | ||
|- | |- | ||
| 3 | | 3 | ||
| [[File: | | [[File:LADX The Travels of Link Photo 4.png|Heads Up]] | ||
| Jumping down the well in northwestern [[Mabe Village]] while Marin is following him. The Photographer appears inside the well and takes a picture of Marin landing on Link.<ref>{{Cite Text Dump|LADX|90}}</ref> | | Jumping down the well in northwestern [[Mabe Village]] while Marin is following him. The Photographer appears inside the well and takes a picture of Marin landing on Link.<ref>{{Cite Text Dump|LADX|90}}</ref> | ||
|- | |- | ||
| 4 | | 4 | ||
| [[File: | | [[File:LADX The Travels of Link Photo 5.png]] | ||
| Walking up to the [[Weathercock]] in [[Mabe Village]]. The Photographer will want to take a picture of the couple, but [[Tarin]] pushes his way into it.<ref>{{Cite Text Dump|LADX|650}}</ref> | | Walking up to the [[Weathercock]] in [[Mabe Village]]. The Photographer will want to take a picture of the couple, but [[Tarin]] pushes his way into it.<ref>{{Cite Text Dump|LADX|650}}</ref> | ||
|- | |- | ||
| 5 | | 5 | ||
| [[File: | | [[File:LADX The Travels of Link Photo 6.png|Link Discovers Ulrira's Secret]] | ||
| Walking up to the window outside of Grandpa [[Ulrira]]'s house in [[Mabe Village]]. The Photographer walks up and takes a picture of Grandpa Ulrira yapping away on the [[Telephone Booth|phone]].<ref>{{Cite Text Dump|LADX|349}}</ref> | | Walking up to the window outside of Grandpa [[Ulrira]]'s house in [[Mabe Village]]. The Photographer walks up and takes a picture of Grandpa Ulrira yapping away on the [[Telephone Booth|phone]].<ref>{{Cite Text Dump|LADX|349}}</ref> | ||
| '''Always available''' | | '''Always available''' | ||
| Line 55: | Line 55: | ||
|- | |- | ||
| 7 | | 7 | ||
| [[File: | | [[File:LADX The Travels of Link Photo 7.png]] | ||
| Stealing any item from the [[Town Tool Shop]] in [[Mabe Village]]. The Photographer won't be seen this time, and a picture of him shoplifting will automatically be added to the album. <br><br>''Note: If Link goes back into the shop after stealing something, the [[Town Tool Shopkeeper|shopkeeper]] will kill him.'' | | Stealing any item from the [[Town Tool Shop]] in [[Mabe Village]]. The Photographer won't be seen this time, and a picture of him shoplifting will automatically be added to the album. <br><br>''Note: If Link goes back into the shop after stealing something, the [[Town Tool Shopkeeper|shopkeeper]] will kill him.'' | ||
| '''Always available''' | | '''Always available''' | ||
|- | |- | ||
| 8 | | 8 | ||
| [[File: | | [[File:LADX The Travels of Link Photo 8.png]] | ||
| Jumping onto the [[Fisherman]]'s boat and talking to him under the bridge near [[Catfish's Maw]]. The Fisherman tries and fishes up the [[Photographer]].<ref>{{Cite Text Dump|LADX|376}}</ref> The Fisherman falls overboard and the Photographer takes a picture of him splashing in the water. | | Jumping onto the [[Fisherman]]'s boat and talking to him under the bridge near [[Catfish's Maw]]. The Fisherman tries and fishes up the [[Photographer]].<ref>{{Cite Text Dump|LADX|376}}</ref> The Fisherman falls overboard and the Photographer takes a picture of him splashing in the water. | ||
| '''Always available''' | | '''Always available''' | ||
| Line 70: | Line 70: | ||
|- | |- | ||
| 10 | | 10 | ||
| [[File: | | [[File:LADX The Travels of Link Photo 9.png]] | ||
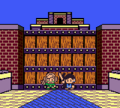
| Walking up to the main gate of [[Kanalet Castle]] before it is opened. [[Richard]] will walk up, saying that he wanted to see how the hunt for the [[Golden Leaves]] was going.<ref>{{Cite Text Dump|LADX|649}}</ref> The Photographer will take a picture of the two in front of the castle.<ref>{{Cite Text Dump|LADX|636}}</ref> | | Walking up to the main gate of [[Kanalet Castle]] before it is opened. [[Richard]] will walk up, saying that he wanted to see how the hunt for the [[Golden Leaves]] was going.<ref>{{Cite Text Dump|LADX|649}}</ref> The Photographer will take a picture of the two in front of the castle.<ref>{{Cite Text Dump|LADX|636}}</ref> | ||
| '''Unavailable''' after opening [[Kanalet Castle]] gate | | '''Unavailable''' after opening [[Kanalet Castle]] gate | ||
|- | |- | ||
| 11 | | 11 | ||
| [[File: | | [[File:LADX The Travels of Link Photo 10.png|I Was Very Afraid]] | ||
| Approaching the [[Ghost (Link's Awakening)|Ghost]]'s grave after Link returns him to it after the completion of [[Angler's Tunnel]].<ref>{{Cite Text Dump|LADX|386}}</ref> | | Approaching the [[Ghost (Link's Awakening)|Ghost]]'s grave after Link returns him to it after the completion of [[Angler's Tunnel]].<ref>{{Cite Text Dump|LADX|386}}</ref> | ||
| '''Always available''' | | '''Always available''' | ||
|- | |- | ||
| 12 | | 12 | ||
| [[File: | | [[File:LADX The Travels of Link Photo 11.png|Close Call]] | ||
| Walking back across the eastern-most bridge of [[Tal Tal Mountain Range]]. The Photographer tries to take a picture, but trips and falls off the bridge just before pushing the button, taking the photo on the way down.<ref>{{Cite Text Dump|LADX|92}}</ref> | | Walking back across the eastern-most bridge of [[Tal Tal Mountain Range]]. The Photographer tries to take a picture, but trips and falls off the bridge just before pushing the button, taking the photo on the way down.<ref>{{Cite Text Dump|LADX|92}}</ref> | ||
| '''Always available''', except when accompanied by the [[Flying Rooster]] | | '''Always available''', except when accompanied by the [[Flying Rooster]] | ||
Revision as of 04:38, 23 October 2018
Template:Item
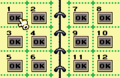
The Travels of Link is a photo album added to Link's Awakening DX, the Game Boy Color remake of Link's Awakening.[1]
Location and Uses
The album is a compilation of the photos taken by the Photographer throughout Link's quest, nearly half of which are taken in Mabe Village. The album is found in the Camera Shop after the photographer takes the first picture of Link in the shop.[2] Afterwards, Link may encounter various events in game where the photographer returns to take another photograph.[3] The album can be obtained at anytime except when Marin, Madam MeowMeow's BowWow, or the Flying Rooster is following him.[4] There are several photographs that can only be taken at certain times, and will be impossible to obtain if Link misses them, whereas the others are available at anytime.
If Link does not get his first photograph taken at the shop, any moments where he would normally encounter a photo event would be ignored until Link gets his album. The exception to this is the photo of Link stealing from the Town Tool Shop; if Link steals an item from the shop before going to the Camera Shop, the picture automatically appears in the album when it is made.
There are a total of 13 photographs, but only 12 can be taken. Link's first photograph also has an alternate version, but only one or the other can be obtained. Photos 2, 3, and 4 are only available when Marin is accompanying Link. Photo 10 is only available before Link has collected all 5 Golden Leaves and opened Kanalet Castle gate. Afterwards, these photos can no longer be obtained. The following is a table containing all 13 photos and how to obtain them.
Photographs
| The Travels of Link Photo Album | |||
|---|---|---|---|
| # | Photo | Obtained by | Availability |
| 1 | 
|
Talking to the Photographer at the Camera Shop for the first time. He asks him to stand in front of a curtain so he can take his picture.[5] If Link agrees, he gets a picture of himself giving the peace sign in front of the curtain.[6] The photo is available after acquiring the Roc's Feather in Tail Cave, which is needed to access Tal Tal Heights where the Camera Shop is located. | Always available |

|
If Link refuses and keeps telling the Photographer "No" he will instead get a picture of himself beaten up in front of the curtain.[7][8][9] | ||
| 2 | 
|
Walking up to the edge of the beach-side cliff in the southwestern corner of Toronbo Shores while accompanied by Marin. The Photographer takes a picture of Link and Marin looking at the ocean.[10] The photo is available after Key Cavern, when Marin follows Link to wake the Walrus blocking the way to Yarna Desert. | Unavailable after waking Walrus |
| 3 | 
|
Jumping down the well in northwestern Mabe Village while Marin is following him. The Photographer appears inside the well and takes a picture of Marin landing on Link.[11] | |
| 4 | 
|
Walking up to the Weathercock in Mabe Village. The Photographer will want to take a picture of the couple, but Tarin pushes his way into it.[12] | |
| 5 | 
|
Walking up to the window outside of Grandpa Ulrira's house in Mabe Village. The Photographer walks up and takes a picture of Grandpa Ulrira yapping away on the phone.[13] | Always available |
| 6 |  |
Walking up to BowWow after rescuing him from the Moblin Cave, "taking him for a walk", completing Bottle Grotto, and returning him to Madame MeowMeow.[14] | Always available |
| 7 | 
|
Stealing any item from the Town Tool Shop in Mabe Village. The Photographer won't be seen this time, and a picture of him shoplifting will automatically be added to the album. Note: If Link goes back into the shop after stealing something, the shopkeeper will kill him. |
Always available |
| 8 | 
|
Jumping onto the Fisherman's boat and talking to him under the bridge near Catfish's Maw. The Fisherman tries and fishes up the Photographer.[15] The Fisherman falls overboard and the Photographer takes a picture of him splashing in the water. | Always available |
| 9 | 
|
Meeting the friendly Zora living in the northeastern house of Animal Village that can only been seen with the Magnifying Lens. The Zora is found in the pond on the upper right hand side of the house.[16] | Always available |
| 10 | 
|
Walking up to the main gate of Kanalet Castle before it is opened. Richard will walk up, saying that he wanted to see how the hunt for the Golden Leaves was going.[17] The Photographer will take a picture of the two in front of the castle.[18] | Unavailable after opening Kanalet Castle gate |
| 11 | 
|
Approaching the Ghost's grave after Link returns him to it after the completion of Angler's Tunnel.[19] | Always available |
| 12 | 
|
Walking back across the eastern-most bridge of Tal Tal Mountain Range. The Photographer tries to take a picture, but trips and falls off the bridge just before pushing the button, taking the photo on the way down.[20] | Always available, except when accompanied by the Flying Rooster |
Trivia
- Cutscenes occur before the photographs 2, 4, 6, 10, and 11 are taken. They are viewed in first person from the Photographer's perspective. If Link is wearing the red or blue clothes, the color changes accordingly in these cutscenes.
- The photograph of Link shoplifting from the Town Tool Shop depicts readable Japanese text. The sign of the left reads "万引防止" ("manbiki boushi"), which means "shoplifting prevention"; and the sign on the right reads "万引は犯罪です" ("manbiki wa hanzai desu"), which means, "Shoplifting is a crime."
Nomenclature
| Language | Name | Meaning | |
|---|---|---|---|
| Japanese | でんせつの りんく (Densetsu no Rinku) | The Legendary Link | |
| FrenchEU | Les voyages de Link | Link's travels | |
| German | Die Abenteuer des Link | ||
Gallery
-

The Travels of Link in the Camera Shop, as seen in-game
-
The Travels of Link completed, as seen in-game
-
Photograph 2 cutscene
-

Photograph 4 cutscene
-

Cutscene of "Link Plays With BowWow", as seen in-game
-
Photograph 10 cutscene


References
- ↑ {{{game}}} text dump
- ↑ {{{game}}} text dump
- ↑ {{{game}}} text dump
- ↑ {{{game}}} text dump
- ↑ {{{game}}} text dump
- ↑ {{{game}}} text dump
- ↑ {{{game}}} text dump
- ↑ {{{game}}} text dump
- ↑ {{{game}}} text dump
- ↑ {{{game}}} text dump
- ↑ {{{game}}} text dump
- ↑ {{{game}}} text dump
- ↑ {{{game}}} text dump
- ↑ {{{game}}} text dump
- ↑ {{{game}}} text dump
- ↑ {{{game}}} text dump
- ↑ {{{game}}} text dump
- ↑ {{{game}}} text dump
- ↑ {{{game}}} text dump
- ↑ {{{game}}} text dump