Adventure Mode: Difference between revisions
KrytenKoro (talk | contribs) |
No edit summary |
||
| Line 4: | Line 4: | ||
{{Mode | {{Mode | ||
|name = Adventure Mode | |name = Adventure Mode | ||
|image = [[File: | |image = [[File:HW_Adventure_Mode_Artwork.png|300px]] | ||
|caption = | |caption = Artwork of Adventure Mode | ||
|game = {{HW}} | |game = {{HW}} | ||
|other = | |other = | ||
| Line 61: | Line 61: | ||
==Gallery== | ==Gallery== | ||
<gallery> | <gallery> | ||
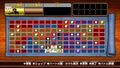
File:HW Adventure Mode Map.jpg|An incomplete Adventure Mode map | |||
File:468px-Reward Map.jpg|Reward map | File:468px-Reward Map.jpg|Reward map | ||
File:MasterQuestmasterquestmap.jpeg|Master Quest map | File:MasterQuestmasterquestmap.jpeg|Master Quest map | ||
Revision as of 20:33, 3 December 2014

Template:Mode Adventure Mode is a game mode in Hyrule Warriors where players can embark on selected missions to earn rewards such as Sealed Weapons, Heart Containers, Pieces of Heart, Item Cards, as well as unlock playable Warriors such as Ghirahim, Agitha and Zant.
Map
Adventure Mode consists of a map grid, based on The Legend of Zelda's Hyrule map, with each block of the map containing different selected missions. Each mission consists of a preset challenge, ranging from normal story battles, to quiz missions, boss rushes and other challenges that differ from the regular gameplay. Missions can be playable as many times as the player wishes. To open more blocks on the map, other missions have to be completed before they may become accessible. Sometimes a mission requires to be cleared in a certain rank before they may open to the next block. Wavy, black lines on the map serve to border between blocks, and in order to get to the blocks they obstruct, missions have to be completed around them.
Some missions restrict which characters or weapons can be used in them. In these cases, it is necessary to have unlocked the character and/or weapon required for the mission to be able to play it.
Victory ranks and rewards
When finishing a mission, the player will be graded on how well they did on a scale of "A", "B", and "C". Each mission requires the player to earn a specific rank in an adjacent mission in order to be unlocked, and a large number of missions require the player to get an "A" rank to earn a specified reward; except for Costumes, these rewards also require that their designated owner be the character used to get the "A".
The exact requirements for an "A" rank vary by mission, but are generally similar. A mission's requirements may include up to three categories, from among "K.O.", "Clear time", and "Damage taken". The "K.O." requirement is 3 for "Fight through the X quiz!" missions, and 1,200 for all others. The "Clear time" requirement is 7 minutes for "Defeat X enemies within 10 minutes!" and "Defeat all Giant Bosses within the time limit!" missions, and 15 minutes for all others. The "Damage taken" requirement varies between 4,000 (10 hearts), 5,000(12½ hearts), 8,000 (20 hearts), or 10,000 (25 hearts), depending on how far into the Death Mountain Range the mission is. As in Legend Mode, the player also recieves a Rupee bonus for how well they performed in each category.
The overall mission rank is calculated by averaging the ranks in the applicable categories and rounding down. Thus, an "A" rank in "K.O." and a "C" rank in "Damage taken" will result in a "B" rank for the mission, while an "A" rank in all parameters is required in order to ace the mission.
Each Adventure Map also awards a Medal for achieving an "A" rank in all of its missions.
Item Cards
Many mission blocks require the use of an Item Card to unlock a secret reward, reveal enemies, or reveal a path to an adjacent square. Each Item Card represents an item from the series, and most are from the original The Legend of Zelda game.
Item Cards are obtained by completing specific missions at any rank, as shown on the Battle Rewards view of the Adventure Map. Once a mission's Item Card is obtained, it will not be possible to obtain more from the same mission until three[verification needed] additional missions have been completed; these missions do not have to be different.
Most Item Card puzzles match the usage of the same items in the original The Legend of Zelda; for example, if a bush was burnt down by the Candle in the original game in order to reveal a secret cave, using the Candle card on that same bush in Adventure Mode will reveal a new reward for the associated mission. However, new obstacles have also been added to the maps in order to incorporate the Item Cards based on later games.
Each Item Card is generally used on a certain type of obstacle, so it is usually possible to simply recognize the obstacle and apply the correct Item Card. However, if the player cannot determine where an Item Card should be applied, they can use the Compass card to reveal one of the squares on which an Item Card should be used.
Item Cards are consumed when used, even when used unsuccesfully, and must be replenished by once again completing the missions that award them. However, since the game only auto-saves once a mission is completed, it is also possible to mulligan by turning the WiiU system off and on again when an Item Card is consumed, allowing the player to apply the Item Card to a different square, instead.
Item Cards are consumed when used, even when used on the wrong spot, though more can be obtained by replaying missions where they're available.
Network Links
If connected to the Nintendo Network during gameplay, other players will sometimes appear on the map screen, being represented by a sprite of Link. If the visitor is a stranger, the Link will be wearing black, and if it is someone on the player's friend list, the sprite will have blue clothing.
Once a network Link appears, the mission on the block it stands at can be played for an extra reward, including powerful weapons and very rare crafting materials.
Completing a Friend Link mission awards the Link's owner a "Friend Bonus", of 100,000 Rupees and a temporary bonus to EXP earned.
Other maps
Rewards Map
By completing an Illustration from defeating 20 correct Gold Skulltulas, the Rewards Map will be unlocked. The Rewards Map is significantly smaller than the other maps, and missions can only be played by first completing their respective Illustrations. Each mission challenge is uniquely based on the content of the Illustration that unlocks it, such as the "True Partners" Illustration unlocking a challenge that requires picking a Warrior to ally with. The map contains new costume rewards for playable characters.
Master Quest Map
The Master Quest Map is included with the Master Quest DLC pack. The Master Quest Map provides new missions and challenges, but with additional clauses that limit the abilities of the Warriors; such as no healing, guarding or items allowed, in addition to the regular mission objectives. The map contains rewards for the playable characters Cia, Volga, and Wizzro, along with new costume and additional rewards for other playable characters.
Twilight Map
The Twilight Map is included with the Twilight Princess DLC pack. The Twilight Map provides new missions and challenges on a slightly smaller map, as well as additional new Item Cards based on items from Twilight Princess. The map also has Portals to move to other sections of the map, as well as Twilight clouds that cover certain mission tiles and give them additional clauses that limit the abilities of Warriors. These clauses can be removed with the Tear of Light Item Card. The map contains new "Twilight" costumes for all characters but Twili Midna, several Heart Containers, and six new 8-Bit weapons.
Gallery
-
An incomplete Adventure Mode map
-
Reward map
-
Master Quest map
