Hinox Mine: Difference between revisions
MannedTooth (talk | contribs) m (Text replacement - "|theme music=" to "|theme=") |
Htwretched (talk | contribs) (→{{Plural|TFH|Drablands Challenge}}: A bug) |
||
| (13 intermediate revisions by 5 users not shown) | |||
| Line 1: | Line 1: | ||
{{Dungeon | {{Infobox Dungeon | ||
|type= level | |type= level | ||
|image= | |image= File:TFH Hinox Mine.png | ||
|caption= | |caption= Stage 1 of Hinox Mine | ||
|location= | |location= {{Term|TFH|Volcano|link}} | ||
|game= {{TFH}} | |game= TFH | ||
| | |item= {{List|{{Term|TFH|Boomerang|link}} ×2, {{Term|TFH|Bow|link}}}} | ||
|quest= | |quest= | ||
|mini-boss= | |mini-boss= | ||
|boss= | |boss= {{Plural|TFH|Hinox Brothers|link}} | ||
|theme= | |theme= | ||
|strategy= | |strategy= | ||
}} | }} | ||
{{Term/Store|Hinox Mine||Series, TFH}} is a Level in {{TFH}}. It is the second Level in the [[Drablands#Volcano|Volcano]] | {{Term/Store|Hinox Mine||Series, TFH}} is a {{Term|TFH|Level|link}} in {{TFH}}.<ref>{{Cite Book|quote= |book= E |publisher= |page= 160}}</ref> It is the second {{Term|TFH|Level}} in the [[Drablands#Volcano|Volcano]] {{Term|TFH|Area}}, preceded by {{Term|TFH|Blazing Trail|link}} and followed by {{Term|TFH|Den of Flames|link}}. | ||
==Themes and Navigation== | ==Themes and Navigation== | ||
{{Term|TFH|Hinox Mine}} is a large volcanic cavern, which contains several railways and {{Plural|TFH|Mine Cart|link}} that are used for transportation over lakes of {{Term|TFH|Lava|link}}. | |||
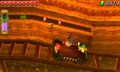
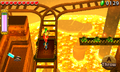
In '''Stage 1''', the | [[File:TFH Hinox Mine Stage 1.png|250px|right|thumb|The beginning of Stage 1]] | ||
In '''Stage 1''', the {{Plural|TFH|Links|link}} begin at a small area with a pair of {{Plural|TFH|Bomb Flower|link}} growing on pillars, and a {{Term|TFH|Cracked Block|link}} barricading the way forward. A pair of {{Plural|TFH|Boomerang|link}} and a {{Term|TFH|Bow|link}} are immediately provided for their use. To destroy the {{Term|TFH|Cracked Block}}, the {{Plural|TFH|Links}} must throw the {{Plural|TFH|Boomerang}} at the {{Plural|TFH|Bomb Flower}} to catch the {{Plural|TFH|Bomb}}, then throw them at the {{Term|TFH|Cracked Block|display=Block}}, which requires two blasts to destroy. Removing it allows one of the {{Plural|TFH|Links}} to shoot an {{Term|TFH|Arrow|link}} at the {{Term|TFH|Shock Switch|link}} up ahead, which raises a flight of stairs to the next area. Here, the {{Plural|TFH|Links}} must work in tandem to activate a set of three timed {{Plural|TFH|Shock Switch}} across a gap. This can be accomplished numerous ways; the intended method is for one {{Term|TFH|Links}} to grab one of the {{Plural|TFH|Bomb Flower}} from the sides, and throw it between the two {{Plural|TFH|Bomb Flower}} that sit next to the {{Plural|TFH|Switch}}, which causes a chain reaction of explosions that activates two {{Plural|TFH|Switch}}. The {{Plural|TFH|Links}} must then quickly form a {{Term|TFH|Totem|link}} so the top {{Term|TFH|Links}} can fire an {{Term|TFH|Arrow}} at the higher {{Term|TFH|Shock Switch}} in the center before others revert to deactivated. Activating all three {{Plural|TFH|Switch}} at once creates a moving platform that leads to the {{Term|TFH|Triforce Gateway|link}}. | |||
{{Clear}} | |||
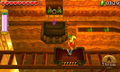
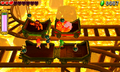
In '''Stage 2''', the Links appear on a platform above a set of rails and a | [[File:TFH Hinox Mine Stage 2.png|250px|right|thumb|Aboard a Mine Cart in Stage 2]] | ||
In '''Stage 2''', the {{Plural|TFH|Links}} appear on a platform above a set of rails and a {{Term|TFH|Mine Cart|link}}. Once they drop into the {{Term|TFH|Mine Cart}}, it will continuously move in a loop around the area, passing by some {{Plural|TFH|Bomb Flower}} and {{Plural|TFH|Red Rupee|link}} on a ledge, and a large {{Term|TFH|Cracked Block}}. The {{Plural|TFH|Links}} with {{Plural|TFH|Boomerang}} can grab the {{Plural|TFH|Bomb}} and throw them to demolish the {{Term|TFH|Cracked Block|display=Block}}, revealing a {{Term|TFH|Shock Switch}} and a {{Term|TFH|Purple Rupee|link}} behind it. The {{Term|TFH|Rupee}} can be retrieved with a {{Term|TFH|Boomerang}} by a {{Term|TFH|Totem}} of two, while the {{Plural|TFH|Links}} must form a {{Term|TFH|Totem}} of three to hit the {{Term|TFH|Switch}} with an {{Term|TFH|Arrow}}. A pair of {{Plural|TFH|Bomb Flower}} sit next to the {{Term|TFH|Switch}} which will also activate it, so {{Term|TFH|Links}}'s aim does not need to be perfect. Hitting this {{Term|TFH|Switch}} turns the rails so the {{Term|TFH|Mine Cart}} will move north to a {{Term|TFH|Triforce Gateway}} and a {{Term|TFH|Squiddy|link}}. | |||
{{Clear}} | |||
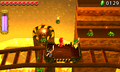
'''Stage 3''' features another | [[File:TFH Hinox Mine Stage 3.png|250px|right|thumb|The three Shock Switches of Stage 3]] | ||
'''Stage 3''' features another {{Term|TFH|Mine Cart}} and a more complex railway. The {{Plural|TFH|Links}} ride the cart around in another loop, and pass by a lever {{Term|TFH|Switch}}. Hitting this turns the rail so the {{Term|TFH|Mine Cart}} can move to the next set of rails, which forms a large loop around most of the {{Term|TFH|Stage}}. This next area contains three more {{Plural|TFH|Shock Switch}} and a number of {{Plural|TFH|Bomb Flower}} on ledges. Each {{Term|TFH|Switch}} has a line of {{Plural|TFH|Bomb Flower}} leading up to them; two of these lines begin at fire stacks near the railway. The {{Plural|TFH|Links}} must activate these {{Plural|TFH|Shock Switch}} by blowing up the lines of {{Plural|TFH|Bomb Flower}}, creating a chain reaction that will hit the {{Plural|TFH|Switch}}. One {{Term|TFH|Switch}} simply requires one {{Term|TFH|Links}} atop a {{Term|TFH|Totem}} to shoot an {{Term|TFH|Arrow}} at the line of {{Plural|TFH|Bomb Flower}}, while the other two require that the {{Plural|TFH|Links}} throw {{Plural|TFH|Bombs}} into the fire stacks. Alternately, the other two {{Plural|TFH|Switch}} can also be hit with an {{Term|TFH|Arrow}} that is shot with just the right angle and timing. Hitting all three {{Plural|TFH|Shock Switch}} opens a door to the {{Term|TFH|Triforce Gateway}} back on the starting platform, and turns the rails to lead back to it. | |||
{{Clear}} | |||
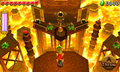
'''Stage 4''' is where the Links | [[File:TFH Hinox Brothers Promotional Screenshot.png|250px|right|thumb|The Hinox Brothers in Stage 4]] | ||
'''Stage 4''' is where the {{Plural|TFH|Links}} battle two of the {{Plural|TFH|Hinox Brothers|link}} aboard a larger, two-car {{Term|TFH|Mine Cart}}. The rails run around the entire {{Term|TFH|Stage}}'s perimeter, above a massive pool of {{Term|TFH|Lava}}. A second set of rails for the {{Term|TFH|Mine Cart}} carrying the {{Plural|TFH|Hinox Brothers}} runs parallel through most of the {{Term|TFH|Stage}}, briefly breaking away from the {{Plural|TFH|Links}} in the northern section. Several ledges around the {{Term|TFH|Stage}} have {{Plural|TFH|Heart|link}} that can be retrieved with the {{Term|TFH|Boomerang}}. Once the {{Plural|TFH|Hinox Brothers}} are defeated, the {{Term|TFH|Mine Cart}} returns to the starting platform where the {{Term|TFH|Triforce Gateway}} is activated. | |||
{{Clear}} | |||
===Drablands | ==={{Plural|TFH|Drablands Challenge}}=== | ||
Hinox Mine | Once the {{Term|TFH|Boss|link}} of the {{Term|TFH|Volcano|link}} has been defeated, {{Term|TFH|Hinox Mine}} can be replayed with the following {{Plural|TFH|Drablands Challenge|link}}: "[[Drablands Challenge#Clear within the time limit!|Clear within the time limit!]]", "[[Drablands Challenge#Pop all balloons!|Pop all balloons!]]", and "[[Drablands Challenge#Don't pop any balloons!|Don't pop any balloons!]]". Each {{Term|TFH|Drablands Challenge|display=Challenge}} features the same configuration of {{Plural|TFH|Enemy|link}}. | ||
In "Clear within the time limit!", the {{Plural|TFH|Links|link}} are given a timer of four minutes in [[Multiplayer]], or four minutes and 45 seconds in single-player. This timer can be increased by collecting {{Plural|TFH|Hourglass|link}} or wearing {{Term|TFH|Linebeck's Uniform|link}}. Notably, there are no {{Plural|TFH|Hourglass}} to collect until the final {{Term|TFH|Stage|link}}, where several can be found on the ledges with {{Plural|TFH|Heart|link}}. | |||
In "Pop all balloons!", the four {{Plural|TFH|Stage}} contain seven, seven, six, and six {{Plural|TFH|Balloon|link}} respectively, for a total of 26 {{Plural|TFH|Balloon}}. Due to a bug present in all versions of the game, the {{Term|TFH|Balloon}} floating above the staircase in {{Term|TFH|Stage}} 1 does not need to be popped. | |||
"Don't pop any balloons!" is considered to be one of the most difficult {{Plural|TFH|Drablands Challenge}}, as many of the {{Plural|TFH|Bomb Flower|link}} and {{Plural|TFH|Shock Switch|link}} throughout the {{Term|TFH|Level}} have {{Plural|TFH|Balloon}} floating very close by. For this reason, the {{Term|TFH|Drablands Challenge|display=Challenge}} becomes impossible to complete if the {{Term|TFH|Links}} utilizing the {{Term|TFH|Bow|link}} wears the {{Term|TFH|Kokiri Clothes|link}}. | |||
==== | ==={{Plural|TFH|Material}}=== | ||
At the end of the {{Term|TFH|Level}}, three {{Plural|TFH|Treasure Chest|link}} can be opened. Two contain the same {{Term|TFH|Material|link}}, and one contains another, more valuable {{Term|TFH|Material}}. | |||
== | {{Data Table | ||
*2 | |game= TFH | ||
|columns= {{Term|TFH|Drablands Challenge}}, {{Plural|TFH|Magical Material}} [Amounts] | |||
|- | |||
| N/A | |||
| 2 Goron Ore, 1 Demon Fossil | |||
|- | |||
| [[File:TFH Hourglass Icon.png]]<br/>'''Clear within the time limit!''' | |||
| 2 Monster Guts, 1 Rugged Horn | |||
|- | |||
| [[File:TFH Pop All Balloons Icon.png]]<br/>'''Pop all balloons!''' | |||
| 2 Demon Fossil, 1 Kodongo Tail | |||
|- | |||
| [[File:TFH No Balloons Popped Icon.png]]<br/>'''Don't pop any balloons!''' | |||
| 2 Rugged Horn, 1 Keese Wing | |||
}} | |||
==={{Plural|TFH|Enemy}} and Traps=== | |||
;{{Term|TFH|Stage}} 1 | |||
There are no {{Plural|TFH|Enemy}} in this {{Term|TFH|Stage}}. | |||
;{{Term|TFH|Stage}} 2 | |||
{{Gallery List|Enemies | |||
|TFH= Squiddy | |||
}} | |||
;{{Term|TFH|Stage}} 3 | |||
There are no {{Plural|TFH|Enemy}} in this {{Term|TFH|Stage}}. | |||
;{{Term|TFH|Stage}} 4 | |||
{{Gallery List|Enemies | |||
|TFH= Hinox the Elder, Hinox the Eldest | |||
}} | |||
==Trivia== | |||
*As described in Vol. 3 of the {{Term|TFH|Drablands Diary|link}}, some fossilized bones are hidden in each {{Term|TFH|Level|link}} of the {{Term|TFH|Volcano|link}}. They can be seen on the sloped edge of a platform in {{Term|TFH|Stage}} 2 of {{Term|TFH|Hinox Mine}}, just after the {{Term|TFH|Mine Cart|link}} turns north toward the {{Term|TFH|Triforce Gateway|link}}. | |||
==Nomenclature== | |||
{{Nomenclature}} | |||
== | ==Gallery== | ||
<gallery> | <gallery> | ||
File:TFH | File:TFH Hinox Mine Stage 1 3.png|One solution to the {{Term|TFH|Shock Switch}} puzzle in {{Term|TFH|Stage}} 1 | ||
File:TFH Hinox Mine Stage 2 2.png|Collecting {{Plural|TFH|Rupee}} and {{Plural|TFH|Bomb Flower}} with the {{Term|TFH|Boomerang}} in {{Term|TFH|Stage}} 2 | |||
File:TFH Hinox Mine Stage 2 3.png|Firing an {{Term|TFH|Arrow}} at the {{Term|TFH|Shock Switch}} in {{Term|TFH|Stage}} 2 | |||
File:TFH Hinox Mine Stage 3 2.png|Throwing a {{Term|TFH|Bomb Flower}} to activate a {{Term|TFH|Shock Switch}} in {{Term|TFH|Stage}} 3 | |||
File:TFH Hinox Mine Stage 3 3.png|Firing an {{Term|TFH|Arrow}} to activate a {{Term|TFH|Shock Switch}} in {{Term|TFH|Stage}} 3 | |||
File:TFH Hinox Brothers Volcano Battle 3.png|Battling the {{Plural|TFH|Hinox Brothers}} in {{Term|TFH|Stage}} 4 | |||
</gallery> | </gallery> | ||
{{Ref}} | |||
{{ | |||
{{Categories | |||
|Mines | |||
|levels= TFH | |||
}} | |||
Latest revision as of 01:18, 19 March 2024
Lua error: Cannot access the database: :real_connect(): (08004/1040): Too many connections.
Hinox Mine is a Level in Tri Force Heroes.[1] It is the second Level in the Volcano Area, preceded by Blazing Trail and followed by Den of Flames.
Hinox Mine is a large volcanic cavern, which contains several railways and Mine Carts that are used for transportation over lakes of Lava.

In Stage 1, the Links begin at a small area with a pair of Bomb Flowers growing on pillars, and a Cracked Block barricading the way forward. A pair of Boomerangs and a Bow are immediately provided for their use. To destroy the Cracked Block, the Links must throw the Boomerangs at the Bomb Flowers to catch the Bombs, then throw them at the Block, which requires two blasts to destroy. Removing it allows one of the Links to shoot an Arrow at the Shock Switch up ahead, which raises a flight of stairs to the next area. Here, the Links must work in tandem to activate a set of three timed Shock Switches across a gap. This can be accomplished numerous ways; the intended method is for one Link to grab one of the Bomb Flowers from the sides, and throw it between the two Bomb Flowers that sit next to the Switches, which causes a chain reaction of explosions that activates two Switches. The Links must then quickly form a Totem so the top Link can fire an Arrow at the higher Shock Switch in the center before others revert to deactivated. Activating all three Switches at once creates a moving platform that leads to the Triforce Gateway.

In Stage 2, the Links appear on a platform above a set of rails and a Mine Cart. Once they drop into the Mine Cart, it will continuously move in a loop around the area, passing by some Bomb Flowers and Red Rupees on a ledge, and a large Cracked Block. The Links with Boomerangs can grab the Bombs and throw them to demolish the Block, revealing a Shock Switch and a Purple Rupee behind it. The Rupee can be retrieved with a Boomerang by a Totem of two, while the Links must form a Totem of three to hit the Switch with an Arrow. A pair of Bomb Flowers sit next to the Switch which will also activate it, so Link's aim does not need to be perfect. Hitting this Switch turns the rails so the Mine Cart will move north to a Triforce Gateway and a Squiddy.

Stage 3 features another Mine Cart and a more complex railway. The Links ride the cart around in another loop, and pass by a lever Switch. Hitting this turns the rail so the Mine Cart can move to the next set of rails, which forms a large loop around most of the Stage. This next area contains three more Shock Switches and a number of Bomb Flowers on ledges. Each Switch has a line of Bomb Flowers leading up to them; two of these lines begin at fire stacks near the railway. The Links must activate these Shock Switches by blowing up the lines of Bomb Flowers, creating a chain reaction that will hit the Switches. One Switch simply requires one Link atop a Totem to shoot an Arrow at the line of Bomb Flowers, while the other two require that the Links throw Bombs into the fire stacks. Alternately, the other two Switches can also be hit with an Arrow that is shot with just the right angle and timing. Hitting all three Shock Switches opens a door to the Triforce Gateway back on the starting platform, and turns the rails to lead back to it.

Stage 4 is where the Links battle two of the Hinox Brothers aboard a larger, two-car Mine Cart. The rails run around the entire Stage's perimeter, above a massive pool of Lava. A second set of rails for the Mine Cart carrying the Hinox Brothers runs parallel through most of the Stage, briefly breaking away from the Links in the northern section. Several ledges around the Stage have Hearts that can be retrieved with the Boomerang. Once the Hinox Brothers are defeated, the Mine Cart returns to the starting platform where the Triforce Gateway is activated.
Drablands Challenges
Once the Boss of the Volcano has been defeated, Hinox Mine can be replayed with the following Drablands Challenges: "Clear within the time limit!", "Pop all balloons!", and "Don't pop any balloons!". Each Challenge features the same configuration of Enemies.
In "Clear within the time limit!", the Links are given a timer of four minutes in Multiplayer, or four minutes and 45 seconds in single-player. This timer can be increased by collecting Hourglasses or wearing Linebeck's Uniform. Notably, there are no Hourglasses to collect until the final Stage, where several can be found on the ledges with Hearts.
In "Pop all balloons!", the four Stages contain seven, seven, six, and six Balloons respectively, for a total of 26 Balloons. Due to a bug present in all versions of the game, the Balloon floating above the staircase in Stage 1 does not need to be popped.
"Don't pop any balloons!" is considered to be one of the most difficult Drablands Challenges, as many of the Bomb Flowers and Shock Switches throughout the Level have Balloons floating very close by. For this reason, the Challenge becomes impossible to complete if the Link utilizing the Bow wears the Kokiri Clothes.
Materials
At the end of the Level, three Treasure Chests can be opened. Two contain the same Material, and one contains another, more valuable Material.
| Drablands Challenge | — |
|---|---|
| Magical Materials | |
| Drablands Challenge | Clear within the time limit! |
| Magical Materials | |
| Drablands Challenge | Pop all balloons! |
| Magical Materials | |
| Drablands Challenge | Don't pop any balloons! |
| Magical Materials |
| Drablands Challenge | Magical Materials |
|---|---|
— | |
Clear within the time limit! | |
Pop all balloons! | |
Don't pop any balloons! |
Enemies and Traps
- Stage 1
There are no Enemies in this Stage.
- Stage 2

- Stage 3
There are no Enemies in this Stage.
- Stage 4


Trivia
- As described in Vol. 3 of the Drablands Diary, some fossilized bones are hidden in each Level of the Volcano. They can be seen on the sloped edge of a platform in Stage 2 of Hinox Mine, just after the Mine Cart turns north toward the Triforce Gateway.
Nomenclature
| Language | Names | Meanings |
|---|---|---|
Japanese | ヒノックス坑道 (Hinokkusu Kōdō)[3] | Hinox Mine Shaft |
FrenchCA | Galeries hinox | |
FrenchEU | Galeries hinox[5] | |
German | Hinox-Tunnel[4] | |
Italian | Miniere hinox[2] | |
SpanishLA | Mina hinox[6] | |
SpanishEU | Mina Hinox[7] | |
| This table was generated using translation pages. To request an addition, please contact a staff member with a reference. | ||
Gallery
-
One solution to the Shock Switch puzzle in Stage 1
-
Collecting Rupees and Bomb Flowers with the Boomerang in Stage 2
-
Firing an Arrow at the Shock Switch in Stage 2
-
Throwing a Bomb Flower to activate a Shock Switch in Stage 3
-
Firing an Arrow to activate a Shock Switch in Stage 3
-
Battling the Hinox Brothers in Stage 4


References
- ↑ Encyclopedia, Dark Horse Books, pg. 160
- ↑ "Miniere hinox" — Level Selection (Tri Force Heroes)
- ↑ "ヒノックス坑道" — Level Selection (Tri Force Heroes)
- ↑ "Hinox-Tunnel" — Level Selection (Tri Force Heroes)
- ↑ "Galeries hinox" — Level Selection (Tri Force Heroes)
- ↑ "Mina hinox" — Level Selection (Tri Force Heroes)
- ↑ "Mina Hinox" — Level Selection (Tri Force Heroes)