Secret Fortress: Difference between revisions
mNo edit summary |
Htwretched (talk | contribs) (+2 images) |
||
| (35 intermediate revisions by 16 users not shown) | |||
| Line 1: | Line 1: | ||
{{ | {{Infobox Dungeon | ||
|type= level | |||
|image= File:TFH Secret Fortress.png | |||
|type = level | |caption= Stage 1 of Secret Fortress | ||
|image = | |location= {{Term|TFH|Riverside|link}} | ||
|caption = | |game= TFH | ||
|location = | |item= {{Term|TFH|Water Rod|link}} ×3 | ||
|game = {{TFH}} | |quest= | ||
|mini-boss= | |||
|quest = | |boss= | ||
|mini-boss = | |theme= | ||
|boss = | |strategy= | ||
|theme | |||
|strategy = | |||
}} | }} | ||
{{Term/Store|Secret Fortress||Series, TFH}} is a {{Term|TFH|Level|link}} in {{TFH}}.<ref>{{Cite Book|quote= |book= E |publisher= |page= 159}}</ref> It is the first {{Term|TFH|Level}} in the {{Term|TFH|Riverside|link}} {{Term|TFH|Area}}, and is followed by {{Term|TFH|Abyss of Agony|link}}. | |||
==Themes and Navigation== | ==Themes and Navigation== | ||
The Level takes place in a large, open lake that has a fortress built within. The Level introduces the | The {{Term|TFH|Level}} takes place in a large, open lake that has a fortress built within. The {{Term|TFH|Level}} introduces the {{Term|TFH|Water Rod|link}}, which is essential to crossing the {{Term|TFH|Level}}'s bodies of {{Term|TFH|Water (Terrain)|link}}. | ||
In '''Stage 1''', the Links enter the Level | [[File:TFH Secret Fortress Stage 1.png|250px|right|thumb|Climbing the hill in Stage 1]] | ||
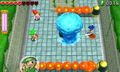
In '''{{Term|TFH|Stage}} 1''', the {{Plural|TFH|Links|link}} enter the {{Term|TFH|Level}} at the base a large hill next to a rushing waterfall, and climb up numerous ledges to reach the top. Three {{Plural|TFH|Water Rod}} provided on the lower ledges make climbing easy work, as the {{Plural|TFH|Links}} can use it to create pillars of {{Term|TFH|Water (Terrain)}} to propel them up. While climbing the hill, the {{Plural|TFH|Links}} encounter several {{Plural|TFH|Blob|link}}. At the top of the hill are three lookout posts with {{Plural|TFH|Floor Switch|link}} on them, watched by a pair of {{Plural|TFH|Spear Throwing Moblin|link}}. Using the {{Plural|TFH|Water Rod}} to get onto the lookout posts, the {{Plural|TFH|Links}} press the {{Plural|TFH|Floor Switch}} to activate a bridge to the {{Term|TFH|Triforce Gateway|link}}, which is on a wooden platform suspended high above the waterfall. | |||
{{Clear}} | |||
In '''Stage 2''', the Links appear at the lakeside with the fortress on the other side. Its gate must be opened by hitting the two | [[File:TFH Secret Fortress Stage 2.png|250px|right|thumb|Crossing a pool in Stage 2]] | ||
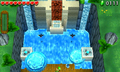
In '''{{Term|TFH|Stage}} 2''', the {{Plural|TFH|Links}} appear at the lakeside with the fortress on the other side. Its gate must be opened by hitting the two {{Plural|TFH|Shock Switch|link}} on its sides. These {{Plural|TFH|Shock Switch}} can be reached by creating bridges of {{Term|TFH|Water (Terrain)}} with the {{Term|TFH|Water Rod}}. One {{Term|TFH|Switch}} is over the {{Term|TFH|Water (Terrain)}} to the right of the fortress gate, and another is on a grassy island to the left inhabited by a {{Term|TFH|Spear Throwing Moblin}}. Striking both {{Plural|TFH|Switch}} lowers the fortress gate, which the {{Plural|TFH|Links}} can then enter by creating more {{Term|TFH|Water (Terrain)}} bridges. Inside the fortress walls, two streams of fire blast from stationary {{Plural|TFH|Guruguru Bar|link}} and prevent the {{Term|TFH|Links}}' crossing. These flames can be temporarily extinguished by creating {{Term|TFH|Water (Terrain)}} pillars in their path. Once the flames are doused with {{Term|TFH|Water (Terrain)}}, the {{Plural|TFH|Links}} can press the {{Plural|TFH|Floor Switch}} beneath them to lower another gate. Outside, a final waterway leads to the {{Term|TFH|Triforce Gateway}}. The {{Plural|TFH|Links}} must cross this waterway with the {{Plural|TFH|Water Rod}} while avoiding the flames from two spinning {{Plural|TFH|Guruguru Bar}} to reach the {{Term|TFH|Triforce Gateway}}, which has a {{Term|TFH|Squiddy|link}} beside it. | |||
{{Clear}} | |||
'''Stage 3''' puts the Links at the beginning of a river bridged by docks. The Links can cross the river to these docks using | [[File:TFH Secret Fortress Stage 3.png|250px|right|thumb|Crossing the docks in Stage 3]] | ||
'''{{Term|TFH|Stage}} 3''' puts the {{Plural|TFH|Links}} at the beginning of a river bridged by docks, which are inhabited by several {{Plural|TFH|Tektite|link}} and {{Plural|TFH|Spear Throwing Moblin}}. The {{Plural|TFH|Links}} can cross the river to these docks using their {{Plural|TFH|Water Rod}}. They soon come to a large dock that spans the width of the river, beyond which is a pool with {{Term|TFH|Water (Terrain)}} flowing heavily against them. This dock has several {{Plural|TFH|Bomb Flower|link}} growing on it, which can be used to activate a pair of {{Plural|TFH|Shock Switch}} at the sides of the pool, which have metal flaps that protect them if any of the {{Plural|TFH|Links}} get too close. Activating the {{Plural|TFH|Shock Switch}} opens a gate at the far end of the pool, revealing two {{Plural|TFH|Cracked Block|link}} barricading the passage. Two {{Plural|TFH|Crow|link}} also appear, flying above the pool. Using the {{Term|TFH|Water Rod}}, the {{Plural|TFH|Link}} must work together to carry a {{Term|TFH|Bomb Flower}} to the other side of the pool and demolish the {{Plural|TFH|Cracked Block}}. Destroying them opens the way to a {{Term|TFH|Triforce Gateway}}. If the {{Plural|TFH|Links}} only manage to destroy one {{Term|TFH|Cracked Block|display=Block}}, they can simply cross over the other one using the {{Term|TFH|Water Rod}}. | |||
{{Clear}} | |||
In '''Stage 4''', the Links appear on a dock over a rushing waterfall beneath them. The fast-moving water will push the Links | In '''{{Term|TFH|Stage}} 4''', the {{Plural|TFH|Links}} appear on a dock over a rushing waterfall beneath them. The fast-moving water will push the {{Plural|TFH|Links}} over the waterfall's edge should any of them fall in. The dock leads to a {{Term|TFH|Big Switch|link}} in the center of several small platforms. Pressing it with all three {{Plural|TFH|Links}} summons a horde of {{Plural|TFH|Spear Throwing Moblin}} and {{Plural|TFH|Keeleon|link}}, and the dock leading to the {{Term|TFH|Switch}} will break away. The {{Plural|TFH|Links}} must defeat all the {{Plural|TFH|Enemy|link}} by using their {{Plural|TFH|Water Rod}} to reach the platforms they stand on. The {{Plural|TFH|Keeleon}} can likewise also be stunned with the {{Term|TFH|Water Rod}}. Narrow pathways will emerge from the depths once some of the {{Plural|TFH|Enemy}} are defeated. After all {{Plural|TFH|Enemy}} are defeated, a platform with the {{Term|TFH|Triforce Gateway}} will rise in the center of the {{Term|TFH|Stage}}. | ||
{{Clear}} | |||
===Drablands | ==={{Plural|TFH|Drablands Challenge}}=== | ||
Once the {{Term|TFH|Boss|link}} of the {{Term|TFH|Riverside|link}} has been defeated, {{Term|TFH|Secret Fortress}} can be replayed with the following {{Plural|TFH|Drablands Challenge|link}}: "{{Term|TFH|Drablands Challenge|section=Pop all balloons!|display=Pop all balloons!|link}}", "{{Term|TFH|Drablands Challenge|section=Clear with halved energy!|display=Clear with halved energy!|link}}", and "{{Term|TFH|Drablands Challenge|section=Evade the Wallmaster!|display=Evade the Wallmaster!|link}}". | |||
In | In "Pop all balloons!", the four {{Plural|TFH|Stage|link}} contain five, five, five, and six {{Plural|TFH|Balloon|link}} respectively, for a total of 21 {{Plural|TFH|Balloon}}. | ||
===Enemies=== | ==={{Plural|TFH|Material}}=== | ||
At the end of the {{Term|TFH|Level}}, three {{Plural|TFH|Treasure Chest|link}} can be opened. Two contain the same {{Term|TFH|Material|link}}, and one contains another, more valuable {{Term|TFH|Material}}. | |||
{{Data Table | |||
|game= TFH | |||
|columns= {{Term|TFH|Drablands Challenge}}, {{Plural|TFH|Magical Material}} [Amounts] | |||
|- | |||
| N/A | |||
| 2 Fresh Kelp, 1 Zora Scale | |||
|- | |||
| [[File:TFH Pop All Balloons Icon.png]]<br/>'''Pop all balloons!''' | |||
| 2 Fresh Kelp, 1 Hytopian Silk | |||
|- | |||
| [[File:TFH Halved Energy Icon.png]]<br/>'''Clear with halved energy!''' | |||
| 2 Zora Scale, 1 Aqua Crown | |||
|- | |||
| [[File:TFH Evade the Wallmaster Icon.png]]<br/>'''Evade the Wallmaster!''' | |||
| 2 Hytopian Silk, 1 Octorok Sucker | |||
}} | |||
==={{Plural|TFH|Enemy}} and Traps=== | |||
{{Tabs | |||
|tab1= No Challenge, "Pop all balloons!", "Clear with halved energy!" | |||
|content1= | |||
;{{Term|TFH|Stage}} 1 | |||
{{Gallery List|Enemies | |||
|TFH= Blob [Qty:5], Spear Throwing Moblin [Qty:2] | |||
}} | |||
;{{Term|TFH|Stage}} 2 | |||
{{Gallery List|Enemies | |||
|TFH= Guruguru Bar [Qty:5]{{List Note|Three {{Plural|TFH|Guruguru Bar}} are stationary, two are rotating.}}, Spear Throwing Moblin [Qty:1], Squiddy | |||
}} | |||
;{{Term|TFH|Stage}} 3 | |||
{{Gallery List|Enemies | |||
|TFH= Crow [Qty:2], Spear Throwing Moblin [Qty:3], Tektite [Qty:2] | |||
}} | |||
;{{Term|TFH|Stage}} 4 | |||
{{Gallery List|Enemies | |||
|TFH= Keeleon [Qty:3], Spear Throwing Moblin [Qty:6] | |||
}} | |||
{{List Notes}} | |||
|tab2= "Evade the Wallmaster!" | |||
|content2= | |||
;{{Term|TFH|Stage}} 1 | |||
{{Gallery List|Enemies | |||
|TFH= Blob [Qty:5], Spear Throwing Moblin [Qty:2], Wallmaster [Qty:1]{{List Note|name= Wallmaster|[[Zelda Wiki:Glossary#Respawn|Respawns]] indefinitely.}} | |||
}} | |||
;{{Term|TFH|Stage}} 2 | |||
{{Gallery List|Enemies | |||
|TFH= Guruguru Bar [Qty:5]{{List Note|Three {{Plural|TFH|Guruguru Bar}} are stationary; two are rotating.}}, Spear Throwing Moblin [Qty:1], Squiddy, Wallmaster [Qty:1]{{List Note|name= Wallmaster}} | |||
}} | |||
;{{Term|TFH|Stage}} 3 | |||
{{Gallery List|Enemies | |||
|TFH= Crow [Qty:2], Spear Throwing Moblin [Qty:3], Tektite [Qty:2], Wallmaster [Qty:1]{{List Note|name= Wallmaster}} | |||
}} | |||
;{{Term|TFH|Stage}} 4 | |||
{{Gallery List|Enemies | |||
|TFH= Keeleon [Qty:3], Spear Throwing Moblin [Qty:6], Wallmaster [Qty:1]{{List Note|name= Wallmaster}} | |||
}} | |||
{{List Notes}} | |||
}} | |||
==Trivia== | |||
*As alluded to in Vol. 2 of the {{Term|TFH|Drablands Diary|link}}, a "[[Turtle Rock (Disambiguation)|Turtle Rock]]"—a rock resembling a turtle shell—is hidden in each {{Term|TFH|Level|link}} of the {{Term|TFH|Riverside|link}}. One can be found in {{Term|TFH|Stage}} 1 of {{Term|TFH|Secret Fortress}}, in the river to the far right of the {{Plural|TFH|Links|link}}' starting position. | |||
==Nomenclature== | |||
{{Nomenclature}} | |||
==Gallery== | |||
<gallery> | <gallery> | ||
File: | File:TFH Secret Fortress Stage 2 2.png|Dowsing {{Plural|TFH|Guruguru Bar}} to activate {{Plural|TFH|Floor Switch}} in {{Term|TFH|Stage}} 2 | ||
File:TFH Secret Fortress Stage 3 2.png|The final pool in {{Term|TFH|Stage}} 3 | |||
File: | |||
</gallery> | </gallery> | ||
{{Ref}} | |||
{{Categories | |||
|Fortresses | |||
|levels= TFH | |||
}} | |||
Latest revision as of 02:33, 23 January 2024
Secret Fortress is a Level in Tri Force Heroes.[1] It is the first Level in the Riverside Area, and is followed by Abyss of Agony.
The Level takes place in a large, open lake that has a fortress built within. The Level introduces the Water Rod, which is essential to crossing the Level's bodies of Water.

In Stage 1, the Links enter the Level at the base a large hill next to a rushing waterfall, and climb up numerous ledges to reach the top. Three Water Rods provided on the lower ledges make climbing easy work, as the Links can use it to create pillars of Water to propel them up. While climbing the hill, the Links encounter several Blobs. At the top of the hill are three lookout posts with Floor Switches on them, watched by a pair of Spear Throwing Moblins. Using the Water Rods to get onto the lookout posts, the Links press the Floor Switches to activate a bridge to the Triforce Gateway, which is on a wooden platform suspended high above the waterfall.

In Stage 2, the Links appear at the lakeside with the fortress on the other side. Its gate must be opened by hitting the two Shock Switches on its sides. These Shock Switches can be reached by creating bridges of Water with the Water Rod. One Switch is over the Water to the right of the fortress gate, and another is on a grassy island to the left inhabited by a Spear Throwing Moblin. Striking both Switches lowers the fortress gate, which the Links can then enter by creating more Water bridges. Inside the fortress walls, two streams of fire blast from stationary Guruguru Bars and prevent the Link' crossing. These flames can be temporarily extinguished by creating Water pillars in their path. Once the flames are doused with Water, the Links can press the Floor Switches beneath them to lower another gate. Outside, a final waterway leads to the Triforce Gateway. The Links must cross this waterway with the Water Rods while avoiding the flames from two spinning Guruguru Bars to reach the Triforce Gateway, which has a Squiddy beside it.

Stage 3 puts the Links at the beginning of a river bridged by docks, which are inhabited by several Tektites and Spear Throwing Moblins. The Links can cross the river to these docks using their Water Rods. They soon come to a large dock that spans the width of the river, beyond which is a pool with Water flowing heavily against them. This dock has several Bomb Flowers growing on it, which can be used to activate a pair of Shock Switches at the sides of the pool, which have metal flaps that protect them if any of the Links get too close. Activating the Shock Switches opens a gate at the far end of the pool, revealing two Cracked Blocks barricading the passage. Two Crows also appear, flying above the pool. Using the Water Rod, the Links must work together to carry a Bomb Flower to the other side of the pool and demolish the Cracked Blocks. Destroying them opens the way to a Triforce Gateway. If the Links only manage to destroy one Block, they can simply cross over the other one using the Water Rod.
In Stage 4, the Links appear on a dock over a rushing waterfall beneath them. The fast-moving water will push the Links over the waterfall's edge should any of them fall in. The dock leads to a Big Switch in the center of several small platforms. Pressing it with all three Links summons a horde of Spear Throwing Moblins and Keeleons, and the dock leading to the Switch will break away. The Links must defeat all the Enemies by using their Water Rods to reach the platforms they stand on. The Keeleons can likewise also be stunned with the Water Rod. Narrow pathways will emerge from the depths once some of the Enemies are defeated. After all Enemies are defeated, a platform with the Triforce Gateway will rise in the center of the Stage.
Drablands Challenges
Once the Boss of the Riverside has been defeated, Secret Fortress can be replayed with the following Drablands Challenges: "Pop all balloons!", "Clear with halved energy!", and "Evade the Wallmaster!".
In "Pop all balloons!", the four Stages contain five, five, five, and six Balloons respectively, for a total of 21 Balloons.
Materials
At the end of the Level, three Treasure Chests can be opened. Two contain the same Material, and one contains another, more valuable Material.
| Drablands Challenge | — |
|---|---|
| Magical Materials | |
| Drablands Challenge | Pop all balloons! |
| Magical Materials | |
| Drablands Challenge | Clear with halved energy! |
| Magical Materials | |
| Drablands Challenge | Evade the Wallmaster! |
| Magical Materials |
| Drablands Challenge | Magical Materials |
|---|---|
— | |
Pop all balloons! | |
Clear with halved energy! | |
Evade the Wallmaster! |
Enemies and Traps


![Guruguru Bar ×5[a]](/wiki/File:TFH_Guruguru_Bar_Model.png)


![Wallmaster ×1[a]](/wiki/File:TFH_Wallmaster_Model.png)
Trivia
- As alluded to in Vol. 2 of the Drablands Diary, a "Turtle Rock"—a rock resembling a turtle shell—is hidden in each Level of the Riverside. One can be found in Stage 1 of Secret Fortress, in the river to the far right of the Links' starting position.
Nomenclature
| Language | Names | Meanings |
|---|---|---|
Japanese | 湖のかくし砦 (Mizūmi no Kakushi Toride)[3] | Lake Hidden Fort |
FrenchCA | Forteresse secrète[7] | |
FrenchEU | Fort secret du lac[5] | |
German | Seeburg[4] | |
Italian | Fortezza lacustre[2] | |
SpanishLA | Fortaleza secreta[6] | |
SpanishEU | Fortaleza Secreta[8] | |
| This table was generated using translation pages. To request an addition, please contact a staff member with a reference. | ||
Gallery
-
Dowsing Guruguru Bars to activate Floor Switches in Stage 2
-
The final pool in Stage 3


References
- ↑ Encyclopedia, Dark Horse Books, pg. 159
- ↑ "Fortezza lacustre" — Level Selection (Tri Force Heroes)
- ↑ "湖のかくし砦" — Level Selection (Tri Force Heroes)
- ↑ "Seeburg" — Level Selection (Tri Force Heroes)
- ↑ "Fort secret du lac" — Level Selection (Tri Force Heroes)
- ↑ "Fortaleza secreta" — Level Selection (Tri Force Heroes)
- ↑ "Forteresse secrète" — Level Selection (Tri Force Heroes)
- ↑ "Fortaleza Secreta" — Level Selection (Tri Force Heroes)