Buzz Blob Cave: Difference between revisions
mNo edit summary |
Htwretched (talk | contribs) (+1 image) |
||
| (46 intermediate revisions by 18 users not shown) | |||
| Line 1: | Line 1: | ||
{{ | {{Infobox Dungeon | ||
|type= level | |||
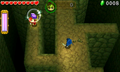
|type = level | |image= File:TFH Buzz Blob Cave Stage 3.png | ||
|image = | |caption= Stage 3 of Buzz Blob Cave | ||
|caption = | |location= {{Term|TFH|Woodlands|link}} | ||
|location = | |game= TFH | ||
|game = {{TFH}} | |item= {{Term|TFH|Bow|link}} ×3 | ||
|quest= | |||
|quest = | |mini-boss= | ||
|mini-boss = | |boss= {{Term|TFH|Electric Blob King|link}} | ||
|boss = | |theme= | ||
|theme | |strategy= | ||
|strategy = | |||
}} | }} | ||
{{Term/Store|Buzz Blob Cave||Series, TFH}} is a {{Term|TFH|Level|link}} in {{TFH}}.<ref>{{Cite Book|quote= |book= E |publisher= |page= 159}}</ref> It is the second {{Term|TFH|Level}} of the {{Term|TFH|Woodlands|link}} {{Term|TFH|Area}}, preceded by {{Term|TFH|Deku Forest|link}} and followed by {{Term|TFH|Moblin Base|link}}. | |||
==Themes and Navigation== | ==Themes and Navigation== | ||
Buzz Blob Cave is a large cavern with deep chasms and sparse foliage. The Level is simple in design, relying heavily on basic | {{Term|TFH|Buzz Blob Cave}} is a large, earthen cavern with deep chasms and sparse foliage. The {{Term|TFH|Level|link}} is simple in design, relying heavily on basic {{Term|TFH|Totem|link}} and {{Term|TFH|Bow|link}} puzzles. Because of this, the {{Term|TFH|Kokiri Clothes|link}} serve well here. | ||
'''Stage 1''' | '''{{Term|TFH|Stage|link}} 1''' has the {{Plural|TFH|Links|link}} separated on elevated ledges in different corners of the {{Term|TFH|Buzz Blob Cave|display=Cave}}. On each of the ledges is a {{Term|TFH|Balloon|link}} that can be popped with a {{Term|TFH|Sword|link}} strike, and a {{Term|TFH|Bow}} for that {{Term|TFH|Links}} to make use of. A short distance from each of these ledges, just out of their {{Plural|TFH|Sword}}' reach, floating {{Plural|TFH|Balloon}} hold up bridges and prevent the {{Plural|TFH|Links}} from getting down. Shooting an {{Term|TFH|Arrow|link}} to pop the {{Term|TFH|Balloon}} causes the bridge to fall into place, allowing the {{Plural|TFH|Links}} passage to reunite in the main part of the {{Term|TFH|Stage}}, where three {{Plural|TFH|Blob|link}} await. The {{Term|TFH|Triforce Gateway}} is blocked by a locked {{Term|TFH|Gate|link}}, and a {{Term|TFH|Key|link}} floats inside a {{Term|TFH|Balloon}} near it. To reach this {{Term|TFH|Balloon}}, the {{Plural|TFH|Links}} must throw each other up two nearby ledges. After the {{Term|TFH|Gate}} is unlocked, the {{Term|TFH|Triforce Gateway|display=Gateway}} can be reached beyond a narrow pathway. | ||
{{Clear}} | |||
[[File:TFH Buzz Blob Cave Stage 2.png|250px|right|thumb|Ambushed by Blobs in Stage 2]] | |||
'''{{Term|TFH|Stage}} 2''' places the {{Plural|TFH|Links}} on a grassy ledge. Below is a large room with a closed {{Term|TFH|Gate}}, a bush-filled ledge to the west that can only be reached by forming a {{Term|TFH|Totem|link}}, and a {{Term|TFH|Big Switch|link}} that can only be activated once all three {{Plural|TFH|Links}} stand on it. Once they do, seven {{Plural|TFH|Blob}} and one {{Term|TFH|Buzz Blob|link}} appear in a circle around them. The latter electrifies the {{Plural|TFH|Links}} upon contact, so it can only be damaged with {{Plural|TFH|Arrow}}. After the {{Plural|TFH|Enemy|link}} are defeated, five more {{Plural|TFH|Blob}} and two more {{Plural|TFH|Buzz Blob}} appear in front of the {{Term|TFH|Gate}}. Defeating them all opens the {{Term|TFH|Gate}}, allowing passage to the {{Term|TFH|Triforce Gateway}}. Beyond the {{Term|TFH|Gate}} is a narrow pathway, which branches off to the left toward a {{Term|TFH|Treasure Chest|link}} containing a {{Term|TFH|Purple Rupee|link}}. | |||
{{Clear}} | |||
'''Stage 3''' | '''Stage 3''' starts the {{Plural|TFH|Links}} off on a small cliff over a deep chasm. Directly ahead of them is a central cliff, which can be reached using the four floating platforms that circle it. On this cliff are two {{Plural|TFH|Totem Deku|link}} and a {{Term|TFH|Shock Switch|link}} on a post. Similarly to how the {{Plural|TFH|Totem Deku}} retract into the ground when the {{Plural|TFH|Links}} approach them, the {{Term|TFH|Shock Switch|display=Switch}} covers itself with metal flaps if any {{Plural|TFH|Links}} get too close, forcing them to strike it from a distance. On the east cliff are a second {{Term|TFH|Shock Switch}} and a {{Term|TFH|Buzz Blob}}. On the north cliff, a third {{Term|TFH|Shock Switch|display=Switch}} and an elevated ledge, and on the west cliff, a {{Term|TFH|Blob}} and an elevated {{Term|TFH|Treasure Chest}} containing a {{Term|TFH|Red Rupee|link}}. Each {{Term|TFH|Shock Switch}} can only be reached by the {{Term|TFH|Links}} atop a full {{Term|TFH|Totem}}. Once all three are struck, the {{Term|TFH|Gate}} blocking the northeast cliff opens, allowing passage to the {{Term|TFH|Triforce Gateway}}, which is beyond a short bridge. A {{Term|TFH|Squiddy|link}} is found beside the {{Term|TFH|Triforce Gateway|display=Gateway}}, along with several {{Plural|TFH|Jar|link}}. | ||
{{Clear}} | |||
'''Stage 4''' is | [[File:TFH Electric Blob King Battle.png|250px|right|thumb|Battling Electric Blob King in Stage 4]] | ||
'''Stage 4''' is the final stage. The {{Plural|TFH|Links}} appear in a small room, which opens ahead of them into a large pit below. Before falling in, the {{Plural|TFH|Links}} can circle around the border to find {{Plural|TFH|Rock|link}} and bushes. A single {{Term|TFH|Heart}} rests behind some {{Plural|TFH|Rock}} to the east. Once all three {{Plural|TFH|Links}} fall in the hole, the {{Term|TFH|Electric Blob King|link}} appears, and the battle ensues. {{Plural|TFH|Heart}} and {{Plural|TFH|Rupee|link}} atop various ledges can be found around the arena. Once the {{Term|TFH|Boss}} is defeated, the {{Term|TFH|Triforce Gateway}} appears, and the {{Term|TFH|Level}} is completed upon entering it. A hidden tunnel can also be found in the north-east of the pit, reachable only by forming a {{Term|TFH|Totem}} and throwing the {{Plural|TFH|Links}} up. One {{Term|TFH|Links}} can enter this tunnel to find several {{Plural|TFH|Rupee}}, including a {{Term|TFH|Red Rupee}}, in an alcove above the {{Term|TFH|Triforce Gateway}}. | |||
{{Clear}} | |||
===Drablands Challenge=== | ==={{Plural|TFH|Drablands Challenge}}=== | ||
Once the {{Term|TFH|Boss|link}} of the {{Term|TFH|Woodlands|link}} has been defeated, {{Term|TFH|Buzz Blob Cave}} can be replayed with the following {{Plural|TFH|Drablands Challenge|link}}: "[[Drablands Challenge#Pop all balloons!|Pop all balloons!]]", "[[Drablands Challenge#Clear within the time limit!|Clear within the time limit!]]", and "[[Drablands Challenge#Clear using only Bombs!|Clear using only Bombs!]]". | |||
In Pop all balloons, a | In "Pop all balloons!", the four {{Plural|TFH|Stage|link}} contain 12, 17, four, and three {{Plural|TFH|Balloon|link}} respectively, for a total of 36 {{Plural|TFH|Balloon}}. Many of them bear a number indicating the size of a {{Term|TFH|Totem|link}} required for the {{Plural|TFH|Links|link}} to reach them. In {{Term|TFH|Stage}} 1, the {{Plural|TFH|Blob}} are absent during this {{Term|TFH|Drablands Challenge|display=Challenge}}. | ||
In | In "Clear within the time limit!", the {{Plural|TFH|Links|link}} are given a timer of one minute and 30 seconds in both single-player and [[Multiplayer]] modes. This timer can be increased by collecting {{Plural|TFH|Hourglass|link}} or wearing {{Term|TFH|Linebeck's Uniform|link}}. Notably, there are no {{Plural|TFH|Hourglass}} to collect in the first two {{Plural|TFH|Stage}} of the {{Term|TFH|Level}}. | ||
===Enemies=== | In "Clear using only Bombs!", the {{Term|TFH|Level}}'s {{Plural|TFH|Bow}} are replaced with {{Plural|TFH|Bomb}}. Anything to be hit indirectly or from a distance must now be struck using a {{Term|TFH|Bomb}} blast, requiring the {{Plural|TFH|Links}} to use precise timing and aiming in order to solve puzzles.<ref>{{Cite Web|quote= I think you probably looked at this course on the first day of Treehouse Live, but you played it in its normal mode, where you were equipped with bows and arrows. But this time, because it's one of the challenge courses, all the players have just bombs.|author= Hiromasa Shikata|published= June 18, 2015|retrieved=August 22, 2015|url= https://www.youtube.com/watch?v=FnQl8A2vx4k|title= Nintendo Treehouse Live @ E3 2015 Day 3 The Legend of Zelda: Tri Force Heroes|site= YouTube|type= Video}}</ref> {{Plural|TFH|Sword}} can still be used during this {{Term|TFH|Drablands Challenge|display=Challenge}}. | ||
==={{Plural|TFH|Material}}=== | |||
At the end of the {{Term|TFH|Level}}, three {{Plural|TFH|Treasure Chest|link}} can be opened. Two contain the same {{Term|TFH|Material|link}}, and one contains another, more valuable {{Term|TFH|Material}}. | |||
{{Data Table | |||
|game= TFH | |||
|columns= {{Term|TFH|Drablands Challenge}}, {{Plural|TFH|Magical Material}} [Amounts] | |||
|- | |||
| N/A | |||
| 2 Blob Jelly, 1 Tektite Shell | |||
|- | |||
| [[File:TFH Pop All Balloons Icon.png]]<br/>'''Pop all balloons!''' | |||
| 2 Armos Spirit, 1 Sweet Shroom | |||
|- | |||
| [[File:TFH Hourglass Icon.png]]<br/>'''Clear within the time limit!''' | |||
| 2 Tektite Shell, 1 Blin Bling | |||
|- | |||
| [[File:TFH Only Bombs Icon.png]]<br/>'''Clear using only Bombs!''' | |||
| 2 Sweet Shroom, 1 Gohma's Eye | |||
}} | |||
==={{Plural|TFH|Enemy}} and Traps=== | |||
{{Tabs | |||
|tab1= No Challenge, "Clear using only Bombs!" | |||
|content1= | |||
;{{Term|TFH|Stage}} 1 | |||
{{Gallery List|Enemies | |||
|TFH= Blob [Qty:3] | |||
}} | |||
;{{Term|TFH|Stage}} 2 | |||
{{Gallery List|Enemies | |||
|TFH= Blob [Qty:12], Buzz Blob [Qty:3] | |||
}} | |||
;{{Term|TFH|Stage}} 3 | |||
{{Gallery List|Enemies | |||
|TFH= Blob [Qty:1], Buzz Blob [Qty:1], Squiddy, Totem Deku [3] [Qty:2] | |||
}} | |||
;{{Term|TFH|Stage}} 4 | |||
{{Gallery List|Enemies | |||
|TFH= Electric Blob King | |||
}} | |||
|tab2= "Pop all balloons!" | |||
|content2= | |||
;{{Term|TFH|Stage}} 1 | |||
There are no {{Plural|TFH|Enemy}} in this {{Term|TFH|Stage}}. | |||
;{{Term|TFH|Stage}} 2 | |||
{{Gallery List|Enemies | |||
|TFH= Blob [Qty:12], Buzz Blob [Qty:3] | |||
}} | |||
;{{Term|TFH|Stage}} 3 | |||
{{Gallery List|Enemies | |||
|TFH= Blob [Qty:1], Buzz Blob [Qty:1], Squiddy, Totem Deku [3] [Qty:2] | |||
}} | |||
;{{Term|TFH|Stage}} 4 | |||
{{Gallery List|Enemies | |||
|TFH= Electric Blob King | |||
}} | |||
|tab3= "Clear within the time limit!" | |||
|content3= | |||
;{{Term|TFH|Stage}} 1 | |||
{{Gallery List|Enemies | |||
|TFH= Blob [Qty:3], Buzz Blob [Qty:2] | |||
}} | |||
;{{Term|TFH|Stage}} 2 | |||
{{Gallery List|Enemies | |||
|TFH= Blob [Qty:2], Buzz Blob [Qty:4] | |||
}} | |||
;{{Term|TFH|Stage}} 3 | |||
{{Gallery List|Enemies | |||
|TFH= Blob [Qty:1], Buzz Blob [Qty:4], Squiddy | |||
}} | |||
;{{Term|TFH|Stage}} 4 | |||
{{Gallery List|Enemies | |||
|TFH= Buzz Blob [Qty:5], Electric Blob King | |||
}} | |||
}} | |||
==={{Plural|TFH|Treasure Chest}}=== | |||
{{Treasure Chests|game= TFH | |||
|- | |||
| Treasure Chest | |||
| Purple Rupee | |||
| At the end of the narrow pathway behind the {{Term|TFH|Gate}} in {{Term|TFH|Stage}} 2 | |||
|- | |||
| Treasure Chest | |||
| Red Rupee | |||
| On a ledge on the upper-left platform in {{Term|TFH|Stage}} 3 | |||
}} | |||
==Trivia== | |||
*{{Term|TFH|Buzz Blob Cave}} was one of the {{Plural|TFH|Level}} included in the E3 demo and in the distributed demo version. In the former, it was formerly known as '''The Forest'''. | |||
*As described in Vol. 1 of the {{Term|TFH|Drablands Diary|link}}, a bright green {{Term|TFH|Butterfly|link}} is hidden in each {{Term|TFH|Level|link}} of the {{Term|TFH|Woodlands|link}}. One can be found in {{Term|TFH|Stage}} 3 of {{Term|TFH|Buzz Blob Cave}}, on a spiderweb directly above the easternmost {{Term|TFH|Shock Switch|link}}. | |||
==Nomenclature== | |||
{{Nomenclature}} | |||
===Other Names=== | |||
{{Other Names | |||
|- | |||
| The Forest<ref>{{Cite YouTube|quote= |title= The Legend of Zelda: Tri Force Heroes - The Forest (Direct Gampelay) |channel= @GameXplain |date= August 2, 2015 |url= https://www.youtube.com/watch?v=RDDrHCUSOHk |archive= https://web.archive.org/web/20230826204312/https://www.youtube.com/watch?v=RDDrHCUSOHk}}</ref> | |||
| {{TFH}} | |||
| {{TFH}} [[E3 2015]] demo | |||
| {{TFH}} | |||
}} | |||
==Gallery== | |||
<gallery> | <gallery> | ||
File: | File:TFH Buzz Blob Cave Stage 2 2.png|The {{Term|TFH|Treasure Chest}} in {{Term|TFH|Stage}} 2 | ||
</gallery> | </gallery> | ||
{{Ref}} | {{Ref}} | ||
{{Categories | |||
{{ | |Caves | ||
|levels= TFH | |||
}} | |||
| | |||
| | |||
Latest revision as of 01:58, 23 January 2024
Buzz Blob Cave is a Level in Tri Force Heroes.[1] It is the second Level of the Woodlands Area, preceded by Deku Forest and followed by Moblin Base.
Buzz Blob Cave is a large, earthen cavern with deep chasms and sparse foliage. The Level is simple in design, relying heavily on basic Totem and Bow puzzles. Because of this, the Kokiri Clothes serve well here.
Stage 1 has the Links separated on elevated ledges in different corners of the Cave. On each of the ledges is a Balloon that can be popped with a Sword strike, and a Bow for that Link to make use of. A short distance from each of these ledges, just out of their Swords' reach, floating Balloons hold up bridges and prevent the Links from getting down. Shooting an Arrow to pop the Balloon causes the bridge to fall into place, allowing the Links passage to reunite in the main part of the Stage, where three Blobs await. The Triforce Gateway is blocked by a locked Gate, and a Key floats inside a Balloon near it. To reach this Balloon, the Links must throw each other up two nearby ledges. After the Gate is unlocked, the Gateway can be reached beyond a narrow pathway.

Stage 2 places the Links on a grassy ledge. Below is a large room with a closed Gate, a bush-filled ledge to the west that can only be reached by forming a Totem, and a Big Switch that can only be activated once all three Links stand on it. Once they do, seven Blobs and one Buzz Blob appear in a circle around them. The latter electrifies the Links upon contact, so it can only be damaged with Arrows. After the Enemies are defeated, five more Blobs and two more Buzz Blobs appear in front of the Gate. Defeating them all opens the Gate, allowing passage to the Triforce Gateway. Beyond the Gate is a narrow pathway, which branches off to the left toward a Treasure Chest containing a Purple Rupee.
Stage 3 starts the Links off on a small cliff over a deep chasm. Directly ahead of them is a central cliff, which can be reached using the four floating platforms that circle it. On this cliff are two Totem Dekus and a Shock Switch on a post. Similarly to how the Totem Dekus retract into the ground when the Links approach them, the Switch covers itself with metal flaps if any Links get too close, forcing them to strike it from a distance. On the east cliff are a second Shock Switch and a Buzz Blob. On the north cliff, a third Switch and an elevated ledge, and on the west cliff, a Blob and an elevated Treasure Chest containing a Red Rupee. Each Shock Switch can only be reached by the Link atop a full Totem. Once all three are struck, the Gate blocking the northeast cliff opens, allowing passage to the Triforce Gateway, which is beyond a short bridge. A Squiddy is found beside the Gateway, along with several Jars.

Stage 4 is the final stage. The Links appear in a small room, which opens ahead of them into a large pit below. Before falling in, the Links can circle around the border to find Rocks and bushes. A single Heart rests behind some Rocks to the east. Once all three Links fall in the hole, the Electric Blob King appears, and the battle ensues. Hearts and Rupees atop various ledges can be found around the arena. Once the Boss is defeated, the Triforce Gateway appears, and the Level is completed upon entering it. A hidden tunnel can also be found in the north-east of the pit, reachable only by forming a Totem and throwing the Links up. One Link can enter this tunnel to find several Rupees, including a Red Rupee, in an alcove above the Triforce Gateway.
Drablands Challenges
Once the Boss of the Woodlands has been defeated, Buzz Blob Cave can be replayed with the following Drablands Challenges: "Pop all balloons!", "Clear within the time limit!", and "Clear using only Bombs!".
In "Pop all balloons!", the four Stages contain 12, 17, four, and three Balloons respectively, for a total of 36 Balloons. Many of them bear a number indicating the size of a Totem required for the Links to reach them. In Stage 1, the Blobs are absent during this Challenge.
In "Clear within the time limit!", the Links are given a timer of one minute and 30 seconds in both single-player and Multiplayer modes. This timer can be increased by collecting Hourglasses or wearing Linebeck's Uniform. Notably, there are no Hourglasses to collect in the first two Stages of the Level.
In "Clear using only Bombs!", the Level's Bows are replaced with Bombs. Anything to be hit indirectly or from a distance must now be struck using a Bomb blast, requiring the Links to use precise timing and aiming in order to solve puzzles.[2] Swords can still be used during this Challenge.
Materials
At the end of the Level, three Treasure Chests can be opened. Two contain the same Material, and one contains another, more valuable Material.
| Drablands Challenge | — |
|---|---|
| Magical Materials | |
| Drablands Challenge | Pop all balloons! |
| Magical Materials | |
| Drablands Challenge | Clear within the time limit! |
| Magical Materials | |
| Drablands Challenge | Clear using only Bombs! |
| Magical Materials |
| Drablands Challenge | Magical Materials |
|---|---|
— | |
Pop all balloons! | |
Clear within the time limit! | |
Clear using only Bombs! |
Enemies and Traps


- Stage 1
There are no Enemies in this Stage.
- Stage 2
- Stage 3
-

Blob ×1
-

Buzz Blob ×1
-

-

Totem Deku ×2
- Stage 4
Treasure Chests
| Treasure Chest | |
|---|---|
| Contents | |
| Notes | At the end of the narrow pathway behind the Gate in Stage 2 |
| Treasure Chest | |
| Contents | |
| Notes | On a ledge on the upper-left platform in Stage 3 |

| Treasure Chest | Contents | Notes |
|---|---|---|
At the end of the narrow pathway behind the Gate in Stage 2 | ||
On a ledge on the upper-left platform in Stage 3 |
Trivia
- Buzz Blob Cave was one of the Levels included in the E3 demo and in the distributed demo version. In the former, it was formerly known as The Forest.
- As described in Vol. 1 of the Drablands Diary, a bright green Butterfly is hidden in each Level of the Woodlands. One can be found in Stage 3 of Buzz Blob Cave, on a spiderweb directly above the easternmost Shock Switch.
Nomenclature
| Language | Names | Meanings |
|---|---|---|
Japanese | ビリビリ洞窟 (Biribiri Dōkutsu)[4] | Biribiri Cave |
FrenchCA | Caverne électrique | |
FrenchEU | Caverne électrique[6] | |
German | Britzel-Höhlen[5] | |
Italian | Grotta elettrica[3] | |
SpanishLA | Caverna eléctrica[7] | |
SpanishEU | Caverna Eléctrica[8] | |
| This table was generated using translation pages. To request an addition, please contact a staff member with a reference. | ||
Other Names
| Name | The Forest[9] |
|---|---|
| Applies to | |
| Source | Tri Force Heroes E3 2015 demo |
| Superseded by |
| Name | Applies to | Source | Superseded by |
|---|---|---|---|
The Forest[9] | Tri Force Heroes E3 2015 demo |
Gallery
-
The Treasure Chest in Stage 2

References
- ↑ Encyclopedia, Dark Horse Books, pg. 159
- ↑ "I think you probably looked at this course on the first day of Treehouse Live, but you played it in its normal mode, where you were equipped with bows and arrows. But this time, because it's one of the challenge courses, all the players have just bombs." — Hiromasa Shikata, Nintendo Treehouse Live @ E3 2015 Day 3 The Legend of Zelda: Tri Force Heroes , YouTube (Video), published June 18, 2015, retrieved August 22, 2015.
- ↑ "Grotta elettrica" — Level Selection (Tri Force Heroes)
- ↑ "ビリビリ洞窟" — Level Selection (Tri Force Heroes)
- ↑ "Britzel-Höhlen" — Level Selection (Tri Force Heroes)
- ↑ "Caverne électrique" — Level Selection (Tri Force Heroes)
- ↑ "Caverna eléctrica" — Level Selection (Tri Force Heroes)
- ↑ "Caverna Eléctrica" — Level Selection (Tri Force Heroes)
- ↑ The Legend of Zelda: Tri Force Heroes - The Forest (Direct Gampelay), @GameXplain on YouTube, Uploaded August 2, 2015 (Archive)