Fortified Zone: Difference between revisions
MannedTooth (talk | contribs) No edit summary |
Htwretched (talk | contribs) (De-Redirect (Floor descriptions missing)) Tags: Removed redirect Disambiguation links |
||
| Line 1: | Line 1: | ||
# | {{Infobox Location | ||
{{Term | |image= File:TFH Fortified Zone.png | ||
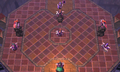
[[ | |caption= Floor B21 in the Fortified Zone | ||
|pronunciation= | |||
|game= TFH | |||
|other= | |||
|inhab= | |||
|items= | |||
|services= | |||
|season= | |||
|temperature= | |||
|counter= | |||
|theme= | |||
|related= {{List|{{Term|TFH|Den of Trials|link}}, {{Term|TFH|Fortress|link}}}} | |||
|strategy= | |||
|zu= | |||
}} | |||
The {{Term/Store|Fortified Zone||Series, TFH}} is a {{Term|TFH|Level|link}} in {{TFH}}.<ref>{{Cite|Entrance to Floor B21<br/>Fortified Zone|Stone Tablet|TFH}}</ref> It is the fifth proper {{Term|TFH|Level}} of the {{Term|TFH|Den of Trials|link}}, preceded by the {{Term|TFH|Frozen Zone|link}} and followed by the {{Term|TFH|Desert Zone|link}}. | |||
==Features and Overview== | |||
{{#vardefine:Round Background|{{!}}style="background-color:#17456e;border-radius:90px;"}} | |||
{| cellpadding="4" style="float: right; border-radius: 60px; border: 1px solid #426787; background-color: #1d578b; text-align:center; padding: 5px 20px; margin: 5px 10px;" | |||
|- | |||
!style="width:40%; font-size:120%"| Items | |||
!style="width:50%; font-size:120%"| Materials | |||
|- | |||
{{#var:Round Background}}| [[File:TFH Gust Jar Icon.png|link=]] '''[[Gust Jar]]''' | |||
{{#var:Round Background}}| '''2× [[File:TFH Stiff Puff Icon.png|link=Stiff Puff]] or [[File:TFH Silver Thread Icon.png|link=Silver Thread]] or [[File:TFH Royal Ring Icon.png|link=Royal Ring]]''' | |||
|- | |||
{{#var:Round Background}}| [[File:TFH Bomb Icon.png|link=]] '''[[Bomb]]''' | |||
{{#var:Round Background}}| '''1× [[File:TFH Antique Coin Icon.png|link=Antique Coin]] or [[File:TFH Fancy Fabric Icon.png|link=Fancy Fabric]] or [[File:TFH Exquisite Lace Icon.png|link=Exquisite Lace]]''' | |||
|- | |||
{{#var:Round Background}}| [[File:TFH Bow Icon.png|link=]] '''[[Bow]]''' | |||
|style="background-color:#1d578b;text-align:center;border-radius:90px;"| | |||
|} | |||
The {{Term|TFH|Fortified Zone}} comprises Floors B21 to B25 of the {{Term|TFH|Den of Trials|link}}, and is based on the scenery and {{Plural|TFH|Enemy|link}} of the {{Term|TFH|Fortress|link}} {{Term|TFH|Area}} of the {{Term|TFH|Drablands|link}}. It is initially unlocked and accessed by completing the prior {{Term|TFH|Frozen Zone|link}}; if all three {{Plural|TFH|Links|link}} have already unlocked the {{Term|TFH|Fortified Zone}}, they can access it directly by standing on the fifth {{Term|TFH|Triforce Gateway|link}} in the {{Term|TFH|Den of Trials|display=Den}}'s hub {{Term|TFH|Level}}. | |||
<!-- | |||
Each Floor of the {{Term|TFH|Frozen Zone}} is an ice-covered octagonal platform with no walls around its edges, and patches of snowy ground in the south corner where the {{Plural|TFH|Links}} appear, and in the north corner where the {{Term|TFH|Triforce Gateway|link}} appears when all {{Plural|TFH|Enemy}} are defeated. However, each Floor features a different layout of holes in the ground, as well as tiles of ice that gradually break under the {{Plural|TFH|Links}}' weight, but soon freeze over again. Floor B16 has eleven such ice tiles, but no other holes; before the {{Plural|TFH|Enemy}} appear, the {{Plural|TFH|Links}} are provided with {{Term|TFH|Fire Gloves|link}}, a {{Term|TFH|Boomerang|link}}, and a {{Term|TFH|Hammer|link}}. Floor B17 has two rows of ice tiles spanning between the patches of snowy ground to the north and south; in the center is a circle of six Mole Holes, from which two {{Plural|TFH|Switch Mole|link}} pop out. Once both {{Plural|TFH|Switch Mole}} and the two {{Plural|TFH|Ice Keese|link}} are defeated, a second wave of {{Plural|TFH|Enemy}} appears. | |||
Floor B18 has a large hole in the center of the {{Term|TFH|Stage}}, surrounded by some ice tiles, which the {{Plural|TFH|Prankster Poe|link}} on each side will throw any {{Term|TFH|Links}} they capture into. As the {{Plural|TFH|Prankster Poe}} and {{Plural|TFH|Blue Sword Soldier|link}} are difficult for a single {{Term|TFH|Links}} to defeat, the {{Plural|TFH|Links}} should stick together when battling them. Floor B19 has two waves of {{Plural|TFH|Enemy}} and is almost entirely covered in ice tiles, with seven small, permanent holes among them. The {{Plural|TFH|Ice Wizzrobe|link}} both appear at a height of two {{Plural|TFH|Links}}, requiring the heroes to form a {{Term|TFH|Totem|link}}, while the dark {{Term|TFH|Wizzrobe|link}} appears at a height of three {{Plural|TFH|Links}}. When they are defeated, a pair of {{Plural|TFH|Soldier (Enemy)|link}} riding {{Plural|TFH|Totem Armos|link}} appear. These {{Plural|TFH|Enemy}} can be defeated by forming a {{Term|TFH|Totem}} to reach them, or by melting the ice tiles beneath them. | |||
--> | |||
Floor B25 is a safe room with three large {{Plural|TFH|Treasure Chest|link}} and a {{Term|TFH|Squiddy|link}} for regaining {{Plural|TFH|Heart|links}}. Two of the {{Plural|TFH|Treasure Chest|display=Chests}} contain the same random, bronze-rarity {{Term|TFH|Material|link}} from the {{Term|TFH|Fortress}} ({{Plural|TFH|Stiff Puff|link}}, {{Plural|TFH|Silver Thread|link}} or {{Plural|TFH|Royal Ring|link}}) and the other contains a random, silver-rarity {{Term|TFH|Material}} ({{Term|TFH|Antique Coin|link}}, {{Term|TFH|Fancy Fabric|link}} or {{Term|TFH|Exquisite Lace|link}}). Once the {{Plural|TFH|Treasure Chest|display=Chests}} are opened, the {{Plural|TFH|Links}}' progress is [[Saving|Saved]]; the {{Term|TFH|Triforce Gateway}} leading to the {{Term|TFH|Fortified Zone|link}} and a small {{Term|TFH|Treasure Chest}} containing an extra {{Term|TFH|Fairy|link}} then appear. | |||
==={{Plural|TFH|Enemy}} and Traps=== | |||
;Floor B21 | |||
{{Gallery List|Enemies | |||
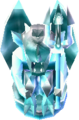
|TFH= Arrow Trap [Qty:4], Blue Poe [Qty:1], Green Poe [Qty:1], Red Poe [Qty:1], Spear Throwing Soldier [Qty:1]{{List Note|Rides on a {{Term|TFH|Totem Armos}}.}}, Totem Armos [Qty:1]{{List Note|Ridden by a {{Term|TFH|Spear Throwing Soldier}}.}} | |||
}} | |||
{{List Notes}} | |||
;Floor B22 | |||
{{Gallery List|Enemies | |||
|TFH= Keeleon [2] [Qty:2]{{List Note|Second dark {{Term|TFH|Keeleon}} appears when the first dark {{Term|TFH|Keeleon}}, the four stacked {{Plural|TFH|Mini-Margo}}, or the solo {{Term|TFH|Mini-Margo}} is defeated.}}, Mini-Margo [Qty:5]{{List Note|Two stacks of two, one solo.}} | |||
}} | |||
{{List Notes}} | |||
;Floor B23 | |||
{{Gallery List|Enemies | |||
|TFH= Beamos [Qty:1], Fire Gimos [Qty:1], Hinox [2] [Qty:4], Ice Gimos [Qty:1], Spear Throwing Soldier [Qty:1]{{List Note|Rides on three {{Plural|TFH|Totem Armos}}.}}, Totem Armos [Qty:3]{{List Note|All ridden by a {{Term|TFH|Spear Throwing Soldier}}.}} | |||
}} | |||
{{List Notes}} | |||
;Floor B24 (first wave) | |||
{{Gallery List|Enemies | |||
|TFH= Sky Shield Soldier [2] [Qty:1], Sky Spear Soldier [2] [Qty:2]{{List Note|One rides on a dark {{Term|TFH|Totem Armos}}.}}, Sky Sword Soldier [2] [Qty:1], Totem Armos [3] [Qty:1]{{List Note|Ridden by a dark {{Term|TFH|Sky Spear Soldier}}.}} | |||
}} | |||
{{List Notes}} | |||
;Floor B24 (second wave) | |||
{{Gallery List|Enemies | |||
|TFH= Sky Ball and Chain Soldier [2] [Qty:1], Sky Spear Soldier [2] [Qty:2]{{List Note|Each rides on two dark {{Plural|TFH|Totem Armos}}.}}, Sky Sword Soldier [2] [Qty:1]{{List Note|Rides on a dark {{Term|TFH|Totem Armos}}.}}, Totem Armos [3] [Qty:5]{{List Note|All ridden by {{Plural|TFH|Enemy}}.}} | |||
}} | |||
{{List Notes}} | |||
;Floor B20 | |||
{{Gallery List|Enemies | |||
|TFH=Squiddy [Qty:1] | |||
}} | |||
==Nomenclature== | |||
{{Nomenclature}} | |||
==Gallery== | |||
<gallery> | |||
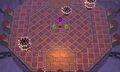
File:TFH Fortified Zone 2.png|Floor B22 | |||
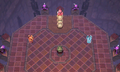
File:TFH Fortified Zone 3.png|Floor B23 | |||
File:TFH Fortified Zone 4.png|Floor B24 | |||
File:TFH Fortified Zone 5.png|Floor B25 | |||
</gallery> | |||
==See Also== | |||
* {{Term|Series|Forest Zone|link}} | |||
* {{Term|Series|Flooded Zone|link}} | |||
* {{Term|Series|Scorching Zone|link}} | |||
* {{Term|Series|Frozen Zone|link}} | |||
* {{Term|Series|Desert Zone|link}} | |||
* {{Term|Series|Shadow Zone|link}} | |||
* {{Term|Series|Baneful Zone|link}} | |||
{{Ref}} | |||
{{Categories | |||
|Den of Trials | |||
|levels= TFH | |||
}} | |||
Revision as of 00:31, 24 December 2023
The Fortified Zone is a Level in Tri Force Heroes.[1] It is the fifth proper Level of the Den of Trials, preceded by the Frozen Zone and followed by the Desert Zone.
Features and Overview
| Items | Materials |
|---|---|
| 2× | |
| 1× | |
The Fortified Zone comprises Floors B21 to B25 of the Den of Trials, and is based on the scenery and Enemies of the Fortress Area of the Drablands. It is initially unlocked and accessed by completing the prior Frozen Zone; if all three Links have already unlocked the Fortified Zone, they can access it directly by standing on the fifth Triforce Gateway in the Den's hub Level.
Floor B25 is a safe room with three large Treasure Chests and a Squiddy for regaining Hearts. Two of the Chests contain the same random, bronze-rarity Material from the Fortress (Stiff Puffs, Silver Threads or Royal Rings) and the other contains a random, silver-rarity Material (Antique Coin, Fancy Fabric or Exquisite Lace). Once the Chests are opened, the Links' progress is Saved; the Triforce Gateway leading to the Fortified Zone and a small Treasure Chest containing an extra Fairy then appear.
Enemies and Traps
- Floor B21
-

Arrow Trap ×4
-

Blue Poe ×1
-

Green Poe ×1
-

Red Poe ×1
-
![Spear Throwing Soldier ×1[a]](//cdn.wikimg.net/en/zeldawiki/images/thumb/c/c2/TFH_Spear_Throwing_Soldier_Model.png/68px-TFH_Spear_Throwing_Soldier_Model.png)
-
![Totem Armos ×1[b]](//cdn.wikimg.net/en/zeldawiki/images/thumb/3/39/TFH_Totem_Armos_Model.png/91px-TFH_Totem_Armos_Model.png)


![Spear Throwing Soldier ×1[a]](/wiki/File:TFH_Spear_Throwing_Soldier_Model.png)
![Totem Armos ×1[b]](/wiki/File:TFH_Totem_Armos_Model.png)
- Floor B22
![Keeleon ×2[a]](/wiki/File:TFH_Keeleon_Model_2.png)
![Mini-Margo ×5[b]](/wiki/File:TFH_Mini-Margo_Model.png)
- Floor B23
-
Beamos ×1
-

Fire Gimos ×1
-

Hinox ×4
-
Ice Gimos ×1
-
-


- Floor B24 (first wave)

![Sky Spear Soldier ×2[a]](/wiki/File:TFH_Sky_Spear_Soldier_Model_2.png)

![Totem Armos ×1[b]](/wiki/File:TFH_Totem_Armos_Model_3.png)
- Floor B24 (second wave)

- Floor B20
-

Squiddy ×1

Nomenclature
| Language | Names | |
|---|---|---|
Japanese | 砦の洞 (Toride no Hora)[3] | |
FrenchCA | Zone fortifiée[8] | |
FrenchEU | Zone fortifiée[5] | |
German | Festungspfad[4] | |
Italian | Antro fortificato[2] | |
Korean | 요새의 동굴 (Yosae-ui Dong-gul)[6] | |
SpanishLA | Zona fortificada[7] | |
SpanishEU | Gruta fortificada[9] | |
| This table was generated using translation pages. To request an addition, please contact a staff member with a reference. | ||
Gallery
-
Floor B22
-
Floor B23
-
Floor B24
-
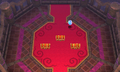
Floor B25


See Also
References
- ↑ "Entrance to Floor B21
Fortified Zone" — Stone Tablet (Tri Force Heroes) - ↑ "Entrata del piano -21
Antro fortificato" — Stone Tablet (Tri Force Heroes) - ↑ "地下21階層 入口
砦の洞" — Stone Tablet (Tri Force Heroes) - ↑ "Ebene 21
Festungspfad" — Stone Tablet (Tri Force Heroes) - ↑ "Entrée du niveau -21
Zone fortifiée" — Stone Tablet (Tri Force Heroes) - ↑ "지하 21층 입구
요새의 동굴" — Stone Tablet (Tri Force Heroes) - ↑ "Entrada a S21
Zona fortificada" — Stone Tablet (Tri Force Heroes) - ↑ "Entrée du niveau SS21
Zone fortifiée" — Stone Tablet (Tri Force Heroes) - ↑ "Entrada al nivel 21
Gruta fortificada" — Stone Tablet (Tri Force Heroes)