Frozen Plateau: Difference between revisions
MannedTooth (talk | contribs) m (Text replacement - "|theme music=" to "|theme=") |
Htwretched (talk | contribs) mNo edit summary |
||
| (14 intermediate revisions by 7 users not shown) | |||
| Line 1: | Line 1: | ||
{{Dungeon | {{Infobox Dungeon | ||
|type= level | |type= level | ||
|image= | |image= File:TFH Frozen Plateau Stage 2 3.png | ||
|caption= | |caption= Stage 2 of Frozen Plateau | ||
|location= | |location= {{Term|TFH|Ice Cavern|link}} | ||
|game= {{TFH}} | |game= TFH | ||
|item= {{Term|TFH|Fire Gloves|link}} ×3 | |||
|quest= | |quest= | ||
|mini-boss= | |mini-boss= | ||
| Line 13: | Line 12: | ||
|strategy= | |strategy= | ||
}} | }} | ||
{{Term/Store|Frozen Plateau||Series, TFH}} is a Level in {{TFH}}. It is the first Level of the | {{Term/Store|Frozen Plateau||Series, TFH}} is a {{Term|TFH|Level|link}} in {{TFH}}.<ref>{{Cite Book|quote= |book= E |publisher= |page= 160}}</ref> It is the first {{Term|TFH|Level}} of the {{Term|TFH|Ice Cavern|link}} {{Term|TFH|Area}}, and is followed by {{Term|TFH|Snowball Ravine|link}}. | ||
==Themes and Navigation== | ==Themes and Navigation== | ||
Frozen Plateau is a frozen tundra at the base of a snowy mountain. Its land is covered in | {{Term|TFH|Frozen Plateau}} is a frozen tundra at the base of a snowy mountain. Its land is covered in {{Plural|TFH|Ice Stalagmite|link}}, which may conceal {{Plural|TFH|Item|link}} such as {{Plural|TFH|Heart|link}} or {{Plural|TFH|Rupee|link}}, as well as tiles of ice above deep chasms that will gradually break under the {{Plural|TFH|Links|link}}' weight. Both of these can be melted with the {{Term|TFH|Fire Gloves|link}} provided in the {{Term|TFH|Level}}. Portions of the ground are covered in slippery ice, which have poor traction, making the {{Term|TFH|Cozy Parka|link}} useful here. | ||
In '''Stage 1''', the Links begin at a small forest of fir trees covered in snow. They | [[File:TFH Frozen Plateau Promotional Screenshot.png|250px|right|thumb|Using Fire Gloves in Stage 1]] | ||
In '''Stage 1''', the {{Plural|TFH|Links}} begin at a small forest of fir trees covered in snow. They follow a path to a wide-open area, covered thickly in ice and strewn with {{Plural|TFH|Ice Stalagmite}}. The {{Plural|TFH|Links}} encounter several {{Plural|TFH|Mini Freezard|link}} here, which will bounce endlessly off the walls and {{Plural|TFH|Ice Stalagmite}} when struck; some of the {{Plural|TFH|Mini Freezard}} are already in motion. The west portion of this area is a raised ledge where the inactive {{Term|TFH|Triforce Gateway|link}} awaits, and to the north of the field of ice is a ledge with three {{Term|TFH|Fire Gloves}}, but the slopes leading to both ledges are blocked by {{Plural|TFH|Ice Stalagmite}}. By throwing one of the {{Plural|TFH|Links}} up the ledge to collect his {{Term|TFH|Fire Gloves}}, he can then melt the {{Plural|TFH|Ice Stalagmite}}, opening the slope. When all three {{Plural|TFH|Links}} pick up the {{Term|TFH|Fire Gloves}}, the {{Term|TFH|Triforce Gateway}} becomes active. To the left of the {{Term|TFH|Fire Gloves}}, an unlit {{Term|TFH|Torchlight|link}} encased in ice can be found; melting the ice and lighting it makes a {{Term|TFH|Treasure Chest|link}} appear nearby, containing a {{Term|TFH|Red Rupee|link}}. Two other {{Plural|TFH|Treasure Chest}}, containing a {{Term|TFH|Blue Rupee|link}} and three {{Plural|TFH|Heart}}, can be found near the {{Term|TFH|Triforce Gateway}}. | |||
{{Clear}} | |||
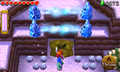
In '''Stage 2''', the Links begin at the side of a snowy cliff. A large | [[File:TFH Frozen Plateau Stage 2.png|250px|right|thumb|The beginning of Stage 2]] | ||
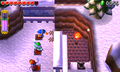
In '''Stage 2''', the {{Plural|TFH|Links}} begin at the side of a snowy cliff. A large {{Term|TFH|Freezard|link}} blocks their path ahead by blowing a constant stream of cold air. A moveable wall prevents the {{Plural|TFH|Links}} from attacking it directly. Beside the wall is a set of {{Plural|TFH|Floor Spikes|link}} with an unlit {{Term|TFH|Torchlight}} in the center. Lighting it from afar with the {{Term|TFH|Fire Gloves}} will move the wall, allowing the {{Plural|TFH|Links}} to melt the {{Term|TFH|Freezard}} and continue forward. Immediately afterward the {{Plural|TFH|Links}} encounter three {{Plural|TFH|Floor Switch|link}} beside another moveable wall, which guards another {{Term|TFH|Torchlight}} on a set of {{Plural|TFH|Floor Spikes}}. Only when these {{Plural|TFH|Floor Switch}} are pressed simultaneously will the wall move, allowing one of the {{Plural|TFH|Links}} to throw a fireball which will bounce off the cliff wall and into the {{Term|TFH|Torchlight}}. This opens a wall to a staircase heading north, where the {{Plural|TFH|Links}} encounter three {{Plural|TFH|Freezard}} blocking their path. These {{Plural|TFH|Enemy}} can be melted by throwing fireballs at the angled wall to the east, where they will bounce across a set of {{Plural|TFH|Floor Spikes}} and melt the {{Plural|TFH|Freezard}} from behind. Beyond them are several {{Plural|TFH|Keese|link}} and an {{Term|TFH|Ice Keese|link}}, as well as more {{Plural|TFH|Freezard}} sitting on ledges blowing cold air. A {{Term|TFH|Magic Plant|link}} takes the {{Plural|TFH|Links}} up to a higher ledge where the {{Term|TFH|Triforce Gateway}} awaits, but it flies through the {{Plural|TFH|Freezard}}' blasts of air, freezing the {{Plural|TFH|Links}} on contact. They can melt the {{Plural|TFH|Freezard}} first by forming a {{Term|TFH|Totem|link}} to reach their height and using the {{Term|TFH|Fire Gloves}}, freeing the path to the {{Term|TFH|Triforce Gateway}}. | |||
{{Clear}} | |||
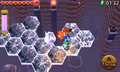
'''Stage 3''' takes place above a huge chasm, | [[File:TFH Frozen Plateau Stage 3.png|250px|right|thumb|The beginning of Stage 3]] | ||
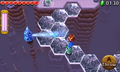
'''Stage 3''' takes place above a huge chasm, where several small sections of land are connected by floating tiles of ice that will gradually crack and break under the {{Plural|TFH|Links}}' weight, if they stand on them for too long. The {{Plural|TFH|Links}} must carefully cross these ice bridges, while being mindful of the {{Plural|TFH|Freezard}} encountered along the way who will try to impede on their progress. The {{Plural|TFH|Links}} can try to throw one another over the {{Plural|TFH|Freezard}}' blasts of air, or wait for them to momentarily stop, then either sneak past quickly or melt them with the {{Term|TFH|Fire Gloves}}. The first solid ground that the {{Plural|TFH|Links}} reach has several {{Plural|TFH|Heart}} trapped inside {{Plural|TFH|Ice Stalagmite}}, as well as a {{Term|TFH|Squiddy|link}} that can prove difficult to strike, given the small standing area. Two {{Plural|TFH|Red Rupee}} can also be found on top of the ice tiles, off the intended pathway. At the next solid ground the {{Plural|TFH|Links}} reach, they are met by two {{Plural|TFH|Ice Keese}}. After defeating them, the {{Plural|TFH|Links}} come to a large platform of ice tiles, where a single {{Term|TFH|Keeleon|link}} is encountered. The {{Term|TFH|Keeleon}}'s thrown {{Plural|TFH|Bomb|link}} will threaten to shatter the ice, but it can be defeated if the {{Plural|TFH|Links}} form a {{Term|TFH|Totem}}. Then, they must carefully light two {{Plural|TFH|Torchlight}} sitting on pillars to the left and right sides of the icy platform, which will create a narrow bridge to the next {{Term|TFH|Triforce Gateway}}. | |||
{{Clear}} | |||
In '''Stage 4''', the Links slide down an icy slope into an arena of ice tiles over a pit, where the | [[File:TFH Frozen Plateau Stage 4.png|250px|right|thumb|Battling Ice Wizzrobes in Stage 4]] | ||
In '''Stage 4''', the {{Plural|TFH|Links}} slide down an icy slope into an arena of ice tiles over a pit, where the fight a group of {{Plural|TFH|Ice Wizzrobe|link}}. These {{Plural|TFH|Enemy}} can be defeated with {{Plural|TFH|Sword|link}} or with the {{Term|TFH|Fire Gloves}}, however the {{Plural|TFH|Links}} must take care as the Gloves' fireballs will also melt the ice flooring. Some of the {{Plural|TFH|Wizzrobe}} appear at ground level, while others are floating at higher elevations, requiring that the {{Plural|TFH|Links}} form a {{Term|TFH|Totem}}. After all {{Plural|TFH|Enemy}} are defeated, the {{Term|TFH|Triforce Gateway}} appears at the bottom of the slope where the {{Term|TFH|Stage}} began. | |||
{{Clear}} | |||
===Drablands Challenge=== | ==={{Plural|TFH|Drablands Challenge}}=== | ||
Frozen Plateau | Once the {{Term|TFH|Boss|link}} of the {{Term|TFH|Ice Cavern|link}} has been defeated, {{Term|TFH|Frozen Plateau}} can be replayed with the following {{Plural|TFH|Drablands Challenge|link}}: "[[Drablands Challenge#Guard the Orb!|Guard the Orb!]]", "[[Drablands Challenge#Pop all balloons!|Pop all balloons!]]", and "[[Drablands Challenge#Don't get hit by snowballs!|Don't get hit by snowballs!]]". | ||
In "Pop all balloons!", the four {{Plural|TFH|Stage|link}} contain six, seven, seven, and five {{Plural|TFH|Balloon|link}} respectively, for a total of 25 {{Plural|TFH|Balloon}}. Several of them require the extra height afforded by a fireball from the {{Term|TFH|Fire Gloves|link}}, in addition to the {{Plural|TFH|Links|link}} forming a {{Term|TFH|Totem|link}}, to be popped. In the final {{Term|TFH|Stage}}, {{Plural|TFH|Balloon}} can be found floating underneath the ice tiles, requiring the use of {{Term|TFH|Fire Gloves}} to both melt the ice and pop the {{Plural|TFH|Balloon}}. | |||
==== | ==={{Plural|TFH|Material}}=== | ||
At the end of the {{Term|TFH|Level}}, three {{Plural|TFH|Treasure Chest|link}} can be opened. Two contain the same {{Term|TFH|Material|link}}, and one contains another, more valuable {{Term|TFH|Material}}. | |||
===="Don't get hit by snowballs!"==== | {{Data Table | ||
|game= TFH | |||
|columns= {{Term|TFH|Drablands Challenge}}, {{Plural|TFH|Magical Material}} [Amounts] | |||
|- | |||
| N/A | |||
| 2 Fluffy Fuzz, 1 Tiny Snowflake | |||
|- | |||
| [[File:TFH Snowball Icon.png]]<br/>'''Don't get hit by snowballs!''' | |||
| 2 Fluffy Fuzz, 1 Serpent Fangs | |||
|- | |||
| [[File:TFH Pop All Balloons Icon.png]]<br/>'''Pop all balloons!''' | |||
| 2 Tiny Snowflake, 1 Crimson Shell | |||
|- | |||
| [[File:TFH Guard the Orb Icon.png]]<br/>'''Guard the orb!''' | |||
| 2 Serpent Fangs, 1 Freezard Water | |||
}} | |||
==={{Plural|TFH|Enemy}} and Traps=== | |||
{{Tabs | |||
|tab1= No Challenge, "Pop all balloons!", "Guard the orb!" | |||
|content1= | |||
;{{Term|TFH|Stage}} 1 | |||
{{Gallery List|Enemies | |||
|TFH= Mini Freezard [Qty:7] | |||
}} | |||
;{{Term|TFH|Stage}} 2 | |||
{{Gallery List|Enemies | |||
|TFH= Floor Spikes [File:TFH Floor Spikes Model.png], Freezard [Qty:9], Ice Keese [Qty:1], Keese [Qty:4] | |||
}} | |||
;{{Term|TFH|Stage}} 3 | |||
{{Gallery List|Enemies | |||
|TFH= Freezard [Qty:2], Ice Keese [Qty:2], Keeleon [Qty:1], Squiddy | |||
}} | |||
;{{Term|TFH|Stage}} 4 | |||
{{Gallery List|Enemies | |||
|TFH= Ice Wizzrobe [Qty:5]{{List Note|Two are at ground level; three require a {{Term|TFH|Totem|link}} to reach.}} | |||
}} | |||
{{List Notes}} | |||
|tab2= "Don't get hit by snowballs!" | |||
|content2= | |||
;{{Term|TFH|Stage}} 1 | |||
{{Gallery List|Enemies | |||
|TFH= Mini Freezard [Qty:7], Snowball | |||
}} | |||
;{{Term|TFH|Stage}} 2 | |||
{{Gallery List|Enemies | |||
|TFH= Floor Spikes [File:TFH Floor Spikes Model.png], Freezard [Qty:9], Ice Keese [Qty:1], Keese [Qty:4], Snowball | |||
}} | |||
;{{Term|TFH|Stage}} 3 | |||
{{Gallery List|Enemies | |||
|TFH= Freezard [Qty:2], Ice Keese [Qty:2], Keeleon [Qty:1], Snowball, Squiddy | |||
}} | |||
;{{Term|TFH|Stage}} 4 | |||
{{Gallery List|Enemies | |||
|TFH= Ice Wizzrobe [Qty:5]{{List Note|Two are at ground level; three require a {{Term|TFH|Totem|link}} to reach.}}, Snowball | |||
}} | |||
{{List Notes}} | |||
}} | |||
==={{Plural|TFH|Treasure Chest}}=== | |||
{{Treasure Chests|game= TFH | |||
|- | |||
| Treasure Chest | |||
| Blue Rupee | |||
| Behind an {{Term|TFH|Ice Stalagmite}} upon entering the icy area in {{Term|TFH|Stage}} 1 | |||
|- | |||
| Treasure Chest | |||
| Heart [File:TFH Three Hearts Sprite.png] {{Qty|3}} | |||
| On a ledge just above the previous {{Term|TFH|Treasure Chest}} in {{Term|TFH|Stage}} 1 | |||
|- | |||
| Treasure Chest | |||
| Red Rupee | |||
| Appears after lighting the {{Term|TFH|Torchlight}} to the left of the {{Term|TFH|Fire Gloves}} in {{Term|TFH|Stage}} 1 | |||
}} | |||
== | ==Trivia== | ||
* | *As described in Vol. 6 of the {{Term|TFH|Drablands Diary|link}}, a snow [[Princess Zelda|princess]] is hidden in each {{Term|TFH|Level|link}} of the {{Term|TFH|Ice Cavern|link}}. One can be found in {{Term|TFH|Stage}} 1 of {{Term|TFH|Frozen Plateau}} by shifting the camera to the right from where the {{Term|TFH|Fire Gloves|link}} are obtained. | ||
==== | ==Nomenclature== | ||
{{Nomenclature}} | |||
== | ==Gallery== | ||
<gallery> | <gallery> | ||
File:TFH | File:TFH Frozen Plateau Stage 2 2.png|Rebounding a fireball to light a {{Term|TFH|Torchlight}}, {{Term|TFH|Stage}} 2 | ||
File:TFH | File:TFH Frozen Plateau Stage 2 4.png|{{Plural|TFH|Freezard}} in the path of a {{Term|TFH|Magic Plant}}, {{Term|TFH|Stage}} 2 | ||
File:TFH | File:TFH Frozen Plateau Stage 3 2.png|Narrow {{Term|TFH|Ice}} platforms blocked by a {{Term|TFH|Freezard}}, {{Term|TFH|Stage}} 3 | ||
File:TFH | File:TFH Frozen Plateau Stage 3 3.png|Battling a {{Term|TFH|Keeleon}} over perilous {{Term|TFH|Ice}} platforms, {{Term|TFH|Stage}} 3 | ||
</gallery> | </gallery> | ||
{{Ref}} | |||
{{ | {{Categories | ||
|Plateaus | |||
|levels= TFH | |||
}} | |||
| | |||
| | |||
Latest revision as of 21:38, 4 December 2023
Frozen Plateau is a Level in Tri Force Heroes.[1] It is the first Level of the Ice Cavern Area, and is followed by Snowball Ravine.
Frozen Plateau is a frozen tundra at the base of a snowy mountain. Its land is covered in Ice Stalagmites, which may conceal Items such as Hearts or Rupees, as well as tiles of ice above deep chasms that will gradually break under the Links' weight. Both of these can be melted with the Fire Gloves provided in the Level. Portions of the ground are covered in slippery ice, which have poor traction, making the Cozy Parka useful here.

In Stage 1, the Links begin at a small forest of fir trees covered in snow. They follow a path to a wide-open area, covered thickly in ice and strewn with Ice Stalagmites. The Links encounter several Mini Freezards here, which will bounce endlessly off the walls and Ice Stalagmites when struck; some of the Mini Freezards are already in motion. The west portion of this area is a raised ledge where the inactive Triforce Gateway awaits, and to the north of the field of ice is a ledge with three Fire Gloves, but the slopes leading to both ledges are blocked by Ice Stalagmites. By throwing one of the Links up the ledge to collect his Fire Gloves, he can then melt the Ice Stalagmites, opening the slope. When all three Links pick up the Fire Gloves, the Triforce Gateway becomes active. To the left of the Fire Gloves, an unlit Torch encased in ice can be found; melting the ice and lighting it makes a Treasure Chest appear nearby, containing a Red Rupee. Two other Treasure Chests, containing a Blue Rupee and three Hearts, can be found near the Triforce Gateway.

In Stage 2, the Links begin at the side of a snowy cliff. A large Freezard blocks their path ahead by blowing a constant stream of cold air. A moveable wall prevents the Links from attacking it directly. Beside the wall is a set of Floor Spikes with an unlit Torch in the center. Lighting it from afar with the Fire Gloves will move the wall, allowing the Links to melt the Freezard and continue forward. Immediately afterward the Links encounter three Floor Switches beside another moveable wall, which guards another Torch on a set of Floor Spikes. Only when these Floor Switches are pressed simultaneously will the wall move, allowing one of the Links to throw a fireball which will bounce off the cliff wall and into the Torch. This opens a wall to a staircase heading north, where the Links encounter three Freezards blocking their path. These Enemies can be melted by throwing fireballs at the angled wall to the east, where they will bounce across a set of Floor Spikes and melt the Freezards from behind. Beyond them are several Keese and an Ice Keese, as well as more Freezards sitting on ledges blowing cold air. A Magic Plant takes the Links up to a higher ledge where the Triforce Gateway awaits, but it flies through the Freezards' blasts of air, freezing the Links on contact. They can melt the Freezards first by forming a Totem to reach their height and using the Fire Gloves, freeing the path to the Triforce Gateway.

Stage 3 takes place above a huge chasm, where several small sections of land are connected by floating tiles of ice that will gradually crack and break under the Links' weight, if they stand on them for too long. The Links must carefully cross these ice bridges, while being mindful of the Freezards encountered along the way who will try to impede on their progress. The Links can try to throw one another over the Freezards' blasts of air, or wait for them to momentarily stop, then either sneak past quickly or melt them with the Fire Gloves. The first solid ground that the Links reach has several Hearts trapped inside Ice Stalagmites, as well as a Squiddy that can prove difficult to strike, given the small standing area. Two Red Rupees can also be found on top of the ice tiles, off the intended pathway. At the next solid ground the Links reach, they are met by two Ice Keese. After defeating them, the Links come to a large platform of ice tiles, where a single Keeleon is encountered. The Keeleon's thrown Bombs will threaten to shatter the ice, but it can be defeated if the Links form a Totem. Then, they must carefully light two Torches sitting on pillars to the left and right sides of the icy platform, which will create a narrow bridge to the next Triforce Gateway.

In Stage 4, the Links slide down an icy slope into an arena of ice tiles over a pit, where the fight a group of Ice Wizzrobes. These Enemies can be defeated with Swords or with the Fire Gloves, however the Links must take care as the Gloves' fireballs will also melt the ice flooring. Some of the Wizzrobes appear at ground level, while others are floating at higher elevations, requiring that the Links form a Totem. After all Enemies are defeated, the Triforce Gateway appears at the bottom of the slope where the Stage began.
Drablands Challenges
Once the Boss of the Ice Cavern has been defeated, Frozen Plateau can be replayed with the following Drablands Challenges: "Guard the Orb!", "Pop all balloons!", and "Don't get hit by snowballs!".
In "Pop all balloons!", the four Stages contain six, seven, seven, and five Balloons respectively, for a total of 25 Balloons. Several of them require the extra height afforded by a fireball from the Fire Gloves, in addition to the Links forming a Totem, to be popped. In the final Stage, Balloons can be found floating underneath the ice tiles, requiring the use of Fire Gloves to both melt the ice and pop the Balloons.
Materials
At the end of the Level, three Treasure Chests can be opened. Two contain the same Material, and one contains another, more valuable Material.
| Drablands Challenge | — |
|---|---|
| Magical Materials | |
| Drablands Challenge | Don't get hit by snowballs! |
| Magical Materials | |
| Drablands Challenge | Pop all balloons! |
| Magical Materials | |
| Drablands Challenge | Guard the orb! |
| Magical Materials |
| Drablands Challenge | Magical Materials |
|---|---|
— | |
Don't get hit by snowballs! | |
Pop all balloons! | |
Guard the orb! |
Enemies and Traps
- Stage 1

- Stage 2


- Stage 3


- Stage 4
![Ice Wizzrobe ×5[a]](/wiki/File:TFH_Ice_Wizzrobe_Model.png)

Treasure Chests
| Treasure Chest | |
|---|---|
| Contents | |
| Notes | Behind an Ice Stalagmite upon entering the icy area in Stage 1 |
| Treasure Chest | |
| Contents |
|
| Notes | On a ledge just above the previous Treasure Chest in Stage 1 |
| Treasure Chest | |
| Contents | |
| Notes | Appears after lighting the Torch to the left of the Fire Gloves in Stage 1 |

| Treasure Chest | Contents | Notes |
|---|---|---|
Behind an Ice Stalagmite upon entering the icy area in Stage 1 | ||
| On a ledge just above the previous Treasure Chest in Stage 1 | |
Appears after lighting the Torch to the left of the Fire Gloves in Stage 1 |
Trivia
- As described in Vol. 6 of the Drablands Diary, a snow princess is hidden in each Level of the Ice Cavern. One can be found in Stage 1 of Frozen Plateau by shifting the camera to the right from where the Fire Gloves are obtained.
Nomenclature
| Language | Names | Meanings |
|---|---|---|
Japanese | 氷結の大地 (Hyōketsu no Daichi)[3] | Frozen Land |
FrenchCA | Plateau glacé | |
FrenchEU | Plateau glacé[5] | |
German | Eisplateau[4] | |
Italian | Altopiano gelido[2] | |
SpanishLA | Tierra del hielo eterno[6] | |
SpanishEU | Tierra del Hielo Eterno[7] | |
| This table was generated using translation pages. To request an addition, please contact a staff member with a reference. | ||
Gallery
-
Rebounding a fireball to light a Torch, Stage 2
-
Freezards in the path of a Magic Plant, Stage 2
-
Narrow Ice platforms blocked by a Freezard, Stage 3
-
Battling a Keeleon over perilous Ice platforms, Stage 3


References
- ↑ Encyclopedia, Dark Horse Books, pg. 160
- ↑ "Altopiano gelido" — Level Selection (Tri Force Heroes)
- ↑ "氷結の大地" — Level Selection (Tri Force Heroes)
- ↑ "Eisplateau" — Level Selection (Tri Force Heroes)
- ↑ "Plateau glacé" — Level Selection (Tri Force Heroes)
- ↑ "Tierra del hielo eterno" — Level Selection (Tri Force Heroes)
- ↑ "Tierra del Hielo Eterno" — Level Selection (Tri Force Heroes)