Snowball Ravine: Difference between revisions
m (→Enemies) |
Htwretched (talk | contribs) mNo edit summary |
||
| (36 intermediate revisions by 13 users not shown) | |||
| Line 1: | Line 1: | ||
{{ | {{Infobox Dungeon | ||
|type= level | |||
|type = level | |image= File:TFH Snowball Ravine Stage 1 2.png | ||
|image = | |caption= Stage 1 of Snowball Ravine | ||
|caption = | |location= {{Term|TFH|Ice Cavern|link}} | ||
|location = | |game= TFH | ||
|game = {{TFH}} | |item= {{List|{{Term|TFH|Boomerang|link}}, {{Term|TFH|Fire Gloves|link}} ×2}} | ||
| | |quest= | ||
|quest = | |mini-boss= | ||
|mini-boss = | |boss= {{Term|TFH|Freezlord|link}} | ||
|boss = | |theme= | ||
|theme | |strategy= | ||
|strategy = | |||
}} | }} | ||
{{Term/Store|Snowball Ravine||Series, TFH}} is a {{Term|TFH|Level|link}} in {{TFH}}.<ref>{{Cite Book|quote= |book= E |publisher= |page= 160}}</ref> It is the second {{Term|TFH|Level}} in the {{Term|TFH|Ice Cavern|link}} {{Term|TFH|Area}}, preceded by {{Term|TFH|Frozen Plateau|link}} and followed by {{Term|TFH|Silver Shrine|link}}. | |||
==Themes and Navigation== | ==Themes and Navigation== | ||
Snowball Ravine is a snow-covered, mountainous landscape, so named because of the large | {{Term|TFH|Snowball Ravine}} is a snow-covered, mountainous landscape, so named because of the large {{Plural|TFH|Snowball|link}} that roll down the sides of the mountain. Littered across the Ravine are snow mounds, which may be cut by several swipes of the {{Term|TFH|Sword|link}}, or melted with the {{Term|TFH|Fire Gloves|link}}. The mounds may contain {{Plural|TFH|Heart|link}}, {{Plural|TFH|Rupee|link}}, or {{Plural|TFH|Enemy|link}} such as {{Plural|TFH|Blue Rat|link}}. The giant {{Plural|TFH|Snowball}} can likewise also be melted into smaller ones with the {{Term|TFH|Fire Gloves}}, then slashed or melted again into nothing. There are also gigantic frozen {{Plural|TFH|Boulder|link}} that roll down the Ravine, though these cannot be melted. | ||
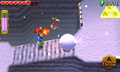
In '''Stage 1''', the Links begin at a small area leading up to several frozen stairways. Giant | [[File:TFH Snowball Ravine Stage 1.png|250px|right|thumb|Snowballs and Boulders continually roll down Stage 1]] | ||
In '''{{Term|TFH|Stage|link}} 1''', the {{Plural|TFH|Links}} begin at a small area leading up to several frozen stairways. Giant {{Plural|TFH|Snowball|link}} and frozen {{Plural|TFH|Boulder|link}} will occasionally roll down these stairs. The {{Plural|TFH|Links}} can find a {{Term|TFH|Boomerang|link}} and a pair of {{Term|TFH|Fire Gloves}} further up the stairs. Another set of stairs to the east leads to the {{Term|TFH|Triforce Gateway|link}}, with {{Plural|TFH|Snowball}} and {{Plural|TFH|Boulder}} also rolling down in the {{Plural|TFH|Links}}' path. Along the path are two gaps that the {{Plural|TFH|Links}} must cross by forming a {{Term|TFH|Totem|link}} and throwing each other across, making sure that the {{Term|TFH|Links}} with the {{Term|TFH|Boomerang}} is not left behind, as he can use the {{Term|TFH|Boomerang}} to carry the other {{Plural|TFH|Links}} across. The {{Term|TFH|Triforce Gateway}} is found at the top of the stairs; a nearby ledge has several {{Plural|TFH|Heart}} and {{Plural|TFH|Rupee}} on it, but {{Term|TFH|Link}} must be careful when collecting them, as the {{Plural|TFH|Snowball}} and {{Plural|TFH|Boulder}} fall from directly above. | |||
{{Clear}} | |||
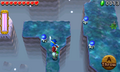
In '''Stage 2''', the Links appear over a deep chasm. A pair of | [[File:TFH Snowball Ravine Stage 2.png|250px|right|thumb|Activating the icy bridge in Stage 2]] | ||
In '''{{Term|TFH|Stage}} 2''', the {{Plural|TFH|Links}} appear over a deep chasm. A pair of {{Plural|TFH|Torchlight|link}} must be lit to activate an icy bridge made of small, rising and lowering platforms. The {{Plural|TFH|Links}} come to a snowy area with {{Plural|TFH|Hardhat Beetle|link}} and snow mounds that may contain {{Plural|TFH|Blue Rat}}; this leads directly to an icy walkway, where the {{Plural|TFH|Links}} must choose either the left or right paths by throwing themselves across a gap in either direction. On the left side is a snowy ledge with two {{Plural|TFH|Floor Switch|link}}, which lowers an obscuring platform in front of a row of unlit {{Plural|TFH|Torchlight}}. The {{Plural|TFH|Links}} must light these {{Plural|TFH|Torch}} using the {{Term|TFH|Fire Gloves}} and the {{Term|TFH|Boomerang}} to carry flames over. On the right side is an icy platform where {{Plural|TFH|Hardhat Beetle|link}} attempt to push them off. A {{Term|TFH|Bomb Flower|link}} grows on this platform, which must be thrown to destroy a {{Term|TFH|Cracked Block|link}} atop a tall {{Term|TFH|Torchlight}}. This requires that the {{Plural|TFH|Links}} quickly form a {{Term|TFH|Totem}} to reach. Once destroyed, the top {{Term|TFH|Links}} can then light the {{Term|TFH|Torchlight}} with the {{Term|TFH|Fire Gloves}}, but must be close enough that the fireball bounces and lights a second {{Term|TFH|Torchlight}} behind it. Doing both tasks activates the {{Term|TFH|Triforce Gateway}} and creates a bridge to it from the central icy walkway. | |||
{{Clear}} | |||
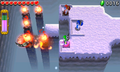
'''Stage 3''' is a snowy mountain | [[File:TFH Snowball Ravine Stage 3.png|250px|right|thumb|Snowballs and Boulders roll extra-fast near the start of Stage 3]] | ||
'''{{Term|TFH|Stage}} 3''' is a snowy, winding mountain path that the {{Plural|TFH|Links}} must ascend while avoiding rolling {{Plural|TFH|Snowball}} and {{Plural|TFH|Boulder}}, as well as some {{Plural|TFH|Enemy}} along the way. After heading east, eventually the {{Plural|TFH|Links}} come to a stairway that goes up; they must make their way up this path by melting any {{Plural|TFH|Snowball}} that roll down, or simply running away from any {{Plural|TFH|Boulder}}. Moving west, the {{Plural|TFH|Link}} again avoid {{Plural|TFH|Snowball}} and frozen {{Plural|TFH|Boulder}} rolling side-by-side from a large chute. Around the side of the chute is a lift that can be activated by lighting an overhead {{Term|TFH|Torchlight}}; a {{Term|TFH|Squiddy|link}} is hidden in a snowy area south of the lift. At the top of the mountain, the {{Plural|TFH|Links}} then move north past a {{Term|TFH|Freezard|link}}, then eastward across a small gap, where more {{Plural|TFH|Snowball}} and {{Plural|TFH|Boulder}} roll in both directions, and several {{Plural|TFH|Ice Wizzrobe|link}} also threaten them. Past all the traps and {{Plural|TFH|Enemy}}, they come to the {{Term|TFH|Triforce Gateway}}. | |||
{{Clear}} | |||
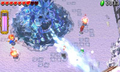
'''Stage 4''' is where | [[File:TFH Snowball Ravine Stage 4.png|250px|right|thumb|Sliding down the icy hill in Stage 4]] | ||
'''{{Term|TFH|Stage}} 4''' is where {{Term|TFH|Freezlord|link}} is fought. The {{Plural|TFH|Links}} begin at the top of a hill, standing around a lit {{Term|TFH|Torchlight}}, with several {{Plural|TFH|Ice Stalagmite|link}} that can be melted to receive {{Plural|TFH|Heart}}. To the north is an icy slope that drops the {{Plural|TFH|Links}} down to an entrance path with two {{Plural|TFH|Energy Potion|link}}, leading to a round, {{Term|TFH|Torchlight}}-filled pit with {{Term|TFH|Freezlord}} at the center. Along the outer walls of the pit are several alcoves where {{Plural|TFH|Pot|link}} containing {{Plural|TFH|Heart}}, {{Plural|TFH|Energy Potion}}, and {{Plural|TFH|Rupee}} can be found. | |||
{{Clear}} | |||
===Enemies=== | ==={{Plural|TFH|Drablands Challenge}}=== | ||
Once the {{Term|TFH|Boss|link}} of the {{Term|TFH|Ice Cavern|link}} has been defeated, {{Term|TFH|Snowball Ravine}} can be replayed with the following {{Plural|TFH|Drablands Challenge|link}}: "{{Term|TFH|Drablands Challenge|section=Adventure in the dark!|display=Adventure in the dark!|link}}", "{{Term|TFH|Drablands Challenge|section=Fewer Heart Containers!|display=Fewer Heart Containers!|link}}", and "{{Term|TFH|Drablands Challenge|section=Transport the orb quickly!|display=Transport the orb quickly!|link}}". Each {{Term|TFH|Drablands Challenge|display=Challenge}} features the same configuration of {{Plural|TFH|Enemy|link}}. | |||
In "Transport the orb quickly!", the {{Plural|TFH|Links|link}} are given a timer of three minutes in [[Multiplayer]], or three minutes and 55 seconds in single-player. This timer can be increased by collecting {{Plural|TFH|Hourglass|link}} or wearing {{Term|TFH|Linebeck's Uniform|link}}. | |||
==={{Plural|TFH|Material}}=== | |||
At the end of the {{Term|TFH|Level}}, three {{Plural|TFH|Treasure Chest|link}} can be opened. Two contain the same {{Term|TFH|Material|link}}, and one contains another, more valuable {{Term|TFH|Material}}. | |||
{{Data Table | |||
|game= TFH | |||
|columns= {{Term|TFH|Drablands Challenge}}, {{Plural|TFH|Magical Material}} [Amounts] | |||
|- | |||
| N/A | |||
| 2 Fluffy Fuzz, 1 Serpent Fangs | |||
|- | |||
| [[File:TFH Adventure in the Dark Icon.png]]<br/>'''Adventure in the dark!''' | |||
| 2 Tiny Snowflake, 1 Crimson Shell | |||
|- | |||
| [[File:TFH Fewer Heart Containers Icon.png]]<br/>'''Fewer Heart Containers!''' | |||
| 2 Serpent Fangs, 1 Freezard Water | |||
|- | |||
| [[File:TFH Transport the Orb Icon.png]]<br/>''Transport the orb quickly!''' | |||
| 2 Crimson Shell, 1 Chill Stone | |||
}} | |||
==={{Plural|TFH|Enemy}} and Traps=== | |||
;{{Term|TFH|Stage}} 1 | |||
{{Gallery List|Enemies | |||
|TFH= Blue Rat [Qty:0 or 1]{{List Note|name= Rat|Inside snow mounds; one sometimes does not appear.}}, Boulder, Snowball | |||
}} | |||
;{{Term|TFH|Stage}} 2 | |||
{{Gallery List|Enemies | |||
|TFH= Blue Rat [Qty:1 or 2]{{List Note|name= Rat}}, Hardhat Beetle [Qty:5] | |||
}} | |||
;{{Term|TFH|Stage}} 3 | |||
{{Gallery List|Enemies | |||
|TFH= Blue Rat [Qty:1 or 2]{{List Note|name= Rat}}, Boulder, Freezard [Qty:1], Ice Keese [Qty:2], Ice Wizzrobe [Qty:2], Snowball, Squiddy | |||
}} | |||
;{{Term|TFH|Stage}} 4 | |||
{{Gallery List|Enemies | |||
|TFH= Freezlord | |||
}} | |||
{{List Notes}} | |||
==={{Plural|TFH|Treasure Chest}}=== | |||
{{Treasure Chests|game= TFH | |||
|- | |||
| Treasure Chest | |||
| Purple Rupee | |||
| On a small platform south of the two raised {{Plural|TFH|Torchlight}} in {{Term|TFH|Stage}} 2 | |||
|- | |||
| Treasure Chest | |||
| Heart [File:TFH Three Hearts Sprite.png] {{Qty|3}} | |||
| On a small platform south of the two raised {{Plural|TFH|Torchlight}} in {{Term|TFH|Stage}} 2 | |||
}} | |||
==Trivia== | |||
As described in Vol. 6 of the {{Term|TFH|Drablands Diary|link}}, a snow [[Princess Zelda|princess]] is hidden in each {{Term|TFH|Level|link}} of the {{Term|TFH|Ice Cavern|link}}. One can be found where {{Term|TFH|Freezlord}} is battled in {{Term|TFH|Stage}} 4 of {{Term|TFH|Snowball Ravine}}, by going to the northern alcove and shifting the camera to the left. | |||
==Nomenclature== | |||
{{Nomenclature}} | |||
==Gallery== | |||
<gallery> | <gallery> | ||
File:TFH | File:TFH Snowball Ravine Stage 1 3.png|Using the {{Term|TFH|Fire Gloves}} to shrink {{Plural|TFH|Snowball}}, {{Term|TFH|Stage}} 1 | ||
File:TFH | File:TFH Snowball Ravine Stage 2 2.png|The slippery crossroads in {{Term|TFH|Stage}} 2 | ||
File:TFH | File:TFH Snowball Ravine Stage 2 3.png|Transferring {{Term|TFH|Fire}} between {{Plural|TFH|Torchlight}} using the {{Term|TFH|Boomerang}}, {{Term|TFH|Stage}} 2 | ||
File:TFH | File:TFH Snowball Ravine Stage 2 4.png|The technique of passing {{Plural|TFH|Bomb}} to the top of a {{Term|TFH|Totem}} in use in {{Term|TFH|Stage}} 2 | ||
File:TFH Snowball Ravine Stage 3 2.png|Icy {{Plural|TFH|Enemy}} and rolling {{Plural|TFH|Snowball}} are a double threat in {{Term|TFH|Stage}} 3 | |||
File:TFH Snowball Ravine Stage 3 3.png|This {{Term|TFH|Snowball}} and {{Term|TFH|Boulder}} dispenser in {{Term|TFH|Stage}} 3 can be challenging to pass | |||
File:TFH Freezlord Promotional Screenshot.png|Battling {{Term|TFH|Freezlord}} in {{Term|TFH|Stage}} 4 | |||
</gallery> | </gallery> | ||
{{Ref}} | |||
{{ | |||
{{Categories | |||
|Canyons | |||
|levels= TFH | |||
}} | |||
| | |||
| | |||
Latest revision as of 21:38, 4 December 2023
Snowball Ravine is a Level in Tri Force Heroes.[1] It is the second Level in the Ice Cavern Area, preceded by Frozen Plateau and followed by Silver Shrine.
Snowball Ravine is a snow-covered, mountainous landscape, so named because of the large Snowballs that roll down the sides of the mountain. Littered across the Ravine are snow mounds, which may be cut by several swipes of the Sword, or melted with the Fire Gloves. The mounds may contain Hearts, Rupees, or Enemies such as Blue Rats. The giant Snowballs can likewise also be melted into smaller ones with the Fire Gloves, then slashed or melted again into nothing. There are also gigantic frozen Boulders that roll down the Ravine, though these cannot be melted.

In Stage 1, the Links begin at a small area leading up to several frozen stairways. Giant Snowballs and frozen Boulders will occasionally roll down these stairs. The Links can find a Boomerang and a pair of Fire Gloves further up the stairs. Another set of stairs to the east leads to the Triforce Gateway, with Snowballs and Boulders also rolling down in the Links' path. Along the path are two gaps that the Links must cross by forming a Totem and throwing each other across, making sure that the Link with the Boomerang is not left behind, as he can use the Boomerang to carry the other Links across. The Triforce Gateway is found at the top of the stairs; a nearby ledge has several Hearts and Rupees on it, but Link must be careful when collecting them, as the Snowballs and Boulders fall from directly above.

In Stage 2, the Links appear over a deep chasm. A pair of Torches must be lit to activate an icy bridge made of small, rising and lowering platforms. The Links come to a snowy area with Hardhat Beetles and snow mounds that may contain Blue Rats; this leads directly to an icy walkway, where the Links must choose either the left or right paths by throwing themselves across a gap in either direction. On the left side is a snowy ledge with two Floor Switches, which lowers an obscuring platform in front of a row of unlit Torches. The Links must light these Torches using the Fire Gloves and the Boomerang to carry flames over. On the right side is an icy platform where Hardhat Beetles attempt to push them off. A Bomb Flower grows on this platform, which must be thrown to destroy a Cracked Block atop a tall Torch. This requires that the Links quickly form a Totem to reach. Once destroyed, the top Link can then light the Torch with the Fire Gloves, but must be close enough that the fireball bounces and lights a second Torch behind it. Doing both tasks activates the Triforce Gateway and creates a bridge to it from the central icy walkway.

Stage 3 is a snowy, winding mountain path that the Links must ascend while avoiding rolling Snowballs and Boulders, as well as some Enemies along the way. After heading east, eventually the Links come to a stairway that goes up; they must make their way up this path by melting any Snowballs that roll down, or simply running away from any Boulders. Moving west, the Links again avoid Snowballs and frozen Boulders rolling side-by-side from a large chute. Around the side of the chute is a lift that can be activated by lighting an overhead Torch; a Squiddy is hidden in a snowy area south of the lift. At the top of the mountain, the Links then move north past a Freezard, then eastward across a small gap, where more Snowballs and Boulders roll in both directions, and several Ice Wizzrobes also threaten them. Past all the traps and Enemies, they come to the Triforce Gateway.

Stage 4 is where Freezlord is fought. The Links begin at the top of a hill, standing around a lit Torch, with several Ice Stalagmites that can be melted to receive Hearts. To the north is an icy slope that drops the Links down to an entrance path with two Energy Potions, leading to a round, Torch-filled pit with Freezlord at the center. Along the outer walls of the pit are several alcoves where Jars containing Hearts, Energy Potions, and Rupees can be found.
Drablands Challenges
Once the Boss of the Ice Cavern has been defeated, Snowball Ravine can be replayed with the following Drablands Challenges: "Adventure in the dark!", "Fewer Heart Containers!", and "Transport the orb quickly!". Each Challenge features the same configuration of Enemies.
In "Transport the orb quickly!", the Links are given a timer of three minutes in Multiplayer, or three minutes and 55 seconds in single-player. This timer can be increased by collecting Hourglasses or wearing Linebeck's Uniform.
Materials
At the end of the Level, three Treasure Chests can be opened. Two contain the same Material, and one contains another, more valuable Material.
| Drablands Challenge | — |
|---|---|
| Magical Materials | |
| Drablands Challenge | Adventure in the dark! |
| Magical Materials | |
| Drablands Challenge | Fewer Heart Containers! |
| Magical Materials | |
| Drablands Challenge | Transport the orb quickly! |
| Magical Materials |
| Drablands Challenge | Magical Materials |
|---|---|
— | |
Adventure in the dark! | |
Fewer Heart Containers! | |
Transport the orb quickly! |
Enemies and Traps
- Stage 1
![Blue Rat ×0 or 1[a]](/wiki/File:TFH_Blue_Rat_Model.png)


- Stage 2

- Stage 3


- Stage 4

Treasure Chests
| Treasure Chest | |
|---|---|
| Contents | |
| Notes | On a small platform south of the two raised Torches in Stage 2 |
| Treasure Chest | |
| Contents |
|
| Notes | On a small platform south of the two raised Torches in Stage 2 |

| Treasure Chest | Contents | Notes |
|---|---|---|
On a small platform south of the two raised Torches in Stage 2 | ||
| On a small platform south of the two raised Torches in Stage 2 |
Trivia
As described in Vol. 6 of the Drablands Diary, a snow princess is hidden in each Level of the Ice Cavern. One can be found where Freezlord is battled in Stage 4 of Snowball Ravine, by going to the northern alcove and shifting the camera to the left.
Nomenclature
| Language | Names | Meanings |
|---|---|---|
Japanese | 雪玉渓谷 (Yukidama Keikoku)[3] | Snowball Valley |
FrenchCA | Vallée Boules de neige[7] | |
FrenchEU | Ravin boules de neige[5] | |
German | Schneeballtal[4] | |
Italian | Gola nevose[2] | |
SpanishLA | Cañón nevado[6] | |
SpanishEU | Cañón Nevado[8] | |
| This table was generated using translation pages. To request an addition, please contact a staff member with a reference. | ||
Gallery
-
Using the Fire Gloves to shrink Snowballs, Stage 1
-
The slippery crossroads in Stage 2
-
Transferring Fire between Torches using the Boomerang, Stage 2
-

The technique of passing Bombs to the top of a Totem in use in Stage 2
-

Icy Enemies and rolling Snowballs are a double threat in Stage 3
-

This Snowball and Boulder dispenser in Stage 3 can be challenging to pass
-
Battling Freezlord in Stage 4


References
- ↑ Encyclopedia, Dark Horse Books, pg. 160
- ↑ "Gola nevose" — Level Selection (Tri Force Heroes)
- ↑ "雪玉渓谷" — Level Selection (Tri Force Heroes)
- ↑ "Schneeballtal" — Level Selection (Tri Force Heroes)
- ↑ "Ravin boules de neige" — Level Selection (Tri Force Heroes)
- ↑ "Cañón nevado" — Level Selection (Tri Force Heroes)
- ↑ "Vallée Boules de neige" — Level Selection (Tri Force Heroes)
- ↑ "Cañón Nevado" — Level Selection (Tri Force Heroes)