Mido Swamp: Difference between revisions
m (Text replacement - "\{\{No Image\|BotW ([^\}]*)(\.png)?\}\}" to "{{No Image|BotW|$1}}") |
|||
| (25 intermediate revisions by 8 users not shown) | |||
| Line 1: | Line 1: | ||
{{ | {{Hatnote|This page is for the location in {{BotW}}. For the location in {{TAoL}}, see {{Term|Series|Midoro Swamp|link}}.}} | ||
| | {{Infobox Location | ||
|image= {{ | |image= | ||
{{Media | |||
|Screenshot BotW= File:BotW Mido Swamp.png | |||
|Screenshot TotK= File:TotK Mido Swamp.png | |||
}} | |||
|caption= | |caption= | ||
|game= | |pronunciation= | ||
|game= BotW, TotK | |||
|other= | |other= | ||
|inhab= | |inhab= | ||
|items= | |items= | ||
|related= | |related= {{Term|Series|Maag Halan Shrine|link}} | ||
|season= | |season= | ||
|theme | |theme= | ||
}} | }} | ||
'''Mido Swamp''' | {{Term/Store|Mido Swamp||Series, BotW, TotK}} is a recurring location in {{TLoZ|Series}}.<ref>{{Cite|'''Mido Swamp'''|Map|BotW}}</ref><ref>{{Cite|'''Mido Swamp'''|Map|TotK}}</ref> | ||
==Features and Overview== | ==Features and Overview== | ||
Mido Swamp is a small mire in the northeastern section of the | ==={{BotW|-}}=== | ||
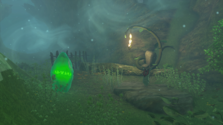
{{Term|BotW|Mido Swamp}} is a small mire in the northeastern section of the {{Term|BotW|Great Hyrule Forest|link}}. It is made of {{Plural|BotW|Bottomless Bog|link}}, though there are several small islands and fallen {{Plural|BotW|Tree|link}} that can be used to travel through it. The {{Term|BotW|Mido Swamp|display=Swamp}} is also surrounded by {{Plural|BotW|Ogre Tree|link}}. | |||
At the end of the {{Term|BotW|Test of Wood|link}} {{Term|BotW|Mini-Game|link}}, {{Term|BotW|Link|link}} must pass through {{Term|BotW|Mido Swamp}}. If {{Term|BotW|Link}} falls into the {{Term|BotW|Mido Swamp|display=Swamp}}, he will drown and be sent to the beginning of the Trial. "{{Term|BotW|The Test of Wood|link}}" {{Term|BotW|Shrine Quest|link}} requires {{Term|BotW|Link}} to complete the {{Term|BotW|Mini-Game}} in order to access {{Term|BotW|Maag Halan Shrine|link}}, which is located at the end of the {{Term|BotW|Mido Swamp|display=Swamp}}.<ref>{{Cite|You arrived at your destination with the forest dweller's sword, forest dweller's bow, and forest dweller's shield equipped. There, you found an ancient shrine.|Adventure Log|BotW}}</ref> Following the {{Term|BotW|Shrine Quest}}, {{Term|BotW|Link}} will be able to play the {{Term|BotW|Mini-Game}} again with a time limit of five minutes.<ref>{{Cite|Well, if you thought that was fun, how about taking a crack at a trial that'll really turn up the heat? Don't worry, Mr. Hero, you'll be doing the same thing as before! The only different is how long you have to do it. If you can make it to the goal within {{Color|BotW Red|five minutes}}, you'll get a prize!|Damia|BotW}}</ref> After {{Term|BotW|Link}} passes through {{Term|BotW|Mido Swamp}}, {{Term|BotW|Damia|link}} will end the {{Term|BotW|Mini-Game}}.<ref>{{Cite|{{Big|Gooooooooal!}}|Damia|BotW}}</ref> | |||
===={{Plural|BotW|Enemy}}==== | |||
{{Gallery List|Enemies | |||
|BotW= | |||
Blue Bokoblin, | |||
Fire Chuchu, | |||
Keese, | |||
Stalkoblin {{Equipment|BotW|Wooden Bow}}{{Equipment|BotW|Fire Arrow}}, | |||
Water Octorok | |||
}} | |||
==={{TotK|-}}=== | |||
{{TotK Quest/Container|width= 47rem| | |||
{{TotK Quest | |||
|name= A Pretty Stone and Five Golden Apples | |||
|type= Shrine Quest | |||
|giver= [[Damia]] | |||
|location= [[Korok Forest]] | |||
}} | |||
}} | |||
{{Stub|TotK}} | |||
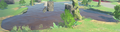
A small grove of {{Plural|TotK|Tree|link}} bearing {{Plural|TotK|Golden Apple|link}} can be found north of the {{Term|TotK|Mido Swamp|display=Swamp}}. To the northwest, a small passage unaffected by the {{Term|TotK|Lost Woods|link}}'s fog is filled with {{Plural|TotK|Bramble|link}}. | |||
====Areas==== | |||
{{Gallery List|Locations | |||
|TotK= Pupunke Shrine | |||
}} | |||
===={{Plural|TotK|Creature}}==== | |||
{{Gallery List|Creatures | |||
|TotK= Hot-Footed Frog, Restless Cricket | |||
}} | |||
=== | ===={{Plural|TotK|Enemy}}==== | ||
< | {{Gallery List|Enemies | ||
|TotK= Bottomless Bog, Bramble, Electric Wizzrobe [Qty:1]{{Equipment|TotK|Topaz Rod}}<!-- Zonaite Sword + Topaz -->, Evermean [Qty:2]{{Equipment|TotK|Apple}}, Fire Chuchu [3][Qty:1], Fire Keese [Qty:3], Keese [Qty:5], Shock Like [Qty:1], Stalkoblin [Qty:1]{{Equipment|TotK|Rusty Broadsword}}{{Equipment|TotK|Rusty Shield}}, Stalkoblin [Qty:1]{{Equipment|TotK|Dragonbone Boko Bow}}{{Equipment|TotK|Yellow Chuchu Jelly}}, Stalkoblin [Qty:1]{{Equipment|TotK|Spiked Boko Bow}}, Stalkoblin [Qty:1]{{Equipment|TotK|Spiked Boko Bow}}{{Equipment|TotK|Red Chuchu Jelly}}, Stalkoblin [Qty:1]{{Equipment|TotK|Spiked Boko Bow}}{{Equipment|TotK|Yellow Chuchu Jelly}}, Stalmoblin [Qty:1]{{Equipment|TotK|Black Moblin Hammer}}<!-- Rusty Claymore + Black Moblin Horn -->, Stalmoblin [Qty:1]{{Equipment|TotK|Black Moblin Sledge}}<!-- Rusty Halberd + Black Moblin Horn -->, Water Octorok [Qty:1] | |||
}} | |||
</ | ===={{Plural|TotK|Material}}==== | ||
{{Gallery List|Materials | |||
|TotK= Golden Apple, Hylian Tomato, Razorshroom, Silent Shroom | |||
}} | |||
===={{Plural|TotK|Treasure Chest}}==== | |||
{{Treasure Chests|game= TotK | |||
|- | |||
| Iron Treasure Chest | |||
| Giant Brightbloom Seed x 10 | |||
| 0807, 2306, 0178 | |||
| Inside the smiling {{Term|TotK|Ogre Tree|link}} in the east part of the {{Term|TotK|Mido Swamp|display=Swamp}} | |||
|- | |||
| Wooden Chest [2] | |||
| Arrow x 10 | |||
| 0840, 2355, 0187 | |||
| Atop the smiling {{Term|TotK|Ogre Tree|link}} south of the {{Term|TotK|Golden Apple|link}} {{Plural|TotK|Tree|link}} | |||
|- | |||
| Iron Treasure Chest | |||
| Bomb Flower x 10 | |||
| 0721, 2394, 0180 | |||
| Embedded in the grounds of the boneyard in the northwest part of {{Term|TotK|Mido Swamp|display=Swamp}} | |||
}} | |||
==Nomenclature== | |||
{{Term|Series|Mido Swamp}} is named for {{Term|Series|Mido|link}}, the self-proclaimed boss of the {{Plural|Series|Kokiri|link}} from {{OoT}}.<ref>{{Cite Guide|quote= |game= BotW|publisher= Piggyback|page= 351}}</ref> | |||
{{Nomenclature}} | |||
==See Also== | ==See Also== | ||
* | * {{Term|Series|Great Hyrule Forest|link}} | ||
* {{Term|Series|Maag Halan Shrine|link}} | |||
* {{Term|Series|Mido|link}} | |||
* {{Term|Series|The Test of Wood|link}} | |||
* {{Term|Series|Test of Wood|link}} | |||
{{Ref}} | |||
{{Categories | |||
|Great Hyrule Forest, Swamps | |||
|locations= BotW, TotK | |||
}} | |||
Latest revision as of 03:21, 18 April 2024
Mido Swamp is a recurring location in The Legend of Zelda series.[1][2]
Features and Overview
Breath of the Wild
Mido Swamp is a small mire in the northeastern section of the Great Hyrule Forest. It is made of Bottomless Bogs, though there are several small islands and fallen Trees that can be used to travel through it. The Swamp is also surrounded by Ogre Trees.
At the end of the Test of Wood Mini-Game, Link must pass through Mido Swamp. If Link falls into the Swamp, he will drown and be sent to the beginning of the Trial. "The Test of Wood" Shrine Quest requires Link to complete the Mini-Game in order to access Maag Halan Shrine, which is located at the end of the Swamp.[3] Following the Shrine Quest, Link will be able to play the Mini-Game again with a time limit of five minutes.[4] After Link passes through Mido Swamp, Damia will end the Mini-Game.[5]
Enemies


Tears of the Kingdom
- Related Quests
|
A Pretty Stone and Five Golden Apples | |||
| Shrine Quest | ||||
A Pretty Stone and Five Golden Apples | |
|
|
A Pretty Stone and Five Golden Apples | |||
| Shrine Quest | ||||
A Pretty Stone and Five Golden Apples | |
A small grove of Trees bearing Golden Apples can be found north of the Swamp. To the northwest, a small passage unaffected by the Lost Woods's fog is filled with Brambles.
Areas

Creatures


Enemies
-
-

-

-
Fire Chuchu ×1
-
Fire Keese ×3
-

Keese ×5
-
Shock Like ×1
-
-
-
-
-
-
-
-


Materials


Treasure Chests
| Treasure Chest | |
|---|---|
| Contents | |
| Coordinates | 0807, 2306, 0178 |
| Notes | Inside the smiling Ogre Tree in the east part of the Swamp |
| Treasure Chest | |
| Contents | |
| Coordinates | 0840, 2355, 0187 |
| Notes | Atop the smiling Ogre Tree south of the Golden Apple Trees |
| Treasure Chest | |
| Contents | |
| Coordinates | 0721, 2394, 0180 |
| Notes | Embedded in the grounds of the boneyard in the northwest part of Swamp |


| Treasure Chest | Contents | Coordinates | Notes |
|---|---|---|---|
0807, 2306, 0178 | Inside the smiling Ogre Tree in the east part of the Swamp | ||
0840, 2355, 0187 | Atop the smiling Ogre Tree south of the Golden Apple Trees | ||
0721, 2394, 0180 | Embedded in the grounds of the boneyard in the northwest part of Swamp |
Nomenclature
Mido Swamp is named for Mido, the self-proclaimed boss of the Kokiri from Ocarina of Time.[6]
| Language | Names | Meanings |
|---|---|---|
Japanese | ミード沼 (Mīdo Numa) | Mīdo Swamp Mīdo is a corruption of ミド (Mido). |
Dutch | Mihdo-moeras[8] | Mihdo Swamp |
SpanishLA | Pantano de Mihdo[7] | Mihdo Swamp |
| This table was generated using translation pages. To request an addition, please contact a staff member with a reference. | ||
See Also
References
- ↑ "Mido Swamp" — Map (Breath of the Wild)
- ↑ "Mido Swamp" — Map (Tears of the Kingdom)
- ↑ "You arrived at your destination with the forest dweller's sword, forest dweller's bow, and forest dweller's shield equipped. There, you found an ancient shrine." — Adventure Log (Breath of the Wild)
- ↑ "Well, if you thought that was fun, how about taking a crack at a trial that'll really turn up the heat? Don't worry, Mr. Hero, you'll be doing the same thing as before! The only different is how long you have to do it. If you can make it to the goal within five minutes, you'll get a prize!" — Damia (Breath of the Wild)
- ↑ "Gooooooooal!" — Damia (Breath of the Wild)
- ↑ The Legend of Zelda: Breath of the Wild—The Complete Official Guide, Piggyback Interactive Limited, pg. 351
- ↑ "Pantano de Mihdo" — Map (Breath of the Wild)
- ↑ "Mihdo-moeras" — Map (Breath of the Wild)