Level 3 (Ancient Stone Tablets): Difference between revisions
m (→top: Mass Formatting <br> to <br/>) |
No edit summary Tag: 2017 source edit |
||
| Line 2: | Line 2: | ||
{{Merge|Level 3}} | {{Merge|Level 3}} | ||
{{Infobox Dungeon | {{Infobox Dungeon | ||
|type = | |type = | ||
|image = [[File:AST Level 3 Entrance.png]] | |image = [[File:AST Level 3 Entrance.png]] | ||
|caption = The entrance room of Level 3 | |caption = The entrance room of {{Term|AST|Level 3}} | ||
|location = East of | |location = East of {{Term|AST|Kakariko Village|link}} | ||
|game = {{AST}} | |game = {{AST}} | ||
|other = | |other = | ||
|item = | |item = {{Term|AST|Magic Hammer|link}}<br/>{{Term|AST|Blue Mail|link}} | ||
|quest = | |quest = {{Term|AST|Stone Tablet|link}} | ||
|mini-boss = | |mini-boss = | ||
|boss = | |boss = {{Term|AST|Helmasaur King|link}} | ||
|theme music = | |theme music = | ||
|strategy= {{StrategyWiki|BS The Legend of Zelda: Inishie no Sekiban/Week 2/Dungeon 3|Level 3}} | |strategy= {{StrategyWiki|BS The Legend of Zelda: Inishie no Sekiban/Week 2/Dungeon 3|Level 3}} | ||
}} | }} | ||
{{Name|Japanese|Level 3}} is the third | {{Name|Japanese|Level 3}} is the third {{Term|AST|Dungeon|link}} in {{AST}}. | ||
==Entrance to the Dungeon== | ==Entrance to the {{Term|AST|Dungeon}}== | ||
Level 3 is located in an underground cave east of | {{Term|AST|Level 3}} is located in an underground cave east of {{Term|AST|Kakariko Village|link}}. The entrance is blocked by a pile of rocks, which must be destroyed by bashing it with the {{Term|AST|Pegasus Shoes|link}}. | ||
==Themes and Navigation== | ==Themes and Navigation== | ||
The | The {{Term|AST|Dungeon|link}} features various puzzles involving {{Plural|AST|Crystal Switch|link}}, which must be hit in order to progress through other rooms. {{Plural|AST|Mole|link}} also block the access to certain areas of the {{Term|AST|Dungeon}}, therefore, they must be pressed by using the {{Term|AST|Magic Hammer|link}}, one of the {{Term|AST|Dungeon}}'s main {{Plural|AST|Item|link}} Many walls can be blown with {{Plural|AST|Bomb|link}}, revealing hidden rooms filled with {{Plural|AST|Treasure Chest|link}} containing {{Plural|AST|Rupee|link}}. A {{Term|AST|Thief|link}} can also be found selling a {{Term|AST|Bomb}} upgrade for 100 {{Plural|AST|Rupee}}. The {{Term|AST|Magic Hammer}} must also be used to defeat the {{Term|AST|Helmasaur King|link}}, the {{Term|AST|Dungeon}}'s {{Term|AST|Boss|link}}. Once defeated, it drops a {{Term|AST|Heart Container|link}}, followed by a {{Term|AST|Stone Tablet|link}}. | ||
==Minor | ==Minor {{Plural|AST|Enemy}} and Traps== | ||
<gallery> | <gallery> | ||
File:ALttP Blue Bari Sprite.png| | File:ALttP Blue Bari Sprite.png|{{Term|AST|Blue Bari|link}} | ||
File:ALttP Red Bari Sprite.png| | File:ALttP Red Bari Sprite.png|{{Term|AST|Red Bari|link}} | ||
File:ALttP Beamos Sprite.png| | File:ALttP Beamos Sprite.png|{{Term|AST|Beamos|link}} | ||
File:ALttP Biri Sprite.png| | File:ALttP Biri Sprite.png|{{Term|AST|Biri|link}} | ||
File:ALttP Anti-Fairies Sprite.png| | File:ALttP Anti-Fairies Sprite.png|{{Term|AST|Bubble|link}} | ||
File:ALttP Blue Hardhat Beetle Sprite.png| | File:ALttP Blue Hardhat Beetle Sprite.png|{{Term|AST|Red Hardhat Beetle|link}} | ||
File:ALttP Red Hardhat Beetle Sprite.png| | File:ALttP Red Hardhat Beetle Sprite.png|{{Term|AST|Hardhat Beetle}} | ||
File:HelmasaurInS.png| | File:HelmasaurInS.png|{{Term|AST|Helmasaur|link}} | ||
File:ALttP Medusa Sprite.png| | File:ALttP Medusa Sprite.png|{{Term|AST|Medusa|link}} | ||
File:ALttP Spark Sprite.png| | File:ALttP Spark Sprite.png|{{Term|AST|Spark|link}} | ||
File:ALttP Blue Stalfos Sprite.png| | File:ALttP Blue Stalfos Sprite.png|{{Term|AST|Blue Stalfos|link}} | ||
File:ALttP Red Stalfos Sprite.png| | File:ALttP Red Stalfos Sprite.png|{{Term|AST|Red Stalfos|link}} | ||
File:ALttP Terrorpin Sprite.png| | File:ALttP Terrorpin Sprite.png|{{Term|AST|Terrorpin|link}} | ||
File:YellowZolInS.png| | File:YellowZolInS.png|{{Term|AST|Yellow Zol|link}} | ||
</gallery> | </gallery> | ||
==Gallery== | ==Gallery== | ||
<gallery> | <gallery> | ||
File:AST Level 3 Exterior.png|The exterior of Level 3 | File:AST Level 3 Exterior.png|The exterior of {{Term|AST|Level 3}} | ||
</gallery> | </gallery> | ||
Revision as of 13:17, 25 August 2022

Level 3 is the third Dungeon in Ancient Stone Tablets.
Entrance to the Dungeon
Level 3 is located in an underground cave east of Kakariko Village. The entrance is blocked by a pile of rocks, which must be destroyed by bashing it with the Pegasus Boots.
The Dungeon features various puzzles involving Shock Switches, which must be hit in order to progress through other rooms. Moles also block the access to certain areas of the Dungeon, therefore, they must be pressed by using the Magic Hammer, one of the Dungeon's main Items Many walls can be blown with Bombs, revealing hidden rooms filled with Treasure Chests containing Rupees. A Thief can also be found selling a Bomb upgrade for 100 Rupees. The Magic Hammer must also be used to defeat the Helmasaur King, the Dungeon's Boss. Once defeated, it drops a Heart Container, followed by a Stone Tablet.
Minor Enemies and Traps
-

-

-

-

-

-

Hardhat Beetle
-

-

-

-

-

Gallery
-
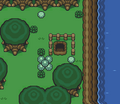
The exterior of Level 3
