Floor Switch: Difference between revisions
TriforceTony (talk | contribs) No edit summary |
TriforceTony (talk | contribs) No edit summary |
||
| (23 intermediate revisions by 12 users not shown) | |||
| Line 5: | Line 5: | ||
|Model OoT= File:OoT Floor Switch Model.png | |Model OoT= File:OoT Floor Switch Model.png | ||
|Model OoT3D= File:OoT3D Floor Switch Model.png | |Model OoT3D= File:OoT3D Floor Switch Model.png | ||
|Model MM= File:MM | |Model MM= File:MM Floor Switch Model.png | ||
|Model MM3D= File:MM3D Floor Switch Model.png | |Model MM3D= File:MM3D Floor Switch Model.png | ||
|Model PH= File:PH Floor Switch Model.png | |Model PH= File:PH Floor Switch Model.png | ||
|Model ST= File: | |Model ST= File:ST Floor Switch Model.png | ||
|Model ALBW= File:ALBW Floor Switch Model.png | |Model ALBW= File:ALBW Floor Switch Model.png | ||
|Model TFH= File:TFH Floor Switch Model.png | |Model TFH= File:TFH Floor Switch Model.png | ||
|Model BotW= File:BotW Floor Switch.png | |Model BotW= File:BotW Floor Switch.png | ||
|Model TotK= File:TotK Floor Switch Model.png | |||
|Sprite ALttP= File:ALttP Floor Switch Sprite.png | |Sprite ALttP= File:ALttP Floor Switch Sprite.png | ||
|Sprite LA= File:LA Floor Switch Sprite.png | |Sprite LA= File:LA Floor Switch Sprite.png | ||
|Sprite LADX= File:LADX Floor Switch Sprite.png | |Sprite LADX= File:LADX Floor Switch Sprite.png | ||
|Sprite FSA= File:FSA Foot Switch Sprite.png | |||
|Sprite TMC= File:TMC Floor Switch Sprite.png | |Sprite TMC= File:TMC Floor Switch Sprite.png | ||
}} | }} | ||
| Line 20: | Line 22: | ||
|pronunciation= | |pronunciation= | ||
|plural= | |plural= | ||
|game= | |game= ALttP, LA, OoT, MM, FSA, TMC, PH, ST, ALBW, TFH, BotW, TotK | ||
|other= | |other= | ||
|uses= | |uses= | ||
|comp= {{Term|Series|Switch|link}} | |comp= | ||
{{List| | |||
{{Term|Series|Switch|link}}, | |||
{{Term|Series|Big Switch|link}}, | |||
{{Term|Series|Pressure Plate|link}}, | |||
}} | |||
|theme= | |theme= | ||
}} | }} | ||
{{Term/Store|Floor Switch|Floor Switches|Series|plural}} | {{Term/Store|Floor Switch|Floor Switches|Series|plural}},{{Exp Game|Series}}<ref name="Guide">{{Cite Guide|quote= |game= LA |publisher= Nintendo |page= 16}}</ref><ref>{{Cite Guide|quote= |game= ALBW |publisher= Prima |page= 16}}</ref>{{Name Ref|ALttP, OoT, MM, PH, ST, TFH, BotW, TotK}} also known as {{Term/Store|Foot Switch|Foot Switches|FSA|plural}},{{Exp Game|FSA}}<ref>{{Cite Manual|game=FSA|page=32}}</ref> are recurring {{Plural|Series|Object|link}} in {{TLoZ|Series}}. {{Plural|Series|Floor Switch}} go unnamed in {{TMC}} and {{TotK}}. | ||
==Location and Uses== | ==Location and Uses== | ||
{{Plural|Series|Floor Switch}} normally take the form of a large button or plate,<ref name="Guide"/> which can be activated by being stepped on by {{Term|Series|Link|link}}, or sometimes by placing a heavy object on top. Some {{Plural|Series|Floor Switch}} are less sensitive than others. Some rusty or malfunctioning {{Plural|Series|Floor Switch | {{Plural|Series|Floor Switch}} normally take the form of a large button or plate,<ref name="Guide"/> which can be activated by being stepped on by {{Term|Series|Link|link}}, or sometimes by placing a heavy object on top. Some {{Plural|Series|Floor Switch}} are less sensitive than others. Some rusty or malfunctioning {{Plural|Series|Floor Switch}} may need to be forced with the {{Term|Series|Megaton Hammer|link}} or similar {{Term|Series|Item|link}}. | ||
Larger {{Plural|Series|Floor Switch}}, which require additional weight or multiple {{Plural|Series|Links|link}} to activate, are known as {{Plural|Series|Big Switch|link}}. | |||
==={{ALttP|-}}=== | ==={{ALttP|-}}=== | ||
| Line 38: | Line 47: | ||
==={{OoT|-}}=== | ==={{OoT|-}}=== | ||
{{ | There are five types of {{Term|OoT3D|Floor Switch}} in {{OoT}}. Yellow-colored {{Plural|OoT3D|Floor Switch}} activate when pushed down with any kind of weight. Blue-colored {{Plural|OoT3D|Floor Switch}} must be held down in order for their effects to remain. Yellow-colored cyst-like {{Plural|OoT3D|Floor Switch}} appear {{Term|OoT3D|Inside Jabu-Jabu's Belly|link}}. These require a significant amount of weight in order to be pressed, and often require {{Term|OoT3D|Link|link}} to carry {{Term|OoT3D|Princess Ruto|link}} with him to do so. Blue-colored counterparts to these appear, though they do not require additional weight. Instead, they function like other blue-colored {{Plural|OoT3D|Floor Switch}} and require a constant weight to hold them down. Other than the cyst-like variety, all {{Plural|OoT3D|Floor Switch}} have the {{Term|OoT3D|Crest of the Gerudo|link}} on them. | ||
{{Plural|OoT3D|Rusty Switch|link}} are {{Plural|OoT3D|Floor Switch}} that have rusted over and can no longer be pressed normally. Instead, these must be smashed with the {{Term|OoT3D|Megaton Hammer|link}}. | |||
==={{MM|-}}=== | ==={{MM|-}}=== | ||
{{Stub|MM}} | {{Stub|MM}} | ||
{{Term|MM3D|Deku Link|link}} is notably too light to depress some {{Plural|MM3D|Floor Switch}}. | {{Term|MM3D|Deku Link|link}} is notably too light to depress some {{Plural|MM3D|Floor Switch}}. | ||
==={{FSA|-}}=== | |||
{{Manual|FSA|Foot Switches|Activate these switches by standing on them.}} | |||
{{Stub|FSA}} | |||
==={{TMC|-}}=== | ==={{TMC|-}}=== | ||
{{Plural|TMC|Floor Switch}} appear mostly in {{Plural|TMC|Dungeon|link}} in {{TMC}}, though a handful also appear in the {{Term|TMC|Overworld|link}}. Many puzzles involve {{Term|TMC|Link|link}} pressing down multiple {{Plural|TMC|Floor Switch}} at once by using {{Plural|TMC|Vase|link}} or copies of himself created by the {{Term|TMC|Four Sword|link}}. Other {{Plural|TMC|Floor Switch}} simply light up {{Plural|TMC|Torch|link}} to produce various effects. | {{Plural|TMC|Floor Switch}} appear mostly in {{Plural|TMC|Dungeon|link}} in {{TMC}}, though a handful also appear in the {{Term|TMC|Overworld|link}}. Many puzzles involve {{Term|TMC|Link|link}} pressing down multiple {{Plural|TMC|Floor Switch}} at once by using {{Plural|TMC|Vase|link}} or copies of himself created by the {{Term|TMC|Four Sword|link}}. Other {{Plural|TMC|Floor Switch}} simply light up {{Plural|TMC|Torch|link}} to produce various effects. | ||
Square-shaped {{Plural|TMC|Floor Switch}} activate and remain active when they are pressed. Round-shaped {{Plural|TMC|Floor Switch}} require a constant weight to hold them down in order for their effects to remain. | |||
==={{PH|-}}=== | ==={{PH|-}}=== | ||
| Line 55: | Line 71: | ||
==={{ALBW|-}}=== | ==={{ALBW|-}}=== | ||
In {{ALBW}}, | In {{ALBW}}, {{Plural|ALBW|Floor Switch}} appear as a circular orange button on a metal panel similar to those in {{ALttP|-}}. They are utilized in several locations to trigger effects and progress through the {{Term|ALBW|Dungeon|link}}. {{Plural|ALBW|Gimos|link}} can be used to hold down {{Plural|ALBW|Floor Switch}} in areas where more than one {{Plural|ALBW|Floor Switch|display=Switch}} must be pressed. | ||
Similar to {{Plural|ALBW|Floor Switch}} are {{Plural|ALBW|Pressure Plate|link}}, which hold the same properties of the {{Term|ALBW|Floor Switch}} but are shaped and colored to blend in with the floor they fit into. | |||
==={{TFH|-}}=== | ==={{TFH|-}}=== | ||
In {{TFH}}, Floor | In {{TFH}}, {{Plural|TFH|Floor Switch}} appear as small, circular buttons. Most {{Plural|TFH|Floor Switch}} appear in groups of two or more, and will only activate when the {{Plural|TFH|Links|link}} depress all of the Switches in the group simultaneously. In some cases, an extra {{Term|TFH|Floor Switch}} must be held down by a {{Term|TFH|Totem Armos|link}} or a statue. | ||
{{Plural|TFH|Big Switch|link}} also appear frequently, requiring the weight of all three {{Plural|TFH|Links}} to depress, as indicated by their etchings depicting three sets of footprints. | |||
==={{BotW|-}}=== | ==={{BotW|-}}=== | ||
In {{BotW}}, Floor Switches can be distinguished if they stay pressed once activated or need to be held down. This is indicated by the latches on the border of the Switch. | In {{BotW}}, Floor Switches can be distinguished if they stay pressed once activated or need to be held down. This is indicated by the latches on the border of the Switch. | ||
{{Plural|BotW|Big Switch|link}} also appear in some {{Plural|BotW|Ancient Shrine|link}}. | |||
==={{TotK|-}}=== | |||
{{Stub|TotK}} | |||
==Nomenclature== | |||
{{Nomenclature}} | |||
==Gallery== | ==Gallery== | ||
| Line 70: | Line 96: | ||
File:Rusty Switch PH.png|A rusty {{Term|PH|Floor Switch}} from {{PH|-}} | File:Rusty Switch PH.png|A rusty {{Term|PH|Floor Switch}} from {{PH|-}} | ||
File:Hammer Switch Corridor.png|{{Term|PH|Link}} pounds down rusty {{Plural|PH|Floor Switch}} in {{Term|PH|Mutoh's Temple}} | File:Hammer Switch Corridor.png|{{Term|PH|Link}} pounds down rusty {{Plural|PH|Floor Switch}} in {{Term|PH|Mutoh's Temple}} | ||
File: | File:BotW Floor Switch Model.png|A {{Term|BotW|Floor Switch}} from {{BotW|-}} | ||
File:BotW Latched Floor Switch.png|A {{Term|BotW|Floor Switch}} with latches from {{BotW|-}} | File:BotW Latched Floor Switch.png|A {{Term|BotW|Floor Switch}} with latches from {{BotW|-}} | ||
</gallery> | </gallery> | ||
==See Also== | ==See Also== | ||
* {{Term|Series|Big Switch|link}} | |||
* {{Term|Series|Pressure Plate|link}} | |||
* {{Term|Series|Switch|link}} | * {{Term|Series|Switch|link}} | ||
| Line 82: | Line 109: | ||
{{Categories | {{Categories | ||
|Switches | |Switches | ||
|objects= ALttP, LA, LADX, LANS, OoT, OoT3D, MM, MM3D, TMC, PH, ST, ALBW, TFH, BotW | |objects= ALttP, LA, LADX, LANS, OoT, OoT3D, MM, MM3D, FSA, TMC, PH, ST, ALBW, TFH, BotW, TotK<!-- Uses Series term --> | ||
}} | }} | ||
Latest revision as of 15:37, 31 March 2024
Floor Switches,(Series)[1][2][name references needed] also known as Foot Switches,(FSA)[3] are recurring Objects in The Legend of Zelda series. Floor Switches go unnamed in The Minish Cap and Tears of the Kingdom.
Location and Uses
Floor Switches normally take the form of a large button or plate,[1] which can be activated by being stepped on by Link, or sometimes by placing a heavy object on top. Some Floor Switches are less sensitive than others. Some rusty or malfunctioning Floor Switches may need to be forced with the Megaton Hammer or similar Item.
Larger Floor Switches, which require additional weight or multiple Links to activate, are known as Big Switches.
A Link to the Past
Link's Awakening
Ocarina of Time
There are five types of Floor Switch in Ocarina of Time. Yellow-colored Floor Switches activate when pushed down with any kind of weight. Blue-colored Floor Switches must be held down in order for their effects to remain. Yellow-colored cyst-like Floor Switches appear Inside Jabu-Jabu's Belly. These require a significant amount of weight in order to be pressed, and often require Link to carry Princess Ruto with him to do so. Blue-colored counterparts to these appear, though they do not require additional weight. Instead, they function like other blue-colored Floor Switches and require a constant weight to hold them down. Other than the cyst-like variety, all Floor Switches have the Crest of the Gerudo on them.
Rusty Switches are Floor Switches that have rusted over and can no longer be pressed normally. Instead, these must be smashed with the Megaton Hammer.
Majora's Mask
Deku Link is notably too light to depress some Floor Switches.
Four Swords Adventures
The Minish Cap
Floor Switches appear mostly in Dungeons in The Minish Cap, though a handful also appear in the Overworld. Many puzzles involve Link pressing down multiple Floor Switches at once by using Jars or copies of himself created by the Four Sword. Other Floor Switches simply light up Torches to produce various effects.
Square-shaped Floor Switches activate and remain active when they are pressed. Round-shaped Floor Switches require a constant weight to hold them down in order for their effects to remain.
Phantom Hourglass
Spirit Tracks
A Link Between Worlds
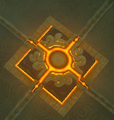
In A Link Between Worlds, Floor Switches appear as a circular orange button on a metal panel similar to those in A Link to the Past. They are utilized in several locations to trigger effects and progress through the Dungeon. Gimos can be used to hold down Floor Switches in areas where more than one Switch must be pressed.
Similar to Floor Switches are Pressure Plates, which hold the same properties of the Floor Switch but are shaped and colored to blend in with the floor they fit into.
Tri Force Heroes
In Tri Force Heroes, Floor Switches appear as small, circular buttons. Most Floor Switches appear in groups of two or more, and will only activate when the Links depress all of the Switches in the group simultaneously. In some cases, an extra Floor Switch must be held down by a Totem Armos or a statue.
Big Switches also appear frequently, requiring the weight of all three Links to depress, as indicated by their etchings depicting three sets of footprints.
Breath of the Wild
In Breath of the Wild, Floor Switches can be distinguished if they stay pressed once activated or need to be held down. This is indicated by the latches on the border of the Switch.
Big Switches also appear in some Ancient Shrines.
Tears of the Kingdom
Nomenclature
| Language | Names | Meanings |
|---|---|---|
Japanese |
| |
| This table was generated using translation pages. To request an addition, please contact a staff member with a reference. | ||
Gallery
-
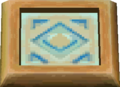
An active Floor Switch from Phantom Hourglass and Spirit Tracks
-
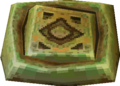
A rusty Floor Switch from Phantom Hourglass
-
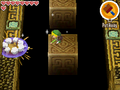
Link pounds down rusty Floor Switches in Mutoh's Temple
-
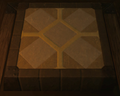
A Floor Switch from Breath of the Wild
-
A Floor Switch with latches from Breath of the Wild


See Also
References
- ↑ 1.0 1.1 The Legend of Zelda: Link's Awakening—Nintendo Player's Guide, Nintendo of America, pg. 16
- ↑ The Legend of Zelda: A Link Between Worlds Prima Official Game Guide, Prima Games, pg. 16
- ↑ Four Swords Adventures manual, pg. 32
- ↑ Nintendo Official Guidebook—The Legend of Zelda: The Minish Cap, Shogakukan, pg. 34
- ↑ "踏みスイッチ" (The Legend of Zelda: Tears of the Kingdom Perfect Guide, Kadokawa Game Linkage Co., Ltd., pg. 419)
- Switches
- Objects
- Objects in A Link to the Past
- Objects in Link's Awakening
- Objects in Link's Awakening DX
- Objects in Link's Awakening (Nintendo Switch)
- Objects in Ocarina of Time
- Objects in Ocarina of Time 3D
- Objects in Majora's Mask
- Objects in Majora's Mask 3D
- Objects in Four Swords Adventures
- Objects in The Minish Cap
- Objects in Phantom Hourglass
- Objects in Spirit Tracks
- Objects in A Link Between Worlds
- Objects in Tri Force Heroes
- Objects in Breath of the Wild
- Objects in Tears of the Kingdom