Armos Knight: Difference between revisions
m (Reverted edits by ShadowBroker44 (Talk) to last revision by TheStoneWatcher) |
mNo edit summary |
||
| (147 intermediate revisions by 38 users not shown) | |||
| Line 1: | Line 1: | ||
{{ | {{Split|Armos Knight (Boss)}} | ||
| | {{Infobox Boss | ||
| | |image= | ||
| | {{Media | ||
| | |Artwork TWW= File:TWW Armos Knight Artwork.png | ||
| | |Model LANS= File:LANS Armos Knight Model.png | ||
| | |Model TWW= File:TWW Armos Knight Figurine Model.png | ||
|Model TWWHD= File:TWWHD Armos Knight Model.png | |||
|Sprite ALttP= File:ALttP Armos Knights Sprite.png | |||
|Sprite LA= File:LA Armos Knight Sprite.png | |||
|Sprite LADX= File:LADX Armos Knight Sprite.png | |||
|Sprite FSA= File:FSA Armos Knight Sprite.png | |||
}} | }} | ||
|caption= | |||
|title= | |||
|game= ALttP, LA, TWW, FSA | |||
|other= ALttP (Himekawa), ALttP (Cagiva) | |||
|dungeon= | |||
{{Infobox Game Blocks | |||
|ALttP= [[Eastern Palace]] | |||
|LA= [[Southern Face Shrine]] | |||
}} | |||
|weakness= | |||
{{Infobox Game Blocks | |||
|Series= [[Bow]] and [[Arrow]]s | |||
|ALttP= [[Sword]] | |||
|LA= [[Sword]], [[Roc's Feather]] | |||
|TWW= [[Bomb]] | |||
}} | |||
|reward= | |||
{{Infobox Game Blocks | |||
|ALttP= [[Pendant of Courage]] | |||
|LA= [[Face Key]] | |||
}} | |||
|attack= | |||
{{Infobox Game Blocks | |||
|TWW= Contact {{Small|(1/2 Heart)}}, Explode {{Small|(1/4 Heart)}} | |||
}} | |||
}} | |||
{{Term/Store|Armos Knight|Armos Knights|Series, ALttP, LA, LADX, TWW, TWWHD|plural}} are recurring [[Boss]]es, [[Mini-Boss]]es, and {{Plural|Series|Enemy|link}} in {{TLoZ|Series}}.<ref>{{Cite Book|quote= |book= E |publisher= |page= 163 {{Exp Game|ALttP, LA, TWW}}}}</ref><ref>{{Cite Book|quote= Well done! You beat the Armos Knight with a combination of heroic courage and wisdom. |character= {{Term|ALttP (Himekawa)|Sahasrahla|link}} |book= ALttP (Himekawa) |publisher= |page= }}</ref>{{Name Ref|FSA, AST, ALttP (Cagiva)}} They are bigger and stronger versions of standard [[Armos]]. | |||
==Characteristics== | |||
==={{ALttP|-}}=== | |||
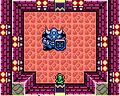
A group of six Armos Knights are the first Dungeon Master Link faces, the boss of the [[Eastern Palace]] in {{ALttP}}. They guard the [[Pendants of Virtue#Pendant of Courage|Pendant of Courage]] within this first dungeon. While they can be defeated with Link's [[Fighter's Sword]], this takes a very large number of hits per knight. The best way to defeat them is to use the [[Bow]] found in the dungeon, as they will fall from three Arrows each. They fight by jumping around in a circular formation, before lining up at the top of the screen and charging at Link all at once, attempting to crush him. Once their numbers are diminished, the last one will turn red and attempt to crush [[Link]] with hard stomps around the room. As with the others, three Arrows will finish him off, although as he will attack close up it may be easier to use the sword. After emerging victorious, Link is rewarded with the Pendant of Courage and a [[Heart Container]]. | |||
Later in the game, they show up once more in {{Term|ALttP|Ganon's Tower|link}}, where they guard the [[Big Key]]. They must be defeated one more time to advance to the top of the tower, where [[Agahnim]] awaits. They are defeated in the same manner as before, but [[Silver Arrow]]s and the [[Master Sword]] allow for a much quicker fight. The battle does, however, take place on a slick ice floor, making attacking a little more troublesome. | |||
==={{LA|-}}=== | |||
In {{LA}}, one Armos Knight is found in the [[Southern Face Shrine]]. It guards the [[Face Key]], which opens the sixth dungeon, {{Term|LANS|Face Shrine|link}}. Link can defeat the knight by shooting Arrows at it with his Bow, or alternately by dashing into it with the [[Sword]] and [[Pegasus Boots]] equipped. This eventually destroys his armor leaving him vulnerable to either more Arrows or Sword strikes. Unlike the Knights in {{ALttP|-}}, this Knight is able to stun Link by slamming the ground with great force. It is important to use the [[Roc's Feather]] when the Knight goes to stomp the ground, as it allows Link to avoid being stunned. Defeating him also allows Link to enter the final room of the Southern Face Shrine, where a mysterious secret of [[Koholint Island|the island]] is hidden. | |||
{{clear}} | |||
==={{TWW|-}}=== | |||
{{Figurines|TWW}} | |||
{{Tingle | |||
|quote1= That's an '''Armos Knight'''! Eeeek! Stop it by shooting an arrow in its single eye! Then put a bomb in its mouth! | |||
}} | |||
This variation of the Armos Knight appears mainly in the [[Tower of the Gods]] and the [[Wind Temple]] as common enemies with similar appearances and weaknesses to Armos found in {{OoT}}. These variations will hop towards Link much like their more standard brethren, but occasionally will stop suddenly to unleash spikes from their sides, when they will open their mouths. If Link throws a [[Bomb]] (or [[Bomb Flower]]) into its open mouth, the monster will be defeated, and hop wildly in a straight line towards where Link stood before exploding like regular Armos. If Link does not throw a bomb in, the monster will close its mouth and continue chasing after him. By shooting it in its eye, its possible to make it open its mouth immediately. With its single eye, this variation of the Armos Knight has a lot in common with [[Eyegore Statue]]s. | |||
==={{FSA|-}}=== | |||
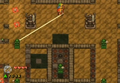
This variation of the Armos Knight appears in the {{Term|FSA|Desert Temple|link}}, the second stage in the [[Desert of Doubt]] in {{FSA}}. A large statue appears at the start of the dungeon who must be moved to gain entrance, and once Link "awakens" the temple, some of them will be revealed from behind barriers and become active. These Armos Knights will come to life when Link gets near, like regular [[Armos]], but they will only stomp after Link when the Links turn their backs on them. They are invincible, unaffected by Swords or Arrows. As with most Armos statues in the game, many other statues in the dungeon will not come to life, but later in the dungeon, six Armos Knights will appear already active in a large room. They stomp around in synchronized jumps a large circle around the room, very similar to the boss from {{ALttP|-}}, although they will not actively attack the four Links. The room itself also has [[Beamos]] throughout, and acts as a deadly puzzle. Once the four Links light all the torches in the room using Arrows, the Armos Knights will be destroyed. | |||
Two big [[Armos]] will appear in [[Hyrule Castle]] earlier in the game, but these are simply very large normal Armos and can be defeated easily with a Sword. | |||
==Other Appearances== | |||
==={{ALttP|-}} (Himekawa)=== | |||
{{Noncanon|Start}} | |||
{{Stub|ALttP (Himekawa)}} | |||
{{Noncanon|End}} | |||
== | ==={{ALttP|-}} (Cagiva)=== | ||
{{Noncanon|Start}} | |||
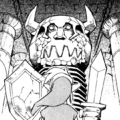
The | The Armos Knights appear in the {{ALttP|Cagiva}}, being the first opponent properly faced by Link since his failed fight with [[Agahnim]]. He manages to defeat 4 of them, however the other two manage to overpower him. Before they could finish the job however, they are defeated by the timely intervention of [[Rasuka]], Link's martial artist friend. | ||
{{Noncanon|End}} | |||
==Trivia== | |||
*The Armos Knights in {{ALttP|-}} represent the first instance of the item found in the dungeon being used to defeat the boss, although unlike later games it is not necessary. | |||
*The Armos Knights in {{TWW|-}} have a nose and moustache oddly similar to [[smw:Wario|Wario]]'s from the [[smw:Mario (franchise)|''Mario'' series]]. | |||
==Nomenclature== | |||
{{Nomenclature}} | |||
===Other Names=== | |||
{{Other Names | |||
|- | |||
| Armor Knight<ref>{{Cite Guide|quote= |game= ALttP&FS|publisher= Nintendo|page= 25}}</ref> | |||
| {{ALttP}} | |||
| {{Guide|ALttP&FS|Nintendo}} | |||
| {{E}} | |||
|- | |||
| Giant Armos Knight<ref>{{Cite Guide|quote= |game= LA |publisher= Nintendo|page= 64}}</ref> | |||
| {{LA}} | |||
| {{Guide|LA|Nintendo}} | |||
| {{E}} | |||
}} | |||
==Gallery== | ==Gallery== | ||
<gallery> | <gallery> | ||
File: | File:ALttP Armos Knight Sprite.png|A single Armos Knight from {{ALttP|-}} | ||
File:ALttP Armos Knight Sprite 2.png|The final Red Armos Knight from {{ALttP|-}} | |||
File:LAarmosknight.jpg|Armos Knight from {{LADX|-}} | |||
File:LADX Armos Knight Damaged Sprite.png|A damaged Armos Knight from {{LADX|-}} | |||
File:FSA Desert Temple 2.png|The watchman statue from {{FSA|-}} | |||
File:FSA Desert Temple 4.png|Two inactive Armos Knight statues from {{FSA|-}} | |||
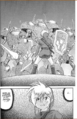
File:ArmosKnightManga.png|Link facing the Armos Knight in the {{ALttP|Himekawa}} | |||
File:LTTP Cagiva Armos Knights.png|Link facing the Armos Knights in the {{ALttP|Cagiva}} | |||
</gallery> | </gallery> | ||
==See Also== | |||
* {{Term|Series|Armos Warrior|link}} | |||
* {{Term|Series|Death Armos|linK}} | |||
* {{Plural|Series|Bass Guitarmos Knights|link}} | |||
{{Ref}} | |||
{{Bosses|ALttP}} | |||
{{Categories | |||
|Armos, Guardians, Knights, Statue Enemies | |||
|bosses= ALttP, LA, LADX, LANS, AST, ALttP (Himekawa) | |||
|enemies= TWW, TWWHD, FSA | |||
}} | |||
Latest revision as of 11:34, 26 April 2024
Armos Knights are recurring Bosses, Mini-Bosses, and Enemies in The Legend of Zelda series.[1][2][name references needed] They are bigger and stronger versions of standard Armos.
Characteristics
A Link to the Past
A group of six Armos Knights are the first Dungeon Master Link faces, the boss of the Eastern Palace in A Link to the Past. They guard the Pendant of Courage within this first dungeon. While they can be defeated with Link's Fighter's Sword, this takes a very large number of hits per knight. The best way to defeat them is to use the Bow found in the dungeon, as they will fall from three Arrows each. They fight by jumping around in a circular formation, before lining up at the top of the screen and charging at Link all at once, attempting to crush him. Once their numbers are diminished, the last one will turn red and attempt to crush Link with hard stomps around the room. As with the others, three Arrows will finish him off, although as he will attack close up it may be easier to use the sword. After emerging victorious, Link is rewarded with the Pendant of Courage and a Heart Container.
Later in the game, they show up once more in Ganon's Tower, where they guard the Big Key. They must be defeated one more time to advance to the top of the tower, where Agahnim awaits. They are defeated in the same manner as before, but Silver Arrows and the Master Sword allow for a much quicker fight. The battle does, however, take place on a slick ice floor, making attacking a little more troublesome.
Link's Awakening
In Link's Awakening, one Armos Knight is found in the Southern Face Shrine. It guards the Face Key, which opens the sixth dungeon, Face Shrine. Link can defeat the knight by shooting Arrows at it with his Bow, or alternately by dashing into it with the Sword and Pegasus Boots equipped. This eventually destroys his armor leaving him vulnerable to either more Arrows or Sword strikes. Unlike the Knights in A Link to the Past, this Knight is able to stun Link by slamming the ground with great force. It is important to use the Roc's Feather when the Knight goes to stomp the ground, as it allows Link to avoid being stunned. Defeating him also allows Link to enter the final room of the Southern Face Shrine, where a mysterious secret of the island is hidden.
The Wind Waker
| Figurine | |
|---|---|
| Description | Habitat: Tower of the Gods |

| Figurine | Description |
|---|---|
Habitat: Tower of the Gods |
This variation of the Armos Knight appears mainly in the Tower of the Gods and the Wind Temple as common enemies with similar appearances and weaknesses to Armos found in Ocarina of Time. These variations will hop towards Link much like their more standard brethren, but occasionally will stop suddenly to unleash spikes from their sides, when they will open their mouths. If Link throws a Bomb (or Bomb Flower) into its open mouth, the monster will be defeated, and hop wildly in a straight line towards where Link stood before exploding like regular Armos. If Link does not throw a bomb in, the monster will close its mouth and continue chasing after him. By shooting it in its eye, its possible to make it open its mouth immediately. With its single eye, this variation of the Armos Knight has a lot in common with Eyegore Statues.
Four Swords Adventures
This variation of the Armos Knight appears in the Desert Temple, the second stage in the Desert of Doubt in Four Swords Adventures. A large statue appears at the start of the dungeon who must be moved to gain entrance, and once Link "awakens" the temple, some of them will be revealed from behind barriers and become active. These Armos Knights will come to life when Link gets near, like regular Armos, but they will only stomp after Link when the Links turn their backs on them. They are invincible, unaffected by Swords or Arrows. As with most Armos statues in the game, many other statues in the dungeon will not come to life, but later in the dungeon, six Armos Knights will appear already active in a large room. They stomp around in synchronized jumps a large circle around the room, very similar to the boss from A Link to the Past, although they will not actively attack the four Links. The room itself also has Beamos throughout, and acts as a deadly puzzle. Once the four Links light all the torches in the room using Arrows, the Armos Knights will be destroyed.
Two big Armos will appear in Hyrule Castle earlier in the game, but these are simply very large normal Armos and can be defeated easily with a Sword.
Other Appearances
A Link to the Past (Himekawa)
A Link to the Past (Cagiva)
The Armos Knights appear in the A Link to the Past manga by Ataru Cagiva, being the first opponent properly faced by Link since his failed fight with Agahnim. He manages to defeat 4 of them, however the other two manage to overpower him. Before they could finish the job however, they are defeated by the timely intervention of Rasuka, Link's martial artist friend.
Trivia
- The Armos Knights in A Link to the Past represent the first instance of the item found in the dungeon being used to defeat the boss, although unlike later games it is not necessary.
- The Armos Knights in The Wind Waker have a nose and moustache oddly similar to Wario's from the Mario series.
Nomenclature
| Language | Names | Meanings |
|---|---|---|
Japanese | デグアモス (Degu Amosu) (ALttP | LA | TWW)[5][6][7] | Big Amosu |
FrenchEU | Grand Armos (TWW)[9] | Big Armos |
German | Armos-Ritter (TWW)[8] | |
Italian | Grand'Armos (ALttP | LA | LADX | TWW | FSA)[3][4] | Great Armos |
SpanishEU | Armos max (TWW)[10] | |
| This table was generated using translation pages. To request an addition, please contact a staff member with a reference. | ||
Other Names
| Name | Armor Knight[11] |
|---|---|
| Applies to | |
| Source | |
| Superseded by | |
| Name | Giant Armos Knight[12] |
| Applies to | |
| Source | |
| Superseded by |
Gallery
-

A single Armos Knight from A Link to the Past
-

The final Red Armos Knight from A Link to the Past
-
Armos Knight from Link's Awakening DX
-

A damaged Armos Knight from Link's Awakening DX
-
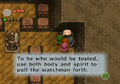
The watchman statue from Four Swords Adventures
-
Two inactive Armos Knight statues from Four Swords Adventures
-
Link facing the Armos Knight in the A Link to the Past manga by Akira Himekawa
-
Link facing the Armos Knights in the A Link to the Past manga by Ataru Cagiva


See Also
References
- ↑ Encyclopedia, Dark Horse Books, pg. 163 (ALttP | LA | TWW)
- ↑ "Well done! You beat the Armos Knight with a combination of heroic courage and wisdom." — Sahasrahla (A Link to the Past manga, VIZ Media, [which page?])
- ↑ Enciclopedia di Hyrule, Magazzini Salani, pg. 163
- ↑ "Grand'Armos
Habitat: Torre degli Spiriti.
Vulnerabile: alle Bombe." — Nintendo Gallery (The Wind Waker) - ↑ Nintendo Official Guidebook: The Legend of Zelda: A Link to the Past Vol. 1, Shogakukan, pg. 132
- ↑ The Legend of Zelda: Link's Awakening Certain Victory Strategy Guide (1993), Futabasha, pg. 29
- ↑ "デグアモス
生息場所 神の塔
有効武器 バクダン" — Nintendo Gallery (The Wind Waker) - ↑ "Armos-Ritter
Heimat: Der Turm der Götter
Wirksame Waffe: Bomben" — Nintendo Gallery (The Wind Waker) - ↑ "Grand Armos
Lieu de résidence: Tour des Dieux.
Arme efficace: Bombe." — Nintendo Gallery (The Wind Waker) - ↑ "Armos max
Hábitat: Torre de los Dioses
Arma efectiva: Bomba" — Nintendo Gallery (The Wind Waker) - ↑ The Legend of Zelda: A Link to the Past & Four Swords—The Official Nintendo Player's Guide, Nintendo of America, pg. 25
- ↑ The Legend of Zelda: Link's Awakening—Nintendo Player's Guide, Nintendo of America, pg. 64
Mazura • Jermafenser • Rebonack • Carock • Gooma • Barba • Thunderbird • Link's Shadow
Ball and Chain Trooper • Armos Knights • Lanmolas • Moldorm • Agahnim
Helmasaur King • Arrghus • Mothula • Blind the Thief • Kholdstare • Vitreous • Trinexx • Ganon
Moldorm • Genie • Slime Eye • Angler Fish • Slime Eel • Facade • Evil Eagle • Hot Head • Shadow Nightmares
Spike Roller • Moblin Chief • Hinox • Dodongo Snakes • Lanmola • Hydrosoar
Master Stalfos • Gohma • Armos Knight • Rover • Grim Creeper • Turtle Rock • Blaino
Gohma • King Dodongo • Barinade • Phantom Ganon • Volvagia • Morpha • Bongo Bongo • Twinrova • Ganon
Lizalfos • Big Octo • Stalfos • Meg • Flare Dancer • White Wolfos • Dark Link • Dead Hand • Gerudo Thief • Iron Knuckle
Odolwa • Goht • Gyorg • Twinmold • Majora's Mask
Dinolfos • Gekko • Wizzrobe • Gerudo Pirate • Wart • Gekko and Mad Jelly
Captain Keeta • Iron Knuckle • Sharp • Igos du Ikana • Garo Master • Gomess • Eyegore
Aquamentus • Dodongo • Mothula • Gohma • Digdogger • Manhandla • Gleeok • Medusa Head • General Onox
Twinrova • Ganon
Brother Goriyas • Facade • Omuai • Agunima • Great Moblin • Syger • Vire • Poe Sisters • Frypolar
Pumpkin Head • Head Thwomp • Shadow Hag • Eyesoar • Smog • Octogon • Possessed Nayru • Plasmarine • Ramrock • Veran
Twinrova • Ganon
Giant Ghini • Swoop • Subterror • Armos Warrior • Great Moblin • Smasher • Vire • Angler Fish • Blue Stalfos
Gohma • Kalle Demos • Gohdan • Helmaroc King • Jalhalla • Molgera • Puppet Ganon • Ganondorf
Mothula • Darknut • Phantom Ganon • Stalfos • Wizzrobe • Mighty Darknut • Big Octo![]()
Phantom Ganon • Stone Arrghus • Helmaroc King • Big Poe • Big Moldorm • Frostare • Vaati • Ganon
Chief Soldier • Shadow Link • Manhandla • Dodongos • Big Dark Stalfos • Gohma • Big Dodongo
Big Green Chuchu • Gleerok • Mazaal • Big Octorok • Gyorg Pair • Vaati
Madderpillar • Dark Nut • Big Blue Chuchu • Red Dark Nut • Black Knight
Diababa • Fyrus • Morpheel • Stallord • Blizzeta • Armogohma • Argorok • Zant • Puppet Zelda • Ganon
Ook • King Bulblin • Dangoro • Twilit Carrier Kargarok • Twilit Bloat
Deku Toad • Death Sword • Darkhammer • Darknut • Aeralfos • Phantom Zant
Stagnox • Fraaz • Phytops • Cragma • Byrne • Skeldritch • Demon Train • Chancellor Cole • Malladus
Mothula • Snapper • Heatoise • Big Blin • Rocktite • Geozard Chief • Dark Link![]()
Ghirahim • Scaldera • Moldarach • The Imprisoned • Koloktos • Tentalus • Levias • Bilocyte • Demise
Stalfos • Lizalfos • Stalmaster • Moldarach • LD-002G Scervo • Dark Lizalfos • Magmanos • Moldorm • LD-003D Dreadfuse
Yuga • Moldorm • Margomill • Gemesaur King • Arrghus • Knucklemaster • Stalblind • Zaganaga • Dharkstare • Grinexx • Yuga Ganon
Armos • Red Stalfos • Heedles • Green & Red Goriyas • Gigabari • Gibdos & Purple Mini-Moldorms • Red Eyegores • Flying Tiles & Devalants • Big Pengator & Pengators • Fire Gimos • Moldorm • Lorule Ball and Chain Soldier • Arrghus
Margoma • Arrghus • Moldorm • Blizzagia • The Lady's Pets • Stalchampion • Prismantus • The Lady • Shadow Links
Electric Blob King • Electric Blob Queen • Hinox Brothers • Freezlord • Vulture Vizier • Grim Repoe • Gigaleon
Windblight Ganon • Fireblight Ganon • Thunderblight Ganon • Waterblight Ganon • Monk Maz Koshia(TCB) • Calamity Ganon • Dark Beast Ganon
Stone Talus • Stone Talus (Luminous) • Stone Talus (Rare) • Igneo Talus • Frost Talus • Igneo Talus Titan(TCB) • Molduga • Molduking(TCB) • Hinox • Blue Hinox • Black Hinox • Master Kohga
Bosses in Tears of the Kingdom
Colgera • Yunobo • Moragia • Marbled Gohma • Sludge Like • Mucktorok • Queen Gibdo • Seized Construct • Phantom Ganon • Demon King's Army • Demon King Ganondorf • Demon Dragon
- Armos
- Guardians
- Knights
- Statue Enemies
- Bosses
- Enemies
- Bosses in A Link to the Past
- Bosses in Link's Awakening
- Bosses in Link's Awakening DX
- Bosses in Link's Awakening (Nintendo Switch)
- Enemies in The Wind Waker
- Enemies in The Wind Waker HD
- Enemies in Four Swords Adventures
- Bosses in Ancient Stone Tablets
- Bosses in A Link to the Past (Himekawa)