Sacred Grove
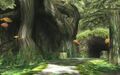
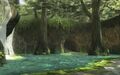
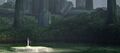
Template:Place The Sacred Grove is a recurring location in the Template:Series, first introduced in Twilight Princess. A massive forest situated deep within the Faron Province and adjacent to the Forest Temple, the grove can only be accessed by those who prove their connection to the Royal Family. It is made up of two sections: a maze-like forest where the Skull Kid dwells and the inner portion of the grove, which serves as the home to both the Master Sword and the Pedestal of Time. The latter section of the Sacred Grove was also the location of the Temple of Time before it fell into ruins, although it can still be accessed by passing through the Door of Time found nearby that will take Link to the past when the temple stood tall.
Appearances and Features
Twilight Princess
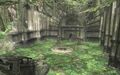
The Sacred Grove is first visited in Twilight Princess after Princess Zelda tells Link as a wolf that the only way his curse will break is by finding the Master Sword.[1] Upon entering the grove, Wolf Link must howl "Zelda's Lullaby" at the Howling Stone to make the Skull Kid appear, who will open a new path further into the forest. From this point on, Link must chase the Skull Kid as he traverses through the forest, although at the same time the young hero will have to avoid the Puppets that will continuously appear as Link tries to find the Skull Kid. After finding the mischievous character three times, he will retreat into a new area of the Sacred Grove, which is surrounded by ruins. Striking the Skull Kid three more times, he will vanish and open up the passage to the section that once was where the Temple of Time stood.
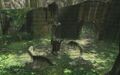
Before entering the final forest area where the Master Sword is hidden, one last puzzle awaits. Here, Wolf Link must howl "Zelda's Lullaby" once again to active two guardian statues. These statues will ask that Link solve their puzzle in order to enter the "true" Sacred Grove, which is where the Master Sword sleeps.[2] The two guards that oversee the entrance to the Master Sword area have dislocated themselves and expect Wolf Link to place them in their respective positions again. The puzzle has the following rules: when Wolf Link moves one step from one tile to another, so do the statues, albeit in different directions. Link has to move in a way that both statues return to their respective tiles at the same time. The statues can't stand on the same tile, so they bounce against each other if this is about to happen.
There are 60 unique ways to solve the puzzle. Due to its vertical symmetry, half of these combinations simply swap left and right.
After the young hero completes the puzzle, the guards will yield passage to the location of the Master Sword. When Wolf Link approaches the sword, Zant's curse will break, allowing Link to return to his Hylian form and proceed to retrieve the Master Sword from its pedestal.[3]
Later on in the game, as Link is searching for the missing Mirror Shards, the young hero must return to the Sacred Grove and once again play hide-and-seek with the Skull Kid. Besting the Skull Kid at his own game will make him and his Puppets vanish from the forest for the rest of the game. Once Link returns to the Pedestal of Time, he will briefly thrust the Master Sword in the pedestal, removing a guardian statue that was blocking the supposed Door of Time. Entering through this door will allow Link to travel back in time before the Temple of Time fell into ruin.
During the ending credits, "The Group" can be seen exploring an area of the Sacred Grove.
Link's Crossbow Training
The Sacred Grove appears as a Defender Mode scenario in Stage Finale of Link's Crossbow Training. Link again stands fixed in place and must eliminate enemies from all around him. Skull Kid appears and conjures his puppet army. Skull Kid himself will flash green to offer the automatic firing upgrade which is useful for taking down the large number of Puppets that appear. As with Twilight Princess, Skull Kid will warp to various niches in the surrounding landscape to protect himself.
Trivia

- The statue guards bear a resemblance to another statue found in a screenshot of Twilight Princess while in its early development.
- The fact that the Master Sword's pedestal lies deep in a secluded grove in a forest serves as a reference to its location in A Link to the Past, as well as a link between the locations of the sword in that game and Ocarina of Time.
- Upon hacking, a second version of the song from Sacred Grove was found. This version resembles the Lost Woods from A Link to the Past, rather than Ocarina of Time. The reason why the song was not included is unknown.
- The forest in the area of the Pedestal of Time resembles the Lost Woods from the introduction of Majora's Mask. It can be accessed via a hack. See here for more details.
- The Sacred Grove's ruins bear a comparable resemblance to the ruined Forest Temple entrance in the Sacred Forest Meadow.
Gallery
-
The Sacred Grove in Twilight Princess
-
The Sacred Grove in Twilight Princess
-
The Sacred Grove in Twilight Princess
-
The inner portion of the Sacred Grove in Twilight Princess
-
The Master Sword resting in the Pedestal of Time as seen during the Twilight Princess's ending


References
- ↑ "Head for the sacred grove that lies deep within the lands guarded by the spirit Faron. There you will find the blade of evil's bane that was crafted by the wisdom of the ancient sages...the Master Sword." — Princess Zelda (Twilight Princess)
- ↑ "We are guardians of this land... Guide us to where we once stood. Only then can you enter the true Sacred Grove..." — Guardian Statue (Twilight Princess)
- ↑ "The sword accepted you as its master..." — Midna (Twilight Princess)
| Language | Name | |
|---|---|---|