The Imprisoned: Difference between revisions
(Replacing links with link templates or fixing error in previous edits w/ AWB) |
m (→Gallery) |
||
| (100 intermediate revisions by 27 users not shown) | |||
| Line 1: | Line 1: | ||
{{Boss | {{Infobox Boss | ||
| | |image= | ||
| | {{Media | ||
| | |Render SS= File:SS The Imprisoned Render.png | ||
| | |Model SS= File:SS The Imprisoned Model.png | ||
| | |Model SSHD= File:SSHD The Imprisoned Model.png | ||
|Sprite SS= File:SS The Imprisoned Icon.png | |||
|Sprite SSHD= File:SSHD The Imprisoned Icon.png | |||
}} | }} | ||
|caption= | |||
|title= | |||
|race= [[Demon]] | |||
|gender= | |||
|game= SS | |||
|other= HW, SSBfWU, SSBU | |||
|era= {{Term|SSHD|Sky Era|link}} | |||
|dungeon= {{Term|SSHD|Sealed Grounds|link}} | |||
|weakness= {{List|{{Term|SSHD|Goddess Sword|link}}, {{Plural|SSHD|Bomb|link}}}} | |||
|reward= | |||
|theme= | |||
|strategy= | |||
|voiceactor= | |||
}} | |||
{{Term/Store|The Imprisoned|The Imprisoneds|Series, SS, SSHD, HW, HWL, HWDE, SSBfWU, SSBU}} is a recurring [[Boss]] and character in {{TLoZ|Series}}.<ref>{{Cite Book|quote= |book= E |publisher= |page= 186 {{Exp Game|SS}}}}</ref>{{Name Ref|HWDE, SSBfWU, SSBU}} It is [[Demise]] rendered in beast form due to the seal placed upon him by the goddess [[Hylia]].<ref>{{Cite|Stripped of his true physical form by the seal that binds him, he takes the shape of an abomination. But even in his hideous state, he's more than capable of devouring this land if we allow him to do what he desires.|Zelda|SS}}</ref> | |||
==Characteristics== | |||
==={{SS|-}}=== | |||
{{Fi | |||
|context1= First battle | |||
|quote1= <p>Target lock: {{Color|SS Blue|The Imprisoned}}</p><p>I have insufficient data on this monster.</p><p>Its enormous size and ominous aura cannot be compared with previously encountered monsters.</p> | |||
|quote2= <p>I can confirm that the {{Color|SS Red|sealing spike}} observed at the top of its head is the same object originally found in the {{Color|SS Blue|Sealed Grounds}}.</p><p>I hypothesize that damage can be inflicted by driving the stone pillar into the monster's head.</p><p>But first, I recommend attacking the beast's feet--where your sword can reach--to stop it from moving.</p> | |||
|quote3= <p>It is probable that the monster will be unable to move if you destroy all of its toes.</p><p>I recommend using the air vents to move ahead of the monster instead of chasing it from behind.</p> | |||
|quote4= <p>If you are able to get between the monster's toes, my analysis indicates you can effectively inflict great damage with a {{Color|SS Green|spin attack}}.</p><p>You can also choose to decrease your risk of physical harm by using {{Color|SS Gold|bombs}} to attack from a distance.</p> | |||
|context5= Second battle | |||
|quote5= <p>Target lock: {{Color|SS Blue|The Imprisoned}}</p><p>There is insufficient data on this target to make a full report at this time.</p><p>But I can confirm the appearance of limb-like appendages that were not previously present. The evil power of this creature has also increased.</p> | |||
|quote6= <p>Analysis indicates that you should be able to use the same basic strategy as in the previous encounter to seal the monster in its prison once more.</p><p>The fingers and toes on its limbs can be destroyed with a physical attack, but you should wait to do so until these targets become a very high priority.</p> | |||
|quote7= <p>I calculate a 100% probability that the large apparatus Groose constructed will be effective against this monster.</p><p>It is likely that a direct hit from this apparatus will stop the monster's movement, creating a window of opportunity for you to attack.</p> | |||
|quote8= <p>{{Color|SS Blue|Groose}}'s defense apparatus can be repositioned by pushing {{Icon|SS Control Left}}{{Icon|SS Control Right}}.</p><p>When the monster is in your blind spot, I recommend you reposition the apparatus and target the monster.</p> | |||
<!-- Is the control stick icon correct? Should it be animated? -->[[Category:Skyward Sword articles needing attention]] | |||
|context9= Third battle | |||
{{ | |quote9= <p>Target lock: {{Color|SS Blue|The Imprisoned}}</p><p>Though the details are still unclear, this monstrosity is the demonic vessel of {{Color|SS Blue|Demise}}.</p><p>I can confirm a previously unseen taillike appendage.</p><p>I recommend generous use of {{Color|SS Blue|Groose}}'s catapult.</p> | ||
You must attempt to seal this beast away again. I suggest a plan of attack similar to what you used in previous encounters. The monster's fingers, like its toes, are comparatively soft targets and can be destroyed by physical attack. | |quote10= <p>You must attempt to seal this beast away again. I suggest a plan of attack similar to what you used in previous encounters.</p><p>The monster's fingers, like its toes, are comparatively soft targets and can be destroyed by physical attack.</p> | ||
After toppling the monster, it is possible that the beast's enormous bulk may prevent you from approaching the | |quote11= <p>After toppling the monster, it is possible that the beast's enormous bulk may prevent you from approaching the {{Color|SS Red|sealing spike}}.</p><p>In this scenario, I recommend that you descend a level and use an air vent to travel to the head of the monster.</p> | ||
The monster has evolved to an immensely powerful state. I calculate the odds you will defeat it by sword alone at approximately 0%. I recommend you utilize Groose's defense apparatus. As a last-ditch measure, you can launch | |quote12= <p>The monster has evolved to an immensely powerful state. I calculate the odds you will defeat it by sword alone at approximately 0%.</p><p>I recommend you utilize Groose's defense apparatus. As a last-ditch measure, you can launch {{Color|SS Red|yourself}}, Master, as a projectile. | ||
}} | }} | ||
The Imprisoned is a massive beast with three rows of teeth and large black scales across its body that have red detailing. It has black flame-like spines across its back, and four large white appendages on each of its feet that resemble toes. | |||
The Imprisoned is a massive beast with three rows of teeth | |||
In the present era, [[Princess Zelda|Zelda]] uses the [[Gate of Time]] in order to return to the time where Demise was recently sealed. Entering an age-long sleep to sustain her mortal body, she managed to keep the seal intact until, thousands of years later, The Imprisoned grows strong enough to overcome it. He is driven back three times, initially by Link alone and later with [[Groose]]'s help. In each instance, Link must topple The Imprisoned over and drive the sealing spike back into its forehead, and finally deliver a [[Skyward Strike]] to the spike to reset the seal. | |||
Eventually, Link manages to acquire the complete [[Triforce]], and wishes for the eradication of Demise. With Demise gone, Zelda awakes, since the seal she was sustaining was no longer necessary. At this point however, [[Ghirahim]] intervenes, capturing Zelda and bringing her to the past, where his master could still be revived. Despite his subsequent defeat by Link's hands, the ritual Ghirahim had begun to perform is completed, restoring Demise to his previous form. | |||
The first time the beast escapes its seal, it only has two legs. The second time it gains arms, which also have white appendages, and tries to climb up to the [[Sealed Temple]]. During the third battle, it has a tail and can fly by releasing a large, floating black halo from its back which carries it through the air. | |||
In all three battles, the general strategy for The Imprisoned is to destroy all eight of the appendages on its feet, causing it to fall down, then drive the [[Sealing Spike]] into its head. Link can also get a level above The Imprisoned then jump on its head and attack the Sealing Spike. However, The Imprisoned will throw Link off its head if he is too slow, forcing the hero to try once more. Despite this, the spike will retain its current depth. Driving the Sealing Spike into The Imprisoned's head three times will cause the beast to explode and be absorbed into the spike which will plummet back down to the original location. Link must then use a Skyward Strike onto the seal and follow a pattern to complete the seal. | |||
In all three battles, the general strategy for The Imprisoned is to destroy all eight of the appendages on its feet, causing it to fall down, then drive the [[Sealing Spike]] into its head. Link can also get a level above The Imprisoned then jump on its head and attack the Sealing Spike. However, The Imprisoned will throw Link off its head if he is too slow, forcing the | |||
During the second and third battle, Link will be accompanied by | During the second and third battle, Link will be accompanied by Groose who has built a machine, the [[Groosenator]]. Link can use the Groosenator to prevent The Imprisoned from climbing up the slopes of the pit, and also to stun him if The Imprisoned gets too far ahead or unapproachable. In the third battle, when The Imprisoned takes flight, a hit from the Groosenator will knock him back down to earth. However, the earthquake blocks Groose's stash of [[Bomb]]s, so Groose must fling Link onto The Imprisoned's head. | ||
If The Imprisoned manages to reach the | If The Imprisoned manages to reach the Sealed Temple, Link receives a [[Game Over]].<ref>{{Cite|It's too late! All... All is lost.|Impa|SS}}</ref> | ||
== | ==Other Appearances== | ||
{{Noncanon|Start}} | |||
==={{HW|-}}=== | |||
[[File:HWDE The Imprisoned Mini Map Icon.png|left]] | |||
{{Image | |||
|image= HW The Imprisoned Render.png | |||
|size= 140px | |||
|align= right | |||
|caption= The Imprisoned from {{HW|-}} | |||
|captionalign= center | |||
}} | |||
The Imprisoned appears as a giant boss in several [[Legend Mode]] Stages and [[Adventure Mode]] Battles in {{HW}}. In Legend Mode, it appears as a boss in the Scenarios "[[Sealed Ambition]]" and "[[The Demon Lord]]". | |||
The Imprisoned appears identical to how it appeared in {{SS|-}}, and is fought the same way. The Imprisoned will stomp around the battlefield, and occasionally sends red shock waves pulsating from its feet or as a brief force field that attempts to strike down opponents. Its eight toes must be attacked and destroyed, which will knock The Imprisoned down and expose its Weak Point Gauge. Unlike its previous incarnation from {{SS|-}}, its entire body becomes vulnerable in this stage. It eventually regains mobility and slithers around in a rampage before eventually getting back up onto its feet again. At about half health, The Imprisoned's steps gain an electric shock wave, and it will sometimes make a smaller, quicker step after three normal steps. In "Sealed Ambition", The Imprisoned gains an additional strategy when it reaches key [[Keep]]s. It will fly up into the air using its black halo and attack the Keep. The Warrior must then activate the Groosenators within these Keeps to knock it down, damaging it and exposing its Weak Point Gauge. Failing to do so will allow The Imprisoned to destroy the Keep. | |||
In {{HW|L}}, during the Linkle's Tale Scenario, "[[The Demon Lord's Plan]]", Ghirahim attempts many times to summon The Imprisoned but, due to the fact that his forces have not completely taken over the Sealed Grounds map, the ritual continues to fail and only summons small, weaker versions of the Imprisoned randomly around the map. | |||
Additionally, in {{HW|L|-}}, a Warrior can unleash their [[Focus Spirit Attack]] on The Imprisoned to expose its Weak Point Gauge when it's rampaging on its stomach instead of waiting for it to stand up. If it's knocked down from a Focus Spirit Attack while still having its toes, destroying the toes will drain the Weak Point Gauge faster. Focus Spirit Attacks do not have this effect in {{HW|DE}}. | |||
The Imprisoned will occasionally drop [[The Imprisoned's Scales]] Silver [[Material]] when defeated, and rarely [[The Imprisoned's Pillar]] Gold Material. | |||
Smaller, weaker versions also appear in certain Adventure Mode stages that act as Captains. They possess a laser beam attack which exposes their Weak Point Gauge afterwards. They can be attacked normally, and do not drop Materials except in {{HW|L|-}}. | |||
==={{SSB4|Wii U|-}}=== | |||
In {{SSB4|Wii U}}, The Imprisoned appears as a [[Trophies in Super Smash Bros. for Nintendo 3DS/Wii U|Trophy]]. | |||
{{SSBTrophy|SSB4|header=yes}} | |||
{{#section:Trophies in Super Smash Bros. for Nintendo 3DS/Wii U|The Imprisoned}} | |||
|} | |||
==={{SSBU|-}}=== | |||
The Imprisoned appears as an Advanced [[Primary Spirit]] in {{SSBU}}. The Imprisoned's [[Spirit Battle]] involves a fight against a black-colored {{Ssb|King K. Rool|Giant King K. Rool}} alongside his hostile [[Ghirahim]] [[Assist Trophy|Assist Trophies]]. The conditions of The Imprisoned's Spirit Battle dictate that the enemy Fighter has increased defense at the cost of speed, the Battle is a Timed Stamina Battle, and hostile Assist Trophies will come to Giant King K. Rool's aid. | |||
{{Noncanon|End}} | |||
==Nomenclature== | |||
{{Nomenclature}} | |||
==Gallery== | ==Gallery== | ||
<gallery> | <gallery> | ||
File:Imprisoned. | File:SS The Imprisoned Model 2.png|The Imprisoned's second form from {{SS|-}} | ||
File:The Imprisoned | File:SS The Imprisoned Model 3.png|The Imprisoned's third form without its halo from {{SS|-}} | ||
File:The Imprisoned | File:SS The Imprisoned Model 4.png|The Imprisoned's third form from {{SS|-}} | ||
File:The Imprisoned | File:Imprisoned.jpg|The Imprisoned during Link's dream from {{SS|-}} | ||
File:Binding Seal Original.png|The full, original seal on The Imprisoned | File:SSHD The Imprisoned Icon 2.png|Icon of {{Term|SSHD|The Imprisoned}}'s second form from {{SSHD|-}} | ||
File:Binding Seal Mark 2.png|The | File:SSHD The Imprisoned Icon 3.png|Icon of {{Term|SSHD|The Imprisoned}}'s third form from {{SSHD|-}} | ||
File:Binding Seal Mark 3.png|The emblem of the third seal | File:Binding Seal Original.png|The full, original seal on The Imprisoned from {{SS|-}} | ||
File:Binding Seal Mark 4.png|The emblem of the fourth seal | File:Binding Seal Mark 2.png|The emblem of the second seal from {{SS|-}} | ||
File:SSImprisonedConcept1.jpg|Concept art of The Imprisoned's first form from | File:Binding Seal Mark 3.png|The emblem of the third seal from {{SS|-}} | ||
File:SSImprisonedConcept2.jpg|Concept art of The Imprisoned's second form from | File:Binding Seal Mark 4.png|The emblem of the fourth seal from {{SS|-}} | ||
File:SSImprisonedConcept3.jpg|Concept art of The Imprisoned's third form from | File:SSImprisonedConcept1.jpg|Concept art of The Imprisoned's first form from {{SS|-}} | ||
File:SSImprisonedConcept2.jpg|Concept art of The Imprisoned's second form from {{SS|-}} | |||
File:SSImprisonedConcept3.jpg|Concept art of The Imprisoned's third form from {{SS|-}} | |||
File:SS concept 102.jpg|Concept art of The Imprisoned from {{SS|-}} | |||
File:HW The Imprisoned Icon.png|The Imprisoned portrait from {{HW|-}} | |||
File:HWDE The Imprisoned Portrait.png|The Imprisoned portrait from {{HWDE|-}} | |||
File:HWDE The Dark Imprisoned Portrait.png|The Dark Imprisoned portrait from {{HW|-}} | |||
File:HWDE The Dark Imprisoned Mini Map Icon.png|The Dark Imprisoned Mini-Map icon from {{HW|-}} | |||
File:HW The Imprisoned Adventure Mode Icon.png|The Imprisoned Adventure Mode icon from {{HW|-}} | |||
File:SSBU The Imprisoned Spirit Battle.png|The Imprisoned's Spirit Battle selection screen from {{SSBU|-}} | |||
</gallery> | </gallery> | ||
== | ==See Also== | ||
{{ | * {{Term|Series|Demise|link}} | ||
{{ | * {{Term|Series|The Dark Imprisoned|link}} | ||
{{ | {{Ref}} | ||
{{Bosses|SS}} | {{Bosses|SS}} | ||
{{Categories | |||
|Demons, Giant Bosses, Primary Spirits | |||
|bosses= SS, SSHD, HW, HWL, HWDE | |||
|characters= SS, SSHD, SSBU | |||
|items= SSBfWU | |||
}} | |||
[[ | [[de:Der Verbannte]] | ||
Latest revision as of 00:08, 16 April 2024
The Imprisoned is a recurring Boss and character in The Legend of Zelda series.[1][name references needed] It is Demise rendered in beast form due to the seal placed upon him by the goddess Hylia.[2]
Characteristics
Skyward Sword
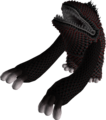
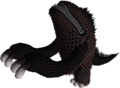
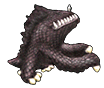
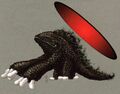
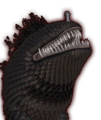
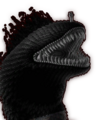
The Imprisoned is a massive beast with three rows of teeth and large black scales across its body that have red detailing. It has black flame-like spines across its back, and four large white appendages on each of its feet that resemble toes.
In the present era, Zelda uses the Gate of Time in order to return to the time where Demise was recently sealed. Entering an age-long sleep to sustain her mortal body, she managed to keep the seal intact until, thousands of years later, The Imprisoned grows strong enough to overcome it. He is driven back three times, initially by Link alone and later with Groose's help. In each instance, Link must topple The Imprisoned over and drive the sealing spike back into its forehead, and finally deliver a Skyward Strike to the spike to reset the seal.
Eventually, Link manages to acquire the complete Triforce, and wishes for the eradication of Demise. With Demise gone, Zelda awakes, since the seal she was sustaining was no longer necessary. At this point however, Ghirahim intervenes, capturing Zelda and bringing her to the past, where his master could still be revived. Despite his subsequent defeat by Link's hands, the ritual Ghirahim had begun to perform is completed, restoring Demise to his previous form.
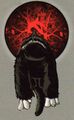
The first time the beast escapes its seal, it only has two legs. The second time it gains arms, which also have white appendages, and tries to climb up to the Sealed Temple. During the third battle, it has a tail and can fly by releasing a large, floating black halo from its back which carries it through the air.
In all three battles, the general strategy for The Imprisoned is to destroy all eight of the appendages on its feet, causing it to fall down, then drive the Sealing Spike into its head. Link can also get a level above The Imprisoned then jump on its head and attack the Sealing Spike. However, The Imprisoned will throw Link off its head if he is too slow, forcing the hero to try once more. Despite this, the spike will retain its current depth. Driving the Sealing Spike into The Imprisoned's head three times will cause the beast to explode and be absorbed into the spike which will plummet back down to the original location. Link must then use a Skyward Strike onto the seal and follow a pattern to complete the seal.
During the second and third battle, Link will be accompanied by Groose who has built a machine, the Groosenator. Link can use the Groosenator to prevent The Imprisoned from climbing up the slopes of the pit, and also to stun him if The Imprisoned gets too far ahead or unapproachable. In the third battle, when The Imprisoned takes flight, a hit from the Groosenator will knock him back down to earth. However, the earthquake blocks Groose's stash of Bombs, so Groose must fling Link onto The Imprisoned's head.
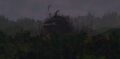
If The Imprisoned manages to reach the Sealed Temple, Link receives a Game Over.[3]
Other Appearances
Hyrule Warriors

The Imprisoned appears as a giant boss in several Legend Mode Stages and Adventure Mode Battles in Hyrule Warriors. In Legend Mode, it appears as a boss in the Scenarios "Sealed Ambition" and "The Demon Lord".
The Imprisoned appears identical to how it appeared in Skyward Sword, and is fought the same way. The Imprisoned will stomp around the battlefield, and occasionally sends red shock waves pulsating from its feet or as a brief force field that attempts to strike down opponents. Its eight toes must be attacked and destroyed, which will knock The Imprisoned down and expose its Weak Point Gauge. Unlike its previous incarnation from Skyward Sword, its entire body becomes vulnerable in this stage. It eventually regains mobility and slithers around in a rampage before eventually getting back up onto its feet again. At about half health, The Imprisoned's steps gain an electric shock wave, and it will sometimes make a smaller, quicker step after three normal steps. In "Sealed Ambition", The Imprisoned gains an additional strategy when it reaches key Keeps. It will fly up into the air using its black halo and attack the Keep. The Warrior must then activate the Groosenators within these Keeps to knock it down, damaging it and exposing its Weak Point Gauge. Failing to do so will allow The Imprisoned to destroy the Keep.
In Hyrule Warriors Legends, during the Linkle's Tale Scenario, "The Demon Lord's Plan", Ghirahim attempts many times to summon The Imprisoned but, due to the fact that his forces have not completely taken over the Sealed Grounds map, the ritual continues to fail and only summons small, weaker versions of the Imprisoned randomly around the map.
Additionally, in Hyrule Warriors Legends, a Warrior can unleash their Focus Spirit Attack on The Imprisoned to expose its Weak Point Gauge when it's rampaging on its stomach instead of waiting for it to stand up. If it's knocked down from a Focus Spirit Attack while still having its toes, destroying the toes will drain the Weak Point Gauge faster. Focus Spirit Attacks do not have this effect in Hyrule Warriors: Definitive Edition.
The Imprisoned will occasionally drop The Imprisoned's Scales Silver Material when defeated, and rarely The Imprisoned's Pillar Gold Material.
Smaller, weaker versions also appear in certain Adventure Mode stages that act as Captains. They possess a laser beam attack which exposes their Weak Point Gauge afterwards. They can be attacked normally, and do not drop Materials except in Hyrule Warriors Legends.
Super Smash Bros. for Wii U
In Super Smash Bros. for Wii U, The Imprisoned appears as a Trophy.
| # | Trophy | Appears in | Description | How to unlock | |
|---|---|---|---|---|---|
| 226 | N/A | 
|
Skyward Sword | Long ago, the demonic king Demise was sealed away by the goddess Hylia, but he awakens once more with the appearance of the Gate of Time. Perhaps because of the incomplete nature of his awakening, he takes this nightmarish form, sprouting more limbs and appendages every time he breaks through the seal that binds him. | Random |
| The Imprisoned | |||||
Super Smash Bros. Ultimate
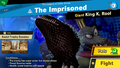
The Imprisoned appears as an Advanced Primary Spirit in Super Smash Bros. Ultimate. The Imprisoned's Spirit Battle involves a fight against a black-colored Giant King K. Rool alongside his hostile Ghirahim Assist Trophies. The conditions of The Imprisoned's Spirit Battle dictate that the enemy Fighter has increased defense at the cost of speed, the Battle is a Timed Stamina Battle, and hostile Assist Trophies will come to Giant King K. Rool's aid.
Nomenclature
| Language | Names | Meanings |
|---|---|---|
Japanese |
|
|
ChineseTR | 被封印者 (Bèi Fēngyìn Zhě) (SSHD | SSBU) | |
ChineseSI | 被封印者 (Bèi Fēngyìn Zhě) (SSHD | SSBU) | |
FrenchEU | Le Banni (SS)[7] | The Banished |
German |
| |
| This table was generated using translation pages. To request an addition, please contact a staff member with a reference. | ||
Gallery
-
The Imprisoned's second form from Skyward Sword
-
The Imprisoned's third form without its halo from Skyward Sword
-

The Imprisoned's third form from Skyward Sword
-
The Imprisoned during Link's dream from Skyward Sword
-

Icon of The Imprisoned's second form from Skyward Sword HD
-
Icon of The Imprisoned's third form from Skyward Sword HD
-

The full, original seal on The Imprisoned from Skyward Sword
-

The emblem of the second seal from Skyward Sword
-

The emblem of the third seal from Skyward Sword
-

The emblem of the fourth seal from Skyward Sword
-
Concept art of The Imprisoned's first form from Skyward Sword
-
Concept art of The Imprisoned's second form from Skyward Sword
-
Concept art of The Imprisoned's third form from Skyward Sword
-
Concept art of The Imprisoned from Skyward Sword
-
The Imprisoned portrait from Hyrule Warriors
-

The Imprisoned portrait from Hyrule Warriors: Definitive Edition
-
The Dark Imprisoned portrait from Hyrule Warriors
-

The Dark Imprisoned Mini-Map icon from Hyrule Warriors
-

The Imprisoned Adventure Mode icon from Hyrule Warriors
-
The Imprisoned's Spirit Battle selection screen from Super Smash Bros. Ultimate


See Also
References
- ↑ Encyclopedia, Dark Horse Books, pg. 186 (SS)
- ↑ "Stripped of his true physical form by the seal that binds him, he takes the shape of an abomination. But even in his hideous state, he's more than capable of devouring this land if we allow him to do what he desires." — Zelda (Skyward Sword)
- ↑ "It's too late! All... All is lost." — Impa (Skyward Sword)
- ↑ "おめぇさんが 相手にできそうなのは今のところ 封印されしものくらいだな" (The only thing you might be able to handle at the moment is the Sealed One.) — Lanayru (Skyward Sword)
- ↑ "Der Verbannte" — Battlefield Info (Hyrule Warriors: Definitive Edition)
- ↑ "Goed, de Banneling! Dat is het enorme weerzinwekkende monster dat je moet verslaan in de Verzegelde Vallei." — Lanayru (Skyward Sword HD)
- ↑ Hyrule Historia, Les Éditions Soleil, pg. 17
Mazura • Jermafenser • Rebonack • Carock • Gooma • Barba • Thunderbird • Link's Shadow
Ball and Chain Trooper • Armos Knights • Lanmolas • Moldorm • Agahnim
Helmasaur King • Arrghus • Mothula • Blind the Thief • Kholdstare • Vitreous • Trinexx • Ganon
Moldorm • Genie • Slime Eye • Angler Fish • Slime Eel • Facade • Evil Eagle • Hot Head • Shadow Nightmares
Spike Roller • Moblin Chief • Hinox • Dodongo Snakes • Lanmola • Hydrosoar
Master Stalfos • Gohma • Armos Knight • Rover • Grim Creeper • Turtle Rock • Blaino
Gohma • King Dodongo • Barinade • Phantom Ganon • Volvagia • Morpha • Bongo Bongo • Twinrova • Ganon
Lizalfos • Big Octo • Stalfos • Meg • Flare Dancer • White Wolfos • Dark Link • Dead Hand • Gerudo Thief • Iron Knuckle
Odolwa • Goht • Gyorg • Twinmold • Majora's Mask
Dinolfos • Gekko • Wizzrobe • Gerudo Pirate • Wart • Gekko and Mad Jelly
Captain Keeta • Iron Knuckle • Sharp • Igos du Ikana • Garo Master • Gomess • Eyegore
Aquamentus • Dodongo • Mothula • Gohma • Digdogger • Manhandla • Gleeok • Medusa Head • General Onox
Twinrova • Ganon
Brother Goriyas • Facade • Omuai • Agunima • Great Moblin • Syger • Vire • Poe Sisters • Frypolar
Pumpkin Head • Head Thwomp • Shadow Hag • Eyesoar • Smog • Octogon • Possessed Nayru • Plasmarine • Ramrock • Veran
Twinrova • Ganon
Giant Ghini • Swoop • Subterror • Armos Warrior • Great Moblin • Smasher • Vire • Angler Fish • Blue Stalfos
Gohma • Kalle Demos • Gohdan • Helmaroc King • Jalhalla • Molgera • Puppet Ganon • Ganondorf
Mothula • Darknut • Phantom Ganon • Stalfos • Wizzrobe • Mighty Darknut • Big Octo![]()
Phantom Ganon • Stone Arrghus • Helmaroc King • Big Poe • Big Moldorm • Frostare • Vaati • Ganon
Chief Soldier • Shadow Link • Manhandla • Dodongos • Big Dark Stalfos • Gohma • Big Dodongo
Big Green Chuchu • Gleerok • Mazaal • Big Octorok • Gyorg Pair • Vaati
Madderpillar • Dark Nut • Big Blue Chuchu • Red Dark Nut • Black Knight
Diababa • Fyrus • Morpheel • Stallord • Blizzeta • Armogohma • Argorok • Zant • Puppet Zelda • Ganon
Ook • King Bulblin • Dangoro • Twilit Carrier Kargarok • Twilit Bloat
Deku Toad • Death Sword • Darkhammer • Darknut • Aeralfos • Phantom Zant
Stagnox • Fraaz • Phytops • Cragma • Byrne • Skeldritch • Demon Train • Chancellor Cole • Malladus
Mothula • Snapper • Heatoise • Big Blin • Rocktite • Geozard Chief • Dark Link![]()
Ghirahim • Scaldera • Moldarach • The Imprisoned • Koloktos • Tentalus • Levias • Bilocyte • Demise
Stalfos • Lizalfos • Stalmaster • Moldarach • LD-002G Scervo • Dark Lizalfos • Magmanos • Moldorm • LD-003D Dreadfuse
Yuga • Moldorm • Margomill • Gemesaur King • Arrghus • Knucklemaster • Stalblind • Zaganaga • Dharkstare • Grinexx • Yuga Ganon
Armos • Red Stalfos • Heedles • Green & Red Goriyas • Gigabari • Gibdos & Purple Mini-Moldorms • Red Eyegores • Flying Tiles & Devalants • Big Pengator & Pengators • Fire Gimos • Moldorm • Lorule Ball and Chain Soldier • Arrghus
Margoma • Arrghus • Moldorm • Blizzagia • The Lady's Pets • Stalchampion • Prismantus • The Lady • Shadow Links
Electric Blob King • Electric Blob Queen • Hinox Brothers • Freezlord • Vulture Vizier • Grim Repoe • Gigaleon
Windblight Ganon • Fireblight Ganon • Thunderblight Ganon • Waterblight Ganon • Monk Maz Koshia(TCB) • Calamity Ganon • Dark Beast Ganon
Stone Talus • Stone Talus (Luminous) • Stone Talus (Rare) • Igneo Talus • Frost Talus • Igneo Talus Titan(TCB) • Molduga • Molduking(TCB) • Hinox • Blue Hinox • Black Hinox • Master Kohga
Bosses in Tears of the Kingdom
Colgera • Yunobo • Moragia • Marbled Gohma • Sludge Like • Mucktorok • Queen Gibdo • Seized Construct • Phantom Ganon • Demon King's Army • Demon King Ganondorf • Demon Dragon
- Demons
- Giant Bosses
- Primary Spirits
- Bosses
- Characters
- Items
- Bosses in Skyward Sword
- Characters in Skyward Sword
- Bosses in Skyward Sword HD
- Characters in Skyward Sword HD
- Bosses in Hyrule Warriors
- Bosses in Hyrule Warriors Legends
- Bosses in Hyrule Warriors: Definitive Edition
- Items in Super Smash Bros. for Wii U
- Characters in Super Smash Bros. Ultimate