Gerudo Desert: Difference between revisions
TriforceTony (talk | contribs) m (Text replacement - "Sand Seal" to "{{Term|BotW|Sand Seal|link}}") |
m (→{{HW|-}}) |
||
| (39 intermediate revisions by 12 users not shown) | |||
| Line 1: | Line 1: | ||
{{Hatnote|This article refers to the location in {{TP}}, {{BotW}}, {{TotK}}, and {{HWAoC}}. For the desert containing [[Gerudo]]s in {{OoT}}, see [[Haunted Wasteland]] and [[Desert Colossus]].}} | |||
{{ | {{Infobox Location | ||
| | |image= | ||
| | {{Media | ||
| | |Screenshot TP= File:TP Gerudo Desert.png | ||
|game= | |Screenshot TPHD= File:TPHD Gerudo Desert.png | ||
|other= | |Screenshot BotW= File:BotW Gerudo Desert.png | ||
|inhab= | |Screenshot TotK= File:TotK Gerudo Desert.png | ||
|items= | |Map BotW= File:BotW Gerudo Desert Map Area.png | ||
| | }} | ||
|theme | |caption= | ||
{{ | |pronunciation= | ||
|game= TP, BotW, TotK | |||
|other= LCT, HW, HWAoC | |||
|inhab= | |||
{{Infobox Game Blocks | |||
|BotW= {{Plural|BotW|Gerudo|link}}, {{Term|BotW|Tera|link}} | |||
|TotK= {{Plural|TotK|Gerudo|link}} | |||
}} | |||
|items= | |||
{{Infobox Game Blocks | |||
|TP= {{Term|TPHD|Piece of Heart|link}}, ×8 {{Plural|TPHD|Poe Soul|link}}, ×2 {{Plural|TPHD|Dayfly|link}} | |||
|BotW= {{Term|BotW|Thunder Helm|link}}, {{Term|BotW|Gerudo Outfit|link}}, {{Term|BotW|Desert Voe Set|link}}, {{Term|BotW|Radiant Set|link}} | |||
}} | |||
|services= | |||
|season= | |||
|temperature= | |||
|counter= | |||
{{Infobox Game Blocks | |||
|TotK= {{Term|Series|Gerudo Desert Depths|link}} {{Small|({{Term|TotK|Depths|link}})}}, {{Term|Series|Gerudo Desert Sky|link}} {{Small|({{Term|TotK|Sky|link}})}} | |||
}} | |||
|theme= | |||
|related= {{Term|Series|Gerudo Highlands|link}} | |||
|strategy= | |||
|zu= | |||
}} | }} | ||
The {{Term/Store|Gerudo Desert||Series, BotW}} | The {{Term/Store|Gerudo Desert||Series, BotW, TotK, HWAoC}}<ref>{{Cite|{{Big|'''Gerudo Desert'''}}|Map|BotW}}</ref><ref>{{Cite|{{Big|'''Gerudo Desert'''}}|Map|TotK}}</ref><ref>{{Cite|{{Big|{{Color|HWAoC Map|'''Gerudo Desert'''}}}}|Map|HWAoC}}</ref>, also known as the '''Western Desert''',{{Exp Game|TP}}<ref>{{Cite|Actually, there's one more of us...but there's been a disturbing turn of events in the {{Color|TPHD Red|western desert}}, so he's gone to check it out.|Telma|TPHD}}</ref> and the '''Great Desert''',{{Exp Game|TP}}<ref>{{Cite Guide|quote= |game= TP|publisher= Nintendo|page= 178}}</ref> is a recurring location in {{TLoZ|Series}}. | ||
{{ | |||
==Features and Overview== | ==Features and Overview== | ||
| Line 22: | Line 41: | ||
The Gerudo Desert is found in the [[Desert Province]] in {{TP}}, located in the {{exp|GCN version; southeast in the Wii version|southwest}} corner of [[Hyrule]]. Although called Gerudo Desert, the [[Gerudo]] themselves do not appear in {{TP|-}}. The Gerudo Desert is completely cut off from the rest of Hyrule after being abandoned years ago. At first, Link can only reach it by being shot out of [[Fyer]]'s cannon and can only leave by [[Warping]] out. According to [[Auru]], the Desert once held a prison to hold Hyrule's worst criminals.<ref>{{Cite|The Gerudo Desert once held a prison built to hold the worst criminals this land has ever known... The criminals who were sentenced to death were sent directly to the underworld by a cursed mirror that was kept in the prison...Now that prison is condemned, and even the road leading to the Desert is impassable.|Auru|TP}}</ref> The Gerudo Desert covers a vast territory, but most of its surface is a barren wasteland with no signs of life other than enemies like [[Moldorm]]s, [[Shadow Beast]]s, [[Bulblin]]s and [[Leever]]s. | The Gerudo Desert is found in the [[Desert Province]] in {{TP}}, located in the {{exp|GCN version; southeast in the Wii version|southwest}} corner of [[Hyrule]]. Although called Gerudo Desert, the [[Gerudo]] themselves do not appear in {{TP|-}}. The Gerudo Desert is completely cut off from the rest of Hyrule after being abandoned years ago. At first, Link can only reach it by being shot out of [[Fyer]]'s cannon and can only leave by [[Warping]] out. According to [[Auru]], the Desert once held a prison to hold Hyrule's worst criminals.<ref>{{Cite|The Gerudo Desert once held a prison built to hold the worst criminals this land has ever known... The criminals who were sentenced to death were sent directly to the underworld by a cursed mirror that was kept in the prison...Now that prison is condemned, and even the road leading to the Desert is impassable.|Auru|TP}}</ref> The Gerudo Desert covers a vast territory, but most of its surface is a barren wasteland with no signs of life other than enemies like [[Moldorm]]s, [[Shadow Beast]]s, [[Bulblin]]s and [[Leever]]s. | ||
The Gerudo Desert holds the [[Arbiter's Grounds ( | The Gerudo Desert holds the [[Arbiter's Grounds (Dungeon)|Arbiter's Grounds]] [[Dungeon]], the aforementioned prison. On top of it lies the [[Mirror Chamber]], a large circular temple where the [[Sage#Twilight Princess|Sages]] reside. It houses the [[Mirror of Twilight]], which is the only way to access the [[Twilight Realm]]. The Mirror of Twilight can create a portal inside a gigantic rock that leads to the [[Palace of Twilight]]. The mirror was shattered into four pieces by [[Zant]], but the three missing pieces are recovered by [[Link]] and [[Midna]]. After the defeat of [[Ganondorf]], Midna departs to the Twilight Palace and shatters the mirror completely. The [[Gerudo Mesa]] can also be found in the Gerudo Desert. It holds the [[Cave of Ordeals]], an optional 50-floor dungeon. | ||
====Areas==== | |||
{{Gallery List|Locations | |||
|TP= Arbiter's Grounds (Dungeon), Cave of Ordeals, Desert Caravan, Gerudo Mesa, Mirror Chamber | |||
}} | |||
==={{BotW|-}}=== | ==={{BotW|-}}=== | ||
In {{BotW|-}}, the Gerudo Desert is a vast desert wasteland located in the southwest section of [[Hyrule]] in the [[Gerudo (Region)|Gerudo]] | In {{BotW|-}}, the Gerudo Desert is a vast desert wasteland located in the southwest section of [[Hyrule]] in the [[Gerudo (Region)|Gerudo]] region. It is plagued by sandstorms that disrupt Link's [[Sheikah Slate]] [[Map]], rendering it unusable. Four [[Molduga]]s can be found throughout the desert. [[Stalizalfos]] appear all over it during the night. | ||
==== | ====Climates==== | ||
{{ | {{Collapsible | ||
|header= Gerudo Desert Climate | |||
|frame= false | |||
|collapse= true | |||
|content= | |||
{{(!}} class="wikitable" | |||
{{!}}+ | |||
!colspan=2{{!}} Climate Data | |||
{{!-}} | |||
{{!}} | |||
[[File:BotW Gerudo Desert Climate Area.png|thumb|center|Map boundaries of the "Gerudo desert" climate within the {{Term|BotW|Gerudo Desert}}]] | |||
=== | {{!}}style="padding: 0px 50px 0px 50px;"{{!}} | ||
{{ | {{(!}} class="wikitable" style="margin: auto auto" | ||
{{!}}+ Weather | |||
{{!-}} | |||
! Weather Type !! Chance | |||
{{!-}} | |||
{{!}} Clear {{!!}} 100% | |||
{{!-}} | |||
{{!}} Cloudy {{!!}} 0% | |||
{{!-}} | |||
{{!}} Rain/Snow {{!!}} 0% | |||
{{!-}} | |||
{{!}} Heavy Rain/Snow {{!!}} 0% | |||
{{!-}} | |||
{{!}} Storm {{!!}} 0% | |||
{{!)}} | |||
==== | {{!-}} | ||
{{ | {{!}}style="padding: 25px 50px 25px 50px;" colspan=2{{!}} | ||
{{(!}} class="wikitable" style="margin: auto auto" | |||
{{!}}+ Temperature vs. Altitude | |||
{{!-}} | |||
! Altitude !! Temperature (Day) !! Temperature (Night) | |||
{{!-}} | |||
{{!}} 0m+ {{!!}} 117.5 °F{{Exp|47.5 °C}} {{!!}} 24.8 °F{{Exp|-4.0 °C}} | |||
{{!-}} | |||
{{!}} 100m+ {{!!}} 113.0 °F{{Exp|45.0 °C}} {{!!}} 23.0 °F{{Exp|-5.0 °C}} | |||
{{!-}} | |||
{{!}} 200m+ {{!!}} 109.4 °F{{Exp|43.0 °C}} {{!!}} 19.4 °F{{Exp|-7.0 °C}} | |||
{{!-}} | |||
{{!}} 300m+ {{!!}} 100.4 °F{{Exp|38.0 °C}} {{!!}} 17.6 °F{{Exp|-8.0 °C}} | |||
{{!-}} | |||
{{!}} 400m+ {{!!}} 86.0 °F{{Exp|30.0 °C}} {{!!}} 8.6 °F{{Exp|-13.0 °C}} | |||
{{!-}} | |||
{{!}} 500m+ {{!!}} 32.0 °F{{Exp|0.0 °C}} {{!!}} -2.2 °F{{Exp|-19.0 °C}} | |||
{{!-}} | |||
{{!}} 600m+ {{!!}} 19.4 °F{{Exp|-7.0 °C}} {{!!}} -13.0 °F{{Exp|-25.0 °C}} | |||
{{!-}} | |||
{{!}} 700m+ {{!!}} 5.0 °F{{Exp|-15.0 °C}} {{!!}} -18.4 °F{{Exp|-28.0 °C}} | |||
{{!-}} | |||
{{!}} 800m+ {{!!}} -18.4 °F{{Exp|-28.0 °C}} {{!!}} -18.4 °F{{Exp|-28.0 °C}} | |||
{{!-}} | |||
{{!}} 900m+ {{!!}} -18.4 °F{{Exp|-28.0 °C}} {{!!}} -18.4 °F{{Exp|-28.0 °C}} | |||
{{!-}} | |||
{{!}} 1000m+ {{!!}} -18.4 °F{{Exp|-28.0 °C}} {{!!}} -18.4 °F{{Exp|-28.0 °C}} | |||
{{!)}} | |||
{{!)}} | |||
{{ | }} | ||
==== | {{Collapsible | ||
{{ | |header= Gerudo Desert Lv2 Climate | ||
|frame= false | |||
|collapse= true | |||
|content= | |||
{{(!}} class="wikitable" | |||
{{!}}+ | |||
!colspan=2{{!}} Climate Data | |||
{{!-}} | |||
{{!}} | |||
[[File:BotW Gerudo Desert Level 2 Climate Area.png|thumb|center|Map boundaries of the "Gerudo desert Lv2" climate within the {{Term|BotW|Gerudo Desert}}]] | |||
=== | {{!}}style="padding: 0px 50px 0px 50px;"{{!}} | ||
{{ | {{(!}} class="wikitable" style="margin: auto auto" | ||
{{!}}+ Weather | |||
{{!-}} | |||
! Weather Type !! Chance | |||
{{!-}} | |||
{{!}} Clear {{!!}} 100% | |||
{{!-}} | |||
{{!}} Cloudy {{!!}} 0% | |||
{{!-}} | |||
{{!}} Rain/Snow {{!!}} 0% | |||
{{!-}} | |||
{{!}} Heavy Rain/Snow {{!!}} 0% | |||
{{!-}} | |||
{{!}} Storm {{!!}} 0% | |||
{{!)}} | |||
==== | {{!-}} | ||
{{ | {{!}}style="padding: 25px 50px 25px 50px;" colspan=2{{!}} | ||
{{(!}} class="wikitable" style="margin: auto auto" | |||
{{!}}+ Temperature vs. Altitude | |||
{{!-}} | |||
! Altitude !! Temperature (Day) !! Temperature (Night) | |||
{{!-}} | |||
{{!}} 0m+ {{!!}} 134.6 °F{{Exp|57.0 °C}} {{!!}} 24.8 °F{{Exp|-4.0 °C}} | |||
{{!-}} | |||
{{!}} 100m+ {{!!}} 131.0 °F{{Exp|55.0 °C}} {{!!}} 23.0 °F{{Exp|-5.0 °C}} | |||
{{!-}} | |||
{{!}} 200m+ {{!!}} 127.4 °F{{Exp|53.0 °C}} {{!!}} 19.4 °F{{Exp|-7.0 °C}} | |||
{{!-}} | |||
{{!}} 300m+ {{!!}} 118.4 °F{{Exp|48.0 °C}} {{!!}} 17.6 °F{{Exp|-8.0 °C}} | |||
{{!-}} | |||
{{!}} 400m+ {{!!}} 104.0 °F{{Exp|40.0 °C}} {{!!}} 8.6 °F{{Exp|-13.0 °C}} | |||
{{!-}} | |||
{{!}} 500m+ {{!!}} 50.0 °F{{Exp|10.0 °C}} {{!!}} -2.2 °F{{Exp|-19.0 °C}} | |||
{{!-}} | |||
{{!}} 600m+ {{!!}} 19.4 °F{{Exp|-7.0 °C}} {{!!}} -13.0 °F{{Exp|-25.0 °C}} | |||
{{!-}} | |||
{{!}} 700m+ {{!!}} 5.0 °F{{Exp|-15.0 °C}} {{!!}} -18.4 °F{{Exp|-28.0 °C}} | |||
{{!-}} | |||
{{!}} 800m+ {{!!}} -18.4 °F{{Exp|-28.0 °C}} {{!!}} -18.4 °F{{Exp|-28.0 °C}} | |||
{{!-}} | |||
{{!}} 900m+ {{!!}} -18.4 °F{{Exp|-28.0 °C}} {{!!}} -18.4 °F{{Exp|-28.0 °C}} | |||
{{!-}} | |||
{{!}} 1000m+ {{!!}} -18.4 °F{{Exp|-28.0 °C}} {{!!}} -18.4 °F{{Exp|-28.0 °C}} | |||
{{!)}} | |||
{{!)}} | |||
{{ | }} | ||
==== | ====Areas==== | ||
{{ | {{Gallery List|Locations | ||
|BotW= Arbiter's Grounds, Dako Tah Shrine, Divine Beast Vah Naboris, Dragon's Exile, East Barrens, East Gerudo Ruins, Fang and Bone [West Barrens], Gerudo Great Skeleton, Gerudo Town, Great Cliffs, Hawa Koth Shrine, Kara Kara Bazaar, Karusa Valley, Keive Tala Shrine, Kema Zoos Shrine, Korsh O'hu Shrine, Lookout Post, Misae Suma Shrine, North Dragon's Exile, North Gerudo Ruins, Northern Icehouse, Palu Wasteland, Palu Wasteland South, Raqa Zunzo Shrine, Sand-Seal Rally, Southern Oasis, Takama Shiri Shrine, Tera's Great Fairy Fountain, Tho Kayu Shrine, Toruma Dunes, West Barrens, West Gerudo Ruins | |||
}} | |||
=== | ==={{TotK|-}}=== | ||
{{Main| | {{TotK Quest/Container| | ||
{{TotK Quest | |||
|name= Regional Phenomena | |||
|type= Main Quest | |||
|giver= [[Purah]] | |||
|location= [[Lookout Landing]] | |||
}} | |||
{{TotK Quest | |||
|name= Riju of Gerudo Town | |||
|type= Main Quest | |||
|giver= [[Riju]] | |||
|location= [[Gerudo Town]] | |||
}} | |||
}} | |||
{{Stub|TotK}} | |||
==== | ====Areas==== | ||
{{ | {{Gallery List|Locations | ||
|TotK= Ancient Altar Ruins, Ancient Prison Ruins, Arbiter's Grounds, Central Gerudo Cave, Chichim Shrine, Desert Rift, Dragon's Exile, East Barrens, East Gerudo Ruins, East Gerudo Ruins Cave, Gerudo Great Skeleton, Gerudo Sanctuary, Gerudo Town, Great Cliffs, Irasak Shrine, Kara Kara Bazaar, Karahatag Shrine, Karusa Valley, Kudanisar Shrine, Lightning Temple, Lookout Post, Miryotanog Shrine, North Dragon's Exile, North Gerudo Ruins, Northern Icehouse, Oasis Source, Palu Wasteland, Palu Wasteland South, Quicksand Cave, Siwakama Shrine, South Gerudo Cave, Southern Oasis, Southern Oasis Training Area, Statue of the Eighth Heroine Room, Toruma Dunes, Valley of Silent Statues, West Barrens, West Gerudo Ruins, West Gerudo Underground Ruins | |||
}} | |||
= | |||
==Other Appearances== | ==Other Appearances== | ||
==={{LCT|-}}=== | ==={{LCT|-}}=== | ||
{{Noncanon|Start}} | |||
In {{LCT}}, the Gerudo Desert appears in two stages. In the first appearance, during [[Link's Crossbow Training#Stage 1|Stage 1]], Link faces a constant onslaught of [[Stalfos]] rising from the sand. The skeletal warriors approach slowly and several Automatic Crossbow upgrades can be obtained by defeating enemies that glow green. Bonus point items are much less common in this barren setting. | In {{LCT}}, the Gerudo Desert appears in two stages. In the first appearance, during [[Link's Crossbow Training#Stage 1|Stage 1]], Link faces a constant onslaught of [[Stalfos]] rising from the sand. The skeletal warriors approach slowly and several Automatic Crossbow upgrades can be obtained by defeating enemies that glow green. Bonus point items are much less common in this barren setting. | ||
The second appearance, during [[Link's Crossbow Training#Stage 5|Stage 5]], is the same as Stage 1 but with different enemies. [[Moldorm]]s will circle Link from under the sand, jumping occasionally, which is the opportunity to shoot them. Between swarms of Moldorms, a group of [[Leever]]s will encircle Link before attacking. | The second appearance, during [[Link's Crossbow Training#Stage 5|Stage 5]], is the same as Stage 1 but with different enemies. [[Moldorm]]s will circle Link from under the sand, jumping occasionally, which is the opportunity to shoot them. Between swarms of Moldorms, a group of [[Leever]]s will encircle Link before attacking. | ||
{{ | {{Noncanon|End}} | ||
==={{HW|-}}=== | |||
{{Noncanon|Start}} | {{Noncanon|Start}} | ||
{{Main|Gerudo Desert (Stage)}} | {{Main|Gerudo Desert (Stage)}} | ||
In {{HW}}, the Gerudo Desert appears as a stage where Warriors must defeat [[Ghirahim]] and [[Zant]]. | In {{HW}}, the Gerudo Desert appears as a stage where Warriors must defeat [[Ghirahim]] and [[Zant]]. | ||
{{Noncanon|End}} | |||
==={{HWAoC|-}}=== | |||
{{Noncanon|Start}} | |||
{{Stub|HWAoC}} | |||
{{Noncanon|End}} | {{Noncanon|End}} | ||
| Line 120: | Line 227: | ||
==Nomenclature== | ==Nomenclature== | ||
{{ | {{Nomenclature}} | ||
==Gallery== | ==Gallery== | ||
<gallery> | <gallery> | ||
File: | File:LCT Arbiter's Grounds: Ranger.jpg|The Gerudo Desert from {{LCT|-}} | ||
File:HW Gerudo Desert.jpg|The Gerudo Desert from {{HW|-}} | File:HW Gerudo Desert.jpg|The Gerudo Desert from {{HW|-}} | ||
</gallery> | </gallery> | ||
==See Also== | |||
* {{Term|Series|Gerudo (Region)|link}} | |||
* {{Term|Series|Gerudo Desert Depths|link}} | |||
* {{Term|Series|Gerudo Desert Sky|link}} | |||
* {{Term|Series|Gerudo Highlands|link}} | |||
{{Ref}} | {{Ref}} | ||
{{TPNavMap}} | {{TPNavMap}} | ||
{{Categories | |||
|Desert Province, Deserts, Gerudo Desert | |||
|locations= TP, BotW, TotK, LCT, HW, HWAoC | |||
}} | |||
Latest revision as of 23:18, 2 May 2024
The Gerudo Desert[1][2][3], also known as the Western Desert,(TP)[4] and the Great Desert,(TP)[5] is a recurring location in The Legend of Zelda series.
Features and Overview
Twilight Princess
The Gerudo Desert is found in the Desert Province in Twilight Princess, located in the southwest corner of Hyrule. Although called Gerudo Desert, the Gerudo themselves do not appear in Twilight Princess. The Gerudo Desert is completely cut off from the rest of Hyrule after being abandoned years ago. At first, Link can only reach it by being shot out of Fyer's cannon and can only leave by Warping out. According to Auru, the Desert once held a prison to hold Hyrule's worst criminals.[6] The Gerudo Desert covers a vast territory, but most of its surface is a barren wasteland with no signs of life other than enemies like Moldorms, Shadow Beasts, Bulblins and Leevers.
The Gerudo Desert holds the Arbiter's Grounds Dungeon, the aforementioned prison. On top of it lies the Mirror Chamber, a large circular temple where the Sages reside. It houses the Mirror of Twilight, which is the only way to access the Twilight Realm. The Mirror of Twilight can create a portal inside a gigantic rock that leads to the Palace of Twilight. The mirror was shattered into four pieces by Zant, but the three missing pieces are recovered by Link and Midna. After the defeat of Ganondorf, Midna departs to the Twilight Palace and shatters the mirror completely. The Gerudo Mesa can also be found in the Gerudo Desert. It holds the Cave of Ordeals, an optional 50-floor dungeon.
Areas


Breath of the Wild
In Breath of the Wild, the Gerudo Desert is a vast desert wasteland located in the southwest section of Hyrule in the Gerudo region. It is plagued by sandstorms that disrupt Link's Sheikah Slate Map, rendering it unusable. Four Moldugas can be found throughout the desert. Stalizalfos appear all over it during the night.
Climates
| Climate Data | |||||||||||||||||||||||||||||||||||||
|---|---|---|---|---|---|---|---|---|---|---|---|---|---|---|---|---|---|---|---|---|---|---|---|---|---|---|---|---|---|---|---|---|---|---|---|---|---|
 |
| ||||||||||||||||||||||||||||||||||||
| |||||||||||||||||||||||||||||||||||||
| Climate Data | |||||||||||||||||||||||||||||||||||||
|---|---|---|---|---|---|---|---|---|---|---|---|---|---|---|---|---|---|---|---|---|---|---|---|---|---|---|---|---|---|---|---|---|---|---|---|---|---|
 |
| ||||||||||||||||||||||||||||||||||||
| |||||||||||||||||||||||||||||||||||||
Areas


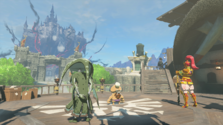
Tears of the Kingdom
Related Quests
|
Regional Phenomena | |||
| Main Quest | ||||
Regional Phenomena | |
|
Riju of Gerudo Town | |||
| Main Quest | ||||
Riju of Gerudo Town | |
|
|
Regional Phenomena | |||
| Main Quest | ||||
Regional Phenomena | |
|
|
Riju of Gerudo Town | |||
| Main Quest | ||||
Riju of Gerudo Town | |
Areas


Other Appearances
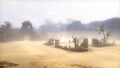
Link's Crossbow Training
In Link's Crossbow Training, the Gerudo Desert appears in two stages. In the first appearance, during Stage 1, Link faces a constant onslaught of Stalfos rising from the sand. The skeletal warriors approach slowly and several Automatic Crossbow upgrades can be obtained by defeating enemies that glow green. Bonus point items are much less common in this barren setting.
The second appearance, during Stage 5, is the same as Stage 1 but with different enemies. Moldorms will circle Link from under the sand, jumping occasionally, which is the opportunity to shoot them. Between swarms of Moldorms, a group of Leevers will encircle Link before attacking.
Hyrule Warriors
In Hyrule Warriors, the Gerudo Desert appears as a stage where Warriors must defeat Ghirahim and Zant.
Hyrule Warriors: Age of Calamity
Trivia
- In Twilight Princess, the Hylian Typography on the map of Hyrule lists the Gerudo Desert under the name "Great Desert".
Nomenclature
| Language | Names | Meanings |
|---|---|---|
Japanese | ゲルドさばく砂漠 (TotK) | |
ChineseTR | 格魯德沙漠 (Gélǔdé Shāmò) (TotK) | |
ChineseSI | 格鲁德沙漠 (Gélǔdé Shāmò) (TotK) | |
Dutch | Gerudo-woestijn (HWAoC)[8] | Same as English. |
FrenchCA | Désert Gerudo (TotK) | |
FrenchEU | Désert Gerudo (TotK) | |
German | Gerudo-Wüste (TotK | HWAoC)[7] | |
Italian | Deserto Gerudo (TotK) | |
Korean | 겔드사막 (TotK) | |
SpanishEU | Desierto de Gerudo (TotK) | |
| This table was generated using translation pages. To request an addition, please contact a staff member with a reference. | ||
Gallery
-

The Gerudo Desert from Link's Crossbow Training
-
The Gerudo Desert from Hyrule Warriors


See Also
References
- ↑ "Gerudo Desert" — Map (Breath of the Wild)
- ↑ "Gerudo Desert" — Map (Tears of the Kingdom)
- ↑ "Gerudo Desert" — Map (Hyrule Warriors: Age of Calamity)
- ↑ "Actually, there's one more of us...but there's been a disturbing turn of events in the western desert, so he's gone to check it out." — Telma (Twilight Princess HD)
- ↑ The Legend of Zelda: Twilight Princess—The Official Nintendo Player's Guide, Nintendo of America, pg. 178
- ↑ "The Gerudo Desert once held a prison built to hold the worst criminals this land has ever known... The criminals who were sentenced to death were sent directly to the underworld by a cursed mirror that was kept in the prison...Now that prison is condemned, and even the road leading to the Desert is impassable." — Auru (Twilight Princess)
- ↑ "Gerudo-Wüste" — Map (Hyrule Warriors: Age of Calamity)
- ↑ "Gerudu-woestijn" — Map (Hyrule Warriors: Age of Calamity)
| Hyrule in Twilight Princess | |
|---|---|
 | |
| Click on a location | |