Armogohma: Difference between revisions
mNo edit summary |
m (→Nomenclature) |
||
| (95 intermediate revisions by 48 users not shown) | |||
| Line 1: | Line 1: | ||
{{Boss | {{Infobox Boss | ||
| | |image= | ||
| | {{Media | ||
| | |Model TP= File:TP Armogohma Model.png | ||
|Model TPHD= File:TPHD Armogohma Model.png | |||
|Render TP= File:TP Armogohma Render.png | |||
| | |||
}} | }} | ||
|caption= | |||
|type= | |||
|race= {{Term|Series|Gohma|link}} | |||
|title= | |||
{{Infobox Game Blocks | |||
|TP= Twilit Arachnid<ref>{{Cite|Twilit Arachnid<br/>{{Big|ARMOGOHMA}}|Game Screen|TPHD}}</ref> | |||
}} | |||
|game= TP | |||
|other= Zelda HD Experience, TP (Himekawa) | |||
|era= {{Term|Series|Era of Twilight|link}} | |||
|dungeon= | |||
{{Infobox Game Blocks | |||
|TP= {{Term|TPHD|Temple of Time (Dungeon)|link}} | |||
}} | |||
|weakness= | |||
{{Infobox Game Blocks | |||
|TP= {{Plural|TPHD|Arrow|link}}, {{Term|TPHD|Dominion Rod|link}} | |||
}} | |||
|reward= | |||
{{Infobox Game Blocks | |||
|TP= {{Term|TPHD|Heart Container|link}}, {{Term|TPHD|Mirror Shard|link}} | |||
}} | |||
|strategy= {{StrategyWiki|The Legend of Zelda: Twilight Princess/Temple of Time#Twilit Arachnid: Armogohma|Armogohma}} | |||
|theme= | |||
}} | |||
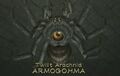
{{Term/Store|Armogohma||Series, TP, TPHD}} is a recurring {{Term|Series|Boss|link}} in {{TLoZ|Series}}.<ref>{{Cite Book|quote= |book= E |publisher= |page= 163 {{Exp Game|TP}}}}</ref> {{Term|Series|Armogohma}} goes unnamed in the ''[[Zelda HD Experience]]''. | |||
==Characteristics== | ==Characteristics== | ||
==={{TP|-}}=== | |||
====Physical Appearance==== | |||
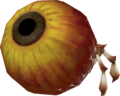
The keeper of one of the {{Plural|TPHD|Mirror Shard|link|display=Shards}} of the {{Term|TPHD|Mirror of Twilight|link}}, Armogohma is a massive, armored arachnid. It has eight grey walking legs. These legs have three joints each and end in a white, pike-like barb. These legs have ornate, rectangular grooves in various places, and several white hairs, mainly near the joints. Armogohma also has two large, spiked pedipalps and two interior fangs near its head. The head has four lesser eyes arranged in a square and four tiny forceps underneath its red mouth. Atop the grey thorax of Armogohma is a circular cavity with a large eyeball inside. This red-yellow eyeball is similar in appearance and size to the eyeball of {{Term|TP|Morpheel|link}}. Armogohma protects its eyeball with an eyelid-like closing in the cavity. Armogohma also has a large, hairy abdomen with alternating light and dark grey stripes. At the very back of the abdomen, Armogohma has two small, red spinnerets. | |||
Armogohma's eyeball is the abdomen of a smaller spider, which is revealed at the end of its battle with Link. This spider has four brown walking legs, a spiked head with four red eyes, and two pedipalps. The abdomen has spider web-like appearance on its front side. | |||
== | ====Mannerisms and Weaknesses==== | ||
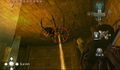
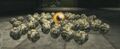
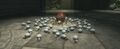
Armogohma is defensive in its battle with Link and has similar mannerisms as {{Term|OoT|Gohma|link}} from {{OoT}}. It spends most of the battle on the ceiling, and scrambles back to the ceiling whenever it is on the ground level. Armogohma protects its eyeball with its eyelid as it walks around. However, when it covers one of the skylights, its eyelid opens, and Armogohma surveys the room with its eyeball. On the ceiling, Armogohma produces eggs from an opening at the back of its abdomen. These eggs fall to the ground and hatch quickly into vicious {{Term|TP|Baby Gohma|link}}. Armogohma also produces a laser-like energy beam from its eyeball that follows Link and injures him if it makes contact. | |||
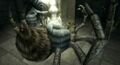
Armogohma's body only takes significant damage when it is smashed by the stone fist of a {{Term|TP|Dominion Rod|link}}-activated statue. The eyeball of Armogohma is also weak point, though Link cannot deal any damage to it while it is attached to Armogohma's body. Armogohma shrieks after its eyeball is hit or struck with the fist of the stone statue. When the eyeball reverts to its spider form, it is even more defensive and skittish than Armogohma. It scurries away from Link and has no attacks. When hit, the eyeball-spider also shrieks. | |||
== | ====Encounter==== | ||
{{Midna | |||
|context1= | |||
|quote1= <p>That is one big spider...</p><p>And it's even got a big nasty eye on its back... If that thing cast its gaze on you, you'd be helpless...</p> | |||
|context2= Once shot down with an Arrow | |||
|quote2= <p>Your best shot is going to be after you've knocked it down!</p><p>If you don't hurry up and attack it, it'll crawl back up to the ceiling!</p> | |||
|context3= Once struck with the Sword | |||
|quote3= <p>That thing is so heavily armored, your sword just bounces right off...</p><p>It's not just big. It's HUGE! I don't know if any of your items could do much to it, {{Player Name}}...</p> | |||
|context5= If Link moves a statue when Armogohma isn't there | |||
|quote5= <p>It doesn't do much good to drop it in front of a statue if you don't move the statue once it's there!</p><p>You have to watch its movements while it's crawling around on the ceiling!</p> | |||
|context6= Once struck with a statue via the Dominion Rod | |||
|quote6= <p>What a handy little spider-crusher!</p><p>Go on! Just whack away!</p> | |||
|context7= Second form | |||
|quote7= <p>It sure is a persistent bug... Even if it is just its eye, it's still alive...</p><p>But now that its armored shell is gone, you should be able to finish it off with your blade!</p> | |||
}} | |||
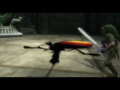
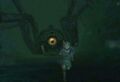
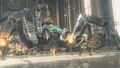
After Link enters Armogohma's chamber, he approaches one of the four large statues. The skylight in front of it goes out. He takes out his {{Term|TP|Sword|link}} and the camera pans upward to reveal Armogohma on the ceiling. Armogohma walks between the four skylight openings on the ceiling, covering one before moving on to the next. It eventually stops over one of them and opens its eye. Link shoots the eye with an Arrow from the {{Term|TP|Hero's Bow|link}}. Armogohma recoils and falls to the ground on its back, in front of one of the corner statues. This queues a [[Critical Point]] and Link fires an energy ball from the Dominion Rod into the statue. The statue activates and smashes Armogohma's body with a stone fist. Armogohma recovers and returns to the ceiling. At times, Armogohma attacks Link with Baby Gohma or its homing energy beam. Link continues to activate the statues and smashes Armogohma's body twice more. Armogohma curls up on itself and explodes. Armogohma's eyeball reveals itself to be a small spider on its own, which tries to escape along with some of its spawn. Link quickly defeats the eyeball-spider and the rest of the Baby Gohma. | |||
After Armogohma's defeat, Link receives a [[Mirror Shard]] and a [[Heart Container]]. | |||
==Other Appearances== | |||
===''Zelda HD Experience''=== | |||
{{Noncanon|Start}} | |||
{{Stub|Zelda HD Experience}} | |||
{{Term|Zelda HD Experience|Armogohma}} attacks {{Term|Zelda HD Experience|Link|link}} within the {{Term|Zelda HD Experience|Temple of Time|link}}. | |||
{{Noncanon|End}} | |||
==Nomenclature== | |||
Armogohma's name is a portmanteau of "armor" and "[[Gohma]]". | |||
{{Nomenclature}} | |||
==Gallery== | ==Gallery== | ||
<gallery> | <gallery> | ||
File:Armogohma.jpg|Twilit Arachnid Armogohma | File:TP Armogohma Eye Model.png|Armogohma's eye front | ||
File: | File:TP Armogohma Eye Model 2.png|Armogohma's eye back | ||
File: | File:Armogohma.jpg|Twilit Arachnid: Armogohma | ||
File:BabyGohmaEggs.jpg | File:Armogohma Critical.jpg|Armogohma shooting a laser | ||
File:armogohmaeye.jpg | File:Armogohma Hammered.jpg|Armogohma being hit by a statue | ||
File: | File:BabyGohmaEggs.jpg|Armogohma's eye surrounded by Gohma Eggs | ||
File:armogohmaeye.jpg|Armogohma's eye surrounded by Baby Gohmas | |||
File:TP Armogohma Eye Flat.png|Armogohma's eye flattened | |||
File:TP Armogohma Beta.jpg|Armogohma chasing Link in an early version of {{TP|-}} | |||
File:Zelda Wii U Tech Demo.jpg|Armogohma in the ''Zelda'' HD Experience | |||
</gallery> | </gallery> | ||
{{Ref}} | |||
{{ | |||
{{Bosses|TP}} | |||
{{ | {{Categories | ||
|Eye Enemies, Gohmas, Twilight Enemies | |||
| | |bosses= TP, TPHD, Zelda HD Experience | ||
}} | |||
| | |||
Latest revision as of 04:15, 15 April 2024
Armogohma is a recurring Boss in The Legend of Zelda series.[2] Armogohma goes unnamed in the Zelda HD Experience.
Characteristics
Twilight Princess
Physical Appearance
The keeper of one of the Shards of the Mirror of Twilight, Armogohma is a massive, armored arachnid. It has eight grey walking legs. These legs have three joints each and end in a white, pike-like barb. These legs have ornate, rectangular grooves in various places, and several white hairs, mainly near the joints. Armogohma also has two large, spiked pedipalps and two interior fangs near its head. The head has four lesser eyes arranged in a square and four tiny forceps underneath its red mouth. Atop the grey thorax of Armogohma is a circular cavity with a large eyeball inside. This red-yellow eyeball is similar in appearance and size to the eyeball of Morpheel. Armogohma protects its eyeball with an eyelid-like closing in the cavity. Armogohma also has a large, hairy abdomen with alternating light and dark grey stripes. At the very back of the abdomen, Armogohma has two small, red spinnerets.
Armogohma's eyeball is the abdomen of a smaller spider, which is revealed at the end of its battle with Link. This spider has four brown walking legs, a spiked head with four red eyes, and two pedipalps. The abdomen has spider web-like appearance on its front side.
Mannerisms and Weaknesses
Armogohma is defensive in its battle with Link and has similar mannerisms as Gohma from Ocarina of Time. It spends most of the battle on the ceiling, and scrambles back to the ceiling whenever it is on the ground level. Armogohma protects its eyeball with its eyelid as it walks around. However, when it covers one of the skylights, its eyelid opens, and Armogohma surveys the room with its eyeball. On the ceiling, Armogohma produces eggs from an opening at the back of its abdomen. These eggs fall to the ground and hatch quickly into vicious Baby Gohma. Armogohma also produces a laser-like energy beam from its eyeball that follows Link and injures him if it makes contact.
Armogohma's body only takes significant damage when it is smashed by the stone fist of a Dominion Rod-activated statue. The eyeball of Armogohma is also weak point, though Link cannot deal any damage to it while it is attached to Armogohma's body. Armogohma shrieks after its eyeball is hit or struck with the fist of the stone statue. When the eyeball reverts to its spider form, it is even more defensive and skittish than Armogohma. It scurries away from Link and has no attacks. When hit, the eyeball-spider also shrieks.
Encounter
After Link enters Armogohma's chamber, he approaches one of the four large statues. The skylight in front of it goes out. He takes out his Sword and the camera pans upward to reveal Armogohma on the ceiling. Armogohma walks between the four skylight openings on the ceiling, covering one before moving on to the next. It eventually stops over one of them and opens its eye. Link shoots the eye with an Arrow from the Hero's Bow. Armogohma recoils and falls to the ground on its back, in front of one of the corner statues. This queues a Critical Point and Link fires an energy ball from the Dominion Rod into the statue. The statue activates and smashes Armogohma's body with a stone fist. Armogohma recovers and returns to the ceiling. At times, Armogohma attacks Link with Baby Gohma or its homing energy beam. Link continues to activate the statues and smashes Armogohma's body twice more. Armogohma curls up on itself and explodes. Armogohma's eyeball reveals itself to be a small spider on its own, which tries to escape along with some of its spawn. Link quickly defeats the eyeball-spider and the rest of the Baby Gohma.
After Armogohma's defeat, Link receives a Mirror Shard and a Heart Container.
Other Appearances
Zelda HD Experience
Nomenclature
Armogohma's name is a portmanteau of "armor" and "Gohma".
| Language | Names | |
|---|---|---|
| This table was generated using translation pages. To request an addition, please contact a staff member with a reference. | ||
Gallery
-

Armogohma's eye front
-
Armogohma's eye back
-
Twilit Arachnid: Armogohma
-
Armogohma shooting a laser
-
Armogohma being hit by a statue
-
Armogohma's eye surrounded by Gohma Eggs
-
Armogohma's eye surrounded by Baby Gohmas
-
Armogohma's eye flattened
-
Armogohma chasing Link in an early version of Twilight Princess
-
Armogohma in the Zelda HD Experience


References
- ↑ "Twilit Arachnid
ARMOGOHMA" — Game Screen (Twilight Princess HD) - ↑ Encyclopedia, Dark Horse Books, pg. 163 (TP)
Mazura • Jermafenser • Rebonack • Carock • Gooma • Barba • Thunderbird • Link's Shadow
Ball and Chain Trooper • Armos Knights • Lanmolas • Moldorm • Agahnim
Helmasaur King • Arrghus • Mothula • Blind the Thief • Kholdstare • Vitreous • Trinexx • Ganon
Moldorm • Genie • Slime Eye • Angler Fish • Slime Eel • Facade • Evil Eagle • Hot Head • Shadow Nightmares
Spike Roller • Moblin Chief • Hinox • Dodongo Snakes • Lanmola • Hydrosoar
Master Stalfos • Gohma • Armos Knight • Rover • Grim Creeper • Turtle Rock • Blaino
Gohma • King Dodongo • Barinade • Phantom Ganon • Volvagia • Morpha • Bongo Bongo • Twinrova • Ganon
Lizalfos • Big Octo • Stalfos • Meg • Flare Dancer • White Wolfos • Dark Link • Dead Hand • Gerudo Thief • Iron Knuckle
Odolwa • Goht • Gyorg • Twinmold • Majora's Mask
Dinolfos • Gekko • Wizzrobe • Gerudo Pirate • Wart • Gekko and Mad Jelly
Captain Keeta • Iron Knuckle • Sharp • Igos du Ikana • Garo Master • Gomess • Eyegore
Aquamentus • Dodongo • Mothula • Gohma • Digdogger • Manhandla • Gleeok • Medusa Head • General Onox
Twinrova • Ganon
Brother Goriyas • Facade • Omuai • Agunima • Great Moblin • Syger • Vire • Poe Sisters • Frypolar
Pumpkin Head • Head Thwomp • Shadow Hag • Eyesoar • Smog • Octogon • Possessed Nayru • Plasmarine • Ramrock • Veran
Twinrova • Ganon
Giant Ghini • Swoop • Subterror • Armos Warrior • Great Moblin • Smasher • Vire • Angler Fish • Blue Stalfos
Gohma • Kalle Demos • Gohdan • Helmaroc King • Jalhalla • Molgera • Puppet Ganon • Ganondorf
Mothula • Darknut • Phantom Ganon • Stalfos • Wizzrobe • Mighty Darknut • Big Octo![]()
Phantom Ganon • Stone Arrghus • Helmaroc King • Big Poe • Big Moldorm • Frostare • Vaati • Ganon
Chief Soldier • Shadow Link • Manhandla • Dodongos • Big Dark Stalfos • Gohma • Big Dodongo
Big Green Chuchu • Gleerok • Mazaal • Big Octorok • Gyorg Pair • Vaati
Madderpillar • Dark Nut • Big Blue Chuchu • Red Dark Nut • Black Knight
Diababa • Fyrus • Morpheel • Stallord • Blizzeta • Armogohma • Argorok • Zant • Puppet Zelda • Ganon
Ook • King Bulblin • Dangoro • Twilit Carrier Kargarok • Twilit Bloat
Deku Toad • Death Sword • Darkhammer • Darknut • Aeralfos • Phantom Zant
Stagnox • Fraaz • Phytops • Cragma • Byrne • Skeldritch • Demon Train • Chancellor Cole • Malladus
Mothula • Snapper • Heatoise • Big Blin • Rocktite • Geozard Chief • Dark Link![]()
Ghirahim • Scaldera • Moldarach • The Imprisoned • Koloktos • Tentalus • Levias • Bilocyte • Demise
Stalfos • Lizalfos • Stalmaster • Moldarach • LD-002G Scervo • Dark Lizalfos • Magmanos • Moldorm • LD-003D Dreadfuse
Yuga • Moldorm • Margomill • Gemesaur King • Arrghus • Knucklemaster • Stalblind • Zaganaga • Dharkstare • Grinexx • Yuga Ganon
Armos • Red Stalfos • Heedles • Green & Red Goriyas • Gigabari • Gibdos & Purple Mini-Moldorms • Red Eyegores • Flying Tiles & Devalants • Big Pengator & Pengators • Fire Gimos • Moldorm • Lorule Ball and Chain Soldier • Arrghus
Margoma • Arrghus • Moldorm • Blizzagia • The Lady's Pets • Stalchampion • Prismantus • The Lady • Shadow Links
Electric Blob King • Electric Blob Queen • Hinox Brothers • Freezlord • Vulture Vizier • Grim Repoe • Gigaleon
Windblight Ganon • Fireblight Ganon • Thunderblight Ganon • Waterblight Ganon • Monk Maz Koshia(TCB) • Calamity Ganon • Dark Beast Ganon
Stone Talus • Stone Talus (Luminous) • Stone Talus (Rare) • Igneo Talus • Frost Talus • Igneo Talus Titan(TCB) • Molduga • Molduking(TCB) • Hinox • Blue Hinox • Black Hinox • Master Kohga
Bosses in Tears of the Kingdom
Colgera • Yunobo • Moragia • Marbled Gohma • Sludge Like • Mucktorok • Queen Gibdo • Seized Construct • Phantom Ganon • Demon King's Army • Demon King Ganondorf • Demon Dragon