Shrine of Water: Difference between revisions
| (27 intermediate revisions by 16 users not shown) | |||
| Line 1: | Line 1: | ||
{{Noncanon}} | {{Noncanon}} | ||
{{ | {{Infobox Dungeon | ||
| | |image= File:ZA Shrine of Water.png | ||
| | |caption= Entrance to the {{Term|ZA|Shrine of Water}} | ||
|location = Sea Island | |location= {{Term|ZA|Sea Island|link}} | ||
|game = | |game= ZA | ||
|item = | |item= {{Term|ZA|Plank|link}} | ||
|mini-boss = Kelpi | |mini-boss= {{Plural|ZA|Kelpi|link}} | ||
|boss = | |boss= {{Term|ZA|Agwanda|link}} | ||
|quest = | |quest= | ||
| | {{List| | ||
{{Term|ZA|Celestial Sign|link}}, | |||
{{Term|ZA|Heart Container|section=Philips CD-i Games|link}}, | |||
}} | }} | ||
}} | |||
The '''Shrine of Water''' is the fifth {{Term|ZA|Dungeon|link}} in {{ZA}}.{{Name Ref|ZA}} It is a flooded cavern on {{Term|ZA|Sea Island}}, guarded by its Shrine Keeper and {{Term|ZA|Boss|link}}, {{Term|ZA|Agwanda}}. | |||
==Entrance to the Shrine== | |||
The {{Term|ZA|Shrine of Water}} is found inside a cave on {{Term|ZA|Sea Island|link}}. The island can only be reached by taking a {{Term|ZA|Raft|link}} from the {{Term|ZA|Seacoast Plain|link}} port across the sea to the island. {{Term|ZA|Princess Zelda|display=Zelda|link}} will need to pay the {{Term|ZA|Characters in Zelda's Adventure|section=Rafter|display=Rafter|link}} 20 {{Plural|ZA|Rupee|link}} as well as provide him the {{Term|ZA|Vial of Winds|link}}, as the offshore wind has died down.<ref>{{Cite|If you wish to cross the sea, bring us twenty Rubies and a Vial of Wind. The offshore wind has died down, and you must bring your own breeze.|Rafter|ZA}}</ref> | |||
==Themes and Navigation== | |||
The {{Term|ZA|Shrine of Water}} is a flooded underground cavern, which contains large pools of water and underground rivers. Its extreme humidity enables coral and other forms of sea life to grow out of the water, and also makes it home to a variety of aquatic monsters on an otherwise uninhabited island. While the first half of the {{Term|ZA|Dungeon|link}} has dry land for Zelda to walk on, the second half is completely flooded, and requires the {{Term|ZA|Raft|link}} from the {{Term|ZA|Meadow of Skotness|link}} to cross. Its realm is entirely under control by the creature {{Term|ZA|Agwanda|link}}, who rules over water itself and guards the Shrine's Water of Life.<ref>{{Cite|I am Agwanda, and this is my realm! I control the waters of life and renewal. I will dry up even you tears, little one!|Agwanda|ZA}}</ref><ref>{{Cite|I know you've come to steal the Water of Life! You shall not have it while I have substance to fill my form. Begone!|Agwanda|ZA}}</ref> Like the {{Term|ZA|Shrine of Earth|link}}, the Shrine's caverns connect to each other between large gaps as shown on the {{Term|ZA|Dungeon}} {{Term|ZA|Map|link}}. The Shrine is otherwise straight-forward, and only has Zelda follow a single path. | |||
Zelda starts in the middle section of the Shrine, where she must walk along a river and avoid Spears stabbing out of the cavern walls. A pair of {{Plural|ZA|Zol|link}} along the way can be defeated for the {{Term|ZA|Dungeon}} {{Term|ZA|Map}}. Eventually, Zelda finds a wooden {{Term|ZA|Plank|link}} jammed in a rock damming part of the river. This {{Term|ZA|Plank}} is used to bridge a gap of the broken bridge crossing the river. | |||
Encountered throughout the Shrine are three {{Plural|ZA|Kelpi|link}}, servants of {{Term|ZA|Agwanda}} who guard the Shrine and act as its mini-bosses.<ref>{{Cite|I am the South Kelpie! It is my honor to fight you for my mistress, the great Agwanda!|South Kelpi|ZA}}</ref> They must be defeated to proceed ahead, and can only be defeated with the use of the {{Term|ZA|Turquoise Ring|link}} {{Term|ZA|Spells of Zelda's Adventure|display=Spell|link}}. The first {{Term|ZA|Kelpi}} is the South {{Term|ZA|Kelpi}}, which is found shortly after crossing the bridge and must be defeated to remove {{Plural|ZA|Floor Spikes|link}} blocking the next passage. After a long walk, Zelda eventually finds the second {{Term|ZA|Kelpi}}, the North {{Term|ZA|Kelpi}}. She must also be defeated to remove {{Plural|ZA|Floor Spikes}} to the next room. Beyond her is the {{Term|ZA|Dungeon}}'s {{Term|ZA|Compass|link}}, found laying in the corner guarded only by {{Plural|ZA|Spear|link}} poking out of the walls. | |||
The | |||
Zelda eventually reaches the {{Term|ZA|Dungeon}}'s flooded second half, and will have to use the {{Term|ZA|Raft}} to cross. The {{Term|ZA|Raft}} follows the water's current, taking her to a pier where Zelda fights a Giant Squid. A short walk leads to the remainder of the Shrine, which is also flooded and filled with swimming {{Plural|ZA|Enemy|link}}. Zelda must defend herself from them while crossing the water with the {{Term|ZA|Raft}}. Here, Zelda encounters the last of the {{Plural|ZA|Kelpi}}, the East {{Term|ZA|Kelpi}}. At the end of the tunnel is the flooded boss room where {{Term|ZA|Agwanda}} is fought, this time no longer requiring the {{Term|ZA|Raft}}. After {{Term|ZA|Agwanda}} is defeated, Zelda retrieves the fifth {{Term|ZA|Celestial Sign|link}}. | |||
The Shrine | |||
{{ | ===Minor {{Plural|ZA|Enemy}}=== | ||
== | {{Store Spawns|Enemies|ZA= Floor Spikes, Octorok, Zol}} | ||
<gallery> | <gallery> | ||
File:ZA Floor Spikes. | File:ZA Floor Spikes Sprite.png|{{Term|ZA|Floor Spikes|link}} | ||
File:ZA Giant Squid. | File:ZA Giant Squid Sprite.png|Giant Squid | ||
File:ZA Octorok. | File:ZA Octorok Sprite.png|{{Term|ZA|Octorok|link}} | ||
File: | File:ZA Spear Trap Sprite.png|Spear | ||
File:ZA Turtle. | File:ZA Turtle Sprite.png|Turtle | ||
File:ZA Zol. | File:ZA Zol Sprite.png|{{Term|ZA|Zol|link}} | ||
</gallery> | </gallery> | ||
==Gallery== | ==Gallery== | ||
<gallery> | <gallery> | ||
File:ZA Shrine of Water Map.png|In-game {{Term|ZA|Map|link}} of the {{Term|ZA|Shrine of Water}} | |||
File:ZA Shrine of Water Map 2.jpg|{{Term|ZA|Map}} of the {{Term|ZA|Shrine of Water}} | |||
</gallery> | |||
{{Ref}} | |||
{{Zelda's Adventure Dungeons}} | {{Zelda's Adventure Dungeons}} | ||
{{Categories | |||
|Shrines | |||
|dungeons= ZA | |||
}} | |||
Latest revision as of 00:29, 7 April 2024
The Shrine of Water is the fifth Dungeon in Zelda's Adventure.[name references needed] It is a flooded cavern on Sea Island, guarded by its Shrine Keeper and Boss, Agwanda.
Entrance to the Shrine
The Shrine of Water is found inside a cave on Sea Island. The island can only be reached by taking a Raft from the Seacoast Plain port across the sea to the island. Zelda will need to pay the Rafter 20 Rubies as well as provide him the Vial of Winds, as the offshore wind has died down.[1]
The Shrine of Water is a flooded underground cavern, which contains large pools of water and underground rivers. Its extreme humidity enables coral and other forms of sea life to grow out of the water, and also makes it home to a variety of aquatic monsters on an otherwise uninhabited island. While the first half of the Dungeon has dry land for Zelda to walk on, the second half is completely flooded, and requires the Raft from the Meadow of Skotness to cross. Its realm is entirely under control by the creature Agwanda, who rules over water itself and guards the Shrine's Water of Life.[2][3] Like the Shrine of Earth, the Shrine's caverns connect to each other between large gaps as shown on the Dungeon Map. The Shrine is otherwise straight-forward, and only has Zelda follow a single path.
Zelda starts in the middle section of the Shrine, where she must walk along a river and avoid Spears stabbing out of the cavern walls. A pair of Zols along the way can be defeated for the Dungeon Map. Eventually, Zelda finds a wooden Plank jammed in a rock damming part of the river. This Plank is used to bridge a gap of the broken bridge crossing the river.
Encountered throughout the Shrine are three Kelpies, servants of Agwanda who guard the Shrine and act as its mini-bosses.[4] They must be defeated to proceed ahead, and can only be defeated with the use of the Turquoise Ring Spell. The first Kelpi is the South Kelpi, which is found shortly after crossing the bridge and must be defeated to remove Floor Spikes blocking the next passage. After a long walk, Zelda eventually finds the second Kelpi, the North Kelpi. She must also be defeated to remove Floor Spikes to the next room. Beyond her is the Dungeon's Compass, found laying in the corner guarded only by Spears poking out of the walls.
Zelda eventually reaches the Dungeon's flooded second half, and will have to use the Raft to cross. The Raft follows the water's current, taking her to a pier where Zelda fights a Giant Squid. A short walk leads to the remainder of the Shrine, which is also flooded and filled with swimming Enemies. Zelda must defend herself from them while crossing the water with the Raft. Here, Zelda encounters the last of the Kelpies, the East Kelpi. At the end of the tunnel is the flooded boss room where Agwanda is fought, this time no longer requiring the Raft. After Agwanda is defeated, Zelda retrieves the fifth Celestial Sign.
Minor Enemies
-
-

Giant Squid
-

-

Spear
-

Turtle
-

Gallery
-
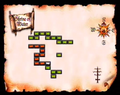
In-game Map of the Shrine of Water
-

Map of the Shrine of Water


References
- ↑ "If you wish to cross the sea, bring us twenty Rubies and a Vial of Wind. The offshore wind has died down, and you must bring your own breeze." — Rafter (Zelda's Adventure)
- ↑ "I am Agwanda, and this is my realm! I control the waters of life and renewal. I will dry up even you tears, little one!" — Agwanda (Zelda's Adventure)
- ↑ "I know you've come to steal the Water of Life! You shall not have it while I have substance to fill my form. Begone!" — Agwanda (Zelda's Adventure)
- ↑ "I am the South Kelpie! It is my honor to fight you for my mistress, the great Agwanda!" — South Kelpi (Zelda's Adventure)
| Dungeons in Zelda's Adventure |
|---|
|
Shrine of Earth • Shrine of Illusion • Shrine of Air • Shrine of Destiny • Shrine of Water • Shrine of Strength • Shrine of Fire |