Floor Spikes: Difference between revisions
TriforceTony (talk | contribs) (Each game should link its own file, not the file of another game.) |
m (→Gallery) |
||
| (35 intermediate revisions by 14 users not shown) | |||
| Line 1: | Line 1: | ||
{{Enemy | {{Move|Floor Spike}} | ||
:''{{Term|CoH|Spike Trap}} redirects here. For the rolling trap, see {{Term|Series|Spiketrap|link}}.'' | |||
{{Infobox Enemy | |||
|image= | |image= | ||
{{Media | {{Media | ||
|Model OoT= File: | |Model OoT= File:OoT Floor Spikes Model 2.png | ||
|Model OoT3D= File:OoT3D Floor Spikes Model.png | |Model OoT3D= File:OoT3D Floor Spikes Model.png | ||
|Model TWW= File: | |Model TWW= File:TWW Floor Spikes Model.png | ||
|Model TWWHD= File:TWWHD Floor Spikes Model.png | |Model TWWHD= File:TWWHD Floor Spikes Model.png | ||
|Model TP= File:Floor Spikes.png | |Model TP= File:TP Floor Spikes Model.png | ||
|Model TPHD= File:TPHD Floor Spikes Model.png | |Model TPHD= File:TPHD Floor Spikes Model.png | ||
|Model PH= File:Floor | |Model PH= File:PH Floor Spikes Model.png | ||
|Model ST= File:Floor | |Model ST= File:ST Floor Spikes Model.png | ||
|Model SS= File:SS Floor | |Model SS= File:SS Floor Spike Model.png | ||
|Model SSHD= File:SSHD Floor Spike Model.png | |||
|Model TFH= File:TFH Floor Spikes Model.png | |Model TFH= File:TFH Floor Spikes Model.png | ||
|Model BotW= File:BotW Floor Spikes Model.png | |Model BotW= File:BotW Floor Spikes Model.png | ||
| Line 16: | Line 19: | ||
|Sprite OoS= File:OoS Floor Spikes Sprite.png | |Sprite OoS= File:OoS Floor Spikes Sprite.png | ||
|Sprite OoA= File:OoA Floor Spikes Sprite.png | |Sprite OoA= File:OoA Floor Spikes Sprite.png | ||
|Sprite TMC= File:TMC Floor Spikes.png | |Sprite TMC= File:TMC Floor Spikes Sprite.png | ||
}} | }} | ||
|caption= | |caption= | ||
|race= | |race= | ||
|game= | |game= ALttP, LA, OoT, OoS, OoA, TWW, FSA, TMC, TP, PH, ST, SS, TFH, BotW | ||
|other= | |other= ZA, CoH | ||
|habitat= {{Plural|Series|Dungeon|link}} | |habitat= {{Plural|Series|Dungeon|link}} | ||
|member= | |member= | ||
| Line 30: | Line 33: | ||
|theme= | |theme= | ||
}} | }} | ||
{{Term/Store|Floor Spikes | {{Term/Store|Floor Spike|Floor Spikes|Series, ST|plural}},{{Exp Game|ST}}<ref>{{Cite|I don't think you can get through these {{Color|ST Light Blue|floor spikes}}, Link. Leave it to me! I'll figure something out!|Princess Zelda|ST}}</ref> also known as {{Term/Store|Spike|Spikes|FSA|plural}}{{Exp Game|FSA}}<ref>{{Cite Guide|game= FSA |publisher= Nintendo |page= 92}}</ref> or {{Term/Store|Spike Trap|Spike Traps|CoH|plural}},{{Exp Game|CoH}}<ref>{{Cite|Defeated By: Spike Trap|Game Over|CoH}}</ref> are recurring traps in {{TLoZ|Series}}.{{Name Ref|ALttP, LA, LADX, OoT, OoT3D, OoS, OoA, TWW, TWWHD, FSA, TP, TPHD, PH, SS, TFH, BotW}} {{Plural|Series|Floor Spikes}} go unnamed in {{TMC}}. | ||
==Characteristics== | ==Characteristics== | ||
==={{ALttP|-}}=== | ==={{ALttP|-}}=== | ||
{{ | {{Plural|ALttP|Floor Spikes}} can be avoided by using the {{Term|ALttP|Magic Cape|link}} in {{ALttP}}, as {{Term|ALttP|Link|link}} can walk directly over them without taking damage. The {{Term|ALttP|Magic Cape}} is necessary to obtain the {{Term|ALttP|Cane of Byrna|link}}, as it is preceded by a number of {{Plural|ALttP|Floor Spikes}} that {{Term|ALttP|Link}} would be unable to traverse safely otherwise. | ||
==={{LA|-}}=== | ==={{LA|-}}=== | ||
{{ | {{Stub|LA}} | ||
==={{OoT|-}}=== | ==={{OoT|-}}=== | ||
Many {{ | Many {{Plural|OoT3D|Floor Spikes}} are found inside the {{Term|OoT3D|Water Temple|link}} in {{OoT}}, typically blocking passage until the water level rises. In the {{Term|OoT3D|Shadow Temple|link}}, certain {{Plural|OoT3D|Floor Spikes}} are invisible, requiring that {{Term|OoT3D|Link}} use the {{Term|OoT3D|Lens of Truth|link}} in order to see them. The {{Term|OoT3D|Hover Boots|link}} can also be used to walk above {{Plural|OoT3D|Floor Spikes}}, momentarily avoiding damage, while the {{Term|OoT3D|Goron Tunic|link}} causes {{Term|OoT3D|Link}} to take damage less frequently from them. | ||
==={{OoS|-}}=== | ==={{OoS|-}}=== | ||
In {{OoS}}, in order to defeat {{Term|OoS|Dodongo|link}}, the {{Term|OoS|Boss|link}} from the {{Term|OoS|Snake's Remains|link}}, {{Term|OoS|Link|link}} must toss it onto the {{ | In {{OoS}}, in order to defeat {{Term|OoS|Dodongo|link}}, the {{Term|OoS|Boss|link}} from the {{Term|OoS|Snake's Remains|link}}, {{Term|OoS|Link|link}} must toss it onto the {{Plural|OoS|Floor Spikes}} found in the center of the room after stunning it with a {{Term|OoS|Bomb|link}}. | ||
==={{OoA|-}}=== | ==={{OoA|-}}=== | ||
{{ | {{Stub|OoA}} | ||
==={{TWW|-}}=== | ==={{TWW|-}}=== | ||
{{ | {{Plural|TWWHD|Floor Spikes}} appear in the {{Term|TWWHD|Forsaken Fortress|link}} and the {{Term|TWWHD|Wind Temple|link}} in {{TWW}}, though in the former they are unable to damage {{Term|TWWHD|Link|link}} and serve only to obstruct his path. In both {{Plural|TWWHD|Dungeon|link}}, the {{Plural|TWWHD|Floor Spikes}} can usually be retracted once a certain puzzle is solved or all enemies in the area have been defeated. | ||
==={{FSA|-}}=== | ==={{FSA|-}}=== | ||
{{ | {{Stub|FSA}} | ||
==={{TMC|-}}=== | ==={{TMC|-}}=== | ||
{{ | {{Plural|TMC|Floor Spikes}} appear in {{Plural|TMC|Dungeon|link}} and other {{Plural|TMC|Cave|link}} across {{Term|TMC|Hyrule|link}} in {{TMC}}, both while {{Term|TMC|Link}} is regular-sized and {{Term|TMC|Minish|link}}-sized. They will damage {{Term|TMC|Link|link}} if he touches them, though they can be leapt over by using {{Term|TMC|Roc's Cape|link}}. | ||
==={{TP|-}}=== | ==={{TP|-}}=== | ||
{{ | {{Plural|TPHD|Floor Spikes}} appear within the {{Term|TPHD|Arbiter's Grounds (Dungeon)|link}} in {{TP}}, where they emerge from holes in the floor when {{Term|TPHD|Link}} approaches. Several of their locations are also concealed by {{Term|TPHD|Quicksand|link}}, making it difficult to judge their position and maneuver around them. When they are above the ground, however, {{Term|TPHD|Link}} is able to destroy them permanently using {{Plural|TPHD|Bomb}}. | ||
==={{PH|-}}=== | ==={{PH|-}}=== | ||
{{ | {{Plural|PH|Floor Spikes}} appear inside {{Plural|PH|Dungeon|link}} in {{PH}}, where they serve to impede {{Term|PH|Link|link}}'s progress and will damage him on contact. {{Term|PH|Link}} can usually deactivate them by defeating enemies and solving puzzles. {{Plural|PH|Phantom|link}} are able to move over {{Plural|PH|Floor Spikes}} without taking damage. Some {{Plural|PH|Floor Spikes}} move up and down intermittently, forcing {{Term|PH|Link}} to pass over them quickly while they are briefly inactive. | ||
==={{ST|-}}=== | ==={{ST|-}}=== | ||
{{ | {{Plural|ST|Floor Spikes}} appear inside {{Plural|ST|Dungeon|link}} in {{ST}}, where they serve to impede {{Term|ST|Link|link}}'s progress and will damage him on contact. {{Term|ST|Link}} can usually deactivate them by defeating enemies and solving puzzles. As {{Plural|ST|Phantom|link}} are unaffected by {{Plural|ST|Floor Spikes}}, {{Term|ST|Princess Zelda|link}} can also harness this immunity when she gains the ability to possess {{Plural|ST|Phantom}}, and use it to cross over the {{Plural|ST|Floor Spikes}} and help solve puzzles normally out of {{Term|ST|Link}}'s reach. | ||
==={{SS|-}}=== | ==={{SS|-}}=== | ||
{{ | {{Plural|SS|Floor Spikes}} appear within a single room inside the {{Term|SS|Lanayru Mining Facility|link}} in {{SS}}, where they are stealthily concealed by large amounts of sand. They activate quickly when {{Term|SS|Link|link}} draws near. This requires {{Term|SS|Link}} to work his way through the maze-like room by using the {{Term|SS|Gust Bellows|link}} to blow away the sand and find a safe path. | ||
==={{TFH|-}}=== | ==={{TFH|-}}=== | ||
{{ | {{Plural|TFH|Floor Spikes}} appear in the {{Term|TFH|Frozen Plateau|link}} level of the {{Term|TFH|Drablands|link}} in {{TFH}}. Here, fireballs can be bounced across them using the {{Term|TFH|Fire Gloves|link}}, which are used to light {{Plural|TFH|Torch|link}} and defeat enemies that are otherwise out of reach. | ||
==={{BotW|-}}=== | ==={{BotW|-}}=== | ||
{{ | {{Stub|BotW}} | ||
{{Plural|BotW|Floor Spikes}} are typically found within {{Plural|BotW|Ancient Shrine|link}}. | |||
==Other Appearances== | ==Other Appearances== | ||
==={{ZA|-}}=== | ==={{ZA|-}}=== | ||
{{Noncanon|Start}} | {{Noncanon|Start}} | ||
{{ | {{Stub|ZA}} | ||
Floor Spikes appear in {{ZA}}. | {{Plural|ZA|Floor Spikes}} appear in {{ZA}}.{{Where}} | ||
{{Noncanon|End}} | {{Noncanon|End}} | ||
==={{CoH|-}}=== | |||
{{Ambig|Start}} | |||
{{Stub|CoH}} | |||
{{Ambig|End}} | |||
==Nomenclature== | ==Nomenclature== | ||
{{ | {{Nomenclature}} | ||
==Gallery== | ==Gallery== | ||
<gallery> | <gallery> | ||
File: | File:OoT Floor Spikes Model.png|Invisible {{Plural|OoT|Floor Spikes}} from {{OoT|-}} | ||
File:OoS LinkCarryingDodongo.png|{{Term|OoS|Link}} tossing {{Term|OoS|Dodongo}} into {{ | File:OoS Floor Spikes Sprite 2.png|Side view of {{Term|OoS|Floor Spikes}} from {{OoS|-}} | ||
File:Gust Bellows SS.png|{{ | File:OoS LinkCarryingDodongo.png|{{Term|OoS|Link}} tossing {{Term|OoS|Dodongo}} into {{Plural|OoS|Floor Spikes}} from {{OoS|-}} | ||
File:TFH | File:Gust Bellows SS.png|{{Plural|SS|Floor Spikes}} from {{SS|-}} | ||
File:ZA Floor Spikes. | File:TFH Floor Spikes.jpg|{{Plural|TFH|Floor Spikes}} from {{TFH|-}} | ||
File:ZA Floor Spikes Sprite.png|{{Plural|ZA|Floor Spikes}} from {{ZA|-}} | |||
File:CoH Spike Trap Sprite.png|{{Plural|CoH|Floor Spikes}} from {{CoH|-}} | |||
</gallery> | </gallery> | ||
{{Ref}} | {{Ref}} | ||
{{Categories | {{Categories | ||
|Traps | |||
|enemies= ALttP, LA, LADX, LANS, OoT, OoT3D, OoS, OoA, TWW, TWWHD, FSA, TMC, TP, TPHD, PH, ST, SS, TFH, BotW, ZA | |enemies= ALttP, LA, LADX, LANS, OoT, OoT3D, OoS, OoA, TWW, TWWHD, FSA, TMC, TP, TPHD, PH, ST, SS, TFH, BotW, ZA | ||
}} | }} | ||
Latest revision as of 00:28, 7 April 2024

- Spike Trap redirects here. For the rolling trap, see Spiketrap.
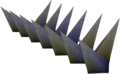
Floor Spikes,(ST)[1] also known as Spikes(FSA)[2] or Spike Traps,(CoH)[3] are recurring traps in The Legend of Zelda series.[name references needed] Floor Spikes go unnamed in The Minish Cap.
Characteristics
A Link to the Past
Floor Spikes can be avoided by using the Magic Cape in A Link to the Past, as Link can walk directly over them without taking damage. The Magic Cape is necessary to obtain the Cane of Byrna, as it is preceded by a number of Floor Spikes that Link would be unable to traverse safely otherwise.
Link's Awakening
Ocarina of Time
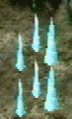
Many Floor Spikes are found inside the Water Temple in Ocarina of Time, typically blocking passage until the water level rises. In the Shadow Temple, certain Floor Spikes are invisible, requiring that Link use the Lens of Truth in order to see them. The Hover Boots can also be used to walk above Floor Spikes, momentarily avoiding damage, while the Goron Tunic causes Link to take damage less frequently from them.
Oracle of Seasons
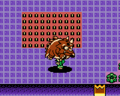
In Oracle of Seasons, in order to defeat Dodongo, the Boss from the Snake's Remains, Link must toss it onto the Floor Spikes found in the center of the room after stunning it with a Bomb.
Oracle of Ages
The Wind Waker
Floor Spikes appear in the Forsaken Fortress and the Wind Temple in The Wind Waker, though in the former they are unable to damage Link and serve only to obstruct his path. In both Dungeons, the Floor Spikes can usually be retracted once a certain puzzle is solved or all enemies in the area have been defeated.
Four Swords Adventures
The Minish Cap
Floor Spikes appear in Dungeons and other Caves across Hyrule in The Minish Cap, both while Link is regular-sized and Minish-sized. They will damage Link if he touches them, though they can be leapt over by using Roc's Cape.
Twilight Princess
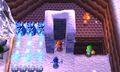
Floor Spikes appear within the Arbiter's Grounds in Twilight Princess, where they emerge from holes in the floor when Link approaches. Several of their locations are also concealed by Quicksand, making it difficult to judge their position and maneuver around them. When they are above the ground, however, Link is able to destroy them permanently using Bombs.
Phantom Hourglass
Floor Spikes appear inside Dungeons in Phantom Hourglass, where they serve to impede Link's progress and will damage him on contact. Link can usually deactivate them by defeating enemies and solving puzzles. Phantoms are able to move over Floor Spikes without taking damage. Some Floor Spikes move up and down intermittently, forcing Link to pass over them quickly while they are briefly inactive.
Spirit Tracks
Floor Spikes appear inside Dungeons in Spirit Tracks, where they serve to impede Link's progress and will damage him on contact. Link can usually deactivate them by defeating enemies and solving puzzles. As Phantoms are unaffected by Floor Spikes, Princess Zelda can also harness this immunity when she gains the ability to possess Phantoms, and use it to cross over the Floor Spikes and help solve puzzles normally out of Link's reach.
Skyward Sword
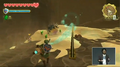
Floor Spikes appear within a single room inside the Lanayru Mining Facility in Skyward Sword, where they are stealthily concealed by large amounts of sand. They activate quickly when Link draws near. This requires Link to work his way through the maze-like room by using the Gust Bellows to blow away the sand and find a safe path.
Tri Force Heroes
Floor Spikes appear in the Frozen Plateau level of the Drablands in Tri Force Heroes. Here, fireballs can be bounced across them using the Fire Gloves, which are used to light Torches and defeat enemies that are otherwise out of reach.
Breath of the Wild
Floor Spikes are typically found within Ancient Shrines.
Other Appearances
Zelda's Adventure
Cadence of Hyrule
Nomenclature
| Language | Names | Meanings |
|---|---|---|
Japanese | トゲ床 (Toge Yuka) (TMC)[6] | Spike Tile |
Italian | Suolo a punte (OoS | OoA)[4][5] | Floor with spikes |
| This table was generated using translation pages. To request an addition, please contact a staff member with a reference. | ||
Gallery
-
Invisible Floor Spikes from Ocarina of Time
-

Side view of Floor Spike from Oracle of Seasons
-
Link tossing Dodongo into Floor Spikes from Oracle of Seasons
-
Floor Spikes from Skyward Sword
-
Floor Spikes from Tri Force Heroes
-
Floor Spikes from Zelda's Adventure
-

Spike Traps from Cadence of Hyrule


References
- ↑ "I don't think you can get through these floor spikes, Link. Leave it to me! I'll figure something out!" — Princess Zelda (Spirit Tracks)
- ↑ The Legend of Zelda: Four Swords Adventures—The Official Nintendo Player's Guide, Nintendo of America, pg. 92
- ↑ "Defeated By: Spike Trap" — Game Over (Cadence of Hyrule)
- ↑ "Fortuna Rosso
1/2 danno da suolo a punte" — Item Screen (Oracle of Seasons, Italian localization) - ↑ "Fortuna Rosso
1/2 danno da suolo a punte" — Item Screen (Oracle of Ages, Italian localization) - ↑ Nintendo Official Guidebook—The Legend of Zelda: The Minish Cap, Shogakukan, pg. 35
- Enemies
- Traps
- Enemies in A Link to the Past
- Enemies in Link's Awakening
- Enemies in Link's Awakening DX
- Enemies in Link's Awakening (Nintendo Switch)
- Enemies in Ocarina of Time
- Enemies in Ocarina of Time 3D
- Enemies in Oracle of Seasons
- Enemies in Oracle of Ages
- Enemies in The Wind Waker
- Enemies in The Wind Waker HD
- Enemies in Four Swords Adventures
- Enemies in The Minish Cap
- Enemies in Twilight Princess
- Enemies in Twilight Princess HD
- Enemies in Phantom Hourglass
- Enemies in Spirit Tracks
- Enemies in Skyward Sword
- Enemies in Tri Force Heroes
- Enemies in Breath of the Wild
- Enemies in Zelda's Adventure