Shrine of Resurrection: Difference between revisions
m (Text replacement - "ch([ST]M?)=" to "zh$1=") |
TriforceTony (talk | contribs) |
||
| (39 intermediate revisions by 15 users not shown) | |||
| Line 1: | Line 1: | ||
{{ | {{Infobox Location | ||
{{ | |image= | ||
| | {{Media | ||
| | |Screenshot BotW= File:BotW Shrine of Resurrection.png | ||
|Screenshot TotK= File:TotK Shrine of Resurrection.png | |||
}} | |||
|caption= | |caption= | ||
|game= | |game= BotW, TotK | ||
|other= HWAoC | |||
|inhab= | |inhab= | ||
|items= | |items= | ||
|related= | {{Infobox Game Blocks | ||
| | |BotW= {{Term|BotW|Sheikah Slate|link}}, {{Term|BotW|One-Hit Obliterator|link}} | ||
}} | |||
|season= | |||
|temperature= | |||
|counter= {{Term|TotK|Secret Spring of Revival|link}} {{Small|({{Term|TotK|Depths|link}})}} | |||
|theme= | |||
|related= | |||
{{List| | |||
{{Plural|Series|Ancient Shrine|link}}, | |||
{{Term|Series|Final Trial|link}}, | |||
}} | |||
|strategy= | |||
|zu= | |||
}} | }} | ||
The | The {{Term/Store|Shrine of Resurrection||Series, BotW, TotK, HWAoC}} is a recurring location in {{TLoZ|Series}}.<ref>{{Cite|{{Color|BotW Monk Blue|'''Shrine of Resurrection'''}}|Map|BotW}}</ref><ref>{{Cite|Shrine of Resurrection|Map|TotK}}</ref><ref name="Purah">{{Cite|Aha, I know! How about we activate the Shrine of Resurrection and then use it as a travel gate?|Purah|HWAoC}}</ref> | ||
==Features and Overview== | ==Features and Overview== | ||
Link awakens from within the Shrine of Resurrection after hearing the call of | ==={{BotW|-}}=== | ||
{{Term|BotW|Link|link}} awakens from his {{Term|BotW|Slumber of Restoration|link}} within the {{Term|BotW|Shrine of Resurrection|display=Shrine}} after hearing the call of {{Term|BotW|Princess Zelda|link}},<ref>{{Cite|Open your eyes... Wake up, Link...|Zelda|BotW}}</ref> whose voice he has forgotten. He is guided to a pedestal, where he receives the {{Term|BotW|Sheikah Slate|link}}.<ref>{{Cite|That is a {{Color|BotW Red|Sheikah Slate}}. Take it. It will help guide you after your long slumber.|Zelda|BotW}}</ref> Afterwards, the door to the chamber opens, leading to another room containing two {{Plural|BotW|Treasure Chest|link}} with the {{Term|BotW|Old Shirt|link}} and the {{Term|BotW|Well-Worn Trousers|link}}. Behind the {{Term|BotW|Treasure Chest|display= Chests}} rests a pedestal from which {{Term|BotW|Link}} can place the {{Term|BotW|Sheikah Slate}} and open the entrance to the {{Term|BotW|Shrine of Resurrection}}, leading to the {{Term|BotW|Great Plateau}}.<ref>{{Cite|Hold the {{Color|BotW Blue|Sheikah Slate}} up to the pedestal. That will show you the way.|Zelda|BotW}}</ref> | |||
One hundred years prior to his awakening, {{Term|BotW|Link}} was nearly defeated after {{Term|BotW|Calamity Ganon|link}}'s return.<ref>{{Cite|Link, save yourself! Go! I'll be fine! Don't worry about me! Run!|Zelda|BotW}}</ref> After being saved by {{Term|BotW|Zelda|link}} near {{Term|BotW|Fort Hateno|link}},<ref>{{Cite|NO! Was... Was that...? The power...|Zelda|BotW}}</ref> she ordered him to be placed in the {{Term|BotW|Shrine of Resurrection}} to recover.<ref>{{Cite|Take Link to the Shrine of Resurrection. If you don't get him there immediately, we are going to lose him forever! Is that clear? So make haste and go! His life is now in your hands!|Zelda|BotW}}</ref> {{Term|BotW|Robbie|link}} and {{Term|BotW|Purah|link}} were the ones to bring him there.<ref>{{Cite|Let me start from the beginning. It was 100 years ago... Calamity Ganon had already swallowed Princess Zelda. Dr. Purah and I had already taken Link to the Shrine of Resurrection and left him to recover.|Robbie's Memoirs|BotW}}</ref> | |||
In {{Term|BotW|The Champions' Ballad|link}}, {{Term|BotW|Link}} must return here to begin the {{Term|BotW|Divine Beast Tamer's Trial|link}}. After completing all of the {{Plural|BotW|Trial|link}}, the {{Term|BotW|Final Trial}} can be accessed by placing the {{Term|BotW|Sheikah Slate}} in the pedestal. In doing this, the chamber is revealed to actually be an elevator which descends into the {{Term|BotW|Dungeon|link}}. | |||
====Areas==== | |||
{{Gallery List|Locations | |||
|BotW= Restoration Room, Second Room | |||
}} | |||
====Equipment==== | |||
{{Heading|During "{{Term|BotW|EX The Champions' Ballad}}"}} | |||
{{Gallery List|Equipment | |||
|BotW= One-Hit Obliterator [Sublocation:Restoration Room] | |||
}} | |||
===={{Plural|BotW|Treasure Chest}}==== | |||
{{Treasure Chests|game= BotW | |||
|- | |||
| Stone Chest | |||
| Old Shirt | |||
| On the western side of the path in the {{Term|BotW|Second Room|link}} | |||
|- | |||
| Stone Chest | |||
| Well-Worn Trousers | |||
| On the eastern side of the path in the {{Term|BotW|Second Room|link}} | |||
}} | |||
===={{Plural|BotW|Korok Seed}}==== | |||
{{Korok Seeds|game= BotW | |||
|- | |||
| Shrine of Resurrection | |||
| Leaves with Fairy Dust | |||
| Hovering in the capsule {{Term|BotW|Link|link}} was resting in<br/>Only appears once {{Term|BotW|Link}} has left the {{Term|BotW|Great Plateau|link}} | |||
}} | |||
==={{TotK|-}}=== | |||
The {{Plural|TotK|Ancient Technology|link}} within the {{Term|TotK|Shrine of Resurrection}} have eroded away, replaced by a {{Term|TotK|Cave|link}} system. The {{Term|TotK|Shrine of Resurrection}}'s counterpart in the {{Term|TotK|Depths|link}} is the {{Term|TotK|Secret Spring of Revival|link}}.<ref>{{Cite|{{Big|The Surface and the Depths}}<br/>The surface and Depths are intricately connected. Someplace special on the surface may be mirrored by something in the Depths as well, and vice versa.|Tips and Tricks|TotK}}</ref> | |||
The entrance to the {{Term|TotK|Shrine of Resurrection|display=Shrine}} is blocked by {{Plural|TotK|Vine|link}} hanging down from above. Though the chambers have eroded into rock and are now covered in foliage, the first few rooms of the {{Term|TotK|Cave}} resemble the terrain of their {{BotW}} counterparts closely. Several {{Plural|TotK|Barrel|link}} and {{Plural|TotK|Wooden Box|link}} can be found where the {{Term|BotW|Treasure Chest}} containing the {{Term|BotW|Well-Worn Trousers}} was located in {{BotW|-}}. The room where {{Term|BotW|Link}} awakened now contains a small {{Term|TotK|Hot Spring|link}}, and a crevice leading further down into the {{Term|TotK|Cave}} has formed, marked by a large root. | |||
A {{Term|TotK|Yiga Clan|link}} base has been built into the lower regions of the {{Term|TotK|Shrine of Resurrection|display=Shrine}}, marked by large flags bearing the {{Term|TotK|Yiga Clan|display=Yiga}} emblem. A {{Term|TotK|Steward Construct|link}} lies inside, inactive, while {{Term|TotK|Mighty Bananas|link}} lie on a small podium in the middle of the base. When {{Term|TotK|Link}} picks up the {{Term|TotK|Mighty Bananas|display=Bananas}}, a {{Term|TotK|Yiga Clan}} member laughs and mocks the swordsman for falling for their trap,<ref>{{Cite|Kehehehe... The noble swordsman, scrounging for scraps? You fell for the oldest trick in the book!|Yiga Clan|TotK}}</ref> causing three {{Plural|TotK|Yiga Footsoldier|link}} to appear and attack {{Term|TotK|Link}}. | |||
Once {{Term|TotK|Link}} defeats the {{Plural|TotK|Yiga Footsoldier}}, the {{Term|TotK|Steward Construct}} will reactivate, thanking him for his assistance when spoken to.<ref>{{Cite|Thank you for driving away the intruders.|Steward Construct|TotK}}</ref> It explains to him that it was taken from the {{Term|TotK|Depths|link}} by the {{Term|TotK|Yiga Clan|display=Yiga}},<ref>{{Cite|Those interlopers carried me here with them from the Depths.|Steward Construct|TotK}}</ref> and chooses to continue its task of managing {{Plural|TotK|Schema Stone|link}} in the {{Term|TotK|Shrine of Resurrection|display=Shrine}} as it has no way to return to its post.<ref>{{Cite|I have no way of returning to where I was stationed there. I will therefore continue my work here. My task in the Depths was to manage {{Color|TotK Red|schema stones}}.|Steward Construct|TotK}}</ref> Explaining to {{Term|TotK|Link}} that {{Plural|TotK|Zonaite|link}} was once mined and processed in the {{Term|TotK|Depths}}, the {{Term|TotK|Steward Construct|display=Construct}} offers him the {{Term|TotK|Schema Stone}} for the {{Term|TotK|Beam Cycle|link}}.<ref>{{Cite|A great deal of zonaite was mined and processed there once. Please hold one moment. I have confirmed that there is a {{Color|TotK Red|schema stone}} you do not yet have. Allow me to rectify that.|Steward Construct|TotK}}</ref>{{Note|If {{Term|TotK|Link}} has not unlocked the {{Term|TotK|Autobuild|link}} {{Term|TotK|Ancient Power|link}}, the {{Term|TotK|Steward Construct}} will instead advise him to visit the {{Term|TotK|Great Abandoned Central Mine|link}} in the {{Term|TotK|Depths}} before returning for his reward.<ref>{{Cite|I {{Color|TotK Red|have something for you}}. But I do not think you are ready to receive it. Please visit the {{Color|TotK Red|Great Abandoned Central Mine}} in the Depths and return here after.|Steward Construct|TotK}}</ref>}} | |||
====Areas==== | |||
{{Gallery List|Locations | |||
|TotK= Restoration Room, Second Room | |||
}} | |||
===={{Plural|TotK|Creature}}==== | |||
{{Gallery List|Creatures | |||
|TotK= Bubbulfrog [Sublocation:Second Room], Hightail Lizard, Sticky Lizard | |||
}} | |||
===={{Plural|TotK|Enemy}}==== | |||
{{Gallery List|Enemies | |||
|TotK= Yiga Footsoldier [Qty:1], Yiga Footsoldier [Qty:3]{{List Note|Three appear after picking up the {{Term|TotK|Mighty Bananas}}.}} | |||
}} | |||
{{List Notes}} | |||
===={{Plural|TotK|Material}}==== | |||
{{Gallery List|Materials | |||
|TotK= Bomb Flower, Brightbloom Seed, Mighty Bananas | |||
}} | |||
====Equipment==== | |||
{{Gallery List|Equipment | |||
|TotK= Torch | |||
}} | |||
==Other Appearances== | |||
==={{HWAoC|-}}=== | |||
{{Noncanon|Start}} | |||
During "{{Term|HWAoC|The Great Plateau|link}}" {{Term|HWAoC|Scenario|link}}, {{Term|HWAoC|Purah}} posits activating the {{Term|HWAoC|Shrine of Resurrection}} so that the {{Plural|HWAoC|Warrior|link}} can bypass the rubble blocking the {{Term|HWAoC|Temple of Time|link}}.<ref name="Purah"/> {{Term|HWAoC|Robbie|link}} agrees with this idea, stating that {{Term|HWAoC|Terrako|link}} should be used in the activation.<ref>{{Cite|Stellar! We can approach the temple from another angle. Let's activate it using this Guardian.|Robbie|HWAoC}}</ref> Since the {{Plural|HWAoC|Yiga Footsoldier|link}} are able to bypass the rubble, {{Term|HWAoC|Princess Zelda|link}} asks them to carry {{Term|HWAoC|Terrako}} to the {{Term|HWAoC|Shrine of Resurrection}},<ref>{{Cite|Can you help us activate the shrine? It appears you are capable of crossing over that rubble.|Princess Zelda|HWAoC}}</ref> which {{Term|HWAoC|Master Kohga|link}} allows them to do.<ref>{{Cite|I feel kinda queasy about helping a member of the Hyrulean royal family, but... Sure. Yiga, roll out!|Master Kohga|HWAoC}}</ref> A {{Term|HWAoC|Yiga Footsoldier}} then disappears with {{Term|HWAoC|Terrako}}.<ref>{{Cite|Wait! To activate the shrine, you must bring this with you.|Impa|HWAoC}}</ref> After defeating the {{Term|HWAoC|Black Hinox|link}} and {{Term|HWAoC|Electric Hinox|link}} blocking their path, the {{Plural|HWAoC|Yiga Footsoldier}} are able to continue on to the {{Term|HWAoC|Shrine of Resurrection}}.<ref>{{Cite|Uh, th-thanks for the help! I'll head for the shrine!|Yiga Footsoldier|HWAoC}}</ref> | |||
Once the {{Term|HWAoC|Shrine of Resurrection}} has been activated, the {{Plural|HWAoC|Warrior}} will be able to access the {{Term|HWAoC|Temple of Time}}.<ref>{{Cite|The Shrine of Resurrection has been activated!|Yiga Footsoldier|HWAoC}}</ref><ref>{{Cite|And now, we head to the temple. You must hurry and provide assistance!|Princess Zelda|HWAoC}}</ref> By gathering at the foot of the nearby {{Term|HWAoC|Sheikah Tower|link}}, a {{Term|HWAoC|Warrior}} will be transported directly to the {{Term|HWAoC|Shrine of Resurrection|display=Shrine}}. From there, they must leave the {{Term|HWAoC|Shrine of Resurrection|display=Shrine}} in order to assist the {{Plural|HWAoC|Hylian Captain|link}}.<ref>{{Cite|Defeat the {{Color|HWAoC Red|Malice Guardian}} and key enemies, and rescue the {{Color|HWAoC Blue|Hylian Captains}}.|Battle Log|HWAoC}}</ref> In order to fulfill future objectives, however, the {{Term|HWAoC|Warrior}} must pass back through the {{Term|HWAoC|Shrine of Resurrection}} to return to the {{Term|HWAoC|Sheikah Tower}}. | |||
{{Noncanon|End}} | |||
==Nomenclature== | ==Nomenclature== | ||
{{ | {{Nomenclature}} | ||
==Gallery== | ==Gallery== | ||
<gallery> | <gallery> | ||
File:BotW Shrine of Resurrection | File:BotW Slumber of Restoration.png|{{Term|BotW|Link}} waking up in the {{Term|BotW|Shrine of Resurrection}} from {{BotW|-}} | ||
File:BotW Shrine of Resurrection Concept Artwork.png|Concept artwork of the {{Term|BotW|Shrine of Resurrection}} from {{BotW|-}} | |||
File:BotW Shrine of Resurrection Concept Artwork 2.png|Concept artwork of the {{Term|BotW|Shrine of Resurrection}} from {{BotW|-}} | |||
File:BotW Shrine of Resurrection Concept Artwork 3.png|Concept artwork of the {{Term|BotW|Shrine of Resurrection}} from {{BotW|-}} | |||
File:BotW Shrine of Resurrection Concept Artwork 4.png|Concept artwork of the {{Term|BotW|Shrine of Resurrection}} from {{BotW|-}} | |||
File:BotW Shrine of Resurrection Concept Artwork 5.png|Concept artwork of the {{Term|BotW|Shrine of Resurrection}} from {{BotW|-}} | |||
</gallery> | </gallery> | ||
==See Also== | |||
* {{Term|Series|Final Trial|link}} | |||
* {{Term|Series|Secret Spring of Revival|link}} | |||
{{Notes}} | |||
{{Ref}} | {{Ref}} | ||
{{Categories | |||
|Ancient Technology, Caves, Great Plateau, Shrines | |||
|locations= BotW, TotK, HWAoC | |||
}} | |||
Latest revision as of 07:40, 30 March 2024
The Shrine of Resurrection is a recurring location in The Legend of Zelda series.[1][2][3]
Features and Overview
Breath of the Wild
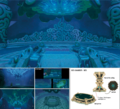
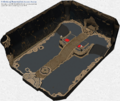
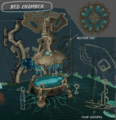
Link awakens from his Slumber of Restoration within the Shrine after hearing the call of Zelda,[4] whose voice he has forgotten. He is guided to a pedestal, where he receives the Sheikah Slate.[5] Afterwards, the door to the chamber opens, leading to another room containing two Treasure Chests with the Old Shirt and the Well-Worn Trousers. Behind the Chests rests a pedestal from which Link can place the Sheikah Slate and open the entrance to the Shrine of Resurrection, leading to the Great Plateau.[6]
One hundred years prior to his awakening, Link was nearly defeated after Calamity Ganon's return.[7] After being saved by Zelda near Fort Hateno,[8] she ordered him to be placed in the Shrine of Resurrection to recover.[9] Robbie and Purah were the ones to bring him there.[10]
In The Champions' Ballad, Link must return here to begin the Divine Beast Tamer's Trial. After completing all of the Trials, the Final Trial can be accessed by placing the Sheikah Slate in the pedestal. In doing this, the chamber is revealed to actually be an elevator which descends into the Dungeon.
Areas
Equipment
During "EX The Champions' Ballad"

Treasure Chests
| Treasure Chest | |
|---|---|
| Contents | |
| Notes | On the western side of the path in the Second Room |
| Treasure Chest | |
| Contents | |
| Notes | On the eastern side of the path in the Second Room |

| Treasure Chest | Contents | Notes |
|---|---|---|
On the western side of the path in the Second Room | ||
On the eastern side of the path in the Second Room |
Korok Seeds
| Korok |  |
|---|---|
| Type | |
| Notes | Hovering in the capsule Link was resting in |

| Korok | Type | Notes |
|---|---|---|
| Hovering in the capsule Link was resting in |
Tears of the Kingdom
The Ancient Technologies within the Shrine of Resurrection have eroded away, replaced by a Cave system. The Shrine of Resurrection's counterpart in the Depths is the Secret Spring of Revival.[11]
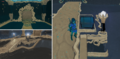
The entrance to the Shrine is blocked by Vines hanging down from above. Though the chambers have eroded into rock and are now covered in foliage, the first few rooms of the Cave resemble the terrain of their Breath of the Wild counterparts closely. Several Barrels and Wooden Boxes can be found where the Treasure Chest containing the Well-Worn Trousers was located in Breath of the Wild. The room where Link awakened now contains a small Hot Spring, and a crevice leading further down into the Cave has formed, marked by a large root.
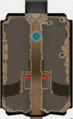
A Yiga Clan base has been built into the lower regions of the Shrine, marked by large flags bearing the Yiga emblem. A Steward Construct lies inside, inactive, while Mighty Bananas lie on a small podium in the middle of the base. When Link picks up the Bananas, a Yiga Clan member laughs and mocks the swordsman for falling for their trap,[12] causing three Yiga Footsoldiers to appear and attack Link.
Once Link defeats the Yiga Footsoldiers, the Steward Construct will reactivate, thanking him for his assistance when spoken to.[13] It explains to him that it was taken from the Depths by the Yiga,[14] and chooses to continue its task of managing Schema Stones in the Shrine as it has no way to return to its post.[15] Explaining to Link that Zonaite was once mined and processed in the Depths, the Construct offers him the Schema Stone for the Beam Cycle.[16][note 1]
Areas


Creatures


Enemies

- ↑ Three appear after picking up the Mighty Bananas.
Materials


Equipment

Other Appearances
Hyrule Warriors: Age of Calamity
During "The Great Plateau" Scenario, Purah posits activating the Shrine of Resurrection so that the Warriors can bypass the rubble blocking the Temple of Time.[3] Robbie agrees with this idea, stating that Terrako should be used in the activation.[18] Since the Yiga Footsoldiers are able to bypass the rubble, Zelda asks them to carry Terrako to the Shrine of Resurrection,[19] which Master Kohga allows them to do.[20] A Yiga Footsoldier then disappears with Terrako.[21] After defeating the Black Hinox and Electric Hinox blocking their path, the Yiga Footsoldiers are able to continue on to the Shrine of Resurrection.[22]
Once the Shrine of Resurrection has been activated, the Warriors will be able to access the Temple of Time.[23][24] By gathering at the foot of the nearby Sheikah Tower, a Warrior will be transported directly to the Shrine. From there, they must leave the Shrine in order to assist the Hylian Captains.[25] In order to fulfill future objectives, however, the Warrior must pass back through the Shrine of Resurrection to return to the Sheikah Tower.
Nomenclature
| Language | Names | Meanings |
|---|---|---|
Japanese | 回生の祠 (Kaisei no Hokora) | Shrine of Regeneration |
Dutch | Tempel der Wederopstanding[27] | Tempel of Resurrection |
FrenchEU | Sanctuaire de la Renaissance | |
Russian | Святилище Жизни (Svyatilishche Zhizni) | Sanctuary of Life |
SpanishLA | Santuario de la vida[26] | Shrine of Life |
| This table was generated using translation pages. To request an addition, please contact a staff member with a reference. | ||
Gallery
-

Link waking up in the Shrine of Resurrection from Breath of the Wild
-
Concept artwork of the Shrine of Resurrection from Breath of the Wild
-
Concept artwork of the Shrine of Resurrection from Breath of the Wild
-
Concept artwork of the Shrine of Resurrection from Breath of the Wild
-
Concept artwork of the Shrine of Resurrection from Breath of the Wild
-
Concept artwork of the Shrine of Resurrection from Breath of the Wild


See Also
Notes
- ↑ If Link has not unlocked the Autobuild Ancient Power, the Steward Construct will instead advise him to visit the Great Abandoned Central Mine in the Depths before returning for his reward.[17]
References
- ↑ "Shrine of Resurrection" — Map (Breath of the Wild)
- ↑ "Shrine of Resurrection" — Map (Tears of the Kingdom)
- ↑ 3.0 3.1 "Aha, I know! How about we activate the Shrine of Resurrection and then use it as a travel gate?" — Purah (Hyrule Warriors: Age of Calamity)
- ↑ "Open your eyes... Wake up, Link..." — Zelda (Breath of the Wild)
- ↑ "That is a Sheikah Slate. Take it. It will help guide you after your long slumber." — Zelda (Breath of the Wild)
- ↑ "Hold the Sheikah Slate up to the pedestal. That will show you the way." — Zelda (Breath of the Wild)
- ↑ "Link, save yourself! Go! I'll be fine! Don't worry about me! Run!" — Zelda (Breath of the Wild)
- ↑ "NO! Was... Was that...? The power..." — Zelda (Breath of the Wild)
- ↑ "Take Link to the Shrine of Resurrection. If you don't get him there immediately, we are going to lose him forever! Is that clear? So make haste and go! His life is now in your hands!" — Zelda (Breath of the Wild)
- ↑ "Let me start from the beginning. It was 100 years ago... Calamity Ganon had already swallowed Princess Zelda. Dr. Purah and I had already taken Link to the Shrine of Resurrection and left him to recover." — Robbie's Memoirs (Breath of the Wild)
- ↑ "The Surface and the Depths
The surface and Depths are intricately connected. Someplace special on the surface may be mirrored by something in the Depths as well, and vice versa." — Tips and Tricks (Tears of the Kingdom) - ↑ "Kehehehe... The noble swordsman, scrounging for scraps? You fell for the oldest trick in the book!" — Yiga Clan (Tears of the Kingdom)
- ↑ "Thank you for driving away the intruders." — Steward Construct (Tears of the Kingdom)
- ↑ "Those interlopers carried me here with them from the Depths." — Steward Construct (Tears of the Kingdom)
- ↑ "I have no way of returning to where I was stationed there. I will therefore continue my work here. My task in the Depths was to manage schema stones." — Steward Construct (Tears of the Kingdom)
- ↑ "A great deal of zonaite was mined and processed there once. Please hold one moment. I have confirmed that there is a schema stone you do not yet have. Allow me to rectify that." — Steward Construct (Tears of the Kingdom)
- ↑ "I have something for you. But I do not think you are ready to receive it. Please visit the Great Abandoned Central Mine in the Depths and return here after." — Steward Construct (Tears of the Kingdom)
- ↑ "Stellar! We can approach the temple from another angle. Let's activate it using this Guardian." — Robbie (Hyrule Warriors: Age of Calamity)
- ↑ "Can you help us activate the shrine? It appears you are capable of crossing over that rubble." — Zelda (Hyrule Warriors: Age of Calamity)
- ↑ "I feel kinda queasy about helping a member of the Hyrulean royal family, but... Sure. Yiga, roll out!" — Master Kohga (Hyrule Warriors: Age of Calamity)
- ↑ "Wait! To activate the shrine, you must bring this with you." — Impa (Hyrule Warriors: Age of Calamity)
- ↑ "Uh, th-thanks for the help! I'll head for the shrine!" — Yiga Footsoldier (Hyrule Warriors: Age of Calamity)
- ↑ "The Shrine of Resurrection has been activated!" — Yiga Footsoldier (Hyrule Warriors: Age of Calamity)
- ↑ "And now, we head to the temple. You must hurry and provide assistance!" — Zelda (Hyrule Warriors: Age of Calamity)
- ↑ "Defeat the Malice Guardian and key enemies, and rescue the Hylian Captains." — Battle Log (Hyrule Warriors: Age of Calamity)
- ↑ "Santuario de la vida" — Map (Breath of the Wild)
- ↑ "Tempel der Wederopstanding" — Map (Breath of the Wild)