Rapier: Difference between revisions
JumbledLimes (talk | contribs) mNo edit summary |
|||
| (45 intermediate revisions by 13 users not shown) | |||
| Line 1: | Line 1: | ||
{{Noncanon}} | {{Noncanon}} | ||
{{ | {{Infobox Item | ||
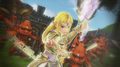
|image= File:HW Zelda Polished Rapier.png | |||
|caption= Zelda wielding the Polished Rapier | |||
|image = | |game= {{HW}} | ||
|caption = Zelda wielding the Polished Rapier | |other= | ||
|cost= | |||
|game = {{HW | |location= | ||
|other = | |uses= Defeating enemies | ||
|cost = | |comp= | ||
|location = | |sample= | ||
|uses = Defeating enemies | |theme= | ||
|comp = | |||
|sample = | |||
|theme | |||
}} | }} | ||
The | The {{Term/Store|Rapier|Rapiers|Series, HW, CoH}} is a class of Weapon used by [[Princess Zelda|Zelda]] in {{HW}}. It is associated with {{Term|HWDE|Element|link|display=Light}}. The Rapier grants Zelda the power to use the [[Light Arrow]]s and the power of her [[Triforce of Wisdom]] as part of her moveset. | ||
==Variations== | ==Variations== | ||
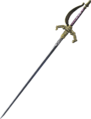
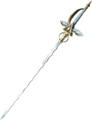
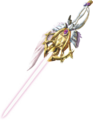
The default Rapier is the '''Polished Rapier'''. The second form of the Rapier is the '''Glittering Rapier''', followed by the '''Gleaming Rapier' | The default Rapier is the '''Polished Rapier'''. The second form of the Rapier is the '''Glittering Rapier''', followed by the '''Gleaming Rapier'''. | ||
{| class=" | The Lv.★ Rapier is the '''8-Bit White Sword?''', which is based on the [[White Sword]] from {{TLoZ}}. It was added to {{HW|-}} with the Master Quest Pack DLC. In {{HW|DE}}, instead of appearing as a separate Weapon, the 8-Bit White Sword? replaces the Gloomy Rapier when the "8-Bit Weapons" Setting is turned on in Game Settings within the Settings menu. | ||
{| class="wikitable" style="text-align:center; width:100%; max-width:40em" | |||
|+Weapon Power | |+Weapon Power | ||
!colspan="3"|Weapon | |||
!colspan=" | |||
!colspan="6"|Number of Stars | !colspan="6"|Number of Stars | ||
|- | |- | ||
! style="width:5%"|Tier | |||
! Icon | ! Icon | ||
! Element(s) | ! Element(s) | ||
| Line 36: | Line 34: | ||
! 5 | ! 5 | ||
|- | |- | ||
| [[File:HW Polished Rapier.png|link=]]<br>'''Polished Rapier''' | ! Lv.1 | ||
| [[File:Element | | [[File:HW Polished Rapier Icon.png|link=]]<br/>'''Polished Rapier''' | ||
| [[File:HWDE Light Element Icon.png|link=|20px]] '''<span style="color:#E0E066">Light</span>''' | |||
| 80 | | 80 | ||
| 88 | | 88 | ||
| Line 45: | Line 44: | ||
| 120 | | 120 | ||
|- | |- | ||
| [[File:HW Glittering Rapier.png|link=]]<br>'''Glittering Rapier''' | ! Lv.2 | ||
| [[File:Element | | [[File:HW Glittering Rapier Icon.png|link=]]<br/>'''Glittering Rapier''' | ||
| [[File:HWDE Light Element Icon.png|link=|20px]] '''<span style="color:#E0E066">Light</span>''' | |||
| 150 | | 150 | ||
| 165 | | 165 | ||
| Line 54: | Line 54: | ||
| 225 | | 225 | ||
|- | |- | ||
| [[File:HW Gleaming Rapier.png|link=]]<br>'''Gleaming Rapier''' | ! Lv.3 | ||
| [[File:Element | | [[File:HW Gleaming Rapier Icon.png|link=]]<br/>'''Gleaming Rapier''' | ||
| [[File:HWDE Light Element Icon.png|link=|20px]] '''<span style="color:#E0E066">Light</span>''' | |||
| 280 | | 280 | ||
| 308 | | 308 | ||
| Line 63: | Line 64: | ||
| 420 | | 420 | ||
|- | |- | ||
| [[File:HW 8-Bit White Sword Icon.png|link=]]<br>'''8-Bit White Sword''' | ! Lv.★ {{Exp Game|HW, HWDE}} | ||
| [[File:Element | | [[File:HW 8-Bit White Sword? Icon.png|link=]]<br/>'''8-Bit White Sword?''' | ||
| [[File:HWDE Light Element Icon.png|link=|20px]] '''<span style="color:#E0E066">Light</span>''' | |||
| 280 | | 280 | ||
| 308 | | 308 | ||
| Line 72: | Line 74: | ||
| 420 | | 420 | ||
|- | |- | ||
| [[File:HW Gleaming Rapier.png|link=]]<br>'''Gleaming Rapier +''' {{Exp| | ! Lv.4 {{Exp Game|HWL, HWDE}} | ||
| [[File:Element | | [[File:HW Gleaming Rapier Icon.png|link=]]<br/>'''Gleaming Rapier +''' | ||
| [[File:HWDE Light Element Icon.png|link=|20px]] '''<span style="color:#E0E066">Light</span>''' | |||
| 500 | |||
| 550 | |||
| 600 | |||
| 650 | |||
| 700 | |||
| 750 | |||
|- | |||
! Lv.4+ {{Exp Game|HWL, HWDE}} | |||
| [[File:HW Gleaming Rapier Icon.png|link=]]<br/>'''Gloomy Rapier''' | |||
| [[File:HWDE Light Element Icon.png|link=|20px]] '''<span style="color:#E0E066">Light</span>'''<br/>[[File:HWDE Darkness Element Icon.png|link=|20px]] '''<span style="color:#3c1463">Darkness</span>''' | |||
| 500 | | 500 | ||
| 550 | | 550 | ||
| Line 80: | Line 93: | ||
| 700 | | 700 | ||
| 750 | | 750 | ||
|} | |||
==Attack Combinations== | |||
{| class="wikitable" style="text-align:center; width:100%;" | |||
|- | |||
!Attack Pattern | |||
!Effect | |||
|- | |||
| '''Y X X''' | |||
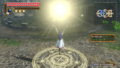
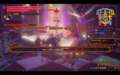
| Zelda performs a backflip, launching any enemies in front of her, and then performs a series of rapid, upward thrusts. If she has at least one Light Orb, she follows up the backflip by summoning a Magic Circle and throwing a light orb downwards. | |||
|- | |||
| '''Y Y X X''' | |||
| Zelda performs a leaping, horizontal slash, and then dives downwards. If she has at least two light orbs, she follows up the slash by firing an arrow towards enemies in front of her, then another below her before the plunge. | |||
|- | |||
| '''Y Y Y X X ''' | |||
| Zelda performs a series of zig-zagging slashes, then performs a series of rapid thrusts and dives downwards. If she has a Light Orb, she follows up the slashes by firing a cluster of arrows that bombard any enemies in front of her. | |||
|- | |||
| '''Y Y Y Y X ''' | |||
| Zelda dashes forwards while performing a series of rapid slashes. If she has a Light Orb, she instead summons a massive triangle around her that explodes with light. | |||
|- | |||
| '''Y Y Y Y Y''' | |||
| Zelda performs a series of slashes before finishing with a thrust. She will then perform a flourish that fills up one bar of the Light Orb gauge. | |||
|- | |||
| '''X''' | |||
| Zelda raises her rapier, fully filling up the Light Orb gauge. | |||
|} | |} | ||
===Special Attack=== | ===Special Attack=== | ||
{{Main|Special Attack}} | {{Main|Special Attack}} | ||
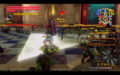
Zelda summons [[Zelda's Bow| | Zelda summons her [[Zelda's Bow|Bow]] into her hands, drawing back a Light Arrow toward her foes ahead and fires, before disappearing as her Rapier returns to her hand. This attack deals damage in a long, rectangular range ahead of Zelda. | ||
==Trivia== | ==Trivia== | ||
| Line 91: | Line 129: | ||
{{#vardefine:Dark|style="background-color:#163d5f"}} | {{#vardefine:Dark|style="background-color:#163d5f"}} | ||
</div> | </div> | ||
{| class="collapsible collapsed" style="text-align:center; width:100%; max-width:31em" | {| class="mw-collapsible mw-collapsed" style="text-align:center; width:100%; max-width:31em" | ||
! Other users of the Rapier | ! Other users of the Rapier | ||
|- | |- | ||
| Line 98: | Line 135: | ||
{| class="wikitable" style="text-align:center; width:99%; max-width:30em" | {| class="wikitable" style="text-align:center; width:99%; max-width:30em" | ||
|- | |- | ||
! | !style="width:30%"| Warrior | ||
! | !style="width:40%"| Map | ||
! | !style="width:30%"| Tile | ||
|- | |- | ||
|rowspan="9"| [[File: | |rowspan="9"| [[File:HWDE Sheik Mini Map Icon.png|link=]]<br/>'''[[Sheik]]''' | ||
|rowspan="4"| [[Master Quest Map]] | |rowspan="4"| [[Master Quest Map]] | ||
| '''H10''' | | '''H10''' | ||
| Line 119: | Line 156: | ||
| '''E7''' | | '''E7''' | ||
|- | |- | ||
| '''H7'''<br>(Ally) | | '''H7'''<br/>(Ally) | ||
|- | |- | ||
| [[Termina Map]] | | [[Termina Map]] | ||
| D11 | | D11 | ||
|- | |- | ||
|{{#var:Dark}} rowspan="2"| [[File: | |{{#var:Dark}} rowspan="2"| [[File:HWDE Lana Mini Map Icon.png|link=]]<br/>'''[[Lana]]''' | ||
|{{#var:Dark}} rowspan="2"| [[Termina Map]] | |{{#var:Dark}} rowspan="2"| [[Termina Map]] | ||
|{{#var:Dark}}| '''G8''' | |{{#var:Dark}}| '''G8''' | ||
| Line 130: | Line 167: | ||
|{{#var:Dark}}| '''D11''' | |{{#var:Dark}}| '''D11''' | ||
|- | |- | ||
|rowspan="1"| [[File: | |rowspan="1"| [[File:HWDE Cia Unmasked Mini Map Icon.png|link=]]<br/>'''[[Cia]]''' | ||
|rowspan="1"| [[Termina Map]] | |rowspan="1"| [[Termina Map]] | ||
| '''D11'''<br>(Ally) | | '''D11'''<br/>(Ally) | ||
|} | |} | ||
|} | |} | ||
| Line 138: | Line 175: | ||
==Gallery== | ==Gallery== | ||
<gallery> | <gallery> | ||
File:HW Polished Rapier Artwork.png|Artwork of the Polished Rapier | File:HW Polished Rapier Artwork.png|Artwork of the Polished Rapier from {{HW|-}} | ||
File:HW Glittering Rapier Artwork.png|Artwork of the Glittering Rapier | File:HW Glittering Rapier Artwork.png|Artwork of the Glittering Rapier from {{HW|-}} | ||
File:HW Gleaming Rapier Artwork.png|Artwork of the Gleaming Rapier | File:HW Gleaming Rapier Artwork.png|Artwork of the Gleaming Rapier from {{HW|-}} | ||
File: | File:HW Rapier Adventure Mode Icon.png|Rapier Adventure Mode icon from {{HW|-}} | ||
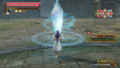
File:HW Zelda Rapier Magic Circle.png|Zelda using a Magic Circle with the Rapier from {{HW|-}} | |||
File:HW Zelda Rapier Magic Circle.png|Zelda using a Magic Circle with the Rapier | File:HW Zelda Magic Circle Nayru's Love.png|Zelda casting Naryu's Love with the Rapier from {{HW|-}} | ||
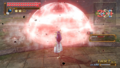
File:HW Zelda Magic Circle Nayru's Love.png|Zelda casting Naryu's Love with the Rapier | File:HW Zelda Magic Circle Farore's Wind.png|Zelda casting Farore's Wind with the Rapier from {{HW|-}} | ||
File:HW Zelda Magic Circle Farore's Wind.png|Zelda casting Farore's Wind with the Rapier | File:HW Zelda Magic Circle Din's Fire.png|Zelda casting Din's Fire with the Rapier from {{HW|-}} | ||
File:HW Zelda Magic Circle Din's Fire.png|Zelda casting Din's Fire with the Rapier | File:Sheik Wielding the Rapier.png|Sheik using the Rapier from {{HW|-}} | ||
File:Sheik Wielding the Rapier.png|Sheik using the Rapier | File:HW Sheik Using the Rapier.png|Sheik using the Rapier from {{HW|-}} | ||
File:HW Sheik Using the Rapier.png|Sheik using the Rapier | File:HW Lana Using the Rapier.png|Lana using the Rapier from {{HW|-}} | ||
File:HW Lana Using the Rapier.png|Lana using the Rapier | File:HWDE Zelda 8-Bit White Sword?.png|Zelda wielding the 8-Bit White Sword? from {{HW|DE|-}} | ||
File:HW | File:HWDE Zelda Gloomy Rapier.png|Zelda wielding the Gloomy Rapier from {{HW|DE|-}} | ||
</gallery> | </gallery> | ||
| Line 156: | Line 193: | ||
{{Youtube|h-cOQcIJGp4|200|Zelda - Rapier gameplay}} | {{Youtube|h-cOQcIJGp4|200|Zelda - Rapier gameplay}} | ||
{{Categories | |||
|Rapiers, Swords, Weapons | |||
|items= HW, HWL, HWDE | |||
}} | |||
Latest revision as of 21:12, 25 August 2023
The Rapier is a class of Weapon used by Zelda in Hyrule Warriors. It is associated with Light. The Rapier grants Zelda the power to use the Light Arrows and the power of her Triforce of Wisdom as part of her moveset.
Variations
The default Rapier is the Polished Rapier. The second form of the Rapier is the Glittering Rapier, followed by the Gleaming Rapier.
The Lv.★ Rapier is the 8-Bit White Sword?, which is based on the White Sword from The Legend of Zelda. It was added to Hyrule Warriors with the Master Quest Pack DLC. In Hyrule Warriors: Definitive Edition, instead of appearing as a separate Weapon, the 8-Bit White Sword? replaces the Gloomy Rapier when the "8-Bit Weapons" Setting is turned on in Game Settings within the Settings menu.
| Weapon | Number of Stars | |||||||
|---|---|---|---|---|---|---|---|---|
| Tier | Icon | Element(s) | 0 | 1 | 2 | 3 | 4 | 5 |
| Lv.1 | Polished Rapier |
80 | 88 | 96 | 104 | 112 | 120 | |
| Lv.2 | Glittering Rapier |
150 | 165 | 180 | 195 | 210 | 225 | |
| Lv.3 | Gleaming Rapier |
280 | 308 | 336 | 364 | 392 | 420 | |
| Lv.★ (HW | HWDE) | 8-Bit White Sword? |
280 | 308 | 336 | 364 | 392 | 420 | |
| Lv.4 (HWL | HWDE) | Gleaming Rapier + |
500 | 550 | 600 | 650 | 700 | 750 | |
| Lv.4+ (HWL | HWDE) | Gloomy Rapier |
500 | 550 | 600 | 650 | 700 | 750 | |
Attack Combinations
| Attack Pattern | Effect |
|---|---|
| Y X X | Zelda performs a backflip, launching any enemies in front of her, and then performs a series of rapid, upward thrusts. If she has at least one Light Orb, she follows up the backflip by summoning a Magic Circle and throwing a light orb downwards. |
| Y Y X X | Zelda performs a leaping, horizontal slash, and then dives downwards. If she has at least two light orbs, she follows up the slash by firing an arrow towards enemies in front of her, then another below her before the plunge. |
| Y Y Y X X | Zelda performs a series of zig-zagging slashes, then performs a series of rapid thrusts and dives downwards. If she has a Light Orb, she follows up the slashes by firing a cluster of arrows that bombard any enemies in front of her. |
| Y Y Y Y X | Zelda dashes forwards while performing a series of rapid slashes. If she has a Light Orb, she instead summons a massive triangle around her that explodes with light. |
| Y Y Y Y Y | Zelda performs a series of slashes before finishing with a thrust. She will then perform a flourish that fills up one bar of the Light Orb gauge. |
| X | Zelda raises her rapier, fully filling up the Light Orb gauge. |
Special Attack
Zelda summons her Bow into her hands, drawing back a Light Arrow toward her foes ahead and fires, before disappearing as her Rapier returns to her hand. This attack deals damage in a long, rectangular range ahead of Zelda.
Trivia
- Other Warriors make use of the Rapier in certain Adventure Mode battles:
| Other users of the Rapier | |||||||||||||||||||||||
|---|---|---|---|---|---|---|---|---|---|---|---|---|---|---|---|---|---|---|---|---|---|---|---|
|
Gallery
-
Artwork of the Polished Rapier from Hyrule Warriors
-
Artwork of the Glittering Rapier from Hyrule Warriors
-
Artwork of the Gleaming Rapier from Hyrule Warriors
-

Rapier Adventure Mode icon from Hyrule Warriors
-
Zelda using a Magic Circle with the Rapier from Hyrule Warriors
-
Zelda casting Naryu's Love with the Rapier from Hyrule Warriors
-
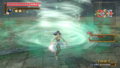
Zelda casting Farore's Wind with the Rapier from Hyrule Warriors
-
Zelda casting Din's Fire with the Rapier from Hyrule Warriors
-
Sheik using the Rapier from Hyrule Warriors
-
Sheik using the Rapier from Hyrule Warriors
-
Lana using the Rapier from Hyrule Warriors
-
Zelda wielding the 8-Bit White Sword? from Hyrule Warriors: Definitive Edition
-
Zelda wielding the Gloomy Rapier from Hyrule Warriors: Definitive Edition


