Pyramid of Power: Difference between revisions
PhantomCaleb (talk | contribs) (Automated update of notice templates - wrapping sections so they can be hidden) |
|||
| Line 19: | Line 19: | ||
==Non-canon Appearances== | ==Non-canon Appearances== | ||
{{ | {{Noncanon|start}} | ||
===''A Link to the Past'' comic=== | ===''A Link to the Past'' comic=== | ||
The Pyramid of Power is briefly featured in the [[The Legend of Zelda: A Link to the Past (Comic)|''A Link to the Past'' comic]]. After failing to save Princess Zelda from Agahnim's clutches, Link kills Agahnim by deflecting his own magic. However, Agahnim, with his final breath, manages to transport Link into the Dark World, with Hyrule Castle collapsing as the Pyramid of Power is revealed.<ref>{{cite book|quote=It appears you are not such a fool after all... But it makes no difference... My defeat will not restore the wise men's seal, on the contrary... [...] And with my final breath...you will join Zelda in...the Dark World!|book=A Link to the Past|publisher=Nintendo Power|page=5,6}}</ref> | The Pyramid of Power is briefly featured in the [[The Legend of Zelda: A Link to the Past (Comic)|''A Link to the Past'' comic]]. After failing to save Princess Zelda from Agahnim's clutches, Link kills Agahnim by deflecting his own magic. However, Agahnim, with his final breath, manages to transport Link into the Dark World, with Hyrule Castle collapsing as the Pyramid of Power is revealed.<ref>{{cite book|quote=It appears you are not such a fool after all... But it makes no difference... My defeat will not restore the wise men's seal, on the contrary... [...] And with my final breath...you will join Zelda in...the Dark World!|book=A Link to the Past|publisher=Nintendo Power|page=5,6}}</ref> | ||
{{Noncanon|end}} | |||
==Gallery== | ==Gallery== | ||
Revision as of 18:44, 18 January 2013
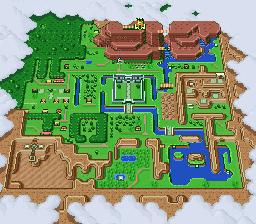
The Pyramid of Power[1] is a huge golden pyramid in the Dark World in A Link to the Past, which mirrors the location of Hyrule Castle in the Light World.
Features
After Link defeated Agahnim in Hyrule Castle, Agahnim sent him to the Dark World, and deposited him on top of the pyramid. Later, after Link defeated Agahnim in Ganon's Tower, Ganon fled to the Pyramid of Power. Link destroyed him, and rescued the Triforce, which Ganon kept inside the pyramid. A lower stage of the pyramid was also home to the cursed Fat Fairy, who gives Link the Silver Arrows and the Golden Sword. It may be that the top of the Pyramid was once the spot where the Triforce shined down upon the rest of the Sacred Realm, this being due to a picture of the Sacred Realm prior to its corruption from the manual of A Link to to the Past in addition to the steps that allow one to ascend to top of the pyramid from below and its location at the very heart of the Sacred Realm.
In the Game Boy Advance release of the game, the pyramid also contains the Palace of the Four Sword, a bonus dungeon for those who have completed Four Swords multiplayer game.
Non-canon Appearances
A Link to the Past comic
The Pyramid of Power is briefly featured in the A Link to the Past comic. After failing to save Princess Zelda from Agahnim's clutches, Link kills Agahnim by deflecting his own magic. However, Agahnim, with his final breath, manages to transport Link into the Dark World, with Hyrule Castle collapsing as the Pyramid of Power is revealed.[2]
Gallery
-
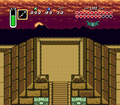
Ganon in his bat form just before he crashes through the roof of the Pyramid of Power in A Link to the Past
-
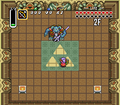
Ganon as he appears at the beginning of Link's battle with him in the Pyramid of Power
-
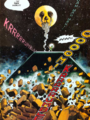
The Pyramid of Power in the A Link to the Past comic


.png)
References
| Locations in A Link to the Past | |
|---|---|
| Locations in the Light World | Locations in the Dark World |
 Click on a location |
 Click on a location |
| Language | Name | |
|---|---|---|