Lockup: Difference between revisions
TriforceTony (talk | contribs) No edit summary |
|||
| Line 10: | Line 10: | ||
|inhab= | |inhab= | ||
|items= | |items= | ||
|related= {{List|{{Term|Series|Lockup Back Room|link}}, {{Term|Series|Water Pump Room|link}}, {{Term|Series|West Passage|link}}}} | |related= | ||
{{List| | |||
{{Term|Series|Lockup Back Room|link}}, | |||
{{Term|Series|Water Pump Room|link}}, | |||
{{Term|Series|West Passage|link}}, | |||
}} | |||
|season= | |season= | ||
|theme= | |theme= | ||
}} | }} | ||
{{Term/Store|Lockup||Series, BotW, TotK}} is a recurring location in {{TLoZ|Series}}.<ref>{{Cite|'''Lockup'''|Map|BotW}}</ref><ref>{{Cite|'''Lockup'''|Map|TotK}}</ref> | The {{Term/Store|Lockup||Series, BotW, TotK}} is a recurring location in {{TLoZ|Series}}.<ref>{{Cite|'''Lockup'''|Map|BotW}}</ref><ref>{{Cite|'''Lockup'''|Map|TotK}}</ref> | ||
==Features and Overview== | ==Features and Overview== | ||
==={{BotW|-}}=== | ==={{BotW|-}}=== | ||
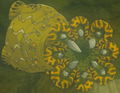
{{Term|BotW|Lockup}} is a series of dungeon cells found under the northeastern side of the {{Term|BotW|Hyrule Castle Underground|link}}. The {{Term|BotW|Lockup Back Room|link}} is located at its far end. {{Term|BotW|Lockup}}'s entrance is guarded by a {{Term|BotW|Decayed Guardian|link}} and marked {{Plural|BotW|Luminous Stone Deposit|link}}. The portcullis is placed over a small pool of {{Term|BotW|Water (Terrain)|link}}, allowing {{Term|BotW|Link|link}} to lift it with {{Term|BotW|Cryonis}} to gain entry into the {{Term|BotW|Lockup}}. It is also possible for {{Term|BotW|Link}} to enter from the side of the cliff bearing the {{Term|BotW|Lockup}}, placing him inside a cell opposite a {{Term|BotW|Glowing Eyeball}}. If defeated, the {{Term|BotW|Glowing Eyeball}} will release its control on a wooden {{Term|BotW|Lever|link}} placed between the two cells, consequently opening the parallel cells. | The {{Term|BotW|Lockup}} is a series of dungeon cells found under the northeastern side of the {{Term|BotW|Hyrule Castle Underground|link}}. The {{Term|BotW|Lockup Back Room|link}} is located at its far end. The {{Term|BotW|Lockup}}'s entrance is guarded by a {{Term|BotW|Decayed Guardian|link}} and marked {{Plural|BotW|Luminous Stone Deposit|link}}. The portcullis is placed over a small pool of {{Term|BotW|Water (Terrain)|link}}, allowing {{Term|BotW|Link|link}} to lift it with {{Term|BotW|Cryonis}} to gain entry into the {{Term|BotW|Lockup}}. It is also possible for {{Term|BotW|Link}} to enter from the side of the cliff bearing the {{Term|BotW|Lockup}}, placing him inside a cell opposite a {{Term|BotW|Glowing Eyeball}}. If defeated, the {{Term|BotW|Glowing Eyeball}} will release its control on a wooden {{Term|BotW|Lever|link}} placed between the two cells, consequently opening the parallel cells. | ||
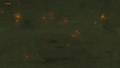
As the {{Term|BotW|Lever}} is broken, the third cell on the left-hand side can only be accessed through a cracked tile wall between the second and third cells. A second {{Term|BotW|Glowing Eyeball}} connected to a mass of {{Term|BotW|Malice|link}} occupies the switch between the fourth row of cells. The left-hand side hosts a cracked tile wall that connects to the {{Term|BotW|Water Pump Room|link}} and the {{Term|BotW|West Passage|link}}. | As the {{Term|BotW|Lever}} is broken, the third cell on the left-hand side can only be accessed through a cracked tile wall between the second and third cells. A second {{Term|BotW|Glowing Eyeball}} connected to a mass of {{Term|BotW|Malice|link}} occupies the switch between the fourth row of cells. The left-hand side hosts a cracked tile wall that connects to the {{Term|BotW|Water Pump Room|link}} and the {{Term|BotW|West Passage|link}}. | ||
| Line 43: | Line 48: | ||
====={{Plural|BotW|Sub-Boss}}===== | ====={{Plural|BotW|Sub-Boss}}===== | ||
{{Gallery List|Enemies | {{Gallery List|Enemies | ||
|BotW= Stalnox [Qty:1][Sublocation:Lockup Back Room]<br/>{{Small|''Hyrule Castle Underground''}} {{Equipment|BotW|Royal Broadsword}}{{Equipment|BotW|Great Thunderblade}}{{Equipment|BotW|Royal Halberd}} | |BotW= Stalnox [Qty:1][Sublocation:Lockup Back Room]<br/>{{Small|''Hyrule Castle Underground''}}{{Equipment|BotW|Royal Broadsword}}{{Equipment|BotW|Great Thunderblade}}{{Equipment|BotW|Royal Halberd}} | ||
}} | }} | ||
| Line 91: | Line 96: | ||
==Gallery== | ==Gallery== | ||
<gallery> | <gallery> | ||
File:BotW Lockup Back Room.png|The back room of {{Term|BotW|Lockup}} | File:BotW Lockup Back Room.png|The back room of the {{Term|BotW|Lockup}} from {{BotW|-}} | ||
</gallery> | </gallery> | ||
Revision as of 02:22, 16 April 2024
The Lockup is a recurring location in The Legend of Zelda series.[1][2]
Features and Overview
Breath of the Wild
The Lockup is a series of dungeon cells found under the northeastern side of the Hyrule Castle Underground. The Lockup Back Room is located at its far end. The Lockup's entrance is guarded by a Decayed Guardian and marked Luminous Stone Deposits. The portcullis is placed over a small pool of Water, allowing Link to lift it with Cryonis to gain entry into the Lockup. It is also possible for Link to enter from the side of the cliff bearing the Lockup, placing him inside a cell opposite a Glowing Eyeball. If defeated, the Glowing Eyeball will release its control on a wooden Lever Switch placed between the two cells, consequently opening the parallel cells.
As the Lever Switch is broken, the third cell on the left-hand side can only be accessed through a cracked tile wall between the second and third cells. A second Glowing Eyeball connected to a mass of Malice occupies the switch between the fourth row of cells. The left-hand side hosts a cracked tile wall that connects to the Water Pump Room and the West Passage.
Inside the Lockup, Link can find a Wooden Box, which can be broken open for supplies.
Areas

Enemies


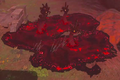
![Pool of Malice[a]](/wiki/File:BotW_Pool_of_Malice_Model.png)
- ↑ These disappear when their corresponding Glowing Eyeballs are destroyed.
Sub-Bosses
-
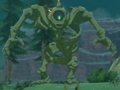
Stalnox ×1
Hyrule Castle Underground Royal Broadsword Great Thunderblade Royal Halberd

Equipment


Treasure Chests
| Treasure Chest | |
|---|---|
| Contents | |
| Notes | At the end of the waterway beyond the cells |
| Treasure Chest | |
| Contents | |
| Notes | Inside the third cell |

| Treasure Chest | Contents | Notes |
|---|---|---|
At the end of the waterway beyond the cells | ||
Inside the third cell |
Tears of the Kingdom
Enemies
-
Gloom Spawn ×1
-
Shock Like ×2


Equipment


Treasure Chests
| Treasure Chest | |
|---|---|
| Contents | |
| Coordinates | -0488, 1009, 0020 |
| Notes | In the Back Room, guarded by Gloom Spawn |

| Treasure Chest | Contents | Coordinates | Notes |
|---|---|---|---|
-0488, 1009, 0020 | In the Back Room, guarded by Gloom Spawn |
Nomenclature
| Language | Names | Meanings |
|---|---|---|
Japanese | 牢屋 (Rōya) | Jail |
ChineseSI | 牢房 (Láofáng)[5] | |
Dutch | Kerker[4] | Dungeon |
SpanishLA | Calabozo[3] | Dungeon |
| This table was generated using translation pages. To request an addition, please contact a staff member with a reference. | ||
Gallery
-
The back room of the Lockup from Breath of the Wild
See Also
References
- ↑ "Lockup" — Map (Breath of the Wild)
- ↑ "Lockup" — Map (Tears of the Kingdom)
- ↑ "Calabozo" — N/A (Breath of the Wild)
- ↑ "Kerker" — Map (Breath of the Wild)
- ↑ "牢房" — Map (Breath of the Wild)