Dungeon Room: Difference between revisions

From Zelda Wiki, the Zelda encyclopedia
Jump to navigation Jump to search
m (Bot: Automated text replacement (-The exterior of +The door to ))
mNo edit summary
 
(5 intermediate revisions by 4 users not shown)
Line 7: Line 7:
|caption=  
|caption=  
|pronunciation=  
|pronunciation=  
|game= {{TWW}}
|game= TWW
|other=  
|other=  
|inhab=  
|inhab=  
Line 22: Line 22:


==Features and Overview==
{{Stub|TWW, TWWHD}} <!-- Was messing around in noclip and saw that there's a note to the left of the door as you walk in. What does it say? -->
The {{Term|TWWHD|Dungeon Room}} is one of the [[Room]]s in the {{Term|TWWHD|Nintendo Gallery|link}}, located behind the third door to the left of {{Term|TWWHD|Carlov}}'s counter. It contains [[Figurine]]s of {{Plural|TWWHD|Enemy|link}}. The wallpaper design is based on the first room of {{Term|TWWHD|Dragon Roost Cavern|link}}.
Like every other {{Term|TWWHD|Room}}, a note is pinned on the wall to the left of the door walking in. It gives instructions on how to view figurines.
{{#lst:Nintendo Gallery|wall-note}}


===List of Figurines===
Line 31: Line 34:
{{Data Table Copy
{{Data Table Copy
|fromPage= Figurines in The Wind Waker
|fromPage= Figurines in The Wind Waker
|name= Dungeon Room
|storedAs= Dungeon Room
|excludeColumns= Subject(s)
|excludeColumns= Subject(s)
}}
}}
Line 39: Line 42:


==Gallery==
==Gallery==
{{Images|TWWHD}}
{{Lacking Images|TWWHD}}
<gallery>
<gallery>
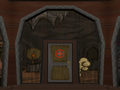
File:TWW Dungeon Room Exterior.png|The door to the {{Term|TWWHD|Dungeon Room}} from {{TWW}}

Latest revision as of 09:09, 24 April 2024

The Dungeon Room is a location in The Wind Waker.[1]

Features and Overview

The Dungeon Room is one of the Rooms in the Nintendo Gallery, located behind the third door to the left of Carlov's counter. It contains Figurines of Enemies. The wallpaper design is based on the first room of Dragon Roost Cavern.

Like every other Room, a note is pinned on the wall to the left of the door walking in. It gives instructions on how to view figurines.

Wall Note

Viewing your favorite figurines:
Control Stick UpControl Stick Down Move Up and Down
Control Stick LeftControl Stick Right Rotate
C-Stick Zoom by Tilting Up and Down
A Button View Explanation
B Button Quit

Talk about simple!

List of Figurines

There are a total of 19 Figurines in the Dungeon Room.

Figurine
TWW Armos Figurine Model.png
Armos
Description

Habitat: Tower of the Gods
Vulnerability: Arrows

These small statues shift into autopilot and attack prey. Shoot them in the eyes with an arrow to silence them, then destroy them by hacking their crystal backs.

Notes
Can be obtained with a Pictograph of a Beamos.
Figurine
TWW Armos Knight Figurine Model.png
Armos Knight
Description

Habitat: Tower of the Gods
Vulnerability: Bombs

These auto-homing statues were created to deter intruders. To destroy them, you must toss bombs into their gaping mouths.

Notes
Figurine
TWW Boko Baba Figurine Model.png
Boko Baba
Description

Habitat: Forbidden Woods
Spoils: Boko Baba Seeds

These creatures that mimic Baba Buds attempt to swallow anything that comes near. Defeat them by stunning them with a jump attack and then cutting their stems.

Notes
Figurine
TWW Bokoblin Figurine Model.png
Bokoblin
Description

Habitat: Forsaken Fortress
Spoils: Joy Pendants
These little imps wield sharp machetes and Boko sticks when attacking. If they have no weapon, they'll attempt to fight hand-to-hand.

Notes
Figurine
TWW Red Bubble & Blue Bubble Figurine Model.png
Red Bubble & Blue Bubble
Description

Habitat: Tower of the Gods
Stronger Form: Blue Bubble

The cursed blue flames of the Blue Bubble steal the power away from all of your attacks. Bubbles can be easily blown away by the Deku Leaf.

Notes
Figurine
TWW ChuChu Figurine Model.png
ChuChu
Description

Habitat: Varied
Spoils: Chu Jelly

There are ChuChus of many different colors, all with their own distinct characteristics. In general, they are most susceptible to projectile weapons.

Notes
Figurine
TWW Floormaster Figurine Model.png
Floormaster
Description

Habitat: Forsaken Fortress
Personality: Surprisingly lonely

These creatures use their long hands to grab their victims, which they then yank into another room. They occasionally grab nearby vases and throw them.

Notes
Figurine
TWW Gyorg Figurine Model.png
Gyorg
Description

Habitat: The Great Sea
Weakness: Projectiles

These so-called ocean killing machines are plentiful in the Great Sea. You should attack them with arrows or bombs before they're able to knock you into the sea.

Notes
Figurine
TWW Kargaroc Figurine Model.png
Kargaroc
Description

Habitat: Dragon Roost
Spoils: Golden Feathers

These fierce and dangerous opponents often carry Bokoblins and Moblins into battle. You can use your Grappling Hook to steal their Golden Feathers.

Notes
Figurine
TWW Keese & Fire Keese Figurine Model.png
Keese & Fire Keese
Description

Habitat: Dragon Roost Cavern
Least Favorite Thing: Projectiles

These bats fly around dark places and attack anything that moves. Great care should be taken around Fire Keeses that appear during times of volcanic activity.

Notes
Figurine
TWW Magtail Figurine Model.png
Magtail
Description

Habitat: Dragon Roost Cavern
Weakness: Water

These creatures are covered in a hard exoskeleton that not even the searing heat of lava can penetrate. Their eyes are their only weakness. Magtails can be picked up and carried around when they've rolled into a defensive position.

Notes
Figurine
TWW Miniblin Figurine Model.png
Miniblin
Description

Habitat: Forsaken Fortress
Talent: Herd movements

These little beasts are quick and agile. They scurry along walls and gather in great numbers. You should deal with them individually so they don't surround you.

Notes
Figurine
TWW Morth Figurine Model.png
Morth
Description

Habitat: Forbidden Woods
Least Favorite Thing: Deku Leaves

These creatures attack in groups and cling to the bodies of their prey. A spin attack is the best way to shake them off. They're light and vulnerable to Deku Leaf blasts.

Notes
Figurine
TWW Octorok Figurine Model.png
Octorok
Description

Habitat: The Forest Haven, Great Sea
Winner of the Perfect Attendance Award (TWW)
Series: Exemplary enemy (TWWHD)

When approached, these creatures tend to hide in the water. They can easily be defeated by reflecting the rocks they shoot with a sword or shield.

Notes
Figurine
TWW Peahat Figurine Model.png
Peahat
Description

Habitat: Forbidden Woods
Talent: Rotating

These strange creatures use their propeller-like wings to float in midair. They can be easily knocked out of the sky with either projectiles or a Deku Leaf.

Notes
Figurine
TWW Poe Figurine Model.png
Poe
Description

Habitat: Earth Temple
Best Attack: Possession

These ghostly creatures have no physical form, so physical attacks pass right through them. Shining light on them with the Mirror Shield makes them take form.

Notes
Figurine
TWW Rat Figurine Model.png
Rat
Description

Habitat: Forsaken Fortress
Favorite Food: All-Purpose Bait

These creatures attack spontaneously and attempt to steal Rupees. The ones that carry bombs around are apparently known as Bombchus.

Notes
Figurine
TWW ReDead Figurine Model.png
ReDead
Description

Habitat: Earth Temple
Least Favorite Thing: Mirror Shield

These undead creatures live only in the darkest depths of the earth. Their icy cold gazes paralyze their victims with fear. Try to attack them from behind.

Notes
Figurine
TWW Seahat Figurine Model.png
Seahat
Description

Habitat: The Great Sea
Weakness: Projectiles

These tremendous flying fish can be found only on the Great Sea. They tend to ram ships to knock their prey into the sea, so it is best to attack them from a distance.

Notes
FigurineDescriptionNotes
TWW Armos Figurine Model.png
Armos

Habitat: Tower of the Gods
Vulnerability: Arrows

These small statues shift into autopilot and attack prey. Shoot them in the eyes with an arrow to silence them, then destroy them by hacking their crystal backs.

Can be obtained with a Pictograph of a Beamos.
TWW Armos Knight Figurine Model.png
Armos Knight

Habitat: Tower of the Gods
Vulnerability: Bombs

These auto-homing statues were created to deter intruders. To destroy them, you must toss bombs into their gaping mouths.

TWW Boko Baba Figurine Model.png
Boko Baba

Habitat: Forbidden Woods
Spoils: Boko Baba Seeds

These creatures that mimic Baba Buds attempt to swallow anything that comes near. Defeat them by stunning them with a jump attack and then cutting their stems.

TWW Bokoblin Figurine Model.png
Bokoblin

Habitat: Forsaken Fortress
Spoils: Joy Pendants
These little imps wield sharp machetes and Boko sticks when attacking. If they have no weapon, they'll attempt to fight hand-to-hand.

TWW Red Bubble & Blue Bubble Figurine Model.png
Red Bubble & Blue Bubble

Habitat: Tower of the Gods
Stronger Form: Blue Bubble

The cursed blue flames of the Blue Bubble steal the power away from all of your attacks. Bubbles can be easily blown away by the Deku Leaf.

TWW ChuChu Figurine Model.png
ChuChu

Habitat: Varied
Spoils: Chu Jelly

There are ChuChus of many different colors, all with their own distinct characteristics. In general, they are most susceptible to projectile weapons.

TWW Floormaster Figurine Model.png
Floormaster

Habitat: Forsaken Fortress
Personality: Surprisingly lonely

These creatures use their long hands to grab their victims, which they then yank into another room. They occasionally grab nearby vases and throw them.

TWW Gyorg Figurine Model.png
Gyorg

Habitat: The Great Sea
Weakness: Projectiles

These so-called ocean killing machines are plentiful in the Great Sea. You should attack them with arrows or bombs before they're able to knock you into the sea.

TWW Kargaroc Figurine Model.png
Kargaroc

Habitat: Dragon Roost
Spoils: Golden Feathers

These fierce and dangerous opponents often carry Bokoblins and Moblins into battle. You can use your Grappling Hook to steal their Golden Feathers.

TWW Keese & Fire Keese Figurine Model.png
Keese & Fire Keese

Habitat: Dragon Roost Cavern
Least Favorite Thing: Projectiles

These bats fly around dark places and attack anything that moves. Great care should be taken around Fire Keeses that appear during times of volcanic activity.

TWW Magtail Figurine Model.png
Magtail

Habitat: Dragon Roost Cavern
Weakness: Water

These creatures are covered in a hard exoskeleton that not even the searing heat of lava can penetrate. Their eyes are their only weakness. Magtails can be picked up and carried around when they've rolled into a defensive position.

TWW Miniblin Figurine Model.png
Miniblin

Habitat: Forsaken Fortress
Talent: Herd movements

These little beasts are quick and agile. They scurry along walls and gather in great numbers. You should deal with them individually so they don't surround you.

TWW Morth Figurine Model.png
Morth

Habitat: Forbidden Woods
Least Favorite Thing: Deku Leaves

These creatures attack in groups and cling to the bodies of their prey. A spin attack is the best way to shake them off. They're light and vulnerable to Deku Leaf blasts.

TWW Octorok Figurine Model.png
Octorok

Habitat: The Forest Haven, Great Sea
Winner of the Perfect Attendance Award (TWW)
Series: Exemplary enemy (TWWHD)

When approached, these creatures tend to hide in the water. They can easily be defeated by reflecting the rocks they shoot with a sword or shield.

TWW Peahat Figurine Model.png
Peahat

Habitat: Forbidden Woods
Talent: Rotating

These strange creatures use their propeller-like wings to float in midair. They can be easily knocked out of the sky with either projectiles or a Deku Leaf.

TWW Poe Figurine Model.png
Poe

Habitat: Earth Temple
Best Attack: Possession

These ghostly creatures have no physical form, so physical attacks pass right through them. Shining light on them with the Mirror Shield makes them take form.

TWW Rat Figurine Model.png
Rat

Habitat: Forsaken Fortress
Favorite Food: All-Purpose Bait

These creatures attack spontaneously and attempt to steal Rupees. The ones that carry bombs around are apparently known as Bombchus.

TWW ReDead Figurine Model.png
ReDead

Habitat: Earth Temple
Least Favorite Thing: Mirror Shield

These undead creatures live only in the darkest depths of the earth. Their icy cold gazes paralyze their victims with fear. Try to attack them from behind.

TWW Seahat Figurine Model.png
Seahat

Habitat: The Great Sea
Weakness: Projectiles

These tremendous flying fish can be found only on the Great Sea. They tend to ram ships to knock their prey into the sea, so it is best to attack them from a distance.

Nomenclature

ZW Nomenclature Asset.png Names in Other Regions ZW Nomenclature Asset 2.png
LanguageNames
This table was generated using translation pages.
To request an addition, please contact a staff member with a reference.

Gallery

ZW Lacking Images Asset.png
It has been requested that image(s) be added to this section.
Please remember to remove this template once the image(s) have been added.

References