Cube Pattern: Difference between revisions
No edit summary |
mNo edit summary |
||
| (14 intermediate revisions by 6 users not shown) | |||
| Line 1: | Line 1: | ||
{{Infobox Object | {{Infobox Object | ||
|image= File:BotW Cube Pattern Model.png | |image= | ||
{{Media | |||
|Model BotW= File:BotW Cube Pattern Model.png | |||
|Model TotK= File:TotK Cube Pattern Model.png | |||
}} | |||
|caption= | |caption= | ||
|pronunciation= | |pronunciation= | ||
|plural= | |plural= | ||
|game= | |game= BotW, TotK | ||
|other= | |other= | ||
|location= | |location= | ||
|uses= Finding {{Plural| | |uses= Finding {{Plural|Series|Korok|link}} | ||
|comp= {{Term| | |comp= {{Term|Series|Rock Pattern|link}} | ||
|theme= | |theme= | ||
}} | }} | ||
{{Term/Store|Cube Pattern|Cube Patterns|Series, BotW|plural}} are {{Plural| | {{Term/Store|Cube Pattern|Cube Patterns|Series, BotW, TotK|plural}} are recurring {{Plural|Series|Object|link}} in {{TLoZ|Series}}.<ref>{{Cite Guide|quote= |game= BotW |publisher= Piggyback |page= 330 |edition= Expanded Edition |year= 2018}}</ref><ref>{{Cite Guide|quote= |game= TotK |publisher= Piggyback |page= 309}}</ref> | ||
==Location and Uses== | ==Location and Uses== | ||
{{Plural|BotW|Cube Pattern}} | ==={{BotW|-}}=== | ||
{{Plural|BotW|Cube Pattern}} are a type of {{Term|BotW|Korok Seed Puzzle|link}} found throughout {{Term|BotW|Hyrule Kingdom|link}}. They take the form of two separate structures made entirely of cubes, with one structure having a cube that the other lacks. To rectify this, {{Term|BotW|Link|link}} must find a nearby cube, which he can lift with the {{Term|BotW|Magnesis|link}} {{Term|BotW|Rune|link}}. He must then place this cube in the correct space on the structure that is missing one. Doing so will cause a {{Term|BotW|Korok|link}} to appear, who then gives {{Term|BotW|Link}} a {{Term|BotW|Korok Seed|link}}.<ref>{{Cite|Yahaha! You found me!|Korok|BotW}}</ref> | |||
===Akkala=== | ====Akkala==== | ||
A total of four {{Plural|BotW|Cube Pattern}} can be found in {{Term|BotW|Akkala|link}}. | A total of four {{Plural|BotW|Cube Pattern}} can be found in {{Term|BotW|Akkala|link}}. | ||
<div class="mw-collapsible mw-collapsed" data-expandtext="Show Akkala Locations ▼" data-collapsetext="Hide Akkala Locations ▲"> | <div class="mw-collapsible mw-collapsed" data-expandtext="Show Akkala Locations ▼" data-collapsetext="Hide Akkala Locations ▲"> | ||
| Line 26: | Line 31: | ||
|colspan="2" |'''{{Term|BotW|Akkala Highlands|link}}''' | |colspan="2" |'''{{Term|BotW|Akkala Highlands|link}}''' | ||
|- | |- | ||
|[[File:BotW | |[[File:BotW Malin Bay East Korok.png|300px]] | ||
| | |{{Term|Series|Malin Bay East|link}} | ||
|- | |- | ||
|[[File:BotW Ordorac Quarry Korok.png|300px]] | |[[File:BotW Ordorac Quarry Korok.png|300px]] | ||
| Line 42: | Line 47: | ||
</div> | </div> | ||
===Central Hyrule=== | ====Central Hyrule==== | ||
A total of nine {{Plural|BotW|Cube Pattern}} can be found in {{Term|BotW|Central Hyrule|link}}. | A total of nine {{Plural|BotW|Cube Pattern}} can be found in {{Term|BotW|Central Hyrule|link}}. | ||
<div class="mw-collapsible mw-collapsed" data-expandtext="Show Central Hyrule Locations ▼" data-collapsetext="Hide Central Hyrule Locations ▲"> | <div class="mw-collapsible mw-collapsed" data-expandtext="Show Central Hyrule Locations ▼" data-collapsetext="Hide Central Hyrule Locations ▲"> | ||
| Line 52: | Line 57: | ||
|colspan="2" |'''{{Term|BotW|Great Plateau|link}}''' | |colspan="2" |'''{{Term|BotW|Great Plateau|link}}''' | ||
|- | |- | ||
|[[File:BotW Great Plateau Korok | |[[File:BotW Great Plateau Korok 4.png|300px]] | ||
|On a cliff west of {{Term|BotW|Hopper Pond|link}} | |On a cliff south and west of {{Term|BotW|Hopper Pond|link}} | ||
|- | |- | ||
|[[File:BotW Great Plateau Korok | |[[File:BotW Great Plateau Korok 5.png|300px]] | ||
| | |West side of the {{Term|BotW|Great Plateau}} | ||
|- | |- | ||
|colspan="2" |'''{{Term|BotW|Hyrule Field|link}}''' | |colspan="2" |'''{{Term|BotW|Hyrule Field|link}}''' | ||
| Line 80: | Line 85: | ||
|colspan="2" |'''{{Term|BotW|Hyrule Ridge|link}}''' | |colspan="2" |'''{{Term|BotW|Hyrule Ridge|link}}''' | ||
|- | |- | ||
|[[File:BotW Regencia River Korok | |[[File:BotW Regencia River Korok 4.png|300px]] | ||
|At the split of the {{Term|BotW|Regencia River}} and {{Term|BotW|Tamio River|link}} | |At the split of the {{Term|BotW|Regencia River}} and {{Term|BotW|Tamio River|link}} | ||
|- | |- | ||
| Line 90: | Line 95: | ||
</div> | </div> | ||
===Eldin=== | ====Eldin==== | ||
A total of eight {{Plural|BotW|Cube Pattern}} can be found in {{Term|BotW|Eldin (Region)|link}}. | A total of eight {{Plural|BotW|Cube Pattern}} can be found in {{Term|BotW|Eldin (Region)|link}}. | ||
<div class="mw-collapsible mw-collapsed" data-expandtext="Show Eldin Locations ▼" data-collapsetext="Hide Eldin Locations ▲"> | <div class="mw-collapsible mw-collapsed" data-expandtext="Show Eldin Locations ▼" data-collapsetext="Hide Eldin Locations ▲"> | ||
| Line 108: | Line 113: | ||
|{{Term|BotW|Pico Pond|link}} | |{{Term|BotW|Pico Pond|link}} | ||
|- | |- | ||
|[[File:BotW | |[[File:BotW Trilby Plain Korok 2.png|300px]] | ||
|{{Term|BotW|Trilby Plain|link}} | |{{Term|BotW|Trilby Plain|link}} | ||
|- | |- | ||
| Line 130: | Line 135: | ||
</div> | </div> | ||
===Faron=== | ====Faron==== | ||
A total of four {{Plural|BotW|Cube Pattern}} can be found in {{Term|BotW|Faron (Region)|link}}. | A total of four {{Plural|BotW|Cube Pattern}} can be found in {{Term|BotW|Faron (Region)|link}}. | ||
<div class="mw-collapsible mw-collapsed" data-expandtext="Show Faron Locations ▼" data-collapsetext="Hide Faron Locations ▲"> | <div class="mw-collapsible mw-collapsed" data-expandtext="Show Faron Locations ▼" data-collapsetext="Hide Faron Locations ▲"> | ||
| Line 156: | Line 161: | ||
</div> | </div> | ||
===Gerudo=== | ====Gerudo==== | ||
A total of 19 {{Plural|BotW|Cube Pattern}} can be found in {{Term|BotW|Gerudo (Region)|link}}. | A total of 19 {{Plural|BotW|Cube Pattern}} can be found in {{Term|BotW|Gerudo (Region)|link}}. | ||
<div class="mw-collapsible mw-collapsed" data-expandtext="Show Gerudo Locations ▼" data-collapsetext="Hide Gerudo Locations ▲"> | <div class="mw-collapsible mw-collapsed" data-expandtext="Show Gerudo Locations ▼" data-collapsetext="Hide Gerudo Locations ▲"> | ||
| Line 166: | Line 171: | ||
|colspan="2" |'''{{Term|BotW|Gerudo Desert|link}}''' | |colspan="2" |'''{{Term|BotW|Gerudo Desert|link}}''' | ||
|- | |- | ||
|[[File:BotW East | |[[File:BotW East Barrens Korok 2.png|300px]] | ||
|In a {{Term|BotW|Monster Stronghold|link}} on the {{Term|BotW|East Barrens|link}} | |In a {{Term|BotW|Monster Stronghold|link}} on the {{Term|BotW|East Barrens|link}} | ||
|- | |- | ||
| Line 213: | Line 218: | ||
|East end of {{Term|BotW|Nephra Hill|link}} | |East end of {{Term|BotW|Nephra Hill|link}} | ||
|- | |- | ||
|[[File:BotW Gerudo Highlands Korok | |[[File:BotW Gerudo Highlands Korok 9.png|300px]] | ||
|South of {{Term|BotW|Zirco Mesa|link}} | |South of {{Term|BotW|Zirco Mesa|link}} | ||
|- | |- | ||
|[[File:BotW Gerudo Highlands Korok | |[[File:BotW Gerudo Highlands Korok 15.png|300px]] | ||
|On the arch west of {{Term|BotW|Laparoh Mesa|link}} | |On the arch west of {{Term|BotW|Laparoh Mesa|link}} | ||
|- | |- | ||
|[[File:BotW Gerudo Highlands Korok | |[[File:BotW Gerudo Highlands Korok 16.png|300px]] | ||
|South of {{Term|BotW|Meadela's Mantle|link}} | |South of {{Term|BotW|Meadela's Mantle|link}} | ||
|- | |- | ||
| Line 227: | Line 232: | ||
</div> | </div> | ||
===Hebra=== | ====Hebra==== | ||
A total of six {{Plural|BotW|Cube Pattern}} can be found in {{Term|BotW|Hebra|link}}. | A total of six {{Plural|BotW|Cube Pattern}} can be found in {{Term|BotW|Hebra|link}}. | ||
<div class="mw-collapsible mw-collapsed" data-expandtext="Show Hebra Locations ▼" data-collapsetext="Hide Hebra Locations ▲"> | <div class="mw-collapsible mw-collapsed" data-expandtext="Show Hebra Locations ▼" data-collapsetext="Hide Hebra Locations ▲"> | ||
| Line 254: | Line 259: | ||
|In the {{Term|BotW|Tanagar Canyon}}, north of {{Term|BotW|Upland Lindor|link}} | |In the {{Term|BotW|Tanagar Canyon}}, north of {{Term|BotW|Upland Lindor|link}} | ||
|- | |- | ||
|[[File:BotW Forgotten Temple Korok.png|300px]] | |[[File:BotW Forgotten Temple Korok 5.png|300px]] | ||
|On top of the {{Term|BotW|Forgotten Temple|link}} | |On top of the {{Term|BotW|Forgotten Temple|link}} | ||
|} | |} | ||
</div> | </div> | ||
===Lanayru=== | ====Lanayru==== | ||
A total of five {{Plural|BotW|Cube Pattern}} can be found in {{Term|BotW|Lanayru (Region)|link}}. | A total of five {{Plural|BotW|Cube Pattern}} can be found in {{Term|BotW|Lanayru (Region)|link}}. | ||
<div class="mw-collapsible mw-collapsed" data-expandtext="Show Lanayru Locations ▼" data-collapsetext="Hide Lanayru Locations ▲"> | <div class="mw-collapsible mw-collapsed" data-expandtext="Show Lanayru Locations ▼" data-collapsetext="Hide Lanayru Locations ▲"> | ||
| Line 270: | Line 275: | ||
|- | |- | ||
|[[File:BotW Lanayru Great Spring Korok 4.png|300px]] | |[[File:BotW Lanayru Great Spring Korok 4.png|300px]] | ||
|South of the lake from where {{Term|BotW|Divine Beast Vah Ruta|link}} aims at {{Term|BotW|Hyrule Castle ( | |South of the lake from where {{Term|BotW|Divine Beast Vah Ruta|link}} aims at {{Term|BotW|Hyrule Castle (Dungeon)|link}} | ||
|- | |- | ||
|[[File:BotW Brynna Plain Korok 2.png|300px]] | |[[File:BotW Brynna Plain Korok 2.png|300px]] | ||
| Line 286: | Line 291: | ||
</div> | </div> | ||
===Necluda=== | ====Necluda==== | ||
A total of 10 {{Plural|BotW|Cube Pattern}} can be found in {{Term|BotW|Necluda|link}}. | A total of 10 {{Plural|BotW|Cube Pattern}} can be found in {{Term|BotW|Necluda|link}}. | ||
<div class="mw-collapsible mw-collapsed" data-expandtext="Show Necluda Locations ▼" data-collapsetext="Hide Necluda Locations ▲"> | <div class="mw-collapsible mw-collapsed" data-expandtext="Show Necluda Locations ▼" data-collapsetext="Hide Necluda Locations ▲"> | ||
| Line 329: | Line 334: | ||
|} | |} | ||
</div> | </div> | ||
==={{TotK|-}}=== | |||
{{Stub|TotK}} | |||
==Nomenclature== | ==Nomenclature== | ||
{{Nomenclature}} | {{Nomenclature}} | ||
==Gallery== | |||
<gallery> | |||
File:BotW Zonai Cube Pattern Repeating.png|The Zonai crest as it repeats on the sides of the cubes from {{BotW|-}} | |||
</gallery> | |||
==See Also== | ==See Also== | ||
* {{Term|Series|Korok|link}} | * {{Term|Series|Korok|link}} | ||
* {{Term|Series| | * {{Term|Series|Korok Seed Puzzle|link}} | ||
{{Ref}} | {{Ref}} | ||
{{Categories | {{Categories | ||
|objects= BotW | |Korok Seed Puzzles | ||
|objects= BotW, TotK | |||
}} | }} | ||
Latest revision as of 19:44, 26 April 2024
Cube Patterns are recurring Objects in The Legend of Zelda series.[1][2]
Location and Uses
Breath of the Wild
Cube Patterns are a type of Korok Seed Puzzle found throughout Hyrule Kingdom. They take the form of two separate structures made entirely of cubes, with one structure having a cube that the other lacks. To rectify this, Link must find a nearby cube, which he can lift with the Magnesis Rune. He must then place this cube in the correct space on the structure that is missing one. Doing so will cause a Korok to appear, who then gives Link a Korok Seed.[3]
Akkala
A total of four Cube Patterns can be found in Akkala.
| Image | Location |
|---|---|
| Akkala Highlands | |

|
Malin Bay East |

|
East end of Ordorac Quarry |

|
West end of Ordorac Quarry |
| Akkala Sea | |

|
East Akkala Beach |
Central Hyrule
A total of nine Cube Patterns can be found in Central Hyrule.
| Image | Location |
|---|---|
| Great Plateau | |

|
On a cliff south and west of Hopper Pond |

|
West side of the Great Plateau |
| Hyrule Field | |

|
At the end of the Hylia River |

|
West end of North Hyrule Plain |

|
North of Aquame Bridge |

|
Along the Regencia River south of the Sage Temple Ruins |

|
Northeast corner of East Hyrule Castle |

|
Castle Town Prison |
| Hyrule Ridge | |

|
At the split of the Regencia River and Tamio River |
| Lake Hylia | |

|
Southwest edge of Lake Hylia |
Eldin
A total of eight Cube Patterns can be found in Eldin.
| Image | Location |
|---|---|
| Death Mountain | |

|
In a Ruined House east of Death Mountain |
| Eldin Canyon | |

|
Pico Pond |

|
Trilby Plain |

|
One a mountain west of Cephla Lake |

|
Broca Island |

|
Gorko Lake |

|
Eldin's Flank |
| Eldin Mountains | |

|
Deplian Badlands |
Faron
A total of four Cube Patterns can be found in Faron.
| Image | Location |
|---|---|
| Faron Grasslands | |

|
On the hands of the Dragon statue surrounding the Spring of Courage |

|
South end of Ibara Butte |

|
Along a tidepool on Puffer Beach |
| Faron Sea | |

|
Cora Lake |
Gerudo
A total of 19 Cube Patterns can be found in Gerudo.
| Image | Location |
|---|---|
| Gerudo Desert | |

|
In a Monster Stronghold on the East Barrens |

|
Palu Wasteland |

|
Great Cliffs |

|
Great Cliffs |
| Gerudo Highlands | |

|
East of Ishto Soh Shrine |

|
Between Stalry Plateau and the Taobab Grassland |

|
In the Gerudo Canyon, north of Stalry Plateau |

|
In the Gerudo Canyon, south of Jee Noh Shrine |

|
East end of Koukot Plateau |

|
West of Wasteland Tower |

|
On Spectacle Rock, south of Wasteland Tower |

|
West end of East Gerudo Mesa |

|
Northwest of the South Lomei Labyrinth |

|
Champion's Gate |

|
East end of Nephra Hill |

|
South of Zirco Mesa |
| File:BotW Gerudo Highlands Korok 15.png | On the arch west of Laparoh Mesa |
| File:BotW Gerudo Highlands Korok 16.png | South of Meadela's Mantle |
| File:BotW Gerudo Summit Korok.png | West end of the Gerudo Summit |
Hebra
A total of six Cube Patterns can be found in Hebra.
| Image | Location |
|---|---|
| Hebra Mountains | |
| File:BotW Mount Drena Korok.png | Northeast corner of Mount Drena |
| File:BotW Icefall Foothills Korok.png | Icefall Foothills |
| Tabantha Frontier | |
| File:BotW Cuho Mountain Korok.png | East end of Cuho Mountain |
| File:BotW Tanagar Canyon Korok 4.png | In the Tanagar Canyon, south of the Tabantha Great Bridge |
| File:BotW Tanagar Canyon Korok 5.png | In the Tanagar Canyon, north of Upland Lindor |

|
On top of the Forgotten Temple |
Lanayru
A total of five Cube Patterns can be found in Lanayru.
| Image | Location |
|---|---|
| Lanayru Great Spring | |
| File:BotW Lanayru Great Spring Korok 4.png | South of the lake from where Divine Beast Vah Ruta aims at Hyrule Castle |
| File:BotW Brynna Plain Korok 2.png | North end of Brynna Plain |
| File:BotW Tal Tal Peak Korok.png | South end of Tal Tal Peak |
| File:BotW Upland Zorana Korok 2.png | South end of Upland Zorana |
| File:BotW Ruto Precipice Korok.png | North end of Ruto Precipice |
Necluda
A total of 10 Cube Patterns can be found in Necluda.
| Image | Location |
|---|---|
| East Necluda | |
| File:BotW Pierre Plateau Korok.png | North edge of Pierre Plateau |
| File:BotW Nirvata Plateau Korok.png | Nirvata Plateau |
| File:BotW Cliffs of Quince Korok.png | Cliffs of Quince |
| File:BotW Ebon Mountain Korok.png | West end of Ebon Mountain |
| West Necluda | |
| File:BotW West Necluda Korok 6.png | North of the Farosh Hills |
| File:BotW West Necluda Korok 7.png | West of the Hills of Baumer |
| File:BotW West Necluda Korok 8.png | Between the Pillars of Levia and Bonooru's Stand |
| File:BotW Calora Lake Korok.png | North of Calora Lake |
| File:BotW Floria Falls Korok.png | Over the Floria Falls, from the Waterfall below Corta Lake |
| File:BotW Lake Floria Korok.png | South end of Lake Floria |
Tears of the Kingdom
Nomenclature
| Language | Names | |
|---|---|---|
| This table was generated using translation pages. To request an addition, please contact a staff member with a reference. | ||
Gallery
-
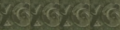
The Zonai crest as it repeats on the sides of the cubes from Breath of the Wild
See Also
References
- ↑ The Legend of Zelda: Breath of the Wild—The Complete Official Guide (Expanded Edition, 2018), Piggyback Interactive Limited, pg. 330
- ↑ The Legend of Zelda: Tears of the Kingdom—The Complete Official Guide, Piggyback Interactive Limited, pg. 309
- ↑ "Yahaha! You found me!" — Korok (Breath of the Wild)