Bosses in Hyrule Warriors: Difference between revisions
Jump to navigation
Jump to search
TriforceTony (talk | contribs) m (Text replacement - "HWL Phantom Ganon Artwork.png" to "HWL Phantom Ganon Render.png") |
TriforceTony (talk | contribs) |
||
| Line 3: | Line 3: | ||
</noinclude> | </noinclude> | ||
==Enemy Characters== | ==Enemy Characters== | ||
{{Tab2 | |||
|default= 3 | |||
|tab1= {{HW|-}} | |||
|content1= | |||
<gallery class="center"> | <gallery class="center"> | ||
File:HW Cia Render.png|''The Dark Sorceress:'' | File:HW Cia Render.png|''The Dark Sorceress:'' {{Term|HWDE|Cia|link}}<br>{{Small|''({{Term|HWDE|Shining Beacon|link}})''}} | ||
File:HW Link Dark Link Costume Render.png| | File:HW Link Dark Link Costume Render.png|{{Term|HWDE|Dark Link|link}}<br>{{Small|''({{Term|HWDE|A War of Spirit|link}})''<br>''({{Term|HWDE|Reclaiming the Darkness|link}}) {{Exp Game|HWL|HWDE}}''}} | ||
File:HW Volga Render.png|''Dragon Knight:'' | File:HW Volga Render.png|''Dragon Knight:'' {{Term|HWDE|Volga|link}}<br>{{Small|''({{Term|HWDE|The Armies of Ruin|link}})''<br>''({{Term|HWDE|The Sorceress of the Valley|link}})''<br>''({{Term|HWDE|Land in the Sky|link}})''<br>''({{Term|HWDE|Shining Beacon|link}})''<br>''({{Term|HWDE|The Dragon of the Caves|link}})''<br>''({{Term|HWDE|Powers Collide|link}}) {{Exp Game|HWL|HWDE}}''}} | ||
File:HW Wizzro Render.png|''Twisted Wizard:'' | File:HW Wizzro Render.png|''Twisted Wizard:'' {{Term|HWDE|Wizzro|link}}<br>{{Small|''({{Term|HWDE|The Sheikah Tribesman|link}})''<br>''({{Term|HWDE|The Sacred Sword|link}})''<br>''({{Term|HWDE|The Dragon of the Caves|link}})''<br>''({{Term|HWDE|Darkness Falls|link}})''}} | ||
File:HWDE Wizzro Zelda Icon.png|''Princess of Hyrule:'' | File:HWDE Wizzro Zelda Icon.png|''Princess of Hyrule:'' {{Term|HWDE|Wizzro|link|display=Zelda?}}<br>{{Small|''({{Term|HWDE|The Water Temple|link}})''}} | ||
File:HWDE Wizzro Lana Icon.png| | File:HWDE Wizzro Lana Icon.png|{{Term|HWDE|Wizzro|link|display=Lana?}}<br>{{Small|''({{Term|HWDE|The Sacred Sword|link}})''}} | ||
File:HW Link Render.png|''The Hero:'' | File:HW Link Render.png|''The Hero:'' {{Term|HWDE|Link|link}}<br>{{Small|''({{Term|HWDE|Battle of the Triforce|link}})''}} | ||
File:HW Lana Render.png|''The White Sorceress:'' | File:HW Lana Render.png|''The White Sorceress:'' {{Term|HWDE|Lana|link}}<br>{{Small|''({{Term|HWDE|March of the Demon King|link}})''<br>''({{Term|HWDE|The Invasion Begins|link}})''}} | ||
File:HW Zelda Render.png|''Princess of Hyrule:'' | File:HW Zelda Render.png|''Princess of Hyrule:'' {{Term|HWDE|Princess Zelda|link}}<br>{{Small|''({{Term|HWDE|Battle of the Triforce|link}})''<br>''({{Term|HWDE|The Invasion Begins|link}})''}} | ||
File:HW Impa Render.png|''Hyrulean General:'' | File:HW Impa Render.png|''Hyrulean General:'' {{Term|HWDE|Impa|link}}<br>{{Small|''({{Term|HWDE|March of the Demon King|link}})''<br>''({{Term|HWDE|Battle of the Triforce|link}})''<br>''({{Term|HWDE|The Invasion Begins|link}})''}} | ||
File:HW Ganondorf Render.png|''The Demon King:'' | File:HW Ganondorf Render.png|''The Demon King:'' {{Term|HWDE|Ganondorf|link}}<br>{{Small|''({{Term|HWDE|A War of Spirit|link}})''<br>''({{Term|HWDE|Liberation of the Triforce|link}})''<br>''({{Term|HWDE|Darkness Falls|link}})''}} | ||
File:HW Darunia Render.png|''Goron Chief:'' | File:HW Darunia Render.png|''Goron Chief:'' {{Term|HWDE|Darunia|link}}<br>{{Small|''({{Term|HWDE|Land of Myth|link}})''}} | ||
File:HW Agitha Render.png|''Insect...Princess?:'' | File:HW Agitha Render.png|''Insect...Princess?:'' {{Term|HWDE|Agitha|link}}<br>{{Small|''({{Term|HWDE|The Usurper King|link}})''}} | ||
File:HW Midna Render.png|''Twilight Princess:'' | File:HW Midna Render.png|''Twilight Princess:'' {{Term|HWDE|Midna|link}}<br>{{Small|''({{Term|HWDE|Land of Twilight|link}})''<br>''({{Term|HWDE|The Usurper King|link}})''}} | ||
File:HW Fi Render.png|''The Goddess Sword:'' | File:HW Fi Render.png|''The Goddess Sword:'' {{Term|HWDE|Fi|link}}<br>{{Small|''({{Term|HWDE|The Demon Lord|link}})''}} | ||
File:HW Ghirahim Render.png|''Demon Lord:'' | File:HW Ghirahim Render.png|''Demon Lord:'' {{Term|HWDE|Ghirahim|link}}<br>{{Small|''({{Term|HWDE|Land in the Sky|link}})''<br>''({{Term|HWDE|Sealed Ambition|link}})''<br>''({{Term|HWDE|Enduring Resolve|link}})''<br>''({{Term|HWDE|The Demon Lord|link}})''<br>''({{Term|HWDE|The Demon Lord's Plan|link}}) {{Exp Game|HWL|HWDE}}''}} | ||
File:HW Zant Render.png|''Usurper King:'' | File:HW Zant Render.png|''Usurper King:'' {{Term|HWDE|Zant|link}}<br>{{Small|''({{Term|HWDE|The Shadow King|link}})''<br>''({{Term|HWDE|Enduring Resolve|link}})''<br>''({{Term|HWDE|The Usurper King|link}})''}} | ||
File:HW Skull Kid Render.png|''Majora's Puppet:'' | File:HW Skull Kid Render.png|''Majora's Puppet:'' {{Term|HWDE|Skull Kid|link}} <br>{{Small|''({{Term|HWDE|The Girl in the Green Tunic|link}}) {{Exp Game|HWL|HWDE}}''}} | ||
File:HWDE Dark Zant Icon.png| | File:HWDE Dark Zant Icon.png|{{Term|HWDE|Dark Zant|link}} <br>{{Small|''({{Term|HWDE|Her True Self|link}}) {{Exp Game|HWL|HWDE}}''}} | ||
File:HWDE Dark Twili Midna Icon.png| | File:HWDE Dark Twili Midna Icon.png|{{Term|HWDE|Dark Twili Midna|link}} <br>{{Small|''({{Term|HWDE|Her True Self|link}}) {{Exp Game|HWL|HWDE}}''}} | ||
File:HWDE Dark Cia Icon.png| | File:HWDE Dark Cia Icon.png|{{Term|HWDE|Dark Cia|link}} <br>{{Small|''({{Term|HWDE|Reclaiming the Darkness|link}}) {{Exp Game|HWL|HWDE}}''}} | ||
</gallery> | </gallery> | ||
|tab2= {{HW|L|-}} | |||
|content2= | |||
{{#section:Bosses in Hyrule Warriors Legends|Enemy Characters}} | |||
|tab3= {{HW|DE|-}} | |||
|content3= | |||
{{#section:Bosses in Hyrule Warriors: Definitive Edition|Enemy Characters}} | |||
}} | |||
==[[Giant Boss]]es== | ==[[Giant Boss]]es== | ||
Revision as of 00:25, 28 April 2020
Enemy Characters
Giant Bosses
-
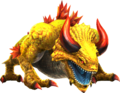
Fire Breathing: King Dodongo
(The Armies of Ruin)
(Ganondorf's Return)
(The Dragon of the Caves) -
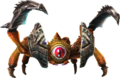
Arthropod Cyclops Monster: Gohma
(The Sorceress of the Woods)
(Ganondorf's Return)
(Darkness Falls)
(A New Disturbance) (HWL)
(Watchers of the Triforce) (HWL) -
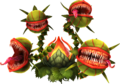
Poisonous Tree: Manhandla
(The Sorceress of the Valley)
(Ganondorf's Return)
(Darkness Falls)
(Watchers of the Triforce) (HWL) -
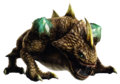
Fire Breathing: King Dodongo
(The Water Temple)
(The Other Hero) (HWL) -
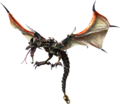
Twilit Dragon: Argorok
(The Shadow King)
(Liberation of the Triforce)
(The Usurper King) -

-
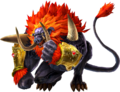
Dark Beast: Ganon
(Liberation of the Triforce) -
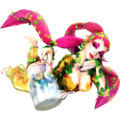
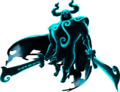
Great Fairy
(Ganon's Fury Mode) -
Helmaroc King
(The Search for Cia) (HWL) -