Royal Hidden Passage: Difference between revisions
m (Added gallery images) |
TriforceTony (talk | contribs) |
||
| (13 intermediate revisions by 5 users not shown) | |||
| Line 19: | Line 19: | ||
==Features and Overview== | ==Features and Overview== | ||
The {{Term|TotK|Royal Hidden Passage}} is a series of tunnels and underground structures that lead from {{Term|TotK|Hyrule Castle|link}} to the {{Term|TotK|Emergency Shelter|link}}. It can be accessed via hatches located in the {{Term|TotK|Observation Room|link}} and near the {{Term|TotK|Guards' Chamber|link}}. Alternatively, the {{Term|TotK|Royal Hidden Passage|display=Passage}} can be accessed through the {{Term|TotK|Emergency Shelter}} | {{TotK Quest/Container| | ||
{{TotK Quest | |||
|name= Who Goes There? | |||
|type= Side Adventure | |||
|giver= [[Jerrin]] | |||
|location= [[Lookout Landing]] | |||
}} | |||
}} | |||
The {{Term|TotK|Royal Hidden Passage}} is a series of tunnels and underground structures that lead from {{Term|TotK|Hyrule Castle|link}} to the {{Term|TotK|Emergency Shelter|link}}. It can be accessed via hatches located in the {{Term|TotK|Observation Room|link}} and near the {{Term|TotK|Guards' Chamber|link}}. Alternatively, the {{Term|TotK|Royal Hidden Passage|display=Passage}} can be accessed through the {{Term|TotK|Emergency Shelter}} after one {{Term|TotK|Region|link}} has been investigated for the "{{Term|TotK|Regional Phenomena|link}}" {{Term|TotK|Main Quest|link}}. | |||
A large cavern holds a {{Term|TotK|Stalnox|link}} hidden beneath a pile of rocks. In the same area's {{Term|TotK|Water|link}}-filled portion, a tunnel to the north leads to {{Term|TotK|Hyrule Castle}}, while a tunnel to the south leads to the {{Term|TotK|Emergency Shelter|link}} and {{Term|TotK|Horned Statue|link}}. | A large cavern holds a {{Term|TotK|Stalnox|link}} hidden beneath a pile of rocks. In the same area's {{Term|TotK|Water|link}}-filled portion, a tunnel to the north leads to {{Term|TotK|Hyrule Castle}}, while a tunnel to the south leads to the {{Term|TotK|Emergency Shelter|link}} and {{Term|TotK|Horned Statue|link}}. | ||
Numerous {{Plural|TotK|Ore Deposit|link}} and {{Plural|TotK|Luminous Stone Deposit|link}} can be found throughout the {{Term|TotK|Royal Hidden Passage|display=Passage}}. A {{Term|TotK|Stone Tablet|link}} beneath the {{Term|TotK|Observation Room}} entrance explains the origins of {{Term|TotK|Hyrule Castle}}.<ref>{{Cite|Deep beneath this land, our mighty first ruler imprisoned the Demon King.<br />To ensure the king's magic would hold, we erected a castle here to protect this sacred site.<br />Without the castle in place, the site may be disturbed, allowing the Demon King's hatred and rage to be revived.<br />The preservation of this castle is therefore tied to the prosperity of the kingdom.<br />May it watch over an eternal peace.|Stone Tablet|TotK}}</ref> | Numerous {{Plural|TotK|Ore Deposit|link}}, {{Plural|TotK|Rare Ore Deposit|link}}, and {{Plural|TotK|Luminous Stone Deposit|link}} can be found throughout the {{Term|TotK|Royal Hidden Passage|display=Passage}}. A {{Term|TotK|Stone Tablet|link}} beneath the {{Term|TotK|Observation Room}} entrance explains the origins of {{Term|TotK|Hyrule Castle}}.<ref>{{Cite|Deep beneath this land, our mighty first ruler imprisoned the Demon King.<br />To ensure the king's magic would hold, we erected a castle here to protect this sacred site.<br/>Without the castle in place, the site may be disturbed, allowing the Demon King's hatred and rage to be revived.<br/>The preservation of this castle is therefore tied to the prosperity of the kingdom.<br/>May it watch over an eternal peace.|Stone Tablet|TotK}}</ref> | ||
==={{Plural|TotK|Creature}}=== | |||
{{Gallery List|Creatures | |||
|TotK= Bubbulfrog, Glowing Cave Fish, Hightail Lizard, Hot-Footed Frog, Sticky Lizard, Tireless Frog | |||
}} | |||
==={{Plural|TotK|Enemy}}=== | |||
{{Gallery List|Enemies | |||
|TotK= Black Bokoblin {{Qty|1}}, | |||
Black Horriblin {{Qty|1}}{{Equipment|TotK|Knight's Halberd}}, | |||
Black Horriblin {{Qty|4}}{{Equipment|TotK|Rusty-Halberd Stick}}<!-- Sturdy Long Stick + Rusty Halberd -->, | |||
Blue Lizalfos {{Qty|1}}{{Equipment|TotK|Giant Boomerang}} | |||
Electric Keese {{Qty|1}}, | |||
Fire Chuchu {{Qty|1}}, | |||
Fire Chuchu [2] {{Qty|1}}, | |||
Ice Like {{Qty|1}}, | |||
Keese {{Qty|7}}, | |||
Shock Like {{Qty|1}}, | |||
Stalkoblin {{Qty|3}}{{Equipment|TotK|Rusty Broadsword}}, | |||
Stalkoblin {{Qty|1}}{{Equipment|TotK|Rusty Claymore}}, | |||
Stalkoblin {{Qty|1}}{{Equipment|TotK|Rusty Halberd}}, | |||
Stalmoblin {{Qty|1}}{{Equipment|TotK|Rusty Claymore}}, | |||
Stone Pebblit {{Qty|6}} | |||
}} | |||
==={{Plural|TotK|Material}}=== | ==={{Plural|TotK|Material}}=== | ||
{{Gallery List|Materials | {{Gallery List|Materials | ||
|TotK= Bomb Flower, Brightbloom Seed | |TotK= Bomb Flower, Brightbloom Seed, Giant Brightbloom Seed, Hearty Truffle, Hylian Shroom, Raw Meat | ||
}} | }} | ||
=== | ===={{Plural|TotK|Boss}}==== | ||
{{Gallery List|Enemies | {{Gallery List|Enemies | ||
|TotK= | |TotK= Stalnox {{Qty|1}}{{Equipment|TotK|Knight's Broadsword}}{{Equipment|TotK|Knight's Claymore}}{{Equipment|TotK|Knight's Halberd}} | ||
}} | |||
===Equipment=== | |||
{{Gallery List|Equipment | |||
|TotK= Rock Hammer <!-- Sturdy Wooden Stick + Rock -->, Soldier's Bow, Soldier's Broadsword, Soldier's Claymore, Soldier's Shield, Soldier's Spear, Traveler's Bow, Traveler's Claymore, Traveler's Shield, Traveler's Spear, Traveler's Sword, Wooden Bow | |||
}} | |||
==={{Plural|TotK|Treasure Chest}}=== | |||
{{Treasure Chests|game= TotK | |||
|- | |||
| Iron Treasure Chest | |||
| Soldier's Greaves | |||
| -0306, 0280, -0005 | |||
| Guarded by the {{Term|TotK|Like Like|link}} in the armory | |||
|- | |||
| Iron Treasure Chest | |||
| Soldier's Claymore | |||
| -0324, 0306, -0005 | |||
| Below a pile of rubble in the northwestern chamber of the armory | |||
|- | |||
| Iron Treasure Chest | |||
| Soldier's Armor | |||
| -0268, 0637, -0034 | |||
| Behind the cell in the second armory | |||
|- | |||
| Iron Treasure Chest | |||
| Soldier's Helm | |||
| -0232, 0467, -0038 | |||
| Guarded by the {{Term|TotK|Shock Like|link}} | |||
|- | |||
| Iron Treasure Chest | |||
| Knight's-Halberd Halberd [File:TotK Knight's-Halberd Halberd Model.png]<!-- Knight's Halberd + Knight's Halberd --> | |||
| -0214, 0527, -0053 | |||
| Inside the {{Term|TotK|Black Horriblin|link}} camp | |||
|- | |||
| Iron Treasure Chest | |||
| Soldier's Shield | |||
| -0229, 0786, 0041 | |||
| In the third armory on the first floor up from the {{Term|TotK|Stone Tablet|link}} | |||
|- | |||
| Iron Treasure Chest | |||
| Soldier's Spear | |||
| -0291, 0801, 0054 | |||
| In the circular chamber along the pathway to the {{Term|TotK|Guards' Chamber|link}} on the second floor up from the {{Term|TotK|Stone Tablet|link}} | |||
|- | |||
| Iron Treasure Chest | |||
| Soldier's Bow | |||
| -0229, 0786, 0072 | |||
| To the right of the unlit {{Term|TotK|Cooking Pot|link}} on the third floor up from the {{Term|TotK|Stone Tablet|link}} | |||
|- | |||
| Iron Treasure Chest | |||
| Knight's Halberd | |||
| -0229, 0793, 0073 | |||
| Behind the unlit {{Term|TotK|Cooking Pot|link}} on the third floor up from the {{Term|TotK|Stone Tablet|link}} | |||
|- | |||
| Iron Treasure Chest | |||
| Diamond | |||
| -0253, 0761, 0088 | |||
| Atop the staircase leading to the {{Term|TotK|Observation Room|link}} | |||
}} | }} | ||
| Line 40: | Line 131: | ||
==Gallery== | ==Gallery== | ||
<gallery> | <gallery> | ||
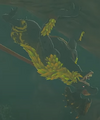
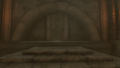
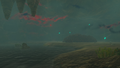
File:TotK Royal Hidden Passage Tunnel Fork.png| | File:TotK Royal Hidden Passage 2.png|The Royal Hidden Passage below Hyrule Castle | ||
File:TotK Royal Hidden Passage Stalnox Room.png| | File:TotK Royal Hidden Passage 3.png|The entrance to the Royal Hidden Passage in the Emergency Shelter | ||
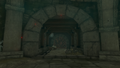
File:TotK Royal Hidden Passage 4.png|One of the entrances to the Royal Hidden Passage in Hyrule Castle | |||
File:TotK Royal Hidden Passage 5.png|One of the entrances to the Royal Hidden Passage in Hyrule Castle | |||
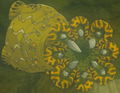
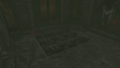
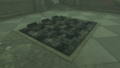
File:TotK Royal Hidden Passage Tunnel Fork.png|The tunnel fork hidden beneath breakable {{Plural|TotK|Rock}} | |||
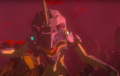
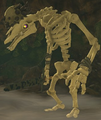
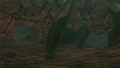
File:TotK Royal Hidden Passage Stalnox Room.png|The cavern containing the {{Term|TotK|Stalnox}} | |||
</gallery> | </gallery> | ||
==See Also== | |||
* {{Term|Series|Emergency Shelter|link}} | |||
{{Ref}} | {{Ref}} | ||
{{Categories | {{Categories | ||
|Caves | |Caves, Hyrule Field | ||
|locations= TotK | |locations= TotK | ||
}} | }} | ||
Latest revision as of 00:37, 11 May 2024
The Royal Hidden Passage is a location in Tears of the Kingdom.[1]
Features and Overview
- Related Quests

|
Who Goes There? | |||
| Side Adventure | ||||
Who Goes There? | |
|
|
Who Goes There? | |||
| Side Adventure | ||||
Who Goes There? | |
The Royal Hidden Passage is a series of tunnels and underground structures that lead from Hyrule Castle to the Emergency Shelter. It can be accessed via hatches located in the Observation Room and near the Guards' Chamber. Alternatively, the Passage can be accessed through the Emergency Shelter after one Region has been investigated for the "Regional Phenomena" Main Quest.
A large cavern holds a Stalnox hidden beneath a pile of rocks. In the same area's Water-filled portion, a tunnel to the north leads to Hyrule Castle, while a tunnel to the south leads to the Emergency Shelter and Horned Statue.
Numerous Ore Deposits, Rare Ore Deposits, and Luminous Stone Deposits can be found throughout the Passage. A Stone Tablet beneath the Observation Room entrance explains the origins of Hyrule Castle.[2]
Creatures


Enemies
-

-
-
-
-

Fire Chuchu ×1
-
Fire Chuchu ×1
-

Ice Like ×1
-

Keese ×7
-
Shock Like ×1
-
-
-
-
-


Materials


Bosses

Equipment


Treasure Chests
| Treasure Chest | |
|---|---|
| Contents | |
| Coordinates | -0306, 0280, -0005 |
| Notes | Guarded by the Like Like in the armory |
| Treasure Chest | |
| Contents | |
| Coordinates | -0324, 0306, -0005 |
| Notes | Below a pile of rubble in the northwestern chamber of the armory |
| Treasure Chest | |
| Contents | |
| Coordinates | -0268, 0637, -0034 |
| Notes | Behind the cell in the second armory |
| Treasure Chest | |
| Contents | |
| Coordinates | -0232, 0467, -0038 |
| Notes | Guarded by the Shock Like |
| Treasure Chest | |
| Contents | |
| Coordinates | -0214, 0527, -0053 |
| Notes | Inside the Black Horriblin camp |
| Treasure Chest | |
| Contents | |
| Coordinates | -0229, 0786, 0041 |
| Notes | In the third armory on the first floor up from the Stone Tablet |
| Treasure Chest | |
| Contents | |
| Coordinates | -0291, 0801, 0054 |
| Notes | In the circular chamber along the pathway to the Guards' Chamber on the second floor up from the Stone Tablet |
| Treasure Chest | |
| Contents | |
| Coordinates | -0229, 0786, 0072 |
| Notes | To the right of the unlit Cooking Pot on the third floor up from the Stone Tablet |
| Treasure Chest | |
| Contents | |
| Coordinates | -0229, 0793, 0073 |
| Notes | Behind the unlit Cooking Pot on the third floor up from the Stone Tablet |
| Treasure Chest | |
| Contents | |
| Coordinates | -0253, 0761, 0088 |
| Notes | Atop the staircase leading to the Observation Room |

| Treasure Chest | Contents | Coordinates | Notes |
|---|---|---|---|
-0306, 0280, -0005 | Guarded by the Like Like in the armory | ||
-0324, 0306, -0005 | Below a pile of rubble in the northwestern chamber of the armory | ||
-0268, 0637, -0034 | Behind the cell in the second armory | ||
-0232, 0467, -0038 | Guarded by the Shock Like | ||
-0214, 0527, -0053 | Inside the Black Horriblin camp | ||
-0229, 0786, 0041 | In the third armory on the first floor up from the Stone Tablet | ||
-0291, 0801, 0054 | In the circular chamber along the pathway to the Guards' Chamber on the second floor up from the Stone Tablet | ||
-0229, 0786, 0072 | To the right of the unlit Cooking Pot on the third floor up from the Stone Tablet | ||
-0229, 0793, 0073 | Behind the unlit Cooking Pot on the third floor up from the Stone Tablet | ||
-0253, 0761, 0088 | Atop the staircase leading to the Observation Room |
Nomenclature
| Language | Names | |
|---|---|---|
| This table was generated using translation pages. To request an addition, please contact a staff member with a reference. | ||
Gallery
-
The Royal Hidden Passage below Hyrule Castle
-
The entrance to the Royal Hidden Passage in the Emergency Shelter
-
One of the entrances to the Royal Hidden Passage in Hyrule Castle
-
One of the entrances to the Royal Hidden Passage in Hyrule Castle
-
The tunnel fork hidden beneath breakable Rocks
-
The cavern containing the Stalnox


See Also
References
- ↑ "Royal Hidden Passage" — Map (Tears of the Kingdom)
- ↑ "Deep beneath this land, our mighty first ruler imprisoned the Demon King.
To ensure the king's magic would hold, we erected a castle here to protect this sacred site.
Without the castle in place, the site may be disturbed, allowing the Demon King's hatred and rage to be revived.
The preservation of this castle is therefore tied to the prosperity of the kingdom.
May it watch over an eternal peace." — Stone Tablet (Tears of the Kingdom)