Docks: Difference between revisions
mNo edit summary |
TriforceTony (talk | contribs) |
||
| (5 intermediate revisions by 3 users not shown) | |||
| Line 1: | Line 1: | ||
{{Infobox Location | {{Infobox Location | ||
|image= File:BotW Docks.png | |image= | ||
{{Media | |||
|Screenshot BotW= File:BotW Docks.png | |||
|Screenshot TotK= File:TotK Docks.png | |||
}} | |||
|caption= | |caption= | ||
|game= BotW | |game= BotW, TotK | ||
|other= | |other= HWAoC | ||
|inhab= | |inhab= | ||
|items= | |items= | ||
|related= {{List|{{Term| | |related= | ||
{{List| | |||
{{Term|Series|Library|link}}, | |||
{{Term|Series|Saas Ko'sah Shrine|link}} | |||
}} | |||
|season= | |season= | ||
|theme= | |theme= | ||
}} | }} | ||
The {{Term/Store|Docks||Series, BotW}} are a location in {{BotW}} | The {{Term/Store|Docks||Series, BotW, TotK}} are a recurring location in {{TLoZ|Series}}.{{Exp Game|BotW, TotK}}<ref>{{Cite|'''Docks'''|Map|BotW}}</ref><ref>{{Cite|'''Docks'''|Map|TotK}}</ref> The {{Term|Series|Docks}} go unnamed in {{HWAoC}}. | ||
==Features and Overview== | ==Features and Overview== | ||
The {{Term|BotW|Docks}} are located inside a | ==={{BotW|-}}=== | ||
The {{Term|BotW|Docks}} are located inside a {{Term|BotW|Cave|link}} on the northern end of the grounds of {{Term|BotW|Hyrule Castle (Dungeon)|link}}. {{Term|BotW|Link|link}} can access the {{Term|BotW|Docks}} via the {{Term|BotW|Hyrule Castle Moat|link}}. The pathway out of the {{Term|BotW|Docks}} leads into the {{Term|BotW|Library|link}}. Many {{Plural|BotW|Wooden Box|link}}, {{Plural|BotW|Barrel|link}}, and {{Plural|BotW|Bomb Barrel|link}} can be found throughout the {{Term|BotW|Docks}}. | |||
On the higher level of the {{Term|BotW|Dock}}, {{Term|BotW|Link}} can find several lit stationary {{Plural|BotW| | Above the mouth of the {{Term|BotW|Cave}} is a grassy ledge with a pair of {{Plural|BotW|Torch}} on it. There is a thin path leading up to this ledge on the north side of the {{Term|BotW|Docks}}. In between the {{Plural|BotW|Torch}} sits a pedestal with a {{Term|BotW|Great Flameblade|link}} embedded in it. On the higher level of the {{Term|BotW|Dock}}, {{Term|BotW|Link}} can find several lit stationary {{Plural|BotW|Torch|link}} surrounding a single unlit one. If {{Term|BotW|Link}} ignites this stationary {{Term|BotW|Torch}}, {{Term|BotW|Saas Ko'sah Shrine|link}} will emerge from the ground nearby. | ||
====Areas==== | |||
{{Gallery List|Locations | |||
|BotW= Saas Ko'sah Shrine | |||
}} | |||
=== | ===={{Plural|BotW|Creature}}==== | ||
{{Gallery List|Creatures | {{Gallery List|Creatures | ||
|BotW= Hearty Salmon | |BotW= Hearty Salmon | ||
}} | }} | ||
=== | ===={{Plural|BotW|Enemy}}==== | ||
{{Heading|Normal Mode}} | |||
{{Gallery List|Enemies | |||
|BotW= Black Lizalfos [Qty:3]{{Equipment|BotW|Steel Lizal Bow}}{{Equipment|BotW|Shock Arrow}}, Keese [Qty:3] | |||
}} | |||
{{Heading|{{Term|BotW|Master Mode}}}} | |||
{{Gallery List|Enemies | {{Gallery List|Enemies | ||
|BotW= | |BotW= Keese [Qty:3], Silver Lizalfos [Qty:3]{{Equipment|BotW|Steel Lizal Bow}}{{Equipment|BotW|Shock Arrow}} | ||
}} | }} | ||
===Equipment=== | ====Equipment==== | ||
{{Gallery List| | {{Gallery List|Equipment | ||
|BotW= Great Flameblade | |BotW= Great Flameblade | ||
}} | }} | ||
===={{Plural|BotW|Treasure Chest}}==== | |||
{{Treasure Chests|game= BotW | |||
|- | |||
| Metal Chest | |||
| Star Fragment | |||
| Underwater in between the two piers<br/>Requires {{Term|BotW|Magnesis|link}} | |||
|- | |||
| Metal Chest | |||
| Gold Rupee | |||
| Underwater west of the south pier<br/>Requires {{Term|BotW|Magnesis}} | |||
|- | |||
| Wooden Chest | |||
| Shock Arrow x5 | |||
| Floating on the {{Term|BotW|Water (Terrain)}} on the south side of the north pier | |||
|- | |||
| Wooden Chest | |||
| Ancient Arrow | |||
| Floating on the {{Term|BotW|Water (Terrain)}} on the north side of the south pier | |||
}} | |||
===={{Plural|BotW|Korok Seed}}==== | |||
{{Korok Seeds|game= BotW | |||
|- | |||
| Docks | |||
| Natural Hiding Spot | |||
| Under a {{Term|BotW|Rock|link}} on the ledge above the entrance | |||
}} | |||
==={{TotK|-}}=== | |||
{{Stub|TotK}} | |||
As in {{BotW}}, the Docks connect {{Term|TotK|Hyrule Castle|link}} to the {{Term|TotK|Hyrule Castle Moat|link}} in {{Term|TotK|Hyrule Field|link}}. | |||
====Creatures==== | |||
{{Gallery List|Creatures | |||
|TotK= Hearty Salmon | |||
}} | |||
====Enemies==== | |||
{{Gallery List|Enemies | |||
|TotK= Gloom, Gloom Spawn [Qty:1] | |||
}} | |||
====Equipment==== | |||
{{Gallery List|Equipment | |||
|TotK= Traveler's Claymore | |||
}} | |||
====Treasure Chests==== | |||
{{Treasure Chests|game= TotK | |||
|- | |||
| Wooden Chest [2] | |||
| Royal Broadsword | |||
| -0232, 1176, 0009 | |||
| In the {{Term|TotK|Water (Terrain)|link}} of the Docks | |||
|- | |||
| Wooden Chest [2] | |||
| Arrow x 10 | |||
| -0230, 1199, 0009 | |||
| In the {{Term|TotK|Water (Terrain)|link}} behind the gate in the Docks | |||
|- | |||
| Stone Chest [2] | |||
| Hylian Shield | |||
| -0153, 1157, 0038 | |||
| At the top of the Docks<br/>Only accessible by lighting the large {{Term|TotK|Torch|link}} | |||
}} | |||
==Other Appearances== | |||
==={{HWAoC|-}}=== | |||
{{Noncanon|Start}} | |||
The {{Term|HWAoC|Docks}} are part of the {{Term|HWAoC|Hyrule Castle|link}} {{Term|HWAoC|Stage|link}} in {{HWAoC|-}}. The {{Term|HWAoC|Docks}} appear similar to their {{BotW|-}} counterpart, but with fast-flowing {{Term|HWAoC|Water (Terrain)|link}} that has four defeated {{Plural|HWAoC|Guardian|link}} partially submerged in it. Broken {{Plural|HWAoC|Barrel|link}} and intact {{Plural|HWAoC|Wooden Box|link}} sit inside the {{Term|HWAoC|Cave|link}}, and some of the {{Plural|HWAoC|Torch|link}} have been broken, lighting parts of the ground on {{Term|HWAoC|Fire|link}}. The ledge at the entrance is inaccessible and covered in green {{Term|HWAoC|Grass|link}}. The upper layer remains mostly the same apart from two broken {{Plural|HWAoC|Torch}}. | |||
During the "{{Term|HWAoC|Calamity Strikes|link}}" {{Term|HWAoC|Scenario|link}}, a {{Term|HWAoC|Warrior|link}} and {{Term|HWAoC|Zelda|link}} arrive in the {{Term|HWAoC|Docks}} through the {{Term|HWAoC|Hidden Passage|link}} in the {{Term|HWAoC|Sanctum|link}} mid-{{Term|HWAoC|Great Calamity|link|display=Calamity}}, following the fleeing {{Term|HWAoC|King Rhoam|link}}.<ref>{{Cite|We defeated them, somehow. Now then, do you know my father's whereabouts?|Zelda|HWAoC}}<br/>{{Cite|The king fled through the back entrance. We were cut off from the others amid the chaos.|Hylian Captain|HWAoC}}<br/>{{Cite|Let's exit out the back as well, then. I'm so relieved father is all right...|Zelda|HWAoC}}</ref> After {{Term|HWAoC|Zelda}} reaches the {{Term|HWAoC|Hyrule Castle Corridors|link}} through the {{Term|HWAoC|Library|link}}, two of the four inactive {{Plural|HWAoC|Guardian Stalker|link}} in the upper layer of the {{Term|HWAoC|Docks}} activate to pursue her.<ref>{{Cite|The {{Color|HWAoC Red|Guardians}} at the docks have activated!|Battle Log|HWAoC}}</ref> Once these two are defeated, the remaining {{Plural|HWAoC|Guardian Stalker}} activate as well.<ref>{{Cite|More {{Color|HWAoC Red|Guardians}} at the docks have activated!|Battle Log|HWAoC}}</ref> | |||
{{Noncanon|End}} | |||
==Nomenclature== | ==Nomenclature== | ||
| Line 41: | Line 130: | ||
==See Also== | ==See Also== | ||
* {{Term|Series|Hyrule Castle ( | * {{Term|Series|Hyrule Castle (Dungeon)|link}} | ||
* {{Term|Series|Library|link}} | * {{Term|Series|Library|link}} | ||
* {{Term|Series|Saas Ko'sah Shrine|link}} | * {{Term|Series|Saas Ko'sah Shrine|link}} | ||
| Line 49: | Line 138: | ||
{{Categories | {{Categories | ||
|Harbors, Hyrule Castle | |Harbors, Hyrule Castle | ||
|locations= BotW | |locations= BotW, TotK, HWAoC<!-- Uses Series term --> | ||
}} | }} | ||
Latest revision as of 22:36, 10 May 2024
The Docks are a recurring location in The Legend of Zelda series.(BotW | TotK)[1][2] The Docks go unnamed in Hyrule Warriors: Age of Calamity.
Features and Overview
Breath of the Wild
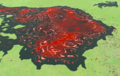
The Docks are located inside a Cave on the northern end of the grounds of Hyrule Castle. Link can access the Docks via the Hyrule Castle Moat. The pathway out of the Docks leads into the Library. Many Wooden Boxes, Barrels, and Bomb Barrels can be found throughout the Docks.
Above the mouth of the Cave is a grassy ledge with a pair of Torches on it. There is a thin path leading up to this ledge on the north side of the Docks. In between the Torches sits a pedestal with a Great Flameblade embedded in it. On the higher level of the Dock, Link can find several lit stationary Torches surrounding a single unlit one. If Link ignites this stationary Torch, Saas Ko'sah Shrine will emerge from the ground nearby.
Areas

Creatures
Enemies
Normal Mode

Master Mode

Equipment

Treasure Chests
| Treasure Chest | |
|---|---|
| Contents | |
| Notes | Underwater in between the two piers |
| Treasure Chest | |
| Contents | |
| Notes | Underwater west of the south pier |
| Treasure Chest | |
| Contents | |
| Notes | Floating on the Water on the south side of the north pier |
| Treasure Chest | |
| Contents | |
| Notes | Floating on the Water on the north side of the south pier |

| Treasure Chest | Contents | Notes |
|---|---|---|
Underwater in between the two piers | ||
Underwater west of the south pier | ||
Floating on the Water on the south side of the north pier | ||
Floating on the Water on the north side of the south pier |
Korok Seeds
| Korok | |
|---|---|
| Type | |
| Notes | Under a Rock on the ledge above the entrance |

| Korok | Type | Notes |
|---|---|---|
Under a Rock on the ledge above the entrance |
Tears of the Kingdom
As in Breath of the Wild, the Docks connect Hyrule Castle to the Hyrule Castle Moat in Hyrule Field.
Creatures

Enemies
-
-
Gloom Spawn ×1


Equipment
Treasure Chests
| Treasure Chest | |
|---|---|
| Contents | |
| Coordinates | -0232, 1176, 0009 |
| Notes | In the Water of the Docks |
| Treasure Chest | |
| Contents | |
| Coordinates | -0230, 1199, 0009 |
| Notes | In the Water behind the gate in the Docks |
| Treasure Chest | |
| Contents | |
| Coordinates | -0153, 1157, 0038 |
| Notes | At the top of the Docks |


| Treasure Chest | Contents | Coordinates | Notes |
|---|---|---|---|
-0232, 1176, 0009 | In the Water of the Docks | ||
-0230, 1199, 0009 | In the Water behind the gate in the Docks | ||
-0153, 1157, 0038 | At the top of the Docks |
Other Appearances
Hyrule Warriors: Age of Calamity
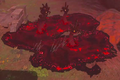
The Docks are part of the Hyrule Castle Stage in Hyrule Warriors: Age of Calamity. The Docks appear similar to their Breath of the Wild counterpart, but with fast-flowing Water that has four defeated Guardians partially submerged in it. Broken Barrels and intact Wooden Boxes sit inside the Cave, and some of the Torches have been broken, lighting parts of the ground on Fire. The ledge at the entrance is inaccessible and covered in green Grass. The upper layer remains mostly the same apart from two broken Torches.
During the "Calamity Strikes" Scenario, a Warrior and Zelda arrive in the Docks through the Hidden Passage in the Sanctum mid-Calamity, following the fleeing King Rhoam.[3] After Zelda reaches the Hyrule Castle Corridors through the Library, two of the four inactive Guardians in the upper layer of the Docks activate to pursue her.[4] Once these two are defeated, the remaining Guardians activate as well.[5]
Nomenclature
| Language | Names | |
|---|---|---|
Japanese | ふなつ船着きば場 | |
ChineseTR | 船塢 (Chuánwù) | |
ChineseSI | 船坞 (Chuánwù) | |
FrenchCA | Embarcadère | |
FrenchEU | Embarcadère | |
German | Anlegestelle | |
Italian | Molo | |
Korean | 선착장 | |
SpanishEU | Embarcadero | |
| This table was generated using translation pages. To request an addition, please contact a staff member with a reference. | ||
See Also
References
- ↑ "Docks" — Map (Breath of the Wild)
- ↑ "Docks" — Map (Tears of the Kingdom)
- ↑ "We defeated them, somehow. Now then, do you know my father's whereabouts?" — Zelda (Hyrule Warriors: Age of Calamity)
"The king fled through the back entrance. We were cut off from the others amid the chaos." — Hylian Captain (Hyrule Warriors: Age of Calamity)
"Let's exit out the back as well, then. I'm so relieved father is all right..." — Zelda (Hyrule Warriors: Age of Calamity) - ↑ "The Guardians at the docks have activated!" — Battle Log (Hyrule Warriors: Age of Calamity)
- ↑ "More Guardians at the docks have activated!" — Battle Log (Hyrule Warriors: Age of Calamity)