Second Gatehouse: Difference between revisions
No edit summary |
TriforceTony (talk | contribs) |
||
| (12 intermediate revisions by 4 users not shown) | |||
| Line 1: | Line 1: | ||
{{Infobox Location | {{Infobox Location | ||
|image= File:BotW Second Gatehouse.png | |image= | ||
{{Media | |||
|Screenshot BotW= File:BotW Second Gatehouse.png | |||
|Screenshot TotK= File:TotK Second Gatehouse.png | |||
}} | |||
|caption= | |caption= | ||
|game= | |pronunciation= | ||
|other= | |game= BotW, TotK | ||
|other= HWAoC | |||
|inhab= | |inhab= | ||
|items= | |items= | ||
| | |services= | ||
|season= | |season= | ||
|temperature= | |||
|counter= | |||
|theme= | |theme= | ||
|related= {{Term|Series|First Gatehouse|link}} | |||
|strategy= | |||
|zu= | |||
}} | }} | ||
The {{Term/Store|Second Gatehouse||Series, BotW}} is a location in {{BotW}} | The {{Term/Store|Second Gatehouse||Series, BotW, TotK}} is a recurring location in {{TLoZ|Series}}.{{Exp Game|BotW, TotK}}<ref>{{Cite|'''Second Gatehouse'''|Map|BotW}}</ref><ref>{{Cite|'''Second Gatehouse'''|Map|TotK}}</ref> The {{Term|Series|Second Gatehouse}} goes unnamed in {{HWAoC}}. | ||
==Features and Overview== | ==Features and Overview== | ||
The {{Term|BotW|Second Gatehouse}} is a small building located along the path to the {{Term|BotW|Sanctum|link}}, continuing from the {{Term|BotW|First Gatehouse|link}}. Much like the {{Term|BotW|First Gatehouse}}, it is flanked by two {{Plural|BotW|Guardian Turret|link}}. If {{Term|BotW|Link|link}} enters the {{Term|BotW|Second Gatehouse}}, the portcullises at the entrance and exit will close and a {{Term|BotW|White-Maned Lynel|link}} will descend from the ceiling. Upon its defeat, the portcullises will be raised once again. | ==={{BotW|-}}=== | ||
The {{Term|BotW|Second Gatehouse}} is a small building located along the path to the {{Term|BotW|Sanctum|link}}, continuing from the {{Term|BotW|First Gatehouse|link}}. Much like the {{Term|BotW|First Gatehouse}}, it is flanked by two {{Plural|BotW|Guardian Turret|link}}. If {{Term|BotW|Link|link}} enters the {{Term|BotW|Second Gatehouse}}, the portcullises at the entrance and exit will close and a {{Term|BotW|White-Maned Lynel|link}} will descend from the ceiling. Upon its defeat, the portcullises will be raised once again. The conical spire roof of the Second Gatehouse has broken in places, giving {{Term|BotW|Link}} access to the interior. | |||
===={{Plural|BotW|Enemy}}==== | |||
{{Gallery List|Enemies | |||
|BotW= Guardian Turret [Qty:2], White-Maned Lynel [Qty:1]{{Equipment|BotW|Savage Lynel Sword}}{{Equipment|BotW|Savage Lynel Bow}}{{Equipment|BotW|Shock Arrow}}{{Equipment|BotW|Savage Lynel Shield}} | |||
}} | |||
===={{Plural|BotW|Treasure Chest}}==== | |||
{{Treasure Chests|game= BotW | |||
|- | |||
| Metal Chest | |||
| Ancient Arrow x3 | |||
| Falls to the floor of the {{Term|BotW|Second Gatehouse}} after the {{Term|BotW|White-Maned Lynel|link}} is defeated | |||
|- | |||
| Stone Chest | |||
| Bomb Arrow x5 | |||
| On the upper level of the {{Term|BotW|Second Gatehouse|display=Gatehouse}} | |||
|- | |||
| Stone Chest | |||
| Royal Guard's Spear | |||
| Inside of the broken spire | |||
}} | |||
===={{Plural|TotK|Korok Seed}}==== | |||
{{Korok Seeds|game= BotW | |||
|- | |||
| Second Gatehouse | |||
| Leaves with Fairy Dust | |||
| Atop the {{Term|BotW|Second Gatehouse}}'s spire | |||
}} | |||
==={{TotK|-}}=== | |||
{{Stub|TotK}} | |||
As in {{BotW}}, the Second Gatehouse is located along the {{Term|TotK|Hyrule Castle Courtyard|link}} beneath the {{Term|TotK|Sanctum|link}} within {{Term|TotK|Hyrule Castle|link}} in {{Term|TotK|Hyrule Field|link}}. It connects {{Term|TotK|Hyrule Castle 1F|link}} to {{Term|TotK|Hyrule Castle B1|link}}. | |||
====Enemies==== | |||
{{Gallery List|Enemies | |||
|TotK= Gloom | |||
}} | |||
=====Sub-Bosses===== | |||
{{Heading|During the "Crisis at Hyrule Castle" Main Quest}} | |||
{{Listing Container| | |||
{{Listing Item|header= {{Small|''Scourge of Hyrule Castle''}}<br/>Monster Forces|perrow= 4|content= | |||
{{Gallery List|Enemies | |||
|TotK= Black Bokoblin [Qty:1]{{Equipment|TotK|Sturdy Wooden Stick}}{{Equipment|TotK|Dragonbone Boko Shield}}, Black Bokoblin [Qty:1]{{Equipment|TotK|Dragonbone Boko Bow}}, Black Boss Bokoblin [Qty:1]{{Equipment|TotK|Sturdy Thick Stick}}, Blue Bokoblin [2][Qty:1]{{Equipment|TotK|Rock Hammer}}<!-- Sturdy Wooden Stick + Rock -->{{Equipment|TotK|Royal Guard's Shield}} | |||
}} | |||
}} | |||
}} | |||
====Equipment==== | |||
{{Gallery List|Equipment | |||
|TotK= Knight's Broadsword, Royal Guard's Shield | |||
}} | |||
=== | ====Treasure Chests==== | ||
{{Treasure Chests|game= TotK | |||
|- | |||
| Stone Chest [2] | |||
| Royal Halberd | |||
| -0153, 0895, 0284 | |||
| Along the northern wall | |||
|- | |||
| Stone Chest [2] | |||
| Royal Bow | |||
| -0159, 0879, 0325 | |||
| Inside the roof | |||
}} | |||
==Other Appearances== | |||
==={{HWAoC|-}}=== | |||
{{Noncanon|Start}} | |||
The {{Term|Series|Second Gatehouse}} appears as part of the {{Term|HWAoC|Hyrule Castle|link}} {{Term|HWAoC|Stage|link}}. | |||
{{Noncanon|End}} | |||
==Nomenclature== | ==Nomenclature== | ||
| Line 31: | Line 104: | ||
==Gallery== | ==Gallery== | ||
<gallery> | <gallery> | ||
File: | File:TotK Second Gatehouse Interior.png|The interior of the Second Gatehouse from {{TotK|-}} | ||
</gallery> | </gallery> | ||
==See Also== | ==See Also== | ||
* {{Term|Series|First Gatehouse|link}} | * {{Term|Series|First Gatehouse|link}} | ||
* {{Term|Series|Hyrule Castle ( | * {{Term|Series|Hyrule Castle (Dungeon)|link}} | ||
{{Ref}} | {{Ref}} | ||
| Line 42: | Line 115: | ||
{{Categories | {{Categories | ||
|Houses, Hyrule Castle | |Houses, Hyrule Castle | ||
|locations= BotW | |locations= BotW, TotK, HWAoC <!-- Uses Series term --> | ||
}} | }} | ||
Latest revision as of 19:42, 10 May 2024
The Second Gatehouse is a recurring location in The Legend of Zelda series.(BotW | TotK)[1][2] The Second Gatehouse goes unnamed in Hyrule Warriors: Age of Calamity.
Features and Overview
Breath of the Wild
The Second Gatehouse is a small building located along the path to the Sanctum, continuing from the First Gatehouse. Much like the First Gatehouse, it is flanked by two Guardian Turrets. If Link enters the Second Gatehouse, the portcullises at the entrance and exit will close and a White-Maned Lynel will descend from the ceiling. Upon its defeat, the portcullises will be raised once again. The conical spire roof of the Second Gatehouse has broken in places, giving Link access to the interior.
Enemies


Treasure Chests
| Treasure Chest | |
|---|---|
| Contents | |
| Notes | Falls to the floor of the Second Gatehouse after the White-Maned Lynel is defeated |
| Treasure Chest | |
| Contents | |
| Notes | On the upper level of the Gatehouse |
| Treasure Chest | |
| Contents | |
| Notes | Inside of the broken spire |


| Treasure Chest | Contents | Notes |
|---|---|---|
Falls to the floor of the Second Gatehouse after the White-Maned Lynel is defeated | ||
On the upper level of the Gatehouse | ||
Inside of the broken spire |
Korok Seeds
| Korok |  |
|---|---|
| Type | |
| Notes | Atop the Second Gatehouse's spire |

| Korok | Type | Notes |
|---|---|---|
| Atop the Second Gatehouse's spire |
Tears of the Kingdom
As in Breath of the Wild, the Second Gatehouse is located along the Hyrule Castle Courtyard beneath the Sanctum within Hyrule Castle in Hyrule Field. It connects Hyrule Castle 1F to Hyrule Castle B1.
Enemies

Sub-Bosses
During the "Crisis at Hyrule Castle" Main Quest
Scourge of Hyrule Castle
Monster Forces


Equipment

Treasure Chests
| Treasure Chest | |
|---|---|
| Contents | |
| Coordinates | -0153, 0895, 0284 |
| Notes | Along the northern wall |
| Treasure Chest | |
| Contents | |
| Coordinates | -0159, 0879, 0325 |
| Notes | Inside the roof |

| Treasure Chest | Contents | Coordinates | Notes |
|---|---|---|---|
-0153, 0895, 0284 | Along the northern wall | ||
-0159, 0879, 0325 | Inside the roof |
Other Appearances
Hyrule Warriors: Age of Calamity
The Second Gatehouse appears as part of the Hyrule Castle Stage.
Nomenclature
| Language | Names | Meanings |
|---|---|---|
Japanese | 二の丸 (Ni no Maru) | Second Compound |
Dutch | Binnenste kasteelring[4] | Inner Castle Ring |
SpanishLA | Baluarte oriental[3] | Eastern Bulwark |
| This table was generated using translation pages. To request an addition, please contact a staff member with a reference. | ||
Gallery
-
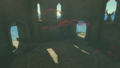
The interior of the Second Gatehouse from Tears of the Kingdom

See Also
References
- ↑ "Second Gatehouse" — Map (Breath of the Wild)
- ↑ "Second Gatehouse" — Map (Tears of the Kingdom)
- ↑ "Baluarte oriental" — N/A (Breath of the Wild)
- ↑ "Binneste kasteelring" — Map (Breath of the Wild)