The Lady's Pets: Difference between revisions
Weirdguy42 (talk | contribs) m (Added German name and meaning) |
TriforceTony (talk | contribs) No edit summary |
||
| (30 intermediate revisions by 9 users not shown) | |||
| Line 1: | Line 1: | ||
{{Boss | {{Infobox Boss | ||
|type= | |||
|type = | |image= File:TFH The Lady's Pets (Margoma) Model.png | ||
|image = | |caption= The {{Term|TFH|Margoma|link}} pet | ||
|caption = The Margoma pet | |title= | ||
|title = | |race= | ||
|race = | {{List| | ||
| | {{Term|TFH|Margoma}}, | ||
{{Term|TFH|Moldorm (Boss)|link}}, | |||
| | {{Term|TFH|Arrghus|link}}, | ||
| | |||
| | |||
| | |||
| | |||
| | |||
}} | }} | ||
' | |gender= | ||
|game= TFH | |||
|dungeon= {{Term|TFH|The Lady's Lair|link}} | |||
|weakness= | |||
{{List| | |||
{{Plural|TFH|Bomb|link}} {{Small|(Margoma pet)}}, | |||
{{Term|TFH|Boomerang|link}}, | |||
{{Term|TFH|Gripshot|link}}, | |||
{{Term|TFH|Sword|link}}, | |||
}} | |||
|reward= | |||
|exp= | |||
|theme= | |||
|strategy= | |||
|voiceactor= | |||
}} | |||
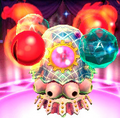
{{Term/Store|The Lady's Pets||Series, TFH}}, also known as the '''Tri Furies''',<ref>{{Cite|My precious petsies, the Tri Furies, will knock some fashion sense into you!|Lady Maud|TFH}}</ref> are the trio of {{Plural|TFH|Boss|link}} of {{Term|TFH|The Lady's Lair|link}} in {{TFH}}. They are robot-like creatures dressed in brightly colored jewels and cloth, which {{Term|TFH|Lady Maud|link}} summons to fight the {{Plural|TFH|Links|link}}. They greatly resemble the {{Term|TFH|Margoma}}, Moldorm, and {{Term|TFH|Arrghus}} {{Plural|TFH|Boss}} previously encountered, and are fought much the same way. | |||
== | ==Characteristics== | ||
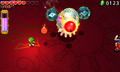
When the battle begins, Lady Maud first summons her pet resembling | When the battle begins, {{Term|TFH|Lady Maud|link}} first summons her pet resembling {{Term|TFH|Margoma|link}}. This pet changes direction more frequently than {{Term|TFH|Margoma}} when chasing the {{Plural|TFH|Links}}, and uses a whirlwind maneuver in which it spins in place, hovering for several seconds while blowing gusts of wind in all directions. Like {{Term|TFH|Margoma}}, this pet will charge after the {{Plural|TFH|Links}} when it approaches them, and will briefly get stuck when it hits the wall. At this point, the {{Plural|TFH|Links}} can throw a {{Term|TFH|Bomb|link}} into the opening on its upper body. {{Plural|TFH|Bomb}} can be obtained by using the {{Term|TFH|Boomerang|link}} or {{Term|TFH|Gripshot|link}} toward one of the platforms containing {{Plural|TFH|Bomb Flower|link}} on either side of the battle area, which otherwise cannot be reached due to a gap between the platforms. After throwing a {{Term|TFH|Bomb}} into the pet’s opening, it will be stunned as a purple crystal appears in its opening and the spikes on its body retract. The {{Plural|TFH|Links}} can then throw the top {{Term|TFH|Link}} onto the pet to slash at the crystal with the {{Term|TFH|Sword|link}}. | ||
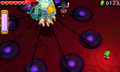
After the Margoma pet is defeated, it will disappear and in its place a | After the {{Term|TFH|Margoma}} pet is defeated, it will disappear and in its place a {{Term|TFH|Moldorm (Boss)|link}}-shaped pet will appear. The pet’s head will continuously spew flames in front of it—which can be temporarily extinguished with the {{Term|TFH|Gust Jar|link}}—as it slithers after one of the {{Plural|TFH|Links}}. Unlike the Moldorm fought previously, there is no colored indication of which {{Term|TFH|Link}} it follows. The targeted {{Term|TFH|Link|link}} can lure the pet away while the other two {{Plural|TFH|Links}} form a {{Term|TFH|Totem|link}} and attack its vulnerable, raised tail. After enough damage, the pet will start to move erratically around the {{Term|TFH|Stage|link}}. The {{Plural|TFH|Links}} will then need to form a {{Term|TFH|Totem}} of three to strike its tail. | ||
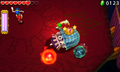
After defeating the Moldorm pet, the final, | After defeating the Moldorm pet, the final, {{Term|TFH|Arrghus|link}}-shaped pet appears. Four eyes rotate around the pet; two on fire, and the other two encased in ice. These eyes will periodically dive down onto the floor, however attacking any of them directly will only hurt the {{Plural|TFH|Links}} (either by burning them or freezing them on the spot). Instead, the {{Plural|TFH|Links}} must stun the eyes with any of their Items, allowing them to strike back without threat of being harmed. The icy eyes can only be stunned with the {{Term|TFH|Gust Jar}}, however; other {{Plural|TFH|Item|link}} will cause them to rejoin the pet. The eyes can also be knocked off the pet and stunned by having the {{Plural|TFH|Links}} form a {{Term|TFH|Totem}} and pull them off with the {{Term|TFH|Gripshot}}. They can also be eliminated by using the {{Term|TFH|Gust Jar}} to blow them out of the battle area, or destroyed by throwing timely {{Plural|TFH|Bomb}} at them. After the eyes have been destroyed, the pet will begin to use {{Term|TFH|Arrghus}}'s wide-ranged ink attack. The {{Plural|TFH|Links}} can then form a {{Term|TFH|Totem}} and use any {{Term|TFH|Weapon|link}} on the pet's weak point—its real eye—to stun it. Alternately, it can still be stunned even if there are eyes remaining if there is an opening that allows them to hit the real eye. Once stunned, the {{Plural|TFH|Links}} can run up to it and attack it with the {{Term|TFH|Sword|link}}. After taking enough hits, the final pet will be defeated. Any eyes remaining that were not destroyed will then turn into {{Plural|TFH|Heart|link}}. | ||
== | ==Nomenclature== | ||
{{ | {{Nomenclature}} | ||
==Gallery== | ==Gallery== | ||
<gallery> | <gallery> | ||
File:The Lady's Pet Moldorm.png|The Moldorm pet | File:TFH The Lady's Pet Margoma Whirlwind.png|The {{Term|TFH|Margoma}} pet's "whirlwind" maneuver | ||
File:The Lady's | File:TFH The Lady's Pets (Moldorm) Model.png|The Moldorm pet | ||
File:TFH The Lady's Pets (Arrghus) Model.png|The {{Term|TFH|Arrghus}} pet | |||
File:TFH The Lady's Pets Battle.png|Using a {{Term|TFH|Bomb}} to stun the {{Term|TFH|Margoma}} pet | |||
File:TFH The Lady's Pets Battle 2.png|Attacking the {{Term|TFH|Margoma}} pet's weak spot | |||
File:TFH The Lady's Pets Battle 3.png|Luring the {{Term|TFH|Moldorm (Boss)}} pet and striking its weak spot | |||
File:TFH The Lady's Pets Battle 4.png|Using a thrown {{Term|TFH|Spin Attack}} to strike the {{Term|TFH|Moldorm (Boss)}} pet's weak spot | |||
File:TFH The Lady's Pets Battle 5.png|Throwing a {{Term|TFH|Bomb}} to destroy the {{Term|TFH|Arrghus}} pet's eyes | |||
File:TFH The Lady's Pets Battle 6.png|Using the {{Term|TFH|Gust Jar}} to stun the {{Term|TFH|Arrghus}} pet's eyes | |||
File:TFH The Lady's Pets Battle 7.png|Using the {{Term|TFH|Gripshot}} to knock down the {{Term|TFH|Arrghus}} pet's eyes | |||
File:TFH The Lady's Pets Battle 8.png|Avoiding the {{Term|TFH|Arrghus}} pet's ink attack | |||
File:TFH The Lady's Pets Battle 9.png|Attacking the {{Term|TFH|Arrghus}} pet's weak spot | |||
File:TFH The Lady's Pets Battle 10.png|{{Term|TFH|Lady Maud}} reacting to her Pets' defeat | |||
</gallery> | </gallery> | ||
| Line 76: | Line 58: | ||
{{Bosses|TFH}} | {{Bosses|TFH}} | ||
{{Categories | |||
|bosses= TFH | |||
}} | |||
Latest revision as of 12:00, 28 April 2024
The Lady's Pets, also known as the Tri Furies,[1] are the trio of Bosses of The Lady's Lair in Tri Force Heroes. They are robot-like creatures dressed in brightly colored jewels and cloth, which Lady Maud summons to fight the Links. They greatly resemble the Margoma, Moldorm, and Arrghus Bosses previously encountered, and are fought much the same way.
Characteristics
When the battle begins, Lady Maud first summons her pet resembling Margoma. This pet changes direction more frequently than Margoma when chasing the Links, and uses a whirlwind maneuver in which it spins in place, hovering for several seconds while blowing gusts of wind in all directions. Like Margoma, this pet will charge after the Links when it approaches them, and will briefly get stuck when it hits the wall. At this point, the Links can throw a Bomb into the opening on its upper body. Bombs can be obtained by using the Boomerang or Gripshot toward one of the platforms containing Bomb Flowers on either side of the battle area, which otherwise cannot be reached due to a gap between the platforms. After throwing a Bomb into the pet’s opening, it will be stunned as a purple crystal appears in its opening and the spikes on its body retract. The Links can then throw the top Link onto the pet to slash at the crystal with the Sword.
After the Margoma pet is defeated, it will disappear and in its place a Moldorm-shaped pet will appear. The pet’s head will continuously spew flames in front of it—which can be temporarily extinguished with the Gust Jar—as it slithers after one of the Links. Unlike the Moldorm fought previously, there is no colored indication of which Link it follows. The targeted Link can lure the pet away while the other two Links form a Totem and attack its vulnerable, raised tail. After enough damage, the pet will start to move erratically around the Stage. The Links will then need to form a Totem of three to strike its tail.
After defeating the Moldorm pet, the final, Arrghus-shaped pet appears. Four eyes rotate around the pet; two on fire, and the other two encased in ice. These eyes will periodically dive down onto the floor, however attacking any of them directly will only hurt the Links (either by burning them or freezing them on the spot). Instead, the Links must stun the eyes with any of their Items, allowing them to strike back without threat of being harmed. The icy eyes can only be stunned with the Gust Jar, however; other Items will cause them to rejoin the pet. The eyes can also be knocked off the pet and stunned by having the Links form a Totem and pull them off with the Gripshot. They can also be eliminated by using the Gust Jar to blow them out of the battle area, or destroyed by throwing timely Bombs at them. After the eyes have been destroyed, the pet will begin to use Arrghus's wide-ranged ink attack. The Links can then form a Totem and use any Weapon on the pet's weak point—its real eye—to stun it. Alternately, it can still be stunned even if there are eyes remaining if there is an opening that allows them to hit the real eye. Once stunned, the Links can run up to it and attack it with the Sword. After taking enough hits, the final pet will be defeated. Any eyes remaining that were not destroyed will then turn into Hearts.
Nomenclature
| Language | Names | Meanings |
|---|---|---|
Japanese | レディガイルズ (Redi Gairuzu)[3] | |
FrenchCA | Bras droits de Lady[8] | Lady's Sidekicks |
FrenchEU | Laquais de Lady[5] | Lady's Lackeys |
German | Ladys Kollektion[4] | |
Italian | Icuccioli di Lady[2] | |
Korean | 레이디가일즈 (Leidigailjeu)[6] | |
SpanishLA | Mascotas de Milady[7] | |
SpanishEU | Paladines de Milady[9] | |
| This table was generated using translation pages. To request an addition, please contact a staff member with a reference. | ||
Gallery
-

The Margoma pet's "whirlwind" maneuver
-

The Moldorm pet
-
The Arrghus pet
-

Using a Bomb to stun the Margoma pet
-

Attacking the Margoma pet's weak spot
-

Luring the Moldorm pet and striking its weak spot
-

Using a thrown Spin Attack to strike the Moldorm pet's weak spot
-
Throwing a Bomb to destroy the Arrghus pet's eyes
-

Using the Gust Jar to stun the Arrghus pet's eyes
-

Using the Gripshot to knock down the Arrghus pet's eyes
-
Avoiding the Arrghus pet's ink attack
-
Attacking the Arrghus pet's weak spot
-

Lady Maud reacting to her Pets' defeat

_Model.png)
_Model.png)


References
- ↑ "My precious petsies, the Tri Furies, will knock some fashion sense into you!" — Lady Maud (Tri Force Heroes)
- ↑ "Icuccioli di Lady" — N/A (Tri Force Heroes)
- ↑ "レディガイルズ" — N/A (Tri Force Heroes)
- ↑ "Ladys Kollektion" — N/A (Tri Force Heroes)
- ↑ "Laquais de Lady" — N/A (Tri Force Heroes)
- ↑ "레이디가일즈" — N/A (Tri Force Heroes)
- ↑ "Mascotas de Milady" — N/A (Tri Force Heroes)
- ↑ "Bras droits de Lady" — N/A (Tri Force Heroes)
- ↑ "Paladines de Milady" — N/A (Tri Force Heroes)
Mazura • Jermafenser • Rebonack • Carock • Gooma • Barba • Thunderbird • Link's Shadow
Ball and Chain Trooper • Armos Knights • Lanmolas • Moldorm • Agahnim
Helmasaur King • Arrghus • Mothula • Blind the Thief • Kholdstare • Vitreous • Trinexx • Ganon
Moldorm • Genie • Slime Eye • Angler Fish • Slime Eel • Facade • Evil Eagle • Hot Head • Shadow Nightmares
Spike Roller • Moblin Chief • Hinox • Dodongo Snakes • Lanmola • Hydrosoar
Master Stalfos • Gohma • Armos Knight • Rover • Grim Creeper • Turtle Rock • Blaino
Gohma • King Dodongo • Barinade • Phantom Ganon • Volvagia • Morpha • Bongo Bongo • Twinrova • Ganon
Lizalfos • Big Octo • Stalfos • Meg • Flare Dancer • White Wolfos • Dark Link • Dead Hand • Gerudo Thief • Iron Knuckle
Odolwa • Goht • Gyorg • Twinmold • Majora's Mask
Dinolfos • Gekko • Wizzrobe • Gerudo Pirate • Wart • Gekko and Mad Jelly
Captain Keeta • Iron Knuckle • Sharp • Igos du Ikana • Garo Master • Gomess • Eyegore
Aquamentus • Dodongo • Mothula • Gohma • Digdogger • Manhandla • Gleeok • Medusa Head • General Onox
Twinrova • Ganon
Brother Goriyas • Facade • Omuai • Agunima • Great Moblin • Syger • Vire • Poe Sisters • Frypolar
Pumpkin Head • Head Thwomp • Shadow Hag • Eyesoar • Smog • Octogon • Possessed Nayru • Plasmarine • Ramrock • Veran
Twinrova • Ganon
Giant Ghini • Swoop • Subterror • Armos Warrior • Great Moblin • Smasher • Vire • Angler Fish • Blue Stalfos
Gohma • Kalle Demos • Gohdan • Helmaroc King • Jalhalla • Molgera • Puppet Ganon • Ganondorf
Mothula • Darknut • Phantom Ganon • Stalfos • Wizzrobe • Mighty Darknut • Big Octo![]()
Phantom Ganon • Stone Arrghus • Helmaroc King • Big Poe • Big Moldorm • Frostare • Vaati • Ganon
Chief Soldier • Shadow Link • Manhandla • Dodongos • Big Dark Stalfos • Gohma • Big Dodongo
Big Green Chuchu • Gleerok • Mazaal • Big Octorok • Gyorg Pair • Vaati
Madderpillar • Dark Nut • Big Blue Chuchu • Red Dark Nut • Black Knight
Diababa • Fyrus • Morpheel • Stallord • Blizzeta • Armogohma • Argorok • Zant • Puppet Zelda • Ganon
Ook • King Bulblin • Dangoro • Twilit Carrier Kargarok • Twilit Bloat
Deku Toad • Death Sword • Darkhammer • Darknut • Aeralfos • Phantom Zant
Stagnox • Fraaz • Phytops • Cragma • Byrne • Skeldritch • Demon Train • Chancellor Cole • Malladus
Mothula • Snapper • Heatoise • Big Blin • Rocktite • Geozard Chief • Dark Link![]()
Ghirahim • Scaldera • Moldarach • The Imprisoned • Koloktos • Tentalus • Levias • Bilocyte • Demise
Stalfos • Lizalfos • Stalmaster • Moldarach • LD-002G Scervo • Dark Lizalfos • Magmanos • Moldorm • LD-003D Dreadfuse
Yuga • Moldorm • Margomill • Gemesaur King • Arrghus • Knucklemaster • Stalblind • Zaganaga • Dharkstare • Grinexx • Yuga Ganon
Armos • Red Stalfos • Heedles • Green & Red Goriyas • Gigabari • Gibdos & Purple Mini-Moldorms • Red Eyegores • Flying Tiles & Devalants • Big Pengator & Pengators • Fire Gimos • Moldorm • Lorule Ball and Chain Soldier • Arrghus
Margoma • Arrghus • Moldorm • Blizzagia • The Lady's Pets • Stalchampion • Prismantus • The Lady • Shadow Links
Electric Blob King • Electric Blob Queen • Hinox Brothers • Freezlord • Vulture Vizier • Grim Repoe • Gigaleon
Windblight Ganon • Fireblight Ganon • Thunderblight Ganon • Waterblight Ganon • Monk Maz Koshia(TCB) • Calamity Ganon • Dark Beast Ganon
Stone Talus • Stone Talus (Luminous) • Stone Talus (Rare) • Igneo Talus • Frost Talus • Igneo Talus Titan(TCB) • Molduga • Molduking(TCB) • Hinox • Blue Hinox • Black Hinox • Master Kohga
Bosses in Tears of the Kingdom
Colgera • Yunobo • Moragia • Marbled Gohma • Sludge Like • Mucktorok • Queen Gibdo • Seized Construct • Phantom Ganon • Demon King's Army • Demon King Ganondorf • Demon Dragon