Material: Difference between revisions
KrytenKoro (talk | contribs) |
TriforceTony (talk | contribs) No edit summary |
||
| (323 intermediate revisions by 62 users not shown) | |||
| Line 1: | Line 1: | ||
{{Item | {{Infobox Item | ||
| | |type= | ||
| | |image= | ||
| | {{Media | ||
|Sprite BotW= File:BotW Material Icon.png | |||
|Sprite TotK= File:TotK Material Icon.png | |||
}} | }} | ||
|caption= | |||
|game= TFH, BotW, TotK | |||
|other= HW, HWL, HWAoC | |||
|cost= | |||
|uses= | |||
|comp= {{List|{{Plural|Series|Spoil|link}}, {{Term|Series|Treasure|link}}, {{Term|Series|Ingredient|link}}}} | |||
|sample= | |||
|theme= | |||
}} | |||
{{Term/Store|Material|Materials|Series, TFH, BotW, HW, HWL, HWDE|plural}} are a recurring type of item in {{TLoZ|Series}} used in creating new items.<ref>{{Cite|Materials|Tutorial|HWDE}}</ref><ref>{{Cite|Materials|Inventory|BotW}}</ref>{{Name Ref|TFH}} | |||
==Location and Uses== | ==Location and Uses== | ||
==={{TFH|-}}=== | |||
{{Main|Magical Material}} | |||
{{Plural|TFH|Magical Material|link}} are used to craft various {{Plural|TFH|Outfit|link}} at {{Term|TFH|Madame Couture's|link}}. | |||
====List of {{Plural|TFH|Magical Material}}==== | |||
{{Gallery List|Items | |||
|TFH= Antique Coin, Fabled Butterfly, Friendly Token, Gold Dust, Mystery Jade, Royal Ring | |||
}} | |||
:[[File:TFH Hytopian Silk Icon.png|x26px|link=Magical Material]] [[Magical Material|See more Magical Materials in ''Tri Force Heroes'']] | |||
==={{BotW|-}}=== | |||
Materials in {{BotW}} can be found all throughout Hyrule, after defeating enemies, in Treasure Chests, or hunting for food. They cover a wide variety of items, and as such have a wide variety of uses. Materials can sometimes be eaten raw, but are best cooked together to create much more nourishing [[Food#Breath of the Wild|Food]], that restore more hearts and have other positive effects. Each type of Material occupies its own slot. There is a maximum capacity of 999 Materials per slot.<ref>{{Cite Web|url= https://youtu.be/sGUSY0IoSHs?t=268|title= BotW Glitches & Tricks: Hold Smuggling, and Dead Link Inventory.|author= Kleric|site= YouTube}}</ref> Materials are also used to have the [[Great Fairy#Breath of the Wild|Great Fairies]] upgrade [[armor]]. | |||
===List of Materials=== | Materials can be sold for Rupees as well. The listed value is the price a merchant will pay Link for the item. Buying these items from most merchants will cost Link four times this value; [[Beedle]] will charge five times this value. Select materials may also be exchanged for [[Mon]] by [[Kilton]]. | ||
{| | |||
====List of Materials==== | |||
{{Gallery List|Items | |||
|BotW= Ancient Core, Diamond, Giant Ancient Core, Naydra's Scale, Silent Princess, Star Fragment | |||
}} | |||
:[[File:BotW Material Icon.png|x26px|link=Materials in Breath of the Wild]] [[Materials in Breath of the Wild|See more Materials in ''Breath of the Wild'']] | |||
==={{TotK|-}}=== | |||
{{Main|Materials in Tears of the Kingdom}} | |||
{{Plural|TotK|Material}} are used in a variety of ways. They are commonly dropped by {{Plural|TotK|Enemy|link}} but may also be found along the ground. | |||
====List of {{Plural|TotK|Material}}==== | |||
{{Gallery List|Items | |||
|TotK= Ancient Blade, King's Scale, Large Zonai Charge, Large Zonaite, Light Dragon's Horn, Muddle Bud | |||
}} | |||
:[[File:ZW TotK Material.png|x26px|link=Materials in Tears of the Kingdom]] [[Materials in Tears of the Kingdom|See more Materials in ''Tears of the Kingdom'']] | |||
==Other Appearances== | |||
==={{HW|-}}=== | |||
{{Noncanon|Start}} | |||
In {{HW}}, {{Plural|HWDE|Material}} are similar to {{Plural|HWDE|Spoil|link}} and {{Plural|HWDE|Treasure|link}} in that each {{Term|HWDE|Material}} is a unique {{Term|HWDE|Item|link}} possessed by the {{Term|HWDE|Enemy|link}} that dropped it. {{Plural|HWDE|Material}} are dropped by nearly every {{Term|HWDE|Enemy}} type except {{Plural|HWDE|Cucco|link}} and infantry soldiers, and only when the {{Term|HWDE|Enemy}} does not drop a {{Term|HWDE|Weapon Bag|link}}. They come in three rarities, with at most two rarities of item for each enemy type. The most common are {{Plural|HWDE|Bronze Material|link}}, which are the only item drops for the basic infantry {{Plural|HWDE|Captain (Hyrule Warriors)|link}}. {{Plural|HWDE|Silver Material|link}} are dropped by unique {{Plural|HWDE|Captain (Hyrule Warriors)}}, {{Plural|HWDE|Warrior|link}}, and {{Plural|HWDE|Giant Boss|link}}. Rare {{Plural|HWDE|Gold Material|;oml}} are dropped only by {{Plural|HWDE|Warrior}} and {{Plural|HWDE|Giant Boss}}. {{Plural|HWDE|Enemy}} can be influenced to drop their rarer {{Plural|HWDE|Material}} by using {{Plural|HWDE|Weapon|link}} with the "Material+" {{Term|HWDE|Skill|link}}, by creating a special {{Term|HWDE|Mixture|link}} in the {{Term|HWDE|Apothecary|link}}, or by activating the reward while using {{Term|HWDE|Focus Spirit|link}}. | |||
{{Plural|HWDE|Material}} are primarily used to craft {{Plural|HWDE|Badge|link}} for the playable {{Plural|HWDE|Warrior}}, with each {{Term|HWDE|Badge}} having its own recipe of specific {{Plural|HWDE|Material}}. {{Plural|HWDE|Material}} can also be used to brew one-use elixirs by consuming a set amount of any {{Term|HWDE|Material}} of a given rarity. | |||
====List of Materials==== | |||
<div style="display:none"> | |||
{{#vardefine:Col|colspan="2"{{!}}}} | |||
</div> | |||
{| class="wikitable sortable" style="text-align:center; width: 100%; max-width:50em;" | |||
|+ Enemy Materials | |||
|- | |- | ||
! | !style="width: 34%"| Enemy | ||
!width=" | !style="width: 33%" class="unsortable"| Bronze | ||
!width=" | !style="width: 33%" class="unsortable"| Silver | ||
|- | |- | ||
| [[File: | | {{Section|Bulblin|[[File:HWDE Bulblin Captain Mini Map Icon.png|link=]]<br/>'''[[Bulblin]]'''}} | ||
| | | [[File:HW Metal Plate Icon.png|x50px]]<br/>'''[[Metal Plate]]''' | ||
| | | — | ||
|- | |- | ||
| [[File: | | {{Section|Stalchild|[[File:HWDE Stalchild Captain Mini Map Icon.png|link=]]<br/>'''[[Stalchild]]'''}} | ||
| | | [[File:HW Monster Tooth Icon.png|x50px]]<br/>'''[[Monster Tooth]]''' | ||
| | | — | ||
|- | |- | ||
|[[File: | | {{Section|Bokoblin|[[File:HWDE Bokoblin Captain Mini Map Icon.png|link=]]<br/>'''[[Bokoblin]]'''}} | ||
| | | [[File:HW Old Rag Icon.png|x50px]]<br/>'''[[Old Rag]]''' | ||
| | | — | ||
|- | |- | ||
| [[File: | | {{Section|Hylian Soldier|[[File:HWDE Hylian Soldier Mini Map Icon.png|link=]]<br/>'''[[Hylian Soldier]]'''}} | ||
| [[File:HW Soldier's Uniform Icon.png|x50px]]<br/>'''[[Soldier's Uniform]]''' | |||
| [[ | | — | ||
|- | |- | ||
| [[File: | | {{Section|Goron|[[File:HWDE Goron Captain Mini Map Icon 2.png|link=]]<br/>'''[[Goron]]'''}} | ||
| | | [[File:HW Rock Icon.png|x50px]]<br/>'''[[Rock]]''' | ||
| | | — | ||
|- | |- | ||
| [[File: | | {{Section|Aeralfos|[[File:HWDE Aeralfos Mini Map Icon.png|link=]]<br/>'''[[Aeralfos]]'''}} | ||
| | | [[File:HW Aeralfos Leather Icon.png|x50px]]<br/>'''[[Aeralfos Leather]]''' | ||
| | | [[File:HW Round Aeralfos Shield Icon.png|x50px]]<br/>'''[[Round Aeralfos Shield]]''' | ||
|- | |- | ||
| [[File: | | {{Section|Fiery Aeralfos|[[File:HWDE Fiery Aeralfos Mini Map Icon.png|link=]]<br/>'''[[Fiery Aeralfos]]'''}} | ||
| | | [[File:HW Fiery Aeralfos Leather Icon.png|x50px]]<br/>'''[[Fiery Aeralfos Leather]]''' | ||
| | | [[File:HW Fiery Aeralfos Wing Icon.png|x50px]]<br/>'''[[Fiery Aeralfos Wing]]''' | ||
|- | |- | ||
| [[File: | | {{Section|Gibdo|[[File:HWDE Gibdo Mini Map Icon.png|link=]]<br/>'''[[Gibdo]]'''}} | ||
| | | [[File:HW Gibdo Bandage Icon.png|x50px]]<br/>'''[[Gibdo Bandage]]''' | ||
| | | [[File:HW Heavy Gibdo Sword Icon.png|x50px]]<br/>'''[[Heavy Gibdo Sword]]''' | ||
|- | |- | ||
| [[File: | | {{Section|ReDead Knight|[[File:HWDE ReDead Knight Mini Map Icon.png|link=]]<br/>'''[[ReDead Knight]]'''}} | ||
| | | [[File:HW ReDead Bandage Icon.png|x50px]]<br/>'''[[ReDead Bandage]]''' | ||
| | | [[File:HW ReDead Knight Ashes Icon.png|x50px]]<br/>'''[[ReDead Knight Ashes]]''' | ||
|- | |- | ||
| [[File: | | {{Section|Lizalfos|[[File:HWDE Lizalfos Mini Map Icon.png|link=]]<br/>'''[[Lizalfos]]'''}} | ||
| | | [[File:HW Lizalfos Scale Icon.png|x50px]]<br/>'''[[Lizalfos Scale]]''' | ||
| | | [[File:HW Lizalfos Gauntlet Icon.png|x50px]]<br/>'''[[Lizalfos Gauntlet]]''' | ||
|- | |- | ||
| [[File: | | {{Section|Dinolfos|[[File:HWDE Dinolfos Mini Map Icon.png|link=]]<br/>'''[[Dinolfos]]'''}} | ||
| | | [[File:HW Dinolfos Fang Icon.png|x50px]]<br/>'''[[Dinolfos Fang]]''' | ||
| | | [[File:HW Dinolfos Arm Guard Icon.png|x50px]]<br/>'''[[Dinolfos Arm Guard]]''' | ||
|- | |- | ||
| [[File: | | {{Section|Moblin|[[File:HWDE Moblin Mini Map Icon.png|link=]]<br/>'''[[Moblin]]'''}} | ||
| | | [[File:HW Moblin Flank Icon.png|x50px]]<br/>'''[[Moblin Flank]]''' | ||
| | | [[File:HW Moblin Spear Icon.png|x50px]]<br/>'''[[Moblin Spear]]''' | ||
|- | |- | ||
| [[File: | | {{Section|Shield Moblin|[[File:HWDE Shield Moblin Mini Map Icon.png|link=]]<br/>'''[[Shield Moblin]]'''}} | ||
| | | [[File:HW Shield-Moblin Helmet Icon.png|x50px]]<br/>'''[[Shield-Moblin Helmet]]''' | ||
| | | [[File:HW Metal Moblin Shield Icon.png|x50px]]<br/>'''[[Metal Moblin Shield]]''' | ||
|- | |- | ||
| [[File: | | {{Section|Darknut|[[File:HWDE Darknut Mini Map Icon.png|link=]]<br/>'''[[Darknut]]'''}} | ||
| | | [[File:HW Piece of Darknut Armor Icon.png|x50px]]<br/>'''[[Piece of Darknut Armor]]''' | ||
| | | [[File:HW Large Darknut Sword Icon.png|x50px]]<br/>'''[[Large Darknut Sword]]''' | ||
|- | |- | ||
| [[File: | | {{Section|Stalmaster|[[File:HWDE Stalmaster Mini Map Icon.png|link=]]<br/>'''[[Stalmaster]]'''}} | ||
| | | [[File:HW Stalmaster Wrist Bone Icon.png|x50px]]<br/>'''[[Stalmaster Wrist Bone]]''' | ||
| | | [[File:HW Stalmaster's Skull Icon.png|x50px]]<br/>'''[[Stalmaster's Skull]]''' | ||
|- | |- | ||
| [[File: | | {{Section|Big Poe|[[File:HWDE Big Poe Mini Map Icon.png|link=]]<br/>'''[[Big Poe]]'''}} | ||
| | | [[File:HW Big Poe Necklace Icon.png|x50px]]<br/>'''[[Big Poe Necklace]]''' | ||
| | | [[File:HW Big Poe's Lantern Icon.png|x50px]]<br/>'''[[Big Poe's Lantern]]''' | ||
|- | |- | ||
| [[File: | | {{Section|Icy Big Poe|[[File:HWDE Icy Big Poe Mini Map Icon.png|link=]]<br/>'''[[Icy Big Poe]]'''}} | ||
| | | [[File:HW Essence of Icy Big Poe Icon.png|x50px]]<br/>'''[[Essence of Icy Big Poe]]''' | ||
| | | [[File:HW Icy Big Poe's Talisman Icon.png|x50px]]<br/>'''[[Icy Big Poe's Talisman]]''' | ||
|- | |- | ||
| [[File: | | {{Section|Hylian Captain|[[File:HWDE Hylian Captain Mini Map Icon.png|link=]]<br/>'''[[Captain (Hyrule Warriors)|Hylian Captain]]'''}} | ||
| | | [[File:HW Hylian Captain Gauntlet Icon.png|x50px]]<br/>'''[[Hylian Captain Gauntlet]]''' | ||
| | | [[File:HW Holy Hylian Shield Icon.png|x50px]]<br/>'''[[Holy Hylian Shield]]''' | ||
|- | |- | ||
| [[File: | | {{Section|Goron Captain|[[File:HWDE Goron Captain Mini Map Icon.png|link=]]<br/>'''[[Goron Captain]]'''}} | ||
| | | [[File:HW Goron Armor Breastplate Icon.png|x50px]]<br/>'''[[Goron Armor Breastplate]]''' | ||
| | | [[File:HW Thick Goron Helmet Icon.png|x50px]]<br/>'''[[Thick Goron Helmet]]''' | ||
|} | |||
{| class="wikitable sortable" style="text-align:center; width: 100%; max-width:50em;" | |||
|+ Boss Materials | |||
|- | |- | ||
!{{#var:Col}} Boss | |||
| | !width="33%" class="unsortable"| Silver | ||
| | !width="33%" class="unsortable"| Gold | ||
|- | |- | ||
| [[File: | |{{#var:Col}} {{Section|Ganon|[[File:HWDE Ganon Mini Map Icon.png|link=]]<br/>'''[[Ganon]]'''}} | ||
| | | [[File:HW Ganon's Mane Icon.png|x50px]]<br/>'''[[Ganon's Mane]]''' | ||
| | | [[File:HW Ganon's Fang Icon.png|x50px]]<br/>'''[[Ganon's Fang]]''' | ||
|- | |- | ||
| [[File: | |{{#var:Col}} {{Section|King Dodongo|[[File:HWDE King Dodongo Mini Map Icon.png|link=]]<br/>'''[[King Dodongo]]'''}} | ||
| | | [[File:HW King Dodongo's Claws Icon.png|x50px]]<br/>'''[[King Dodongo's Claws]]''' | ||
| | | [[File:HW King Dodongo's Crystal Icon.png|x50px]]<br/>'''[[King Dodongo's Crystal]]''' | ||
|- | |- | ||
| [[File: | |{{#var:Col}} {{Section|Gohma|[[File:HWDE Gohma Mini Map Icon.png|link=]]<br/>'''[[Gohma]]'''}} | ||
| | | [[File:HW Gohma's Acid Icon.png|x50px]]<br/>'''[[Gohma's Acid]]''' | ||
| | | [[File:HW Gohma's Lens Icon.png|x50px]]<br/>'''[[Gohma's Lens]]''' | ||
|- | |- | ||
| [[File: | |{{#var:Col}} {{Section|Manhandla|[[File:HWDE Manhandla Mini Map Icon.png|link=]]<br/>'''[[Manhandla]]'''}} | ||
| | | [[File:HW Manhandla's Toxic Dust Icon.png|x50px]]<br/>'''[[Manhandla's Toxic Dust]]''' | ||
| [[ | | [[File:HW Manhandla's Sapling Icon.png|x50px]]<br/>'''[[Manhandla's Sapling]]''' | ||
|- | |- | ||
| [[File: | |{{#var:Col}} {{Section|Argorok|[[File:HWDE Argorok Mini Map Icon.png|link=]]<br/>'''[[Argorok]]'''}} | ||
| | | [[File:HW Argorok's Embers Icon.png|x50px]]<br/>'''[[Argorok's Embers]]''' | ||
| | | [[File:HW Argorok's Stone Icon.png|x50px]]<br/>'''[[Argorok's Stone]]''' | ||
|- | |- | ||
| [[File: | |{{#var:Col}} {{Section|The Imprisoned|[[File:HWDE The Imprisoned Mini Map Icon.png|link=]]<br/>'''[[The Imprisoned]]'''}} | ||
| | | [[File:HW The Imprisoned's Scales Icon.png|x50px]]<br/>'''[[The Imprisoned's Scales]]''' | ||
| | | [[File:HW The Imprisoned's Pillar Icon.png|x50px]]<br/>'''[[The Imprisoned's Pillar]]''' | ||
|- | |- | ||
| [[File: | |{{#var:Col}} {{Section|Cia|[[File:HWDE Cia Mini Map Icon.png|link=]]<br/>'''[[Cia]]'''}} | ||
| | | [[File:HW Cia's Bracelet Icon.png|x50px]]<br/>'''[[Cia's Bracelet]]''' | ||
| | | [[File:HW Cia's Staff Icon.png|x50px]]<br/>'''[[Cia's Staff]]''' | ||
|- | |- | ||
| [[File: | |{{#var:Col}} {{Section|Volga|[[File:HWDE Volga Mini Map Icon.png|link=]]<br/>'''[[Volga]]'''}} | ||
| | | [[File:HW Volga's Helmet Icon.png|x50px]]<br/>'''[[Volga's Helmet]]''' | ||
| | | [[File:HW Volga's Dragon Spear Icon.png|x50px]]<br/>'''[[Volga's Dragon Spear]]''' | ||
|- | |- | ||
| [[File: | |{{#var:Col}} {{Section|Wizzro|[[File:HWDE Wizzro Mini Map Icon.png|link=]]<br/>'''[[Wizzro]]'''}} | ||
| | | [[File:HW Wizzro's Robe Icon.png|x50px]]<br/>'''[[Wizzro's Robe]]''' | ||
| | | [[File:HW Wizzro's Ring Icon.png|x50px]]<br/>'''[[Wizzro's Ring]]''' | ||
|- | |- | ||
| [[File: | |width="17%"| {{Section|Link|[[File:HWDE Link Mini Map Icon.png|link=]]<br/>'''[[Link]]'''}} | ||
| | |width="17%"| [[File:HWDE Young Link Mini Map Icon.png|link=]]<br/>'''[[Young Link]]''' | ||
| | | [[File:HW Link's Boots Icon.png|x50px]]<br/>'''[[Link's Boots]]''' | ||
| [[File:HW Link's Scarf Icon.png|x50px]]<br/>'''[[Link's Scarf]]''' | |||
|- | |- | ||
| [[File: | |{{#var:Col}} {{Section|Lana|[[File:HWDE Lana Mini Map Icon.png|link=]]<br/>'''[[Lana]]'''}} | ||
| | | [[File:HW Lana's Hair Clip Icon.png|x50px]]<br/>'''[[Lana's Hair Clip]]''' | ||
| | | [[File:HW Lana's Cloak Icon.png|x50px]]<br/>'''[[Lana's Cloak]]''' | ||
|- | |- | ||
| [[File: | |{{#var:Col}} {{Section|Zelda|[[File:HWDE Zelda Mini Map Icon.png|link=]]<br/>'''[[Princess Zelda|Zelda]]'''}} | ||
| | | [[File:HW Zelda's Brooch Icon.png|x50px]]<br/>'''[[Zelda's Brooch]]''' | ||
| | | [[File:HW Zelda's Tiara Icon.png|x50px]]<br/>'''[[Zelda's Tiara]]''' | ||
|- | |- | ||
| [[File: | |{{#var:Col}} {{Section|Impa|[[File:HWDE Impa Mini Map Icon.png|link=]]<br/>'''[[Impa]]'''}} | ||
| | | [[File:HW Impa's Hair Band Icon.png|x50px]]<br/>'''[[Impa's Hair Band]]''' | ||
| | | [[File:HW Impa's Breastplate Icon.png|x50px]]<br/>'''[[Impa's Breastplate]]''' | ||
|- | |- | ||
| [[File: | |{{#var:Col}} {{Section|Ganondorf|[[File:HWDE Ganondorf Mini Map Icon.png|link=]]<br/>'''[[Ganondorf]]'''}} | ||
| | | [[File:HW Ganondorf's Gauntlet Icon.png|x50px]]<br/>'''[[Ganondorf's Gauntlet]]''' | ||
| | | [[File:HW Ganondorf's Jewel Icon.png|x50px]]<br/>'''[[Ganondorf's Jewel]]''' | ||
|- | |- | ||
| [[File: | |{{#var:Col}} {{Section|Sheik|[[File:HWDE Sheik Mini Map Icon.png|link=]]<br/>'''[[Sheik]]'''}} | ||
| | | [[File:HW Sheik's Kunai Icon.png|x50px]]<br/>'''[[Sheik's Kunai]]''' | ||
| | | [[File:HW Sheik's Turban Icon.png|x50px]]<br/>'''[[Sheik's Turban]]''' | ||
|- | |- | ||
| [[File: | |{{#var:Col}} {{Section|Darunia|[[File:HWDE Darunia Mini Map Icon.png|link=]]<br/>'''[[Darunia]]'''}} | ||
| | | [[File:HW Darunia's Spikes Icon.png|x50px]]<br/>'''[[Darunia's Spikes]]''' | ||
| | | [[File:HW Darunia's Bracelet Icon.png|x50px]]<br/>'''[[Darunia's Bracelet]]''' | ||
|- | |- | ||
| [[File: | |{{#var:Col}} {{Section|Ruto|[[File:HWDE Ruto Mini Map Icon.png|link=]]<br/>'''[[Princess Ruto|Ruto]]'''}} | ||
| | | [[File:HW Ruto's Earrings Icon.png|x50px]]<br/>'''[[Ruto's Earrings]]''' | ||
| [[ | | [[File:HW Ruto's Scale Icon.png|x50px]]<br/>'''[[Ruto's Scale]]''' | ||
|- | |- | ||
| [[File: | |{{#var:Col}} {{Section|Agitha|[[File:HWDE Agitha Mini Map Icon.png|link=]]<br/>'''[[Agitha]]'''}} | ||
| | | [[File:HW Agitha's Basket Icon.png|x50px]]<br/>'''[[Agitha's Basket]]''' | ||
| [[ | | [[File:HW Agitha's Pendant Icon.png|x50px]]<br/>'''[[Agitha's Pendant]]''' | ||
|- | |- | ||
| [[File: | | {{Section|Midna|[[File:HWDE Midna Mini Map Icon.png|link=]]<br/>'''[[Midna]]'''}} | ||
| | | [[File:HWDE Twili Midna Mini Map Icon.png|link=]]<br/>'''[[Twili Midna]]''' | ||
| [[ | | [[File:HW Midna's Hair Icon.png|x50px]]<br/>'''[[Midna's Hair]]''' | ||
| [[File:HW Midna's Fused Shadow Icon.png|x50px]]<br/>'''[[Midna's Fused Shadow]]''' | |||
|- | |- | ||
| [[File: | |{{#var:Col}} {{Section|Fi|[[File:HWDE Fi Mini Map Icon.png|link=]]<br/>'''[[Fi]]'''}} | ||
| | | [[File:HW Fi's Heels Icon.png|x50px]]<br/>'''[[Fi's Heels]]''' | ||
| | | [[File:HW Fi's Crystal Icon.png|x50px]]<br/>'''[[Fi's Crystal]]''' | ||
|- | |- | ||
| [[File: | |{{#var:Col}} {{Section|Ghirahim|[[File:HWDE Ghirahim Mini Map Icon.png|link=]]<br/>'''[[Ghirahim]]'''}} | ||
| | | [[File:HW Ghirahim's Sash Icon.png|x50px]]<br/>'''[[Ghirahim's Sash]]''' | ||
| | | [[File:HW Ghirahim's Cape Icon.png|x50px]]<br/>'''[[Ghirahim's Cape]]''' | ||
|- | |- | ||
| [[File: | |{{#var:Col}} {{Section|Zant|[[File:HWDE Zant Mini Map Icon.png|link=]]<br/>'''[[Zant]]'''}} | ||
| | | [[File:HW Zant's Magic Gem Icon.png|x50px]]<br/>'''[[Zant's Magic Gem]]''' | ||
| | | [[File:HW Zant's Helmet Icon.png|x50px]]<br/>'''[[Zant's Helmet]]''' | ||
|} | |||
{{Clear}} | |||
==={{HW|L|-}}=== | |||
Materials in {{HW|L}} are primarily the same as those in {{HW|-}}, with the addition of new Materials for Warriors who did not yield any in {{HW|-}}, as well as for monsters and Warriors who exist exclusively in {{HW|L|-}}. Certain Warriors, such as Young Link and Twili Midna, also received their own set of Materials apart from their counterparts. | |||
====List of Materials==== | |||
{| class="wikitable sortable" style="text-align:center; width: 100%; max-width:50em;" | |||
|+ Enemy Materials | |||
|- | |- | ||
!style="width: 34%"| Enemy | |||
| | !style="width: 33%" class="unsortable"| Bronze | ||
| | !style="width: 33%" class="unsortable"| Silver | ||
|- | |- | ||
| [[File: | | {{Section|Miniblin|[[File:HWDE Minblin Captain Mini Map Icon.png|link=]]<br/>'''[[Miniblin|Miniblin Captain]]'''}} | ||
| | | [[File:HWL Monster Horn Icon.png|x50px]]<br/>'''[[Monster Horn]]''' | ||
| | | — | ||
|- | |- | ||
| [[File: | | {{Section|Big Blin|[[File:HWDE Big Blin Mini Map Icon.png|link=]]<br/>'''[[Big Blin]]'''}} | ||
| | | [[File:HWL Big Blin Hide Icon.png|x50px]]<br/>'''[[Big Blin Hide]]''' | ||
| | | [[File:HWL Big Blin Club Icon.png|x50px]]<br/>'''[[Big Blin Club]]''' | ||
|- | |- | ||
| [[File: | | {{Section|Stone Blin|[[File:HWDE Stone Blin Mini Map Icon.png|link=]]<br/>'''[[Stone Blin]]'''}} | ||
| | | [[File:HWL Stone Blin Buckler Icon.png|x50px]]<br/>'''[[Stone Blin Buckler]]''' | ||
| | | [[File:HWL Stone Blin Helmet Icon.png|x50px]]<br/>'''[[Stone Blin Helmet]]''' | ||
|} | |||
{| class="wikitable" style="text-align:center; width: 100%; max-width:50em;" | |||
|+ Enemy Materials | |||
|- | |- | ||
!style="width: 34%"| Enemy | |||
| | !style="width: 33%"| Silver | ||
| | !style="width: 33%"| Gold | ||
|- | |- | ||
| [[File: | | [[File:HWDE The Imprisoned Mini Map Icon.png|link=]]<br/>'''[[The Imprisoned]]''' <sup>(Miniature Version)</sup> | ||
| | | [[File:HW The Imprisoned's Scales Icon.png|x50px]]<br/>'''The Imprisoned's Scales''' | ||
| | | [[File:HW The Imprisoned's Pillar Icon.png|x50px]]<br/>'''The Imprisoned's Pillar''' | ||
|- | |- | ||
| | |} | ||
| | {| class="wikitable sortable" style="text-align:center; width: 100%; max-width:50em;" | ||
| | |+ Boss Materials | ||
|- | |- | ||
!{{#var:Col}} Boss | |||
| | !style="width: 33%" class="unsortable"| Silver | ||
| | !style="width: 33%" class="unsortable"| Gold | ||
|- | |- | ||
| [[File: | |{{#var:Col}} {{Section|Helmaroc King|[[File:HWDE Helmaroc King Mini Map Icon.png|link=]]<br/>'''[[Helmaroc King]]'''}} | ||
| | | [[File:HWL Helmaroc Plume Icon.png|x50px]]<br/>'''[[Helmaroc Plume]]''' | ||
| | | [[File:HWL Helmaroc King's Mask Icon.png|x50px]]<br/>'''[[Helmaroc King's Mask]]''' | ||
|- | |- | ||
| [[File: | |{{#var:Col}} {{Section|Phantom Ganon|[[File:HWDE Phantom Ganon Mini Map Icon.png|link=]]<br/>'''[[Phantom Ganon]]'''}} | ||
| | | [[File:HWL Phantom Ganon's Cape Icon.png|x50px]]<br/>'''[[Phantom Ganon's Cape]]''' | ||
| | | [[File:HWL Phantom Ganon's Sword Icon.png|x50px]]<br/>'''[[Phantom Ganon's Sword]]''' | ||
|- | |- | ||
| [[File: | |{{#var:Col}} {{Section|King Daphnes|[[File:HWDE King Daphnes Mini Map Icon.png|link=]]<br/>'''[[Daphnes Nohansen Hyrule|King Daphnes]]'''}} | ||
| | | [[File:HWL King Daphnes's Robe Icon.png|x50px]]<br/>'''[[King Daphnes's Robe]]''' | ||
| | | [[File:HWL King Daphnes's Crown Icon.png|x50px]]<br/>'''[[King Daphnes's Crown]]''' | ||
|- | |- | ||
| [[File: | |{{#var:Col}} {{Section|Linkle|[[File:HWDE Linkle Mini Map Icon.png|link=]]<br/>'''[[Linkle]]'''}} | ||
| | | [[File:HWL Linkle's Boots Icon.png|x50px]]<br/>'''[[Linkle's Boots]]''' | ||
| | | [[File:HWL Linkle's Compass Icon.png|x50px]]<br/>'''[[Linkle's Compass]]''' | ||
|- | |- | ||
| [[File: | |{{#var:Col}} [[File:HWDE Marin Mini Map Icon.png|link=]]<br/>'''[[Marin]]''' | ||
| | | [[File:HW Zelda's Brooch Icon.png|x50px]]<br/>'''Zelda's Brooch''' | ||
| | | [[File:HW Zelda's Tiara Icon.png|x50px]]<br/>'''Zelda's Tiara''' | ||
|- | |- | ||
| [[File: | |{{#var:Col}} [[File:HWDE Medli Mini Map Icon.png|link=]]<br/>'''[[Medli]]''' | ||
| | | [[File:HW Ruto's Earrings Icon.png|x50px]]<br/>'''Ruto's Earrings''' | ||
| | | [[File:HW Ruto's Scale Icon.png|x50px]]<br/>'''Ruto's Scale''' | ||
|- | |- | ||
| [[File: | |{{#var:Col}} {{Section|Skull Kid|[[File:HWDE Skull Kid Mini Map Icon.png|link=]]<br/>'''[[Skull Kid]]'''}} | ||
| | | [[File:HWL Skull Kid's Hat Icon.png|x50px]]<br/>'''[[Skull Kid's Hat]]''' | ||
| | | [[File:HWL Majora's Mask Icon.png|x50px]]<br/>'''[[Majora's Mask (Item)|Majora's Mask]]''' | ||
|- | |- | ||
| [[File: | |style="width: 17%"| {{Section|Tetra|[[File:HWDE Tetra Mini Map Icon.png|link=]]<br/>'''[[Tetra]]'''}} | ||
| | |style="width: 17%"| [[File:HWDE Toon Zelda Mini Map Icon.png|link=]]<br/>'''[[Toon Zelda]]''' | ||
| | | [[File:HWL Tetra's Sandals Icon.png|x50px]]<br/>'''[[Tetra's Sandals]]''' | ||
| [[File:HWL Tetra's Bandana Icon.png|x50px]]<br/>'''[[Tetra's Bandana]]''' | |||
|- | |- | ||
| [[File: | |{{#var:Col}} {{Section|Tingle|[[File:HWDE Tingle Mini Map Icon.png|link=]]<br/>'''[[Tingle]]'''}} | ||
| | | [[File:HWL Tingle's Map Icon.png|x50px]]<br/>'''[[Tingle's Map]]''' | ||
| | | [[File:HWL Tingle's Watch Icon.png|x50px]]<br/>'''[[Tingle's Watch]]''' | ||
|- | |- | ||
| [[File: | |{{#var:Col}} {{Section|Toon Link|[[File:HWDE Toon Link Mini Map Icon.png|link=]]<br/>'''[[Toon Link]]'''}} | ||
| | | [[File:HWL Pirate's Charm Icon.png|x50px]]<br/>'''[[Pirate's Charm]]''' | ||
| | | [[File:HWL Island Outfit Icon.png|x50px]]<br/>'''[[Island Outfit]]''' | ||
|- | |- | ||
| [[File: | |{{#var:Col}} {{Section|Twili Midna|[[File:HWDE Twili Midna Mini Map Icon.png|link=]]<br/>'''[[Twili Midna]]'''}} | ||
| | | [[File:HWL Twili Midna's Hairpin Icon.png|x50px]]<br/>'''[[Twili Midna's Hairpin]]''' | ||
| | | [[File:HWL Twili Midna's Robe Icon.png|x50px]]<br/>'''[[Twili Midna's Robe]]''' | ||
|- | |- | ||
| [[File: | | {{Section|Young Link|[[File:HWDE Young Link Mini Map Icon.png|link=]]<br/>'''[[Young Link]]'''}} | ||
| | | [[File:HWDE Ravio Mini Map Icon.png|link=]]<br/>'''[[Ravio]]''' | ||
| | | [[File:HWL Young Link's Belt Icon.png|x50px]]<br/>'''[[Young Link's Belt]]''' | ||
| [[File:HWL Keaton Mask Icon.png|x50px]]<br/>'''[[Keaton Mask]]''' | |||
|- | |- | ||
| | |{{#var:Col}} [[File:HWDE Yuga Mini Map Icon.png|link=]]<br/>'''[[Yuga]]''' | ||
| [[File:HW Ganondorf's Gauntlet Icon.png|x50px]]<br/>'''Ganondorf's Gauntlet''' | |||
| [[File:HW Ganondorf's Jewel Icon.png|x50px]]<br/>'''Ganondorf's Jewel''' | |||
| [[File: | |||
| [[File: | |||
| | |||
|} | |} | ||
{{Noncanon|End}} | |||
== | ==={{HWAoC|-}}=== | ||
{{ | <section begin="HWAoC Materials"/> | ||
=== | {{Main|Materials in Hyrule Warriors: Age of Calamity}} | ||
<section end="HWAoC Materials"/> | |||
====List of {{Plural|HWAoC|Material}}==== | |||
{{Gallery List|Items | |||
|HWAoC= Ethereal Stone, Guardian Claw, High-Yield Ancient Furnace, Robbie's Maintenance Oil, Robbie's Machine Lubricant, Robbie's Curing Agent | |||
}} | |||
:[[File:HWAoC Fruit Menu Icon.png|x26px|link=Materials in Hyrule Warriors: Age of Calamity]] [[Materials in Hyrule Warriors: Age of Calamity|See more Materials in ''Hyrule Warriors: Age of Calamity'']] | |||
==Trivia== | |||
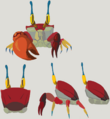
*During development of {{BotW|-}}, crabs were used to create elixirs; however, Nate Bihldorff, senior director of localization at Nintendo of America, convinced [[Hidemaro Fujibayashi]], the game's director, to use them for cooking recipes instead.<ref>{{Cite Web|quote= Nate had made it out to the beach, where he found some crab and a campfire with a pot at sunset. Feeling very pleased with himself, he threw some crab in the pot with some spicy peppers, only to find out crab wasn’t used for food recipes—it was for elixirs! This happened to fit perfectly with my own personal description of crustaceans as being “the insects of the sea,” but as an east coaster who grew up on crab, Nate wasn’t having it. He contacted Fujibayashi-san that night and began passionately explaining to the development team how much people like to eat crab, begging him to add crab dishes to the menu.|author= Bill Trinen|published= May 3, 2017|retrieved= May 3, 2017|url= https://nintendotreehouse.tumblr.com/post/160273426037/now-youre-cooking-with-power|title= Now You’re Cooking with Power|site= Tumblr|type=}}</ref> | |||
==== | ==Nomenclature== | ||
{{Nomenclature}} | |||
{{ | |||
==Gallery== | ==Gallery== | ||
<gallery> | <gallery> | ||
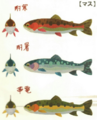
File:HW Bronze Material Model.png|Bronze Material | File:BotW Hearty Salmon Concept Artwork.png|Hearty Salmon concept art from {{BotW|-}} | ||
File:HW Silver Material Model.png|Silver Material | File:BotW Ironshell Crab Concept Artwork.png|Ironshell Crab concept art from {{BotW|-}} | ||
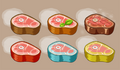
File:HW Gold Material Model.png|Gold Material | File:BotW Steaks Concept Artwork.png|Steaks concept art from {{BotW|-}} | ||
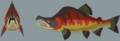
File:BotW Trout Concept Artwork.png|Sizzlefin, Chillfin and Voltfin Trout concept art from {{BotW|-}} | |||
File:TotK Material HUD Icon.png|The {{Term|TotK|Material}} icon in the Heads-Up Display from {{TotK|-}} | |||
File:HW Bronze Material Model.png|Bronze Material from {{HW|-}} | |||
File:HW Silver Material Model.png|Silver Material from {{HW|-}} | |||
File:HW Gold Material Model.png|Gold Material from {{HW|-}} | |||
File:HW Bronze Material Icon.png|Bronze Material icon from {{HW|-}} | |||
File:HW Silver Material Icon.png|Silver Material icon from {{HW|-}} | |||
File:HW Gold Material Icon.png|Gold Material icon from {{HW|-}} | |||
File:HW Bronze Material Adventure Mode Icon.png|Adventure Mode Bronze Material icon from {{HW|-}} | |||
File:HW Silver Material Adventure Mode Icon.png|Adventure Mode Silver Material icon from {{HW|-}} | |||
File:HW Gold Material Adventure Mode Icon.png|Adventure Mode Gold Material icon from {{HW|-}} | |||
</gallery> | </gallery> | ||
{{Ref}} | {{Ref}} | ||
{{Categories | |||
|items= BotW, HW, HWL, HWDE, HWAoC | |||
}} | |||
Revision as of 19:04, 19 September 2023
Materials are a recurring type of item in The Legend of Zelda series used in creating new items.[1][2][name references needed]
Location and Uses
Tri Force Heroes
Magical Materials are used to craft various Outfits at Madame Couture's.
List of Magical Materials
Breath of the Wild
Materials in Breath of the Wild can be found all throughout Hyrule, after defeating enemies, in Treasure Chests, or hunting for food. They cover a wide variety of items, and as such have a wide variety of uses. Materials can sometimes be eaten raw, but are best cooked together to create much more nourishing Food, that restore more hearts and have other positive effects. Each type of Material occupies its own slot. There is a maximum capacity of 999 Materials per slot.[3] Materials are also used to have the Great Fairies upgrade armor.
Materials can be sold for Rupees as well. The listed value is the price a merchant will pay Link for the item. Buying these items from most merchants will cost Link four times this value; Beedle will charge five times this value. Select materials may also be exchanged for Mon by Kilton.
List of Materials
Tears of the Kingdom
Materials are used in a variety of ways. They are commonly dropped by Enemies but may also be found along the ground.
List of Materials
Other Appearances
Hyrule Warriors
In Hyrule Warriors, Materials are similar to Spoils and Treasures in that each Material is a unique Item possessed by the Enemy that dropped it. Materials are dropped by nearly every Enemy type except Cuccos and infantry soldiers, and only when the Enemy does not drop a Dropped Weapon. They come in three rarities, with at most two rarities of item for each enemy type. The most common are Bronze Materials, which are the only item drops for the basic infantry Captains. Silver Materials are dropped by unique Captains, Warriors, and Giant Bosses. Rare Gold Materials are dropped only by Warriors and Giant Bosses. Enemies can be influenced to drop their rarer Materials by using Weapons with the "Material+" Skill, by creating a special Mixture in the Apothecary, or by activating the reward while using Focus Spirit.
Materials are primarily used to craft Badges for the playable Warriors, with each Badge having its own recipe of specific Materials. Materials can also be used to brew one-use elixirs by consuming a set amount of any Material of a given rarity.
List of Materials
Hyrule Warriors Legends
Materials in Hyrule Warriors Legends are primarily the same as those in Hyrule Warriors, with the addition of new Materials for Warriors who did not yield any in Hyrule Warriors, as well as for monsters and Warriors who exist exclusively in Hyrule Warriors Legends. Certain Warriors, such as Young Link and Twili Midna, also received their own set of Materials apart from their counterparts.
List of Materials
| Enemy | Bronze | Silver |
|---|---|---|
Miniblin Captain |
Monster Horn |
— |
Big Blin |
Big Blin Hide |
Big Blin Club |
Stone Blin |
Stone Blin Buckler |
Stone Blin Helmet |
| Enemy | Silver | Gold |
|---|---|---|
The Imprisoned (Miniature Version) |
The Imprisoned's Scales |
The Imprisoned's Pillar |
| Boss | Silver | Gold | |
|---|---|---|---|
Helmaroc King |
Helmaroc Plume |
Helmaroc King's Mask | |
Phantom Ganon |
Phantom Ganon's Cape |
Phantom Ganon's Sword | |
King Daphnes |
King Daphnes's Robe |
King Daphnes's Crown | |
Linkle |
Linkle's Boots |
Linkle's Compass | |
Marin |
Zelda's Brooch |
Zelda's Tiara | |
Medli |
Ruto's Earrings |
Ruto's Scale | |
Skull Kid |
Skull Kid's Hat |
Majora's Mask | |
Tetra |
Toon Zelda |
Tetra's Sandals |
Tetra's Bandana |
Tingle |
Tingle's Map |
Tingle's Watch | |
Toon Link |
Pirate's Charm |
Island Outfit | |
Twili Midna |
Twili Midna's Hairpin |
Twili Midna's Robe | |
Young Link |
Ravio |
Young Link's Belt |
Keaton Mask |
Yuga |
Ganondorf's Gauntlet |
Ganondorf's Jewel | |
Hyrule Warriors: Age of Calamity
List of Materials
Trivia
- During development of Breath of the Wild, crabs were used to create elixirs; however, Nate Bihldorff, senior director of localization at Nintendo of America, convinced Hidemaro Fujibayashi, the game's director, to use them for cooking recipes instead.[4]
Nomenclature
| Language | Names | Meanings |
|---|---|---|
Japanese | 素材 (Sozai) (BotW) | |
Dutch | Ingrediënten (BotW)[6] | Ingredients |
Italian | Materiale (BotW) | |
SpanishLA | Material (TotK)[5] | |
| This table was generated using translation pages. To request an addition, please contact a staff member with a reference. | ||
Gallery
-
Hearty Salmon concept art from Breath of the Wild
-
Ironshell Crab concept art from Breath of the Wild
-
Steaks concept art from Breath of the Wild
-
Sizzlefin, Chillfin and Voltfin Trout concept art from Breath of the Wild
-

The Material icon in the Heads-Up Display from Tears of the Kingdom
-
Bronze Material from Hyrule Warriors
-
Silver Material from Hyrule Warriors
-

Gold Material from Hyrule Warriors
-

Bronze Material icon from Hyrule Warriors
-
Silver Material icon from Hyrule Warriors
-
Gold Material icon from Hyrule Warriors
-

Adventure Mode Bronze Material icon from Hyrule Warriors
-

Adventure Mode Silver Material icon from Hyrule Warriors
-

Adventure Mode Gold Material icon from Hyrule Warriors


References
- ↑ "Materials" — Tutorial (Hyrule Warriors: Definitive Edition)
- ↑ "Materials" — Inventory (Breath of the Wild)
- ↑ Kleric, BotW Glitches & Tricks: Hold Smuggling, and Dead Link Inventory. , YouTube.
- ↑ "Nate had made it out to the beach, where he found some crab and a campfire with a pot at sunset. Feeling very pleased with himself, he threw some crab in the pot with some spicy peppers, only to find out crab wasn’t used for food recipes—it was for elixirs! This happened to fit perfectly with my own personal description of crustaceans as being “the insects of the sea,” but as an east coaster who grew up on crab, Nate wasn’t having it. He contacted Fujibayashi-san that night and began passionately explaining to the development team how much people like to eat crab, begging him to add crab dishes to the menu." — Bill Trinen, Now You’re Cooking with Power , Tumblr, published May 3, 2017, retrieved May 3, 2017.
- ↑ "Materiales" — Inventory (Tears of the Kingdom)
- ↑ "Ingrediënten" — Inventory (Breath of the Wild)